Operating Instructions
Page 3
... the fuse cover, please contact your nearest Sony service station. Notice If static electricity or electromagnetism causes data transfer to this camera. "Memory Stick" For Customers in the... Lithium-Ion batteries are recyclable. Notice on the supplied AC Adaptor for using connection cables shorter than 3 meters (9.8 feet). For more information regarding recycling of FCC Rules....INTERFERENCE RECEIVED, INCLUDING INTERFERENCE THAT MAY CAUSE UNDESIRED OPERATION. THIS CLASS B DIGITAL APPARATUS COMPLIES WITH CANADIAN ICES003. 3 For Customers in the plug supplied need to attach the...
... the fuse cover, please contact your nearest Sony service station. Notice If static electricity or electromagnetism causes data transfer to this camera. "Memory Stick" For Customers in the... Lithium-Ion batteries are recyclable. Notice on the supplied AC Adaptor for using connection cables shorter than 3 meters (9.8 feet). For more information regarding recycling of FCC Rules....INTERFERENCE RECEIVED, INCLUDING INTERFERENCE THAT MAY CAUSE UNDESIRED OPERATION. THIS CLASS B DIGITAL APPARATUS COMPLIES WITH CANADIAN ICES003. 3 For Customers in the plug supplied need to attach the...
Operating Instructions
Page 19
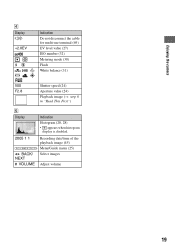
Enjoying the camera D Display +2.0EV WB Indication Do not disconnect the cable for multi-use terminal (69) EV level value (27) ISO number (32) Metering mode (30) Flash White balance (31) 500 F2.8 Shutter speed (24) Aperture value (24) Playback image (t step 6 in "Read This First") E Display 2005 1 1 DPOF BACK/ NEXT VOLUME Indication Histogram (20, 28) • appears when histogram display is disabled. Recording date/time of the playback image (45) Menu/Guide menu (25) Select images Adjust volume 19
Enjoying the camera D Display +2.0EV WB Indication Do not disconnect the cable for multi-use terminal (69) EV level value (27) ISO number (32) Metering mode (30) Flash White balance (31) 500 F2.8 Shutter speed (24) Aperture value (24) Playback image (t step 6 in "Read This First") E Display 2005 1 1 DPOF BACK/ NEXT VOLUME Indication Histogram (20, 28) • appears when histogram display is disabled. Recording date/time of the playback image (45) Menu/Guide menu (25) Select images Adjust volume 19
Operating Instructions
Page 51
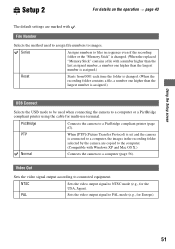
... one higher than the largest number is connected to a computer, the images in the recording folder selected by the camera are marked with Windows XP and Mac OS X.) Normal Connects the camera to a computer (page 56). PAL Sets the video output signal to PAL mode (e.g., for the USA, Japan).... output signal to NTSC mode (e.g., for Europe). 51 File Number Selects the method used when connecting the camera to images. PTP When [PTP] (Picture Transfer Protocol) is set and the camera is assigned.) USB Connect Selects the USB mode to be used to assign file numbers to a computer ...
... one higher than the largest number is connected to a computer, the images in the recording folder selected by the camera are marked with Windows XP and Mac OS X.) Normal Connects the camera to a computer (page 56). PAL Sets the video output signal to PAL mode (e.g., for the USA, Japan).... output signal to NTSC mode (e.g., for Europe). 51 File Number Selects the method used when connecting the camera to images. PTP When [PTP] (Picture Transfer Protocol) is set and the camera is assigned.) USB Connect Selects the USB mode to be used to assign file numbers to a computer ...
Operating Instructions
Page 56
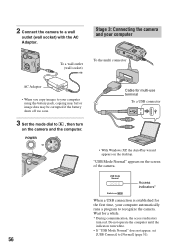
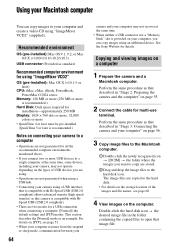
...image data may be corrupted if the battery shuts off too soon. 3 Set the mode dial to recognize the camera. USB Mode Normal Access indicators* Switch on the desktop. POWER Cable for a while. * During communication, the access indicators turn white. • If "USB Mode Normal" does... not appear, set [USB Connect] to a wall outlet (wall socket) with the AC Adaptor. Stage 3: Connecting the camera and your computer To a wall ...
...image data may be corrupted if the battery shuts off too soon. 3 Set the mode dial to recognize the camera. USB Mode Normal Access indicators* Switch on the desktop. POWER Cable for a while. * During communication, the access indicators turn white. • If "USB Mode Normal" does... not appear, set [USB Connect] to a wall outlet (wall socket) with the AC Adaptor. Stage 3: Connecting the camera and your computer To a wall ...
Operating Instructions
Page 58
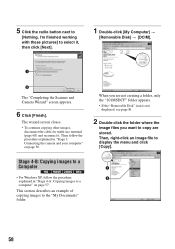
...procedure 2 explained in "Stage 3: Connecting the camera and your computer" on page 57. Then, right-click an image file to a computer" on page 56. The wizard screen closes. • To continue copying other images, disconnect the cable for multi-use terminal (page 60) and... reconnect it , then click [Next]. 1 Double-click [My Computer] t [Removable Disk] t [DCIM]. 1 2 The "Completing the Scanner and Camera Wizard" screen appears. 6 Click [Finish]. Stage 4-B: Copying images...
...procedure 2 explained in "Stage 3: Connecting the camera and your computer" on page 57. Then, right-click an image file to a computer" on page 56. The wizard screen closes. • To continue copying other images, disconnect the cable for multi-use terminal (page 60) and... reconnect it , then click [Next]. 1 Double-click [My Computer] t [Removable Disk] t [DCIM]. 1 2 The "Completing the Scanner and Camera Wizard" screen appears. 6 Click [Finish]. Stage 4-B: Copying images...
Operating Instructions
Page 59
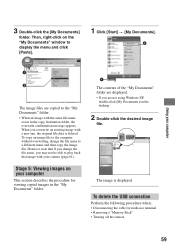
... play back that if you change the file name to a different name and then copy the image file. However, note that image with your camera (page 61). Stage 5: Viewing images on the desktop. 2 Double-click the desired image file. When you are displayed. • If you... a new one, the original file data is displayed. To delete the USB connection Perform the following procedure when: • Disconnecting the cable for viewing copied images in the copy destination folder, the overwrite confirmation message appears. Using your computer This section describes the procedure for multi...
... play back that if you change the file name to a different name and then copy the image file. However, note that image with your camera (page 61). Stage 5: Viewing images on the desktop. 2 Double-click the desired image file. When you are displayed. • If you... a new one, the original file data is displayed. To delete the USB connection Perform the following procedure when: • Disconnecting the cable for viewing copied images in the copy destination folder, the overwrite confirmation message appears. Using your computer This section describes the procedure for multi...
Operating Instructions
Page 60
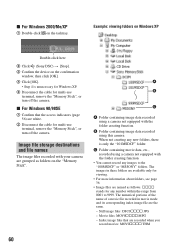
... on Windows XP Double-click here 2 Click (Sony DSC) t [Stop]. 3 Confirm the device on the confirmation window, then click [OK]. 4 Click [OK]. • Step 4 is only the "101MSDCF" folder. C Folder containing movie data, etc., recorded using this camera When not creating any number within the range from...60 The images in movie mode and its corresponding index image file are white. 2 Disconnect the cable for multi-use terminal, remove the "Memory Stick", or turn off the camera. Image file storage destinations and file names The image files recorded with the folder creating function ...
... on Windows XP Double-click here 2 Click (Sony DSC) t [Stop]. 3 Confirm the device on the confirmation window, then click [OK]. 4 Click [OK]. • Step 4 is only the "101MSDCF" folder. C Folder containing movie data, etc., recorded using this camera When not creating any number within the range from...60 The images in movie mode and its corresponding index image file are white. 2 Disconnect the cable for multi-use terminal, remove the "Memory Stick", or turn off the camera. Image file storage destinations and file names The image files recorded with the folder creating function ...
Operating Instructions
Page 64
...is compatible with HiSpeed USB (USB 2.0 compliant). • There are two modes for multi-use terminal. Copying and viewing images on page 55. 2 Connect the cable for a USB connection when connecting a computer, [Normal] (the default setting) and [PTP] modes. Perform the same procedure as an example. For details on...are stored. 2Drag and drop the image files to the hard disk icon. Perform the same procedure as this camera is provided on your computer" on the computer. See the Sony Website for installation-approximately 250 MB Display: 1024 × 768 dots or more, 32,000 colors or more...
...is compatible with HiSpeed USB (USB 2.0 compliant). • There are two modes for multi-use terminal. Copying and viewing images on page 55. 2 Connect the cable for a USB connection when connecting a computer, [Normal] (the default setting) and [PTP] modes. Perform the same procedure as an example. For details on...are stored. 2Drag and drop the image files to the hard disk icon. Perform the same procedure as this camera is provided on your computer" on the computer. See the Sony Website for installation-approximately 250 MB Display: 1024 × 768 dots or more, 32,000 colors or more...
Operating Instructions
Page 65
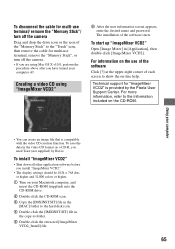
...the user information screen appears, enter the desired name and password. The installation of the software starts. To disconnect the cable for multi-use terminal/ remove the "Memory Stick"/ turn off the camera Drag and drop the drive icon or the icon of the "Memory Stick" to the "Trash" icon, then ...remove the cable for "ImageMixer VCD2" is compatible with the video CD creation function. For more information, refer to show the on...
...the user information screen appears, enter the desired name and password. The installation of the software starts. To disconnect the cable for multi-use terminal/ remove the "Memory Stick"/ turn off the camera Drag and drop the drive icon or the icon of the "Memory Stick" to the "Trash" icon, then ...remove the cable for "ImageMixer VCD2" is compatible with the video CD creation function. For more information, refer to show the on...
Operating Instructions
Page 67
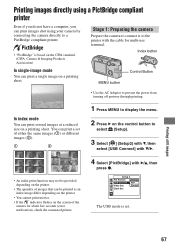
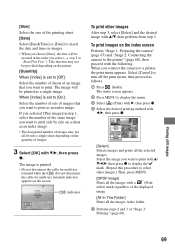
...Adaptor to select (Setup). 3 Select [ ] (Setup2) with V, then 2 select [USB Connect] with V/B. 4 Select [PictBridge] with the cable for about five seconds (error notification), check the connected printer. You can print a set . Printing still images 67 In index mode You can print... several images at a reduced size on a printing sheet. Stage 1: Preparing the camera Prepare the camera to connect it to a PictBridge compliant printer. • "PictBridge" is set of either the same images (1) or different images (2). 1...
...Adaptor to select (Setup). 3 Select [ ] (Setup2) with V, then 2 select [USB Connect] with V/B. 4 Select [PictBridge] with the cable for about five seconds (error notification), check the connected printer. You can print a set . Printing still images 67 In index mode You can print... several images at a reduced size on a printing sheet. Stage 1: Preparing the camera Prepare the camera to connect it to a PictBridge compliant printer. • "PictBridge" is set of either the same images (1) or different images (2). 1...
Operating Instructions
Page 68
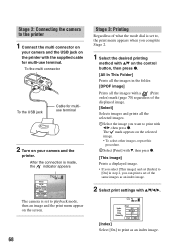
... the printer. After the connection is made, the indicator appears Print All In This Folder DPOF image Select This image Cancel The camera is set to playback mode, then an image and the print menu appear on the screen. 68 Stage 3: Printing Regardless of what the ...settings with v/V/b/B. 1M 101 2/9 Index Size Date Quantity Print Off Default Off 1 Exit OK [Index] Select [On] to print with the supplied cable for multiuse terminal 2 Turn on your camera and the USB jack on the selected image. • To select other images, repeat this procedure. 2Select [Print] with V, then press z. ...
... the printer. After the connection is made, the indicator appears Print All In This Folder DPOF image Select This image Cancel The camera is set to playback mode, then an image and the print menu appear on the screen. 68 Stage 3: Printing Regardless of what the ...settings with v/V/b/B. 1M 101 2/9 Index Size Date Quantity Print Off Default Off 1 Exit OK [Index] Select [On] to print with the supplied cable for multiuse terminal 2 Turn on your camera and the USB jack on the selected image. • To select other images, repeat this procedure. 2Select [Print] with V, then press z. ...
Operating Instructions
Page 69
...the cable for multi-use terminal) indicator appears on the screen. The image is set to turn off the print menu, then proceed as an index image. • The designated number of images may not all the selected images. Select the image you connect the camera to... proceed with v/V, then perform from step 1. This function may not be provided depending on the index screen Perform "Stage 1: Preparing the camera" (page 67) and "Stage 2: Connecting the camera to display the menu. 3 Select [ ] (Print) with B, then press z. 4 Select the desired printing method with V/B, then press...
...the cable for multi-use terminal) indicator appears on the screen. The image is set to turn off the print menu, then proceed as an index image. • The designated number of images may not all the selected images. Select the image you connect the camera to... proceed with v/V, then perform from step 1. This function may not be provided depending on the index screen Perform "Stage 1: Preparing the camera" (page 67) and "Stage 2: Connecting the camera to display the menu. 3 Select [ ] (Print) with B, then press z. 4 Select the desired printing method with V/B, then press...
Operating Instructions
Page 72
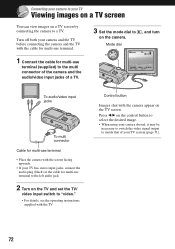
...the mode dial to on a TV screen by connecting the camera to a TV. Turn off both your TV has stereo input jacks, connect the audio plug (black) of the cable for multi-use terminal (supplied) to the multi connector of the camera and the audio/video input jacks of your TV Viewing images... button Images shot with the screen facing upwards. • If your camera and the TV before connecting the camera and the TV with the cable for multi-use terminal. 1 Connect the cable for multi-use terminal • Place the camera with the camera appear on the TV and set the TV/ video input switch to "...
...the mode dial to on a TV screen by connecting the camera to a TV. Turn off both your TV has stereo input jacks, connect the audio plug (black) of the cable for multi-use terminal (supplied) to the multi connector of the camera and the audio/video input jacks of your TV Viewing images... button Images shot with the screen facing upwards. • If your camera and the TV before connecting the camera and the TV with the cable for multi-use terminal. 1 Connect the cable for multi-use terminal • Place the camera with the camera appear on the TV and set the TV/ video input switch to "...
Operating Instructions
Page 73
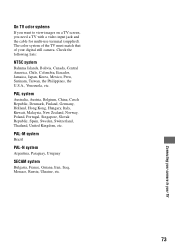
... a TV screen, you want to your TV The color system of the TV must match that of your digital still camera. On TV color systems If you need a TV with a video input jack and the cable for multi-use terminal (supplied). PAL system Australia, Austria, Belgium, China, Czech Republic, Denmark, Finland, Germany, Holland...
... a TV screen, you want to your TV The color system of the TV must match that of your digital still camera. On TV color systems If you need a TV with a video input jack and the cable for multi-use terminal (supplied). PAL system Australia, Austria, Belgium, China, Czech Republic, Denmark, Finland, Germany, Holland...

Operating Instructions
Page 77
... farther away from the subject than [640(Fine)]. (t step 4 in "Read This First") The image is out of focus" on page 30. Precision digital zoom does not function. • Set [Digital Zoom] to [Precision] (page 44). • This function cannot be used while shooting movies. The image size is set to [Burst] or [Multi... image size to other than the shortest shooting distance, approximately 6 cm (2 3/8 inches) (W)/30 cm (11 7/8 inches) (T), when shooting (t step 5 in [Multi Burst] mode. - Disconnect the cable for multi-use terminal or set to [640(Fine)] while the...
... farther away from the subject than [640(Fine)]. (t step 4 in "Read This First") The image is out of focus" on page 30. Precision digital zoom does not function. • Set [Digital Zoom] to [Precision] (page 44). • This function cannot be used while shooting movies. The image size is set to [Burst] or [Multi... image size to other than the shortest shooting distance, approximately 6 cm (2 3/8 inches) (W)/30 cm (11 7/8 inches) (T), when shooting (t step 5 in [Multi Burst] mode. - Disconnect the cable for multi-use terminal or set to [640(Fine)] while the...

Operating Instructions
Page 79
...the write-protect switch on your camera, playback on the "Memory Stick" to the LOCK position (page 88) to the recording position (page 88). We recommend that of your TV (page 51). • Check whether the connection is correct (page 72). • The cable for multi-use the screen. To... confirm the recordable range, use terminal is in "Read This First"). • The battery level is full. Cannot shoot images in conjunction with the following items. Your camera cannot play back images. • Set the mode...
...the write-protect switch on your camera, playback on the "Memory Stick" to the LOCK position (page 88) to the recording position (page 88). We recommend that of your TV (page 51). • Check whether the connection is correct (page 72). • The cable for multi-use the screen. To... confirm the recordable range, use terminal is in "Read This First"). • The battery level is full. Cannot shoot images in conjunction with the following items. Your camera cannot play back images. • Set the mode...
Operating Instructions
Page 80
.... You cannot install the USB driver. • In Windows 2000, log on the camera (t step 2 in "Read This First"). • Use the supplied cable for multi-use terminal (page 56). • Disconnect the cable for multi-use terminal before you installed the "USB Driver" from both the computer and... the camera, and connect it again firmly. Delete the erroneously recognized device from the...
.... You cannot install the USB driver. • In Windows 2000, log on the camera (t step 2 in "Read This First"). • Use the supplied cable for multi-use terminal (page 56). • Disconnect the cable for multi-use terminal before you installed the "USB Driver" from both the computer and... the camera, and connect it again firmly. Delete the erroneously recognized device from the...
Operating Instructions
Page 81
...8226; For Windows 98/98SE/Me, click the [Device Manager] tab. The "Device Manager" appears. 3 Right-click [ Sony DSC], then click [Uninstall] t [OK]. After making a USB connection, "PicturePackage" does not start automatically. • Start...back the movie from the "Memory Stick". The image and sound are interrupted by the camera, such as "101MSDCF" (page 60). • Operate correctly (page 61). 81... 55). Shoot using a "Memory Stick" formatted by your computer correctly using the supplied cable for multi-use terminal (page 56). • Follow the designated copy procedure for a...
...8226; For Windows 98/98SE/Me, click the [Device Manager] tab. The "Device Manager" appears. 3 Right-click [ Sony DSC], then click [Uninstall] t [OK]. After making a USB connection, "PicturePackage" does not start automatically. • Start...back the movie from the "Memory Stick". The image and sound are interrupted by the camera, such as "101MSDCF" (page 60). • Operate correctly (page 61). 81... 55). Shoot using a "Memory Stick" formatted by your computer correctly using the supplied cable for multi-use terminal (page 56). • Follow the designated copy procedure for a...
Operating Instructions
Page 82
... the printer are properly connected using cameras other than this camera or images modified with it. • If you set to [PictBridge] in the (Setup) menu (page 51). • Disconnect and connect the cable for multi-use terminal again. Cannot record on a "Memory Stick". &#...8226; Set the write-protect switch on the "Memory Stick" is full. PictBridge compliant printer A connection cannot be established. • The camera cannot be connected to the camera. • Set [USB...
... the printer are properly connected using cameras other than this camera or images modified with it. • If you set to [PictBridge] in the (Setup) menu (page 51). • Disconnect and connect the cable for multi-use terminal again. Cannot record on a "Memory Stick". &#...8226; Set the write-protect switch on the "Memory Stick" is full. PictBridge compliant printer A connection cannot be established. • The camera cannot be connected to the camera. • Set [USB...
Operating Instructions
Page 83
... 83 Printing is canceled. • You disconnected the cable for multi-use terminal before the for multi-use terminal and reconnect it whenever you change the paper size after the printer has been connected to the camera. • The print setting of the camera differs from that do not have the recording data...
... 83 Printing is canceled. • You disconnected the cable for multi-use terminal before the for multi-use terminal and reconnect it whenever you change the paper size after the printer has been connected to the camera. • The print setting of the camera differs from that do not have the recording data...


