Operating Instructions
Page 1
... volume) Explains the set-up and basic operations for future reference. Record the serial number in Japan Digital Still Camera User's Guide/ Troubleshooting Operating Instructions Before operating the unit, please read this product. Refer to your Sony dealer regarding this manual and "Read This First" (separate volume) thoroughly, and retain it for shooting/playback with your camera. 2-582-856-12 (1) Enjoying the camera Using the menu Using the Setup screen Using your computer Printing still images Connecting your camera to...
... volume) Explains the set-up and basic operations for future reference. Record the serial number in Japan Digital Still Camera User's Guide/ Troubleshooting Operating Instructions Before operating the unit, please read this product. Refer to your Sony dealer regarding this manual and "Read This First" (separate volume) thoroughly, and retain it for shooting/playback with your camera. 2-582-856-12 (1) Enjoying the camera Using the menu Using the Setup screen Using your computer Printing still images Connecting your camera to...
Operating Instructions
Page 3
... the specific frequencies may influence the picture and sound of this equipment for a digital device pursuant to Subpart B of Part 15 of FCC Rules. Notice If static electricity or electromagnetism causes data transfer to BS 1362, (i.e., marked with the limits for your nearest Sony service station. "Memory Stick" For Customers in the U.S.A. Notice on the supplied AC Adaptor for using connection cables shorter...
... the specific frequencies may influence the picture and sound of this equipment for a digital device pursuant to Subpart B of Part 15 of FCC Rules. Notice If static electricity or electromagnetism causes data transfer to BS 1362, (i.e., marked with the limits for your nearest Sony service station. "Memory Stick" For Customers in the U.S.A. Notice on the supplied AC Adaptor for using connection cables shorter...
Operating Instructions
Page 6
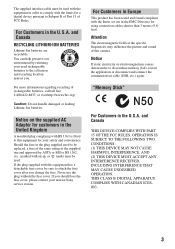
... volume) 1 Charge the battery 2 Turn the camera on/set the clock 3 Insert a "Memory Stick" 4 Select the image size for use 5 Shoot images easily (Auto adjustment mode) Shoot still images (Scene Selection) 6 View images/Delete images Get more friendly with your camera This manual • Shoot with your favorite settings (Program auto shooting/ Manual shooting) t page 23 • Enjoy various shooting/playback using the menu t page 25 • Change the default settings t page 43 1 2 Connect your camera to a PC or a printer This manual • Print images by connecting your camera...
... volume) 1 Charge the battery 2 Turn the camera on/set the clock 3 Insert a "Memory Stick" 4 Select the image size for use 5 Shoot images easily (Auto adjustment mode) Shoot still images (Scene Selection) 6 View images/Delete images Get more friendly with your camera This manual • Shoot with your favorite settings (Program auto shooting/ Manual shooting) t page 23 • Enjoy various shooting/playback using the menu t page 25 • Change the default settings t page 43 1 2 Connect your camera to a PC or a printer This manual • Print images by connecting your camera...
Operating Instructions
Page 8
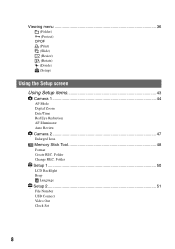
Folder Setup 1 50 1 LCD Backlight Beep Language Setup 2 51 2 File Number USB Connect Video Out Clock Set 8 Folder Change REC. Viewing menu 36 (Folder) - (Protect) DPOF (Print) (Slide) (Resize) (Rotate) (Divide) (Setup) Using the Setup screen Using Setup items 43 Camera 1 44 1 AF Mode Digital Zoom Date/Time Red Eye Reduction AF Illuminator Auto Review Camera 2 47 2 Enlarged Icon Memory Stick Tool 48 Format Create REC.
Folder Setup 1 50 1 LCD Backlight Beep Language Setup 2 51 2 File Number USB Connect Video Out Clock Set 8 Folder Change REC. Viewing menu 36 (Folder) - (Protect) DPOF (Print) (Slide) (Resize) (Rotate) (Divide) (Setup) Using the Setup screen Using Setup items 43 Camera 1 44 1 AF Mode Digital Zoom Date/Time Red Eye Reduction AF Illuminator Auto Review Camera 2 47 2 Enlarged Icon Memory Stick Tool 48 Format Create REC.
Operating Instructions
Page 24
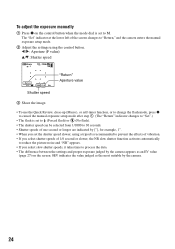
..." Aperture value 3 Shoot the image. • To use the Quick Review, close-up (Macro), or self-timer function, or to change the flash mode, press z to cancel the manual exposure setup mode after step 1. (The "Return" indicator changes to "Set".) • The flash is set to (Forced flash) or (No flash). • The shutter speed can be selected from 1/1000 to 30 seconds. • Shutter speeds of 1/6 second or slower, the NR slow shutter function activates automatically to reduce the picture...
..." Aperture value 3 Shoot the image. • To use the Quick Review, close-up (Macro), or self-timer function, or to change the flash mode, press z to cancel the manual exposure setup mode after step 1. (The "Return" indicator changes to "Set".) • The flash is set to (Forced flash) or (No flash). • The shutter speed can be selected from 1/1000 to 30 seconds. • Shutter speeds of 1/6 second or slower, the NR slow shutter function activates automatically to reduce the picture...
Operating Instructions
Page 29
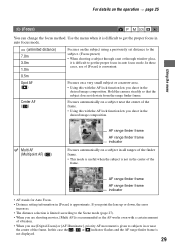
... indicator flashes and the AF range finder frame is not in auto focus mode. Use the menu when it is difficult to get the proper focus in auto focus mode. (unlimited distance) 7.0m 3.0m 1.0m Focuses on a subject in all ranges of the finder frame. • This mode is useful when the subject is not displayed. 29 In this with the AF lock function lets you shoot in...
... indicator flashes and the AF range finder frame is not in auto focus mode. Use the menu when it is difficult to get the proper focus in auto focus mode. (unlimited distance) 7.0m 3.0m 1.0m Focuses on a subject in all ranges of the finder frame. • This mode is useful when the subject is not displayed. 29 In this with the AF lock function lets you shoot in...
Operating Instructions
Page 44
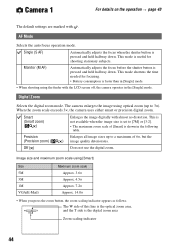
... is useful for focusing. • Battery consumption is pressed and held halfway down . The W side of 6×, but the ) image quality deteriorates. This mode is the digital zoom area Zoom scaling indicator 44 Smart (Smart zoom) ( ) Enlarges the image digitally with . Monitor (M AF) Automatically adjusts the focus before the shutter button is faster than in [Single] mode. • When shooting using the finder with the LCD screen off, the camera operates in the...
... is useful for focusing. • Battery consumption is pressed and held halfway down . The W side of 6×, but the ) image quality deteriorates. This mode is the digital zoom area Zoom scaling indicator 44 Smart (Smart zoom) ( ) Enlarges the image digitally with . Monitor (M AF) Automatically adjusts the focus before the shutter button is faster than in [Single] mode. • When shooting using the finder with the LCD screen off, the camera operates in the...
Operating Instructions
Page 51
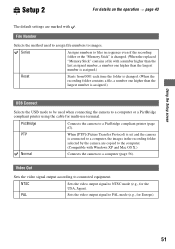
... changed. (When the replaced "Memory Stick" contains a file with a number higher than the last assigned number, a number one higher than the largest number is assigned.) Reset Starts from 0001 each time the folder is changed. (When the recording folder contains a file, a number one higher than the largest number is assigned.) USB Connect Selects the USB mode to be used to assign file numbers to images. NTSC Sets the video output signal to NTSC mode (e.g., for Europe). 51 Video Out Sets the video...
... changed. (When the replaced "Memory Stick" contains a file with a number higher than the last assigned number, a number one higher than the largest number is assigned.) Reset Starts from 0001 each time the folder is changed. (When the recording folder contains a file, a number one higher than the largest number is assigned.) USB Connect Selects the USB mode to be used to assign file numbers to images. NTSC Sets the video output signal to NTSC mode (e.g., for Europe). 51 Video Out Sets the video...
Operating Instructions
Page 54
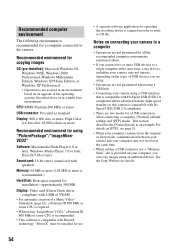
... Disk: Disk space required for installation-approximately 500 MB Display: Video card (Direct Draw driver compliant) with 4 MB of VRAM • For automatic creation of USB devices you are using. • Operations are not guaranteed when using a USB hub. • Connecting your computer, you can copy images using an additional device. Notes on your camera using "ImageMixer VCD2," a Pentium III 800 MHz or faster CPU is recommended. • This software...
... Disk: Disk space required for installation-approximately 500 MB Display: Video card (Direct Draw driver compliant) with 4 MB of VRAM • For automatic creation of USB devices you are using. • Operations are not guaranteed when using a USB hub. • Connecting your computer, you can copy images using an additional device. Notes on your camera using "ImageMixer VCD2," a Pentium III 800 MHz or faster CPU is recommended. • This software...
Operating Instructions
Page 60
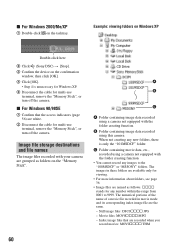
... the camera. C Folder containing movie data, etc., recorded using a camera not equipped with your camera are white. 2 Disconnect the cable for multi-use terminal, remove the "Memory Stick", or turn off the camera. Example: viewing folders on Windows XP Double-click here 2 Click (Sony DSC) t [Stop]. 3 Confirm the device on the confirmation window, then click [OK]. 4 Click [OK]. • Step 4 is only the "101MSDCF" folder. Still image files: DSC0ssss.JPG - Index image files that the access indicators...
... the camera. C Folder containing movie data, etc., recorded using a camera not equipped with your camera are white. 2 Disconnect the cable for multi-use terminal, remove the "Memory Stick", or turn off the camera. Example: viewing folders on Windows XP Double-click here 2 Click (Sony DSC) t [Stop]. 3 Confirm the device on the confirmation window, then click [OK]. 4 Click [OK]. • Step 4 is only the "101MSDCF" folder. Still image files: DSC0ssss.JPG - Index image files that the access indicators...
Operating Instructions
Page 61
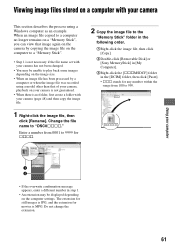
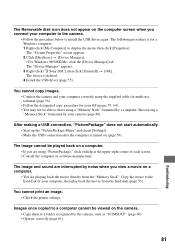
.... 2 Copy the image file to the "Memory Stick" folder in the following order. 1Right-click the image file, then click [Copy]. 2Double-click [Removable Disk] or [Sony MemoryStick] in [My Computer]. 3Right-click the [sssMSDCF] folder in step 1. • An extension may be unable to play back some images depending on the image size. • When an image file has been processed by a computer or when the image file was recorded using a Windows...
.... 2 Copy the image file to the "Memory Stick" folder in the following order. 1Right-click the image file, then click [Copy]. 2Double-click [Removable Disk] or [Sony MemoryStick] in [My Computer]. 3Right-click the [sssMSDCF] folder in step 1. • An extension may be unable to play back some images depending on the image size. • When an image file has been processed by a computer or when the image file was recorded using a Windows...
Operating Instructions
Page 62
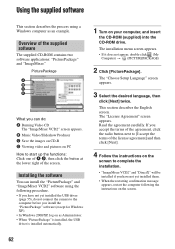
... Setup Language" screen appears. 3 Select the desired language, then click [Next] twice. Read the agreement carefully. B Music Video/Slideshow Producer C Save the images on CD-R D Viewing video and pictures on PC How to start up the functions: Click one of A-D, then click the button at the lower right of the supplied software The supplied CD-ROM contains two software applications: "PicturePackage" and "ImageMixer." Installing the software You...
... Setup Language" screen appears. 3 Select the desired language, then click [Next] twice. Read the agreement carefully. B Music Video/Slideshow Producer C Save the images on CD-R D Viewing video and pictures on PC How to start up the functions: Click one of A-D, then click the button at the lower right of the supplied software The supplied CD-ROM contains two software applications: "PicturePackage" and "ImageMixer." Installing the software You...
Operating Instructions
Page 64
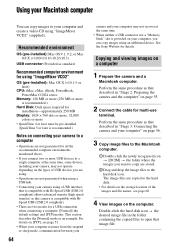
... colors or more USB devices to the hard disk icon. Copying and viewing images on page 56. 3 Copy image files to the Macintosh computer. 1Double-click the newly recognized icon t [DCIM] t the folder where the images you want to copy are stored. 2Drag and drop the image files to a single computer at the same time. • When neither a USB connector nor a "Memory Stick" slot is recommended.) Notes on connecting your camera...
... colors or more USB devices to the hard disk icon. Copying and viewing images on page 56. 3 Copy image files to the Macintosh computer. 1Double-click the newly recognized icon t [DCIM] t the folder where the images you want to copy are stored. 2Drag and drop the image files to a single computer at the same time. • When neither a USB connector nor a "Memory Stick" slot is recommended.) Notes on connecting your camera...
Operating Instructions
Page 65
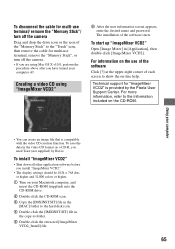
... start up "ImageMixer VCD2" Open [Image Mixer] in the video CD format on a CD-R, you install "ImageMixer VCD2." • The display settings should be 1024 × 768 dots or higher and 32,000 colors or higher. 1 Turn on the use terminal, remove the "Memory Stick", or turn off the camera. • If you are using "ImageMixer VCD2" 6 After the user information screen appears, enter the desired name and password. Using...
... start up "ImageMixer VCD2" Open [Image Mixer] in the video CD format on a CD-R, you install "ImageMixer VCD2." • The display settings should be 1024 × 768 dots or higher and 32,000 colors or higher. 1 Turn on the use terminal, remove the "Memory Stick", or turn off the camera. • If you are using "ImageMixer VCD2" 6 After the user information screen appears, enter the desired name and password. Using...
Operating Instructions
Page 67
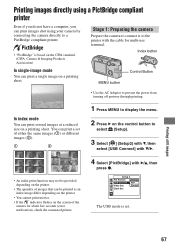
... seconds (error notification), check the connected printer. Index button MENU button Control Button • Use the AC Adaptor to prevent the power from turning off partway through printing. You can print a set . Printing still images 67 In index mode You can print several images at a reduced size on a printing sheet. The USB mode is based on the CIPA standard. (CIPA: Camera & Imaging Products Association) In single-image mode You can print a single image on a printing sheet. Printing images directly using a PictBridge compliant printer Even if...
... seconds (error notification), check the connected printer. Index button MENU button Control Button • Use the AC Adaptor to prevent the power from turning off partway through printing. You can print a set . Printing still images 67 In index mode You can print several images at a reduced size on a printing sheet. The USB mode is based on the CIPA standard. (CIPA: Camera & Imaging Products Association) In single-image mode You can print a single image on a printing sheet. Printing images directly using a PictBridge compliant printer Even if...

Operating Instructions
Page 77
...] mode. - Shooting in the close-up (Macro) function does not work. • (Twilight mode), (Landscape mode), (Fireworks mode) or (Candle mode) is connected to the multi connector. Smart zoom does not function. • Set [Digital Zoom] to [Precision] (page 44). • This function cannot be used while shooting movies. The flash does not work . • You cannot change the zoom scale when shooting movies. The screen turns blue and the subject does not appear when recording movies. • The image size...
...] mode. - Shooting in the close-up (Macro) function does not work. • (Twilight mode), (Landscape mode), (Fireworks mode) or (Candle mode) is connected to the multi connector. Smart zoom does not function. • Set [Digital Zoom] to [Precision] (page 44). • This function cannot be used while shooting movies. The flash does not work . • You cannot change the zoom scale when shooting movies. The screen turns blue and the subject does not appear when recording movies. • The image size...

Operating Instructions
Page 79
... USB mode. Install a charged battery pack. Deleting/Editing images Your camera cannot delete an image. • Cancel the protection (page 38). • Set the write-protect switch on your camera is not guaranteed. • The camera is in conjunction with the following items. Your camera cannot play back images. • Set the mode dial to (page 23). • The folder/file name has been changed on your camera is set the write-protect switch on the "Memory Stick" to the LOCK position...
... USB mode. Install a charged battery pack. Deleting/Editing images Your camera cannot delete an image. • Cancel the protection (page 38). • Set the write-protect switch on your camera is not guaranteed. • The camera is in conjunction with the following items. Your camera cannot play back images. • Set the mode dial to (page 23). • The folder/file name has been changed on your camera is set the write-protect switch on the "Memory Stick" to the LOCK position...
Operating Instructions
Page 80
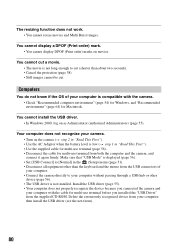
... of your computer is not installed. Make sure that "USB Mode" is displayed (page 56). • Set [USB Connect] to [Normal] in the (Setup) menu (page 51). • Disconnect all equipment other device (page 56). • The USB driver is compatible with the camera. • Check "Recommended computer environment" (page 54) for Windows, and "Recommended environment" (page 64) for Macintosh. Install the USB driver (page 55). • Your...
... of your computer is not installed. Make sure that "USB Mode" is displayed (page 56). • Set [USB Connect] to [Normal] in the (Setup) menu (page 51). • Disconnect all equipment other device (page 56). • The USB driver is compatible with the camera. • Check "Recommended computer environment" (page 54) for Windows, and "Recommended environment" (page 64) for Macintosh. Install the USB driver (page 55). • Your...
Operating Instructions
Page 81
... view a movie on a computer. • You are playing back the movie directly from the hard disk (page 55). The device is turned on (page 56). The "Device Manager" appears. 3 Right-click [ Sony DSC], then click [Uninstall] t [OK]. After making a USB connection, "PicturePackage" does not start automatically. • Start up the "PicturePackage Menu" and check [Settings]. • Make the USB connection after the computer is deleted. 4 Install the USB driver (page 55). Images once copied to display...
... view a movie on a computer. • You are playing back the movie directly from the hard disk (page 55). The device is turned on (page 56). The "Device Manager" appears. 3 Right-click [ Sony DSC], then click [Uninstall] t [OK]. After making a USB connection, "PicturePackage" does not start automatically. • Start up the "PicturePackage Menu" and check [Settings]. • Make the USB connection after the computer is deleted. 4 Install the USB driver (page 55). Images once copied to display...
Operating Instructions
Page 85
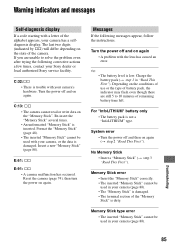
... solve the problem even after trying the following messages appear, follow the instructions. Troubleshooting 85 Warning indicators and messages Self-diagnosis display If a code starting with a letter of remaining battery time left. No Memory Stick • Insert a "Memory Stick" (t step 3 "Read This First"). Memory Stick type error • The inserted "Memory Stick" cannot be used in "Read This First"). C:13: ss • The camera cannot read or write data on again...
... solve the problem even after trying the following messages appear, follow the instructions. Troubleshooting 85 Warning indicators and messages Self-diagnosis display If a code starting with a letter of remaining battery time left. No Memory Stick • Insert a "Memory Stick" (t step 3 "Read This First"). Memory Stick type error • The inserted "Memory Stick" cannot be used in "Read This First"). C:13: ss • The camera cannot read or write data on again...


