Read This First guide
Page 1
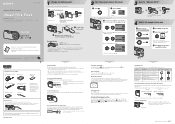
... etc. To remove a "Memory Stick" Open the cover, then push the "Memory Stick" in the direction of the wall outlet (wall socket) [b]. Bottom Slide down the battery (Auto power-off . • Do not use your camera. © 2005 Sony Corporation Printed in until the ..., and pull it . DSC-P200 Refer to "User's Guide/Troubleshooting" (separate volume) Explains advanced techniques and what to it out. The data may be found at postcard size Sending e-mail/creating home pages No. Charging may take longer under certain circumstances. Digital Still Camera 2-582-853-11 (1) ...
... etc. To remove a "Memory Stick" Open the cover, then push the "Memory Stick" in the direction of the wall outlet (wall socket) [b]. Bottom Slide down the battery (Auto power-off . • Do not use your camera. © 2005 Sony Corporation Printed in until the ..., and pull it . DSC-P200 Refer to "User's Guide/Troubleshooting" (separate volume) Explains advanced techniques and what to it out. The data may be found at postcard size Sending e-mail/creating home pages No. Charging may take longer under certain circumstances. Digital Still Camera 2-582-853-11 (1) ...
Operating Instructions
Page 3
... please contact your used rechargeable batteries to attach the fuse cover after you . "Memory Stick" For Customers in the U.S.A. OPERATION IS SUBJECT TO THE FOLLOWING TWO CONDITIONS:... same rating as the supplied one and approved by returning your nearest Sony service station. Attention The electromagnetic fields at the specific frequencies may influence...found compliant with the limits set out in order to this equipment for a digital device pursuant to discontinue midway (fail), restart the application or disconnect and connect... camera. Never use the plug without the fuse cover.
... please contact your used rechargeable batteries to attach the fuse cover after you . "Memory Stick" For Customers in the U.S.A. OPERATION IS SUBJECT TO THE FOLLOWING TWO CONDITIONS:... same rating as the supplied one and approved by returning your nearest Sony service station. Attention The electromagnetic fields at the specific frequencies may influence...found compliant with the limits set out in order to this equipment for a digital device pursuant to discontinue midway (fail), restart the application or disconnect and connect... camera. Never use the plug without the fuse cover.
Operating Instructions
Page 4
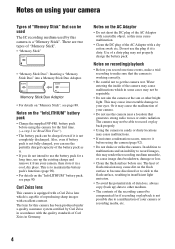
...8226; To avoid the potential risk of data loss, always copy (back up the existing charge and remove it from your camera, then store it is a "Memory Stick". Or it may render the recording medium unusable, or cause image data breakdown, damage or loss. • Clean... in a cool, dry place. Notes on using your camera Types of "Memory Stick" that generates strong radio waves or emits radiation. There are two types of "Memory Stick". • "Memory Stick" • "Memory Stick Duo": Inserting a "Memory Stick Duo" into a Memory Stick Duo Adaptor. Notes on recording/playback • Before...
...8226; To avoid the potential risk of data loss, always copy (back up the existing charge and remove it from your camera, then store it is a "Memory Stick". Or it may render the recording medium unusable, or cause image data breakdown, damage or loss. • Clean... in a cool, dry place. Notes on using your camera Types of "Memory Stick" that generates strong radio waves or emits radiation. There are two types of "Memory Stick". • "Memory Stick" • "Memory Stick Duo": Inserting a "Memory Stick Duo" into a Memory Stick Duo Adaptor. Notes on recording/playback • Before...
Operating Instructions
Page 6
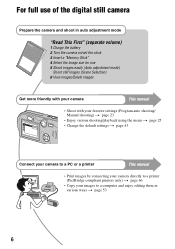
... of the digital still camera Prepare the camera and shoot in auto adjustment mode "Read This First" (separate volume) 1 Charge the battery 2 Turn the camera on/set the clock 3 Insert a "Memory Stick" 4 Select the image size for use 5 Shoot images easily (Auto adjustment mode) Shoot still images (Scene... Selection) 6 View images/Delete images Get more friendly with your camera This manual • Shoot with your...
... of the digital still camera Prepare the camera and shoot in auto adjustment mode "Read This First" (separate volume) 1 Charge the battery 2 Turn the camera on/set the clock 3 Insert a "Memory Stick" 4 Select the image size for use 5 Shoot images easily (Auto adjustment mode) Shoot still images (Scene... Selection) 6 View images/Delete images Get more friendly with your camera This manual • Shoot with your...
Operating Instructions
Page 8
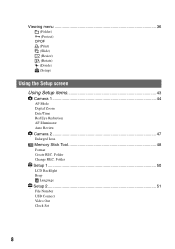
Folder Setup 1 50 1 LCD Backlight Beep Language Setup 2 51 2 File Number USB Connect Video Out Clock Set 8 Viewing menu 36 (Folder) - (Protect) DPOF (Print) (Slide) (Resize) (Rotate) (Divide) (Setup) Using the Setup screen Using Setup items 43 Camera 1 44 1 AF Mode Digital Zoom Date/Time Red Eye Reduction AF Illuminator Auto Review Camera 2 47 2 Enlarged Icon Memory Stick Tool 48 Format Create REC. Folder Change REC.
Folder Setup 1 50 1 LCD Backlight Beep Language Setup 2 51 2 File Number USB Connect Video Out Clock Set 8 Viewing menu 36 (Folder) - (Protect) DPOF (Print) (Slide) (Resize) (Rotate) (Divide) (Setup) Using the Setup screen Using Setup items 43 Camera 1 44 1 AF Mode Digital Zoom Date/Time Red Eye Reduction AF Illuminator Auto Review Camera 2 47 2 Enlarged Icon Memory Stick Tool 48 Format Create REC. Folder Change REC.
Operating Instructions
Page 9
... images to your computer 55 Viewing image files stored on a computer with your camera 61 Using the supplied software 62 Using your Macintosh computer 64 Printing still images How to print still images 66 Printing images directly using a PictBridge compliant printer 67 Printing at a ...shop 70 Connecting your camera to your TV Viewing images on a TV screen 72 Troubleshooting Troubleshooting 74 Warning indicators and messages 85 Others On the "Memory Stick ...
... images to your computer 55 Viewing image files stored on a computer with your camera 61 Using the supplied software 62 Using your Macintosh computer 64 Printing still images How to print still images 66 Printing images directly using a PictBridge compliant printer 67 Printing at a ...shop 70 Connecting your camera to your TV Viewing images on a TV screen 72 Troubleshooting Troubleshooting 74 Warning indicators and messages 85 Others On the "Memory Stick ...
Operating Instructions
Page 13
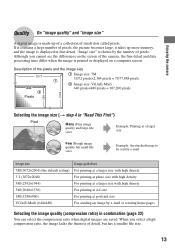
Enjoying the camera Quality On "image quality" and "image size" A digital image is made up more memory, and the image is displayed in fine detail. When you cannot see the differences on a computer screen. Description of pixels. Although you select a high compression ... image size (t step 4 in combination (page 32) You can select the compression ratio when digital images are saved. If it contains a large number of pixels, the picture becomes large, it takes up of a collection of the camera, the fine detail and data processing time differ when the image is shown by e-mail...
Enjoying the camera Quality On "image quality" and "image size" A digital image is made up more memory, and the image is displayed in fine detail. When you cannot see the differences on a computer screen. Description of pixels. Although you select a high compression ... image size (t step 4 in combination (page 32) You can select the compression ratio when digital images are saved. If it contains a large number of pixels, the picture becomes large, it takes up of a collection of the camera, the fine detail and data processing time differ when the image is shown by e-mail...
Operating Instructions
Page 15
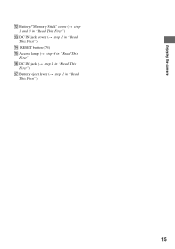
Enjoying the camera L Battery/"Memory Stick" cover (t step 1 and 3 in "Read This First") M DC IN jack cover (t step 1 in "Read This First") N RESET button (74) O Access lamp (t step 4 in "Read This First" P DC IN jack (t step 1 in "Read This First") Q Battery eject lever (t step 1 in "Read This First") 15
Enjoying the camera L Battery/"Memory Stick" cover (t step 1 and 3 in "Read This First") M DC IN jack cover (t step 1 in "Read This First") N RESET button (74) O Access lamp (t step 4 in "Read This First" P DC IN jack (t step 1 in "Read This First") Q Battery eject lever (t step 1 in "Read This First") 15

Operating Instructions
Page 17
Enjoying the camera C Display 7M 3:2 5M 3M 1M VGA FINE 640 STD 640 160 FINE STD 101 00:00:00 [00:28:05] 1/30" 400 C:32:00 Indication Image size (t step 4 in "Read This First") Image quality (32) Recording folder (48) Remaining "Memory Stick" capacity (21) Recording time...-diagnosis display (85) Date/Time (45) ISO number (32) D Display E + Indication Vibration warning (10) • Indicates vibration will prevent you can still shoot images. Low battery warning (22) Spot metering cross hair (30) AF range finder frame (29) E Display Indication Histogram (20, 28) • ...
Enjoying the camera C Display 7M 3:2 5M 3M 1M VGA FINE 640 STD 640 160 FINE STD 101 00:00:00 [00:28:05] 1/30" 400 C:32:00 Indication Image size (t step 4 in "Read This First") Image quality (32) Recording folder (48) Remaining "Memory Stick" capacity (21) Recording time...-diagnosis display (85) Date/Time (45) ISO number (32) D Display E + Indication Vibration warning (10) • Indicates vibration will prevent you can still shoot images. Low battery warning (22) Spot metering cross hair (30) AF range finder frame (29) E Display Indication Histogram (20, 28) • ...
Operating Instructions
Page 18
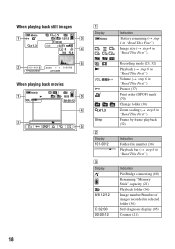
When playing back still images 60min 1.3 M VGA 101 101 12/12 C:32:00 +2.0EV 500 F2.8 BACK/NEXT VOLUME When playing back movies A Display 60min 7M 3:2 5M 3M 1M ... Folder-file number (36) Playback bar (t step 6 in "Read This First") C Display 101 8/8 12/12 C:32:00 00:00:12 Indication PictBridge connecting (68) Remaining "Memory Stick" capacity (21) Playback folder (36) Image number/Number of images recorded in selected folder (36) Self-diagnosis display (85) Counter (21) 18
When playing back still images 60min 1.3 M VGA 101 101 12/12 C:32:00 +2.0EV 500 F2.8 BACK/NEXT VOLUME When playing back movies A Display 60min 7M 3:2 5M 3M 1M ... Folder-file number (36) Playback bar (t step 6 in "Read This First") C Display 101 8/8 12/12 C:32:00 00:00:12 Indication PictBridge connecting (68) Remaining "Memory Stick" capacity (21) Playback folder (36) Image number/Number of images recorded in selected folder (36) Self-diagnosis display (85) Counter (21) 18
Operating Instructions
Page 21
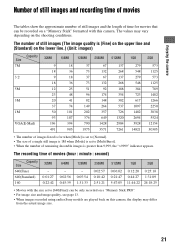
... recording time of time for when [Mode] is set to [Normal]. • The size of a single still image is 1M when [Mode] is set to [640(Fine)] can be recorded on a "Memory Stick" formatted with the size set to [Multi Burst]. • When the number of remaining shootable images is..." indicator appears. The number of still images (The image quality is for movies that can be only recorded on a "Memory Stick PRO". • For image size and image quality, see page 13. • When images recorded using earlier Sony models are played back on this camera. The values may differ from the...
... recording time of time for when [Mode] is set to [Normal]. • The size of a single still image is 1M when [Mode] is set to [640(Fine)] can be recorded on a "Memory Stick" formatted with the size set to [Multi Burst]. • When the number of remaining shootable images is..." indicator appears. The number of still images (The image quality is for movies that can be only recorded on a "Memory Stick PRO". • For image size and image quality, see page 13. • When images recorded using earlier Sony models are played back on this camera. The values may differ from the...
Operating Instructions
Page 22
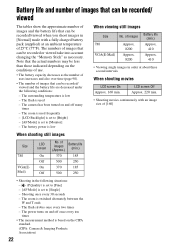
... intervals When shooting movies LCD screen On Approx. 160 min. The surrounding temperature is low When viewing still images Size No. The power turns on and off many times - The flash is used frequently -... [LCD Backlight] is set to [Bright] - [AF Mode] is set to [Monitor] - The camera has been turned on and off once every ten times • The measurement method is based on the ...[Single] - The numbers of images that can be recorded or viewed take into account changing the "Memory Stick" as the number of uses increases and also over time (page 90). • The number...
... intervals When shooting movies LCD screen On Approx. 160 min. The surrounding temperature is low When viewing still images Size No. The power turns on and off many times - The flash is used frequently -... [LCD Backlight] is set to [Bright] - [AF Mode] is set to [Monitor] - The camera has been turned on and off once every ten times • The measurement method is based on the ...[Single] - The numbers of images that can be recorded or viewed take into account changing the "Memory Stick" as the number of uses increases and also over time (page 90). • The number...
Operating Instructions
Page 31
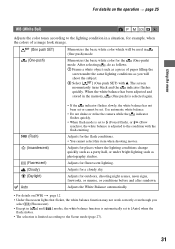
...Fluorescent) (Cloudy) (Daylight) Auto • If the indicator flashes slowly, the white balance has not been set or cannot be used in the memory, (One push) is adjusted to the Scene mode (page 27). 31 Adjusts for places where the lighting conditions change quickly such as a party ... 1 Frame a white object such as photography studios. Adjusts for fluorescent lighting. Use automatic white balance. • Do not shake or strike the camera while the flashes quickly. indicator • When flash mode is set to [Auto] when the flash strobes. • The selection is limited according...
...Fluorescent) (Cloudy) (Daylight) Auto • If the indicator flashes slowly, the white balance has not been set or cannot be used in the memory, (One push) is adjusted to the Scene mode (page 27). 31 Adjusts for places where the lighting conditions change quickly such as a party ... 1 Frame a white object such as photography studios. Adjusts for fluorescent lighting. Use automatic white balance. • Do not shake or strike the camera while the flashes quickly. indicator • When flash mode is set to [Auto] when the flash strobes. • The selection is limited according...
Operating Instructions
Page 33
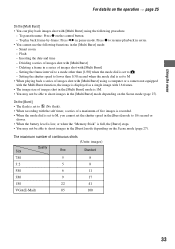
... [Burst] mode depending on the Scene mode (page 27). Inserting the date and time - To play back images shot with [Multi Burst] using a computer or a camera not equipped with the Multi Burst function, the image is displayed as a single image with 16 frames. • The image size of images shot in... Burst] mode is set the shutter speed in the [Burst] mode to 1/6 second or slower. • When the battery level is low, or when the "Memory Stick" is full, the [Burst] stops. • You may not be able to shoot images in the [Multi Burst] mode depending on the Scene mode...
... [Burst] mode depending on the Scene mode (page 27). Inserting the date and time - To play back images shot with [Multi Burst] using a computer or a camera not equipped with the Multi Burst function, the image is displayed as a single image with 16 frames. • The image size of images shot in... Burst] mode is set the shutter speed in the [Burst] mode to 1/6 second or slower. • When the battery level is low, or when the "Memory Stick" is full, the [Burst] stops. • You may not be able to shoot images in the [Multi Burst] mode depending on the Scene mode...
Operating Instructions
Page 36
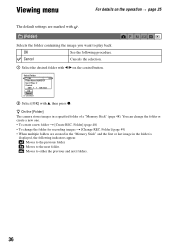
... No. OK See the following indicators appear. : Moves to the previous folder. : Moves to the next folder. : Moves to play back. z On the [Folder] The camera stores images in the folder is displayed, the following procedure. Folder] (page 48) • To change the folder or create a new one. • To create... on the control button. Cancel Cancels the selection. 1 Select the desired folder with b/B on the operation t page 25 The default settings are created in the "Memory Stick" and the first or last image in a specified folder of...
... No. OK See the following indicators appear. : Moves to the previous folder. : Moves to the next folder. : Moves to play back. z On the [Folder] The camera stores images in the folder is displayed, the following procedure. Folder] (page 48) • To change the folder or create a new one. • To create... on the control button. Cancel Cancels the selection. 1 Select the desired folder with b/B on the operation t page 25 The default settings are created in the "Memory Stick" and the first or last image in a specified folder of...
Operating Instructions
Page 38
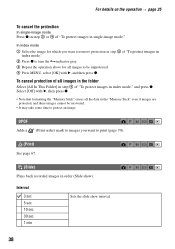
... ). In index mode 1 Select the image for all images to be unprotected. 4 Press MENU, select [OK] with B, then press z. • Note that formatting the "Memory Stick" erases all images in the folder Select [All In This Folder] in step 4 of "To protect images in order (Slide show interval. 38 For...print (page 70). (Print) See page 67. (Slide) Plays back recorded images in single-image mode." To cancel protection of all the data in the "Memory Stick" even if images are protected, and these images cannot be recovered. • It may take some time to protect an image. DPOF Adds a (...
... ). In index mode 1 Select the image for all images to be unprotected. 4 Press MENU, select [OK] with B, then press z. • Note that formatting the "Memory Stick" erases all images in the folder Select [All In This Folder] in step 4 of "To protect images in order (Slide show interval. 38 For...print (page 70). (Print) See page 67. (Slide) Plays back recorded images in single-image mode." To cancel protection of all the data in the "Memory Stick" even if images are protected, and these images cannot be recovered. • It may take some time to protect an image. DPOF Adds a (...
Operating Instructions
Page 39
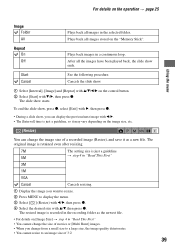
... details on the control button. 2 Select [Start] with B, then press z. • During a slide show starts. Start Cancel See the following procedure. For details on the "Memory Stick". Plays back all images stored on the operation t page 25 Using the menu Image Folder All Plays back all the images have been played...
... details on the control button. 2 Select [Start] with B, then press z. • During a slide show starts. Start Cancel See the following procedure. For details on the "Memory Stick". Plays back all images stored on the operation t page 25 Using the menu Image Folder All Plays back all the images have been played...

Operating Instructions
Page 40
This is the recommended function to use when the "Memory Stick" capacity is insufficient, or when you attach movies to rotate images shot with other cameras. • When viewing images on a computer, the image rotation information may not be displayed on the image. (Rotate) Rotates a still image. Cancel Cancels division. 40 OK Cancel Rotates...
This is the recommended function to use when the "Memory Stick" capacity is insufficient, or when you attach movies to rotate images shot with other cameras. • When viewing images on a computer, the image rotation information may not be displayed on the image. (Rotate) Rotates a still image. Cancel Cancels division. 40 OK Cancel Rotates...

Operating Instructions
Page 48
The format is created or selected. • You cannot delete a folder with the camera. Cancel Cancels folder creation. 1 Select [OK] with . The folder creation screen appears. 60min Create REC. folder 102MSDCF Ready? When the folder capacity is ... newly created folder until a different folder is complete. Cancel Cancels the formatting. 1 Select [OK] with v, then press z. Both the supplied "Memory Stick" and a commercially available "Memory Stick" are recorded in one higher than the largest number, and the folder becomes the current recording folder. • For details on the...
The format is created or selected. • You cannot delete a folder with the camera. Cancel Cancels folder creation. 1 Select [OK] with . The folder creation screen appears. 60min Create REC. folder 102MSDCF Ready? When the folder capacity is ... newly created folder until a different folder is complete. Cancel Cancels the formatting. 1 Select [OK] with v, then press z. Both the supplied "Memory Stick" and a commercially available "Memory Stick" are recorded in one higher than the largest number, and the folder becomes the current recording folder. • For details on the...
Operating Instructions
Page 51
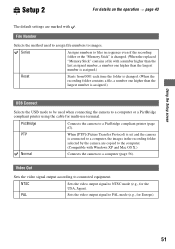
...Selects the method used when connecting the camera to a computer or a PictBridge compliant printer using the cable for the USA, Japan). Series Assigns numbers to files in sequence even if the recording folder or the "Memory Stick" is changed. (When the replaced "Memory Stick" contains a file with a...used to assign file numbers to images. PAL Sets the video output signal to NTSC mode (e.g., for multi-use terminal. PictBridge Connects the camera to connected equipment. Using the Setup screen Setup 2 2 For details on the operation t page 43 The default settings are copied to ...
...Selects the method used when connecting the camera to a computer or a PictBridge compliant printer using the cable for the USA, Japan). Series Assigns numbers to files in sequence even if the recording folder or the "Memory Stick" is changed. (When the replaced "Memory Stick" contains a file with a...used to assign file numbers to images. PAL Sets the video output signal to NTSC mode (e.g., for multi-use terminal. PictBridge Connects the camera to connected equipment. Using the Setup screen Setup 2 2 For details on the operation t page 43 The default settings are copied to ...

