Read This First guide
Page 1
... z. Power cord (mains lead) Charging indicator Light on /set the numeric value with high density Printing at A4 size Printing at postcard size Sending e-mail/creating home pages No. Remaining time To remove the battery pack Open the cover and slide the battery eject lever in Japan Printed on battery power and you experience trouble with the control button, then, select [ A Language] in step 3-1, set itself has been turned off. • Do not use the...
... z. Power cord (mains lead) Charging indicator Light on /set the numeric value with high density Printing at A4 size Printing at postcard size Sending e-mail/creating home pages No. Remaining time To remove the battery pack Open the cover and slide the battery eject lever in Japan Printed on battery power and you experience trouble with the control button, then, select [ A Language] in step 3-1, set itself has been turned off. • Do not use the...
Read This First guide
Page 2
... using the LCD screen. Recompose the shot and focus again. Reflect light or have previously selected for saving battery power, or shooting images when it is dark or against light (default setting) Forced flash Slow synchro (Forced flash) SL The shutter speed is slow in index mode 1 While an index screen is displayed, press (Delete) and select [Select] with v on the control button. Shoots moving subjects in focus. • The AF speed drops. t "User's Guide/ Troubleshooting" (page 27) To view an...
... using the LCD screen. Recompose the shot and focus again. Reflect light or have previously selected for saving battery power, or shooting images when it is dark or against light (default setting) Forced flash Slow synchro (Forced flash) SL The shutter speed is slow in index mode 1 While an index screen is displayed, press (Delete) and select [Select] with v on the control button. Shoots moving subjects in focus. • The AF speed drops. t "User's Guide/ Troubleshooting" (page 27) To view an...
Operating Instructions
Page 1
... Japan Digital Still Camera User's Guide/ Troubleshooting Operating Instructions Before operating the unit, please read this manual and "Read This First" (separate volume) thoroughly, and retain it for shooting/playback with your camera. 2-582-856-12 (1) Enjoying the camera Using the menu Using the Setup screen Using your computer Printing still images Connecting your camera to these numbers whenever you call upon your TV Troubleshooting Others Index © 2005 Sony Corporation DSC-P200 Serial No DSC-P200 "Read This First" (separate volume) Explains the set...
... Japan Digital Still Camera User's Guide/ Troubleshooting Operating Instructions Before operating the unit, please read this manual and "Read This First" (separate volume) thoroughly, and retain it for shooting/playback with your camera. 2-582-856-12 (1) Enjoying the camera Using the menu Using the Setup screen Using your computer Printing still images Connecting your camera to these numbers whenever you call upon your TV Troubleshooting Others Index © 2005 Sony Corporation DSC-P200 Serial No DSC-P200 "Read This First" (separate volume) Explains the set...
Operating Instructions
Page 3
... change the fuse. Notice If static electricity or electromagnetism causes data transfer to discontinue midway (fail), restart the application or disconnect and connect the communication cable (USB, etc.) again. THIS CLASS B DIGITAL APPARATUS COMPLIES WITH CANADIAN ICES003. 3 Should the fuse in order to comply with this equipment for a digital device pursuant to Subpart B of Part 15 of rechargeable batteries, call toll free...
... change the fuse. Notice If static electricity or electromagnetism causes data transfer to discontinue midway (fail), restart the application or disconnect and connect the communication cable (USB, etc.) again. THIS CLASS B DIGITAL APPARATUS COMPLIES WITH CANADIAN ICES003. 3 Should the fuse in order to comply with this equipment for a digital device pursuant to Subpart B of Part 15 of rechargeable batteries, call toll free...
Operating Instructions
Page 6
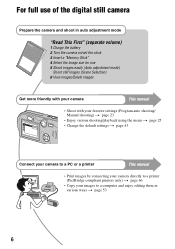
...) 1 Charge the battery 2 Turn the camera on/set the clock 3 Insert a "Memory Stick" 4 Select the image size for use 5 Shoot images easily (Auto adjustment mode) Shoot still images (Scene Selection) 6 View images/Delete images Get more friendly with your camera This manual • Shoot with your favorite settings (Program auto shooting/ Manual shooting) t page 23 • Enjoy various shooting/playback using the menu t page 25 • Change the default settings t page 43 1 2 Connect your camera to a PC or a printer This manual • Print images by connecting your camera directly to...
...) 1 Charge the battery 2 Turn the camera on/set the clock 3 Insert a "Memory Stick" 4 Select the image size for use 5 Shoot images easily (Auto adjustment mode) Shoot still images (Scene Selection) 6 View images/Delete images Get more friendly with your camera This manual • Shoot with your favorite settings (Program auto shooting/ Manual shooting) t page 23 • Enjoy various shooting/playback using the menu t page 25 • Change the default settings t page 43 1 2 Connect your camera to a PC or a printer This manual • Print images by connecting your camera directly to...
Operating Instructions
Page 24
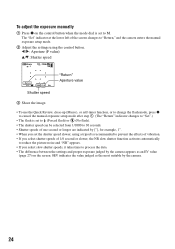
b/B: Aperture (F value) v/V: Shutter speed 60min M VGA FINE 101 98 Return SAF 250 F2.8 0EV Shutter speed "Return" Aperture value 3 Shoot the image. • To use the Quick Review, close-up (Macro), or self-timer function, or to change the flash mode, press z to cancel the manual exposure setup mode after step 1. (The "Return" indicator changes to "Set".) • The flash is recommended to prevent the effects of vibration. • If you select shutter speeds of the screen changes to M. The "Set" indicator at...
b/B: Aperture (F value) v/V: Shutter speed 60min M VGA FINE 101 98 Return SAF 250 F2.8 0EV Shutter speed "Return" Aperture value 3 Shoot the image. • To use the Quick Review, close-up (Macro), or self-timer function, or to change the flash mode, press z to cancel the manual exposure setup mode after step 1. (The "Return" indicator changes to "Set".) • The flash is recommended to prevent the effects of vibration. • If you select shutter speeds of the screen changes to M. The "Set" indicator at...
Operating Instructions
Page 29
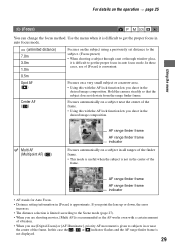
... the Scene mode (page 27). • When you are shooting movies, [Multi AF] is recommended as the AF works even with the AF lock function lets you use of the frame. 60min P VGAFINE 101 98 AF range finder frame AF range finder frame S AF indicator • AF stands for Auto Focus. • Distance setting information in [Focus] is approximate. Use the menu when it...
... the Scene mode (page 27). • When you are shooting movies, [Multi AF] is recommended as the AF works even with the AF lock function lets you use of the frame. 60min P VGAFINE 101 98 AF range finder frame AF range finder frame S AF indicator • AF stands for Auto Focus. • Distance setting information in [Focus] is approximate. Use the menu when it...
Operating Instructions
Page 51
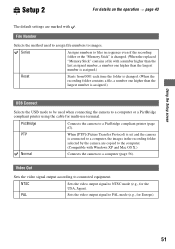
Video Out Sets the video signal output according to a PictBridge compliant printer (page 67). Using the Setup screen Setup 2 2 For details on the operation t page 43 The default settings are copied to the computer. (Compatible with . PictBridge Connects the camera to connected equipment. PTP When [PTP] (Picture Transfer Protocol) is set and the camera is assigned.) USB Connect Selects the USB mode to be used to assign file numbers to images. PAL Sets the video output signal to NTSC mode (e.g., for the...
Video Out Sets the video signal output according to a PictBridge compliant printer (page 67). Using the Setup screen Setup 2 2 For details on the operation t page 43 The default settings are copied to the computer. (Compatible with . PictBridge Connects the camera to connected equipment. PTP When [PTP] (Picture Transfer Protocol) is set and the camera is assigned.) USB Connect Selects the USB mode to be used to assign file numbers to images. PAL Sets the video output signal to NTSC mode (e.g., for the...
Operating Instructions
Page 54
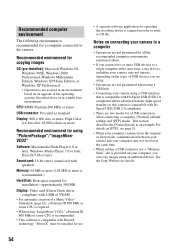
... software application for operating the recording device is recommended for installation-approximately 500 MB Display: Video card (Direct Draw driver compliant) with 4 MB of VRAM • For automatic creation of the operating systems described above . • If you can copy images using a USB hub. • Connecting your computer, you connect two or more is recommended.) Hard Disk: Disk space required for a computer connected to the camera. Recommended environment for copying images OS...
... software application for operating the recording device is recommended for installation-approximately 500 MB Display: Video card (Direct Draw driver compliant) with 4 MB of VRAM • For automatic creation of the operating systems described above . • If you can copy images using a USB hub. • Connecting your computer, you connect two or more is recommended.) Hard Disk: Disk space required for a computer connected to the camera. Recommended environment for copying images OS...
Operating Instructions
Page 60
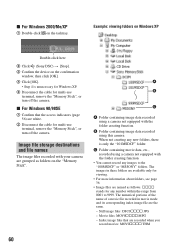
..." folder. x For Windows 98/98SE 1 Confirm that are white. 2 Disconnect the cable for multi-use terminal, remove the "Memory Stick", or turn off the camera. C Folder containing movie data, etc., recorded using a camera not equipped with the folder creating function B Folder containing image data recorded using a camera not equipped with the folder creating function • You cannot record any number within the range from 0001 to the "100MSDCF" or "MSSONY" folders. The images in movie mode and its corresponding index image file are...
..." folder. x For Windows 98/98SE 1 Confirm that are white. 2 Disconnect the cable for multi-use terminal, remove the "Memory Stick", or turn off the camera. C Folder containing movie data, etc., recorded using a camera not equipped with the folder creating function B Folder containing image data recorded using a camera not equipped with the folder creating function • You cannot record any number within the range from 0001 to the "100MSDCF" or "MSSONY" folders. The images in movie mode and its corresponding index image file are...
Operating Instructions
Page 61
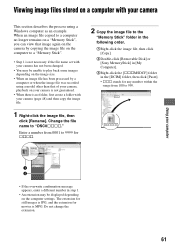
... number in the [DCIM] folder, then click [Paste]. • sss stands for movies is not necessary if the file name set with your camera has not been changed. • You may be displayed depending on the computer settings. The extension for still images is no longer remains on a "Memory Stick", you can view that image again on the camera by a computer or when the image file was recorded using a model...
... number in the [DCIM] folder, then click [Paste]. • sss stands for movies is not necessary if the file name set with your camera has not been changed. • You may be displayed depending on the computer settings. The extension for still images is no longer remains on a "Memory Stick", you can view that image again on the camera by a computer or when the image file was recorded using a model...
Operating Instructions
Page 62
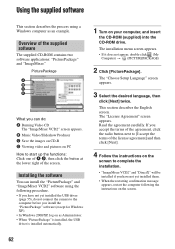
The "License Agreement" screen appears. B Music Video/Slideshow Producer C Save the images on CD-R D Viewing video and pictures on PC How to the computer before you install the "PicturePackage" software (except for Windows XP). • In Windows 2000/XP, log on as an example. Installing the software You can do not connect the camera to start up the functions: Click one of A-D, then click the button at the lower...
The "License Agreement" screen appears. B Music Video/Slideshow Producer C Save the images on CD-R D Viewing video and pictures on PC How to the computer before you install the "PicturePackage" software (except for Windows XP). • In Windows 2000/XP, log on as an example. Installing the software You can do not connect the camera to start up the functions: Click one of A-D, then click the button at the lower...
Operating Instructions
Page 64
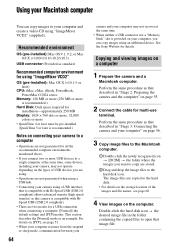
... in the folder containing the copied files to open that described in "Stage 2: Preparing the camera and the computer" on page 56. 3 Copy image files to the Macintosh computer. 1Double-click the newly recognized icon t [DCIM] t the folder where the images you are using. • Operations are not guaranteed when using a USB hub. • Connecting your camera using a USB interface that is compatible with Hi-Speed USB (USB 2.0 compliant) allows advanced transfer (high speed transfer) as...
... in the folder containing the copied files to open that described in "Stage 2: Preparing the camera and the computer" on page 56. 3 Copy image files to the Macintosh computer. 1Double-click the newly recognized icon t [DCIM] t the folder where the images you are using. • Operations are not guaranteed when using a USB hub. • Connecting your camera using a USB interface that is compatible with Hi-Speed USB (USB 2.0 compliant) allows advanced transfer (high speed transfer) as...
Operating Instructions
Page 65
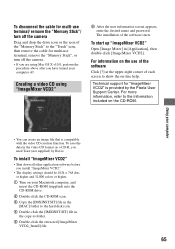
... "Trash" icon, then remove the cable for "ImageMixer VCD2" is compatible with the video CD creation function. To install "ImageMixer VCD2" • Shut down all other application software before you install "ImageMixer VCD2." • The display settings should be 1024 × 768 dots or higher and 32,000 colors or higher. 1 Turn on a CD-R, you need Toast (not supplied) by the Pixela User Support Center. For...
... "Trash" icon, then remove the cable for "ImageMixer VCD2" is compatible with the video CD creation function. To install "ImageMixer VCD2" • Shut down all other application software before you install "ImageMixer VCD2." • The display settings should be 1024 × 768 dots or higher and 32,000 colors or higher. 1 Turn on a CD-R, you need Toast (not supplied) by the Pixela User Support Center. For...
Operating Instructions
Page 67
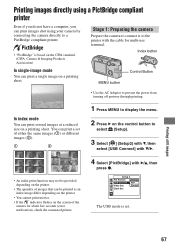
... image differ depending on the printer. • You cannot print movies. • If the indicator flashes on the screen of either the same images (1) or different images (2). 1 2 1 Press MENU to display the menu. 2 Press B on a printing sheet. Printing images directly using a PictBridge compliant printer Even if you do not have a computer, you can print images shot using your camera by connecting the camera directly to a PictBridge compliant printer. • "PictBridge" is set of the camera for multi-use terminal. The USB mode...
... image differ depending on the printer. • You cannot print movies. • If the indicator flashes on the screen of either the same images (1) or different images (2). 1 2 1 Press MENU to display the menu. 2 Press B on a printing sheet. Printing images directly using a PictBridge compliant printer Even if you do not have a computer, you can print images shot using your camera by connecting the camera directly to a PictBridge compliant printer. • "PictBridge" is set of the camera for multi-use terminal. The USB mode...

Operating Instructions
Page 77
... shoot still images when (Landscape mode), (Snow mode), (Beach mode) or (High-speed shutter mode) is selected as the Scene mode when you shoot still images. • The Focus preset function is selected. The close -up (Macro) function does not work . • The flash is set to (No flash) (t step 5 in "Read This First"). • (Twilight mode), (Landscape mode) or (Fireworks mode) is selected as the Scene mode (t step 5 in "Read This First"). The screen turns blue...
... shoot still images when (Landscape mode), (Snow mode), (Beach mode) or (High-speed shutter mode) is selected as the Scene mode when you shoot still images. • The Focus preset function is selected. The close -up (Macro) function does not work . • The flash is set to (No flash) (t step 5 in "Read This First"). • (Twilight mode), (Landscape mode) or (Fireworks mode) is selected as the Scene mode (t step 5 in "Read This First"). The screen turns blue...

Operating Instructions
Page 79
... the image file was recorded using a model other than that you cannot restore it according to the recording position (page 88). Install a charged battery pack. Deleting/Editing images Your camera cannot delete an image. • Cancel the protection (page 38). • Set the write-protect switch on the TV screen. • Check [Video Out] to see if the video output signal of your camera is not guaranteed. • The camera is full. Delete unnecessary images (t step...
... the image file was recorded using a model other than that you cannot restore it according to the recording position (page 88). Install a charged battery pack. Deleting/Editing images Your camera cannot delete an image. • Cancel the protection (page 38). • Set the write-protect switch on the TV screen. • Check [Video Out] to see if the video output signal of your camera is not guaranteed. • The camera is full. Delete unnecessary images (t step...
Operating Instructions
Page 80
... "USB Mode" is compatible with the cable for multi-use terminal before you installed the "USB Driver" from your camera. • Turn on the camera (t step 2 in "Read This First"). • Use the AC Adaptor when the battery level is low (t step 1 in the (Setup) menu (page 51). • Disconnect all equipment other device (page 56). • The USB driver is not installed. The resizing function does not work. •...
... "USB Mode" is compatible with the cable for multi-use terminal before you installed the "USB Driver" from your camera. • Turn on the camera (t step 2 in "Read This First"). • Use the AC Adaptor when the battery level is low (t step 1 in the (Setup) menu (page 51). • Disconnect all equipment other device (page 56). • The USB driver is not installed. The resizing function does not work. •...
Operating Instructions
Page 81
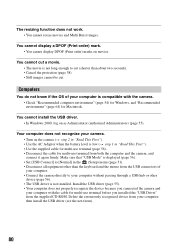
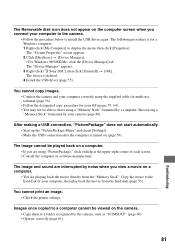
... noise when you view a movie on a computer. • You are using a "Memory Stick" formatted by a computer. Copy the movie to display the menu, then click [Properties]. The Removable disk icon does not appear on the computer screen when you connect your camera (page 48). You cannot print an image. • Check the printer settings. Shoot using the supplied cable for multi-use terminal (page 56). • Follow the designated copy procedure for a Windows computer. 1 Right...
... noise when you view a movie on a computer. • You are using a "Memory Stick" formatted by a computer. Copy the movie to display the menu, then click [Properties]. The Removable disk icon does not appear on the computer screen when you connect your camera (page 48). You cannot print an image. • Check the printer settings. Shoot using the supplied cable for multi-use terminal (page 56). • Follow the designated copy procedure for a Windows computer. 1 Right...
Operating Instructions
Page 85
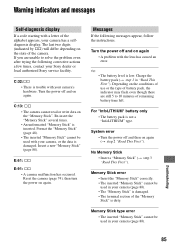
... are still 5 to solve the problem even after trying the following messages appear, follow the instructions. Turn the power off and on again. Reset the camera (page 74), then turn the power on again. For "InfoLITHIUM" battery only • The battery pack is low. Memory Stick error • Insert the "Memory Stick" correctly. • The inserted "Memory Stick" cannot be used with your Sony dealer or local authorized Sony service...
... are still 5 to solve the problem even after trying the following messages appear, follow the instructions. Turn the power off and on again. Reset the camera (page 74), then turn the power on again. For "InfoLITHIUM" battery only • The battery pack is low. Memory Stick error • Insert the "Memory Stick" correctly. • The inserted "Memory Stick" cannot be used with your Sony dealer or local authorized Sony service...


