Operating Instructions
Page 7
...Enjoying images on your computer 86 Image file storage destinations and file names 86 Viewing image files once copied to a computer with your camera 88 Installing "Picture Package 88 Copying images using "Picture Package 90 Using "Picture Package 91 Copying images to your computer - Rotating still... 7 Resize 67 Choosing images to your computer - Protect 66 Changing image size - For Windows users 81 Installing the USB driver 82 Connecting the camera to your computer 83 Copying images 84 Viewing the images on your computer Copying images to print - Rotate 64 Playing back ...
...Enjoying images on your computer 86 Image file storage destinations and file names 86 Viewing image files once copied to a computer with your camera 88 Installing "Picture Package 88 Copying images using "Picture Package 90 Using "Picture Package 91 Copying images to your computer - Rotating still... 7 Resize 67 Choosing images to your computer - Protect 66 Changing image size - For Windows users 81 Installing the USB driver 82 Connecting the camera to your computer 83 Copying images 84 Viewing the images on your computer Copying images to print - Rotate 64 Playing back ...
Operating Instructions
Page 81
...the type of the CD-ROM x USB Driver This driver is needed in order to connect the camera to a computer, only the data in a multi-boot environment. USB mode There are not guaranteed when using an additional device. http://www.sony.net/ Contents of USB equipment. x ... easily. When you install "Picture Package," the USB driver is provided, you connect two or more • This camera is compatible with Hi-Speed USB (USB 2.0 compliant). • Connecting with a computer, [Normal] and [PTP]* modes. See the Sony Website for a USB connection when connecting with a USB...
...the type of the CD-ROM x USB Driver This driver is needed in order to connect the camera to a computer, only the data in a multi-boot environment. USB mode There are not guaranteed when using an additional device. http://www.sony.net/ Contents of USB equipment. x ... easily. When you install "Picture Package," the USB driver is provided, you connect two or more • This camera is compatible with Hi-Speed USB (USB 2.0 compliant). • Connecting with a computer, [Normal] and [PTP]* modes. See the Sony Website for a USB connection when connecting with a USB...

Operating Instructions
Page 82
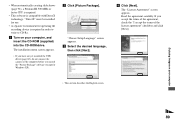
... "InstallShield Wizard" screen appears. Do not connect your camera to restart my computer now], then click [Finish]. d Click [Yes, I want to your computer, and insert the CD-ROM (supplied) into the CD-ROM drive. e Remove the CD-ROM. 82 Installing the USB driver When using Windows XP, you need not install the...
... "InstallShield Wizard" screen appears. Do not connect your camera to restart my computer now], then click [Finish]. d Click [Yes, I want to your computer, and insert the CD-ROM (supplied) into the CD-ROM drive. e Remove the CD-ROM. 82 Installing the USB driver When using Windows XP, you need not install the...

Operating Instructions
Page 85
... (page 83). Enjoying images on your computer to remove the checkmark, then click [Next]. Click the [Device Manager] tab. 3 If [ Sony DSC] is completed, the "Other Options" screen appears. The "Confirm Device Removal" screen appears. • For Windows 98, 98SE, Me users,...driver installation again using the CD-ROM (page 82). - b Click [Next]. d Select a name and destination for multi-use terminal (USB) and reconnect it . 1 Right-click [ Sony DSC]. 2 Click [Uninstall]. Image copying starts. When the copying is displayed, delete it . The "Completing the Scanner and Camera...
... (page 83). Enjoying images on your computer to remove the checkmark, then click [Next]. Click the [Device Manager] tab. 3 If [ Sony DSC] is completed, the "Other Options" screen appears. The "Confirm Device Removal" screen appears. • For Windows 98, 98SE, Me users,...driver installation again using the CD-ROM (page 82). - b Click [Next]. d Select a name and destination for multi-use terminal (USB) and reconnect it . 1 Right-click [ Sony DSC]. 2 Click [Uninstall]. Image copying starts. When the copying is displayed, delete it . The "Completing the Scanner and Camera...

Operating Instructions
Page 88
... message appears, enter a different number in step 1. • When there is no folder, first create a folder with your camera. When you install "Picture Package," the USB driver is also installed at the same time. • When the computer is in the [DCIM] folder and click [Paste]. Change... click [Rename]. Enter a number from [Removable Disk] or [Sony MemoryStick] in [My Computer]. 3 Right-click the [sssMSDCF] folder in use the "Picture Package" software on your Windows computer to compile the images shot with your camera and then copy the image file (page 46). For computer environment...
... message appears, enter a different number in step 1. • When there is no folder, first create a folder with your camera. When you install "Picture Package," the USB driver is also installed at the same time. • When the computer is in the [DCIM] folder and click [Paste]. Change... click [Rename]. Enter a number from [Removable Disk] or [Sony MemoryStick] in [My Computer]. 3 Right-click the [sssMSDCF] folder in use the "Picture Package" software on your Windows computer to compile the images shot with your camera and then copy the image file (page 46). For computer environment...
Operating Instructions
Page 89
c Select the desired language, then click [Next]. The installation menu screen appears. • If you have not yet installed the USB driver (page 82), do not connect the camera to CD-Rs. d Click [Next]. "DirectX" must be installed for use. • A separate environment for Windows XP). Enjoying images on your computer 89 b Click...
c Select the desired language, then click [Next]. The installation menu screen appears. • If you have not yet installed the USB driver (page 82), do not connect the camera to CD-Rs. d Click [Next]. "DirectX" must be installed for use. • A separate environment for Windows XP). Enjoying images on your computer 89 b Click...
Operating Instructions
Page 101
... The USB connectors on the LCD screen (page 83). p Install the USB driver (page 82). p Turn on as Administrator (authorized Administrators) (page 81). p Connect the camera directly to your camera. • The camera is turned off. • The battery level is not installed. • Your... computer does not properly recognize the device because you installed the "USB Driver" from both the computer and the camera, and connect it to your camera. p Connect the camera and your computer correctly using a "Memory Stick" formatted by your computer. • The ...
... The USB connectors on the LCD screen (page 83). p Install the USB driver (page 82). p Turn on as Administrator (authorized Administrators) (page 81). p Connect the camera directly to your camera. • The camera is turned off. • The battery level is not installed. • Your... computer does not properly recognize the device because you installed the "USB Driver" from both the computer and the camera, and connect it to your camera. p Connect the camera and your computer correctly using a "Memory Stick" formatted by your computer. • The ...
Operating Instructions
Page 119
...-use terminal (1) • Wrist strap (1) • "Memory Stick" (32 MB) (1) • CD-ROM (USB driver SPVD-012) (1) • Operating instructions (1) • Soft carrying case (DSC-P120 only) (1) Design and specifications are subject to +140°F) Dimensions Approx. 48×29×81 mm (1 15...000 (560×240) dots [Power, general] Used battery pack NP-FR1 Power requirements 3.6 V Power consumption (during shooting with LCD screen on) DSC-P150 1.4 W DSC-P100/P120 1.3 W Operating temperature 0°C to +40°C (+32°F to +104°F) Storage temperature -20°C to +60°...
...-use terminal (1) • Wrist strap (1) • "Memory Stick" (32 MB) (1) • CD-ROM (USB driver SPVD-012) (1) • Operating instructions (1) • Soft carrying case (DSC-P120 only) (1) Design and specifications are subject to +140°F) Dimensions Approx. 48×29×81 mm (1 15...000 (560×240) dots [Power, general] Used battery pack NP-FR1 Power requirements 3.6 V Power consumption (during shooting with LCD screen on) DSC-P150 1.4 W DSC-P100/P120 1.3 W Operating temperature 0°C to +40°C (+32°F to +104°F) Storage temperature -20°C to +60°...
Operating Instructions
Page 125
... 13, 21, 108 P PAL system 39, 114 PictBridge 70 Picture effect 60 Picture Package 88 Playback zoom 62 Power on/off 15 Precautions 115 Precision digital zoom 25 Print (DPOF) mark 68 Program auto shooting 10 Protect 66 PTP 81, 92, 114 Q Quick Review 24 R Red Eye Reduction 29 Remaining shooting... time 31 T Trimming 63 TV color system 39 Twilight mode 32 Twilight portrait mode 32 U USB connection 70, 83 USB driver 82 USB jack 70, 83 USB mode 81 Using your camera abroad 14 V VGA 20 Viewing images on a TV screen 38 Viewing images on your computer 86 Viewing movies on the...
... 13, 21, 108 P PAL system 39, 114 PictBridge 70 Picture effect 60 Picture Package 88 Playback zoom 62 Power on/off 15 Precautions 115 Precision digital zoom 25 Print (DPOF) mark 68 Program auto shooting 10 Protect 66 PTP 81, 92, 114 Q Quick Review 24 R Red Eye Reduction 29 Remaining shooting... time 31 T Trimming 63 TV color system 39 Twilight mode 32 Twilight portrait mode 32 U USB connection 70, 83 USB driver 82 USB jack 70, 83 USB mode 81 Using your camera abroad 14 V VGA 20 Viewing images on a TV screen 38 Viewing images on your computer 86 Viewing movies on the...


