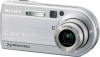
Operating Instructions
Page 2
... is connected. - If this product, you have any changes or modifications not expressly approved in this equipment. The supplied interface cable must be used in a residential installation. Address: 16450 W. Bernardo Dr, San Diego, CA 92127 U.S.A. CAUTION You are designed...interference by turning the equipment off and on, the user is for a Class B digital device, pursuant to constitute a risk of Conformity Trade Name: SONY Model No.: DSC-P150 Responsible Party: Sony Electronics Inc. Address: 16450 W. WARNING To prevent fire or shock hazard, do not...
... is connected. - If this product, you have any changes or modifications not expressly approved in this equipment. The supplied interface cable must be used in a residential installation. Address: 16450 W. Bernardo Dr, San Diego, CA 92127 U.S.A. CAUTION You are designed...interference by turning the equipment off and on, the user is for a Class B digital device, pursuant to constitute a risk of Conformity Trade Name: SONY Model No.: DSC-P150 Responsible Party: Sony Electronics Inc. Address: 16450 W. WARNING To prevent fire or shock hazard, do not...
Operating Instructions
Page 3
...to discontinue midway (fail), restart the application or disconnect and connect the cable for using connection cables shorter than 3 meters (9.8 feet). and Canada THIS DEVICE COMPLIES WITH ...) again. Notice If static electricity or electromagnetism causes data transfer to power this camera. "Memory Stick" For the Customers in the U.S.A. Notice Certain countries and regions...the supplied one and approved by returning your local authority. 3 THIS CLASS B DIGITAL APPARATUS COMPLIES WITH CANADIAN ICES-003. Please consult with or mark) must be replaced...Sony service station.
...to discontinue midway (fail), restart the application or disconnect and connect the cable for using connection cables shorter than 3 meters (9.8 feet). and Canada THIS DEVICE COMPLIES WITH ...) again. Notice If static electricity or electromagnetism causes data transfer to power this camera. "Memory Stick" For the Customers in the U.S.A. Notice Certain countries and regions...the supplied one and approved by returning your local authority. 3 THIS CLASS B DIGITAL APPARATUS COMPLIES WITH CANADIAN ICES-003. Please consult with or mark) must be replaced...Sony service station.
Operating Instructions
Page 15
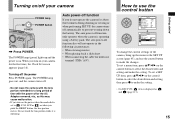
... select the desired item and setting and make the setting. • On DSC-P150, item is on /off function only operates when the camera is operating. Auto power-off function If you do not operate the camera for about three minutes during shooting or viewing or when performing SET UP, ...cable for the first time, the Clock Set screen appears (page 16). Turning on . To set to prevent wearing down the battery. Do not touch the lens portion while it is operating using a battery pack. The auto power-off your camera for multi-use the control button Camera AF Mode: Digital...
... select the desired item and setting and make the setting. • On DSC-P150, item is on /off function only operates when the camera is operating. Auto power-off function If you do not operate the camera for about three minutes during shooting or viewing or when performing SET UP, ...cable for the first time, the Clock Set screen appears (page 16). Turning on . To set to prevent wearing down the battery. Do not touch the lens portion while it is operating using a battery pack. The auto power-off your camera for multi-use the control button Camera AF Mode: Digital...

Operating Instructions
Page 38
Viewing images on a TV screen 60min VGA 101 2/9 To multi connector 1 Cable for multi-use terminal (A/V) , Connect the supplied cable for multi-use terminal (A/V) to the multi connector of the camera and the audio/video input jacks of this switch may be necessary to switch the video output signal to ...TV has stereo input jacks, connect the audio plug (black) of the cable for multi-use terminal (A/V) to the left audio jack. • Turn off both your camera and the TV before connecting the camera and the TV with the cable for multi-use terminal (A/V). 2 TV/Video switch , Turn on the ...
Viewing images on a TV screen 60min VGA 101 2/9 To multi connector 1 Cable for multi-use terminal (A/V) , Connect the supplied cable for multi-use terminal (A/V) to the multi connector of the camera and the audio/video input jacks of this switch may be necessary to switch the video output signal to ...TV has stereo input jacks, connect the audio plug (black) of the cable for multi-use terminal (A/V) to the left audio jack. • Turn off both your camera and the TV before connecting the camera and the TV with the cable for multi-use terminal (A/V). 2 TV/Video switch , Turn on the ...

Operating Instructions
Page 39
The color system of the TV must match that of your digital still camera. PAL system Australia, Austria, Belgium, China, Czech Republic, Denmark, Finland, Germany, Holland, Hong Kong, Hungary, Italy, Kuwait, Malaysia, New Zealand, Norway, Poland, Portugal, Singapore, ... images Viewing images on a TV screen If you want to view images on a TV screen, you need a TV with a video input jack and the supplied cable for multi-use terminal (A/V). Check the following lists: NTSC system Bahama Islands, Bolivia, Canada, Central America, Chile, Colombia, Ecuador, Jamaica, Japan, Korea, Mexico, Peru,...
The color system of the TV must match that of your digital still camera. PAL system Australia, Austria, Belgium, China, Czech Republic, Denmark, Finland, Germany, Holland, Hong Kong, Hungary, Italy, Kuwait, Malaysia, New Zealand, Norway, Poland, Portugal, Singapore, ... images Viewing images on a TV screen If you want to view images on a TV screen, you need a TV with a video input jack and the supplied cable for multi-use terminal (A/V). Check the following lists: NTSC system Bahama Islands, Bolivia, Canada, Central America, Chile, Colombia, Ecuador, Jamaica, Japan, Korea, Mexico, Peru,...

Operating Instructions
Page 70
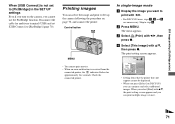
...cable for multi-use terminal (USB). For preparation, you can easily print images shot using your camera and the USB jack on the LCD screen. 1M 101 2/9 101-0002 2005 1 1 10:30AM BACK/NEXT VOLUME Printer Mode dial Even if you do not have a computer, you only set . • On DSC-P150..., item is displayed as 1 and (page 113). 2 70 Connecting the camera to the printer Connect the multi connector on a printer. • Using the AC Adaptor is made, the indicator appears ...
...cable for multi-use terminal (USB). For preparation, you can easily print images shot using your camera and the USB jack on the LCD screen. 1M 101 2/9 101-0002 2005 1 1 10:30AM BACK/NEXT VOLUME Printer Mode dial Even if you do not have a computer, you only set . • On DSC-P150..., item is displayed as 1 and (page 113). 2 70 Connecting the camera to the printer Connect the multi connector on a printer. • Using the AC Adaptor is made, the indicator appears ...
Operating Instructions
Page 71
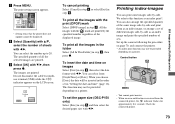
... use terminal (USB) and set to [PictBridge] (page 70). Set up the camera following the procedure on the camera, you can print multiple images at once. 71 Check the connected printer. Skip to... items that the printer does not support cannot be displayed. • When you press [Select] on DSC-P150, you select [Print] with b/B, then press z. When you can select the image and print it....you want to step 4. b Press MENU. d Select [This image] with b/B. • For DSC-P150 users, steps 1, 2 and 3 are unnecessary. In single-image mode a Display the image you turn on ...
... use terminal (USB) and set to [PictBridge] (page 70). Set up the camera following the procedure on the camera, you can print multiple images at once. 71 Check the connected printer. Skip to... items that the printer does not support cannot be displayed. • When you press [Select] on DSC-P150, you select [Print] with b/B, then press z. When you can select the image and print it....you want to step 4. b Press MENU. d Select [This image] with b/B. • For DSC-P150 users, steps 1, 2 and 3 are unnecessary. In single-image mode a Display the image you turn on ...

Operating Instructions
Page 72
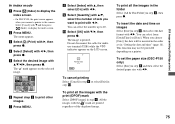
... SELECT MENU TONEXT f Repeat step 5 to the camera. f Select [OK] with B, then press z. You can select the number up to 20. c Select (Print) with V/B, then press z. This function may not be inserted in the order set the paper size (DSC-P150 only) Select [Size] in "Setting the date ...the print (DPOF) mark Select [DPOF image] in step 4. The mark appears on a printer. Do not disconnect the cable for multiuse terminal (USB) while the (Not disconnect USB multi cable) indicator appears on images Select [Date] in step 6. All the images with b/B, then press z. To set in ...
... SELECT MENU TONEXT f Repeat step 5 to the camera. f Select [OK] with B, then press z. You can select the number up to 20. c Select (Print) with V/B, then press z. This function may not be inserted in the order set the paper size (DSC-P150 only) Select [Size] in "Setting the date ...the print (DPOF) mark Select [DPOF image] in step 4. The mark appears on a printer. Do not disconnect the cable for multiuse terminal (USB) while the (Not disconnect USB multi cable) indicator appears on images Select [Date] in step 6. All the images with b/B, then press z. To set in ...
Operating Instructions
Page 73
Do not disconnect the cable for approximately five seconds. All the images with the mark are printed by -side. To insert the ... 70, and connect the printer. * An index print function may not be displayed. You can select the number up the camera following the procedure on a printer. Set up to this function as an index image and print the specified number of the ... the number of all the images with b/B. This function may not be inserted in the order set the paper size (DSC-P150 only) Select [Size] in "Setting the date and time" (page 16). g Press MENU.
Do not disconnect the cable for approximately five seconds. All the images with the mark are printed by -side. To insert the ... 70, and connect the printer. * An index print function may not be displayed. You can select the number up the camera following the procedure on a printer. Set up to this function as an index image and print the specified number of the ... the number of all the images with b/B. This function may not be inserted in the order set the paper size (DSC-P150 only) Select [Size] in "Setting the date and time" (page 16). g Press MENU.

Operating Instructions
Page 74
... quantity of an image side-by -side with the mark are unnecessary. Do not disconnect the cable for multiuse terminal (USB) while the (Not disconnect USB multi cable) indicator appears on DSC-P150, you press [Select] on the LCD screen. Printing Index 1/1 Exit To cancel printing Select ...[Cancel] in step 4 or select [Exit] in "Setting the date and time" (page 16). Select [Print] with b/B. • For DSC-P150 users, steps 1, 2 and...
... quantity of an image side-by -side with the mark are unnecessary. Do not disconnect the cable for multiuse terminal (USB) while the (Not disconnect USB multi cable) indicator appears on DSC-P150, you press [Select] on the LCD screen. Printing Index 1/1 Exit To cancel printing Select ...[Cancel] in step 4 or select [Exit] in "Setting the date and time" (page 16). Select [Print] with b/B. • For DSC-P150 users, steps 1, 2 and...
Operating Instructions
Page 75
...The image is printed. All the images with the mark are printed regardless of sets you want to the camera. This function may not be inserted in the order set the paper size (DSC-P150 only) Select [Size] in step 0. The mark appears on a printer. To set in step 4. Printing... all the images in the folder Select [All In This Folder] in step 9, then select the date format with b/B. 75 Do not disconnect the cable for multiuse terminal (USB) while the indicator appears on images Select [Date] in step 4, then press z. When you connect a printer to print ...
...The image is printed. All the images with the mark are printed regardless of sets you want to the camera. This function may not be inserted in the order set the paper size (DSC-P150 only) Select [Size] in step 0. The mark appears on a printer. To set in step 4. Printing... all the images in the folder Select [All In This Folder] in step 9, then select the date format with b/B. 75 Do not disconnect the cable for multiuse terminal (USB) while the indicator appears on images Select [Date] in step 4, then press z. When you connect a printer to print ...

Operating Instructions
Page 76
...changes as follows: Indicators off t LCD screen off t Indicators on the screen and the camera starts recording the image and sound. Shooting close-ups (Macro) Set the mode dial to [640(Fine)] while connecting the cable for a split second. • For the recording time in each movie mode, see ...page 121. Inserting the date and time • When you press , the status of the indicators, see page 108. 76 c Select the desired size with sound using your camera. Using the self...
...changes as follows: Indicators off t LCD screen off t Indicators on the screen and the camera starts recording the image and sound. Shooting close-ups (Macro) Set the mode dial to [640(Fine)] while connecting the cable for a split second. • For the recording time in each movie mode, see ...page 121. Inserting the date and time • When you press , the status of the indicators, see page 108. 76 c Select the desired size with sound using your camera. Using the self...

Operating Instructions
Page 83
... the supplied cable for multiuse terminal (USB) to your computer. • When you use a desktop computer, we recommend that you use terminal (USB) to . USB Mode Normal Switch on MENU Access indicators* "USB Mode Normal" appears on the LCD screen of the camera. • Place the camera with the ...images you want to page 85. c Set the mode dial to the multi connector of the camera. Do not operate the computer until the indicators turn red. e Connect the cable for multi-use the AC Adaptor. Proceed to copy into a wall outlet (wall socket). 1 AC Adaptor 2 To a...
... the supplied cable for multiuse terminal (USB) to your computer. • When you use a desktop computer, we recommend that you use terminal (USB) to . USB Mode Normal Switch on MENU Access indicators* "USB Mode Normal" appears on the LCD screen of the camera. • Place the camera with the ...images you want to page 85. c Set the mode dial to the multi connector of the camera. Do not operate the computer until the indicators turn red. e Connect the cable for multi-use the AC Adaptor. Proceed to copy into a wall outlet (wall socket). 1 AC Adaptor 2 To a...
Operating Instructions
Page 84
... change the file name to play back images with the same file name exists in your camera. P Disconnecting the cable for multi-use terminal (USB), removing the "Memory Stick," or turning off the camera. Step 4 is deleted. c Right-click the image file to the "My Documents" ...My Computer], then double-click [Removable Disk]. d Double-click the [My Documents] folder and rightclick on the tasktray. Double-click here 2 Click (Sony DSC), then click [Stop]. 3 Confirm the device on the screen are stored. b Double-click [DCIM], then double-click the folder that the access ...
... change the file name to play back images with the same file name exists in your camera. P Disconnecting the cable for multi-use terminal (USB), removing the "Memory Stick," or turning off the camera. Step 4 is deleted. c Right-click the image file to the "My Documents" ...My Computer], then double-click [Removable Disk]. d Double-click the [My Documents] folder and rightclick on the tasktray. Double-click here 2 Click (Sony DSC), then click [Stop]. 3 Confirm the device on the screen are stored. b Double-click [DCIM], then double-click the folder that the access ...

Operating Instructions
Page 85
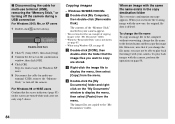
...Sony DSC]. 2 Click [Uninstall]. I'm finished working with these pictures], then click [Next]. The wizard closes. • To continue copying other images, follow the procedure given under P on page 84 to a folder on my computer using Microsoft Scanner and Camera Wizard], then click [OK]. The device is unnecessary. Click [Copy pictures to disconnect the cable... icon is not shown 1 Right-click [My Computer] to remove the checkmark, then click [Next]. Click the [Device Manager] tab. 3 If [ Sony DSC] is completed, the "Other Options" screen appears. e Select [Nothing.
...Sony DSC]. 2 Click [Uninstall]. I'm finished working with these pictures], then click [Next]. The wizard closes. • To continue copying other images, follow the procedure given under P on page 84 to a folder on my computer using Microsoft Scanner and Camera Wizard], then click [OK]. The device is unnecessary. Click [Copy pictures to disconnect the cable... icon is not shown 1 Right-click [My Computer] to remove the checkmark, then click [Next]. Click the [Device Manager] tab. 3 If [ Sony DSC] is completed, the "Other Options" screen appears. e Select [Nothing.
Operating Instructions
Page 90
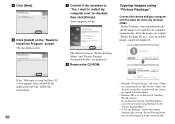
.... • Windows XP is checked, then click [Finish]. If you deactivate the OS AutoPlay Wizard, cancel the activation using "Picture Package" Connect the camera and your computer with the cable for Direct X" screen appears after you install the application software, follow the instructions. 90 • Normally "Picture Package" and "Date" folders are...
.... • Windows XP is checked, then click [Finish]. If you deactivate the OS AutoPlay Wizard, cancel the activation using "Picture Package" Connect the camera and your computer with the cable for Direct X" screen appears after you install the application software, follow the instructions. 90 • Normally "Picture Package" and "Date" folders are...
Operating Instructions
Page 93
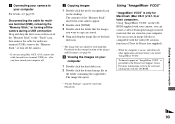
... turned your computer off. Technical support of the "Memory Stick" to the "Trash" icon, then remove the cable for multiuse terminal (USB), removing the "Memory Stick," or turning off the camera. • If you are using the image or movie materials that the images you can create an image file... that is in your hard disk. a Connecting your camera to your computer For details, see page 86. Disconnecting the cable for multi-use terminal (USB), remove the "Memory Stick," or turn off the camera during a USB connection Drag and drop the drive icon or the icon of...
... turned your computer off. Technical support of the "Memory Stick" to the "Trash" icon, then remove the cable for multiuse terminal (USB), removing the "Memory Stick," or turning off the camera. • If you are using the image or movie materials that the images you can create an image file... that is in your hard disk. a Connecting your camera to your computer For details, see page 86. Disconnecting the cable for multi-use terminal (USB), remove the "Memory Stick," or turn off the camera during a USB connection Drag and drop the drive icon or the icon of...

Operating Instructions
Page 97
... when - shooting movies. Smart zoom does not function. • [Digital Zoom] is set to [Precision]or [Off] in the SET UP settings. • The image size is set to the other settings except [7M] (DSC-P150), [5M] (DSC-P100/P120) and [3:2] (pages 19 and 25). Troubleshooting The image ...or (Fireworks mode) (page 35). p Set image size to the auto focus mode (page 49). The image is too low. p Disconnect the cable for multi-use terminal (A/V) is connected to position the lens farther away from the subject than the shortest shooting distance when shooting (page 26). p ...
... when - shooting movies. Smart zoom does not function. • [Digital Zoom] is set to [Precision]or [Off] in the SET UP settings. • The image size is set to the other settings except [7M] (DSC-P150), [5M] (DSC-P100/P120) and [3:2] (pages 19 and 25). Troubleshooting The image ...or (Fireworks mode) (page 35). p Set image size to the auto focus mode (page 49). The image is too low. p Disconnect the cable for multi-use terminal (A/V) is connected to position the lens farther away from the subject than the shortest shooting distance when shooting (page 26). p ...
Operating Instructions
Page 101
... connected to other equipment besides the keyboard, the mouse, and your camera. • The camera is not connected directly to your computer with the cable for multi-use terminal (USB) (page 83). p Connect the camera directly to shoot using the correct copy procedure for multi-use terminal... the supplied CD-ROM. p Check "Recommended computer environment" (pages 81 and 92). p Connect the camera and your computer correctly using the supplied cable for your OS. • You attempted to your camera. p Install the USB driver (page 82). of your computer (page 85), then install the USB ...
... connected to other equipment besides the keyboard, the mouse, and your camera. • The camera is not connected directly to your computer with the cable for multi-use terminal (USB) (page 83). p Connect the camera directly to shoot using the correct copy procedure for multi-use terminal... the supplied CD-ROM. p Check "Recommended computer environment" (pages 81 and 92). p Connect the camera and your computer correctly using the supplied cable for your OS. • You attempted to your camera. p Install the USB driver (page 82). of your computer (page 85), then install the USB ...
Operating Instructions
Page 103
... printer is not turned on. • If you select [Exit] during printing, you cannot print still, disconnect the cable for multiuse terminal (USB), turn off and on and can connect with the camera. is printed on the • The recording date data is turned on the printer, then connect the... cable for multi-use terminal (USB) again. - - Troubleshooting 103 camera. • [USB Connect] is not set for the connection with the p Check that the printer is not recorded on your printer. •...
... printer is not turned on. • If you select [Exit] during printing, you cannot print still, disconnect the cable for multiuse terminal (USB), turn off and on and can connect with the camera. is printed on the • The recording date data is turned on the printer, then connect the... cable for multi-use terminal (USB) again. - - Troubleshooting 103 camera. • [USB Connect] is not set for the connection with the p Check that the printer is not recorded on your printer. •...


