
Operating Instructions
Page 2
...or moisture. However, there is connected. - Consult the dealer or an experienced radio/ TV technician for a Class B digital device, pursuant to persons. Note: Model DSC-M1 is subject to the following measures: - If this device must be determined by one or more of the FCC Rules....in order to comply with the instructions, may call: Sony Customer Information Services Center 1-800-222-SONY (7669) The number below is intended to alert the user to radio communications. Address: 16450 W. The supplied interface cable must accept any questions about this equipment. This symbol is...
...or moisture. However, there is connected. - Consult the dealer or an experienced radio/ TV technician for a Class B digital device, pursuant to persons. Note: Model DSC-M1 is subject to the following measures: - If this device must be determined by one or more of the FCC Rules....in order to comply with the instructions, may call: Sony Customer Information Services Center 1-800-222-SONY (7669) The number below is intended to alert the user to radio communications. Address: 16450 W. The supplied interface cable must accept any questions about this equipment. This symbol is...

Operating Instructions
Page 3
..., or visit http://www.rbrc.org/ Caution: Do not handle damaged or leaking Lithium-Ion batteries. "Memory Stick" For the Customers in the U.S.A. THIS CLASS B DIGITAL APPARATUS COMPLIES WITH CANADIAN ICES-003. Notice If static electricity or electromagnetism causes data transfer to the collection and recycling location nearest you. and Canada.... You can help preserve our environment by returning your used rechargeable batteries to discontinue midway (fail), restart the application or disconnect and connect the USB cable again. 3
..., or visit http://www.rbrc.org/ Caution: Do not handle damaged or leaking Lithium-Ion batteries. "Memory Stick" For the Customers in the U.S.A. THIS CLASS B DIGITAL APPARATUS COMPLIES WITH CANADIAN ICES-003. Notice If static electricity or electromagnetism causes data transfer to the collection and recycling location nearest you. and Canada.... You can help preserve our environment by returning your used rechargeable batteries to discontinue midway (fail), restart the application or disconnect and connect the USB cable again. 3
Operating Instructions
Page 15
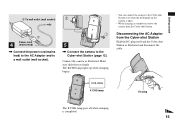
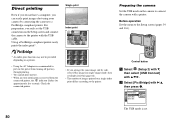
The /CHG lamp lights up when charging begins. • You can connect the camera to the Cyber-shot Station (page 12). Disconnecting the AC Adaptor from the Cyber-shot Station Hold the DC plug itself and the Cyber-shot ... the AC Adaptor and to a wall outlet (wall socket). 2 1 3 5 , Connect the camera to the Cyber-shot Station even when the LCD panel on the camera is open. • When charging is completed. 15 Connect the camera as illustrated and disconnect the cable. /CHG /CHG lamp DC plug The /CHG lamp goes off when charging...
The /CHG lamp lights up when charging begins. • You can connect the camera to the Cyber-shot Station (page 12). Disconnecting the AC Adaptor from the Cyber-shot Station Hold the DC plug itself and the Cyber-shot ... the AC Adaptor and to a wall outlet (wall socket). 2 1 3 5 , Connect the camera to the Cyber-shot Station even when the LCD panel on the camera is open. • When charging is completed. 15 Connect the camera as illustrated and disconnect the cable. /CHG /CHG lamp DC plug The /CHG lamp goes off when charging...
Operating Instructions
Page 30
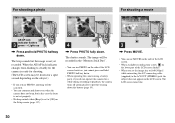
...flashes green t Lights up , Press and hold PHOTO halfway down. • When operating the camera using a battery pack, if you do not operate the camera for a split second depending on the subject.) • If you release PHOTO, shooting will ...be canceled. • You can continue and shoot even when the camera does not beep, but the image is not yet recorded. The image will be recorded in this case the... set the image size to [640(30fps)] while connecting the A/V connecting cable (supplied) to [Off] on the LCD screen. The shutter sounds.
...flashes green t Lights up , Press and hold PHOTO halfway down. • When operating the camera using a battery pack, if you do not operate the camera for a split second depending on the subject.) • If you release PHOTO, shooting will ...be canceled. • You can continue and shoot even when the camera does not beep, but the image is not yet recorded. The image will be recorded in this case the... set the image size to [640(30fps)] while connecting the A/V connecting cable (supplied) to [Off] on the LCD screen. The shutter sounds.
Operating Instructions
Page 46
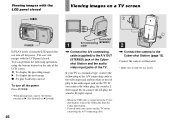
... the Cyber-shot Station. • Turn off the power. Connect the camera as B (fast-forward) or b (rewind). 46 To A/V OUT 1 A/V connecting (STEREO) cable , Connect the A/V connecting cable (supplied) to the A/V OUT (STEREO) jack of the Cybershot Station and the audio/ video input jacks of the TV. Viewing images.... • Make sure to slide the tray firmly. If your camera and the TV before connecting the A/V connecting cable. 1 3 2 , Connect the camera to the audio input jack on the side of the A/V connecting cable to the video input jack and the white or the red plug to...
... the Cyber-shot Station. • Turn off the power. Connect the camera as B (fast-forward) or b (rewind). 46 To A/V OUT 1 A/V connecting (STEREO) cable , Connect the A/V connecting cable (supplied) to the A/V OUT (STEREO) jack of the Cybershot Station and the audio/ video input jacks of the TV. Viewing images.... • Make sure to slide the tray firmly. If your camera and the TV before connecting the A/V connecting cable. 1 3 2 , Connect the camera to the audio input jack on the side of the A/V connecting cable to the video input jack and the white or the red plug to...
Operating Instructions
Page 48
The color system of the TV must match that of your digital still camera. Check the following lists: NTSC system Bahama Islands, Bolivia, Canada, Central America, Chile, Colombia, Ecuador, Jamaica, Japan, Korea, Mexico, Peru, Surinam, Taiwan, the Philippines, the U.S.A., ..., etc. Viewing images on a TV screen If you want to view images on a TV screen, you need a TV with a video input jack and the A/V connecting cable (supplied).
The color system of the TV must match that of your digital still camera. Check the following lists: NTSC system Bahama Islands, Bolivia, Canada, Central America, Chile, Colombia, Ecuador, Jamaica, Japan, Korea, Mexico, Peru, Surinam, Taiwan, the Philippines, the U.S.A., ..., etc. Viewing images on a TV screen If you want to view images on a TV screen, you need a TV with a video input jack and the A/V connecting cable (supplied).
Operating Instructions
Page 80
... cannot print movies. • When an error notification is set the USB connection on a single index print differs according to connect the camera with the USB cable. Direct printing Even if you do not have a computer, you only set . Before operation Set the menu to the Setup screen (...pages 54 and 116). * An index print function may not be provided depending on the camera to the printer. Control button a Select (Setup 2) with V, ...
... cannot print movies. • When an error notification is set the USB connection on a single index print differs according to connect the camera with the USB cable. Direct printing Even if you do not have a computer, you only set . Before operation Set the menu to the Setup screen (...pages 54 and 116). * An index print function may not be provided depending on the camera to the printer. Control button a Select (Setup 2) with V, ...

Operating Instructions
Page 81
...Folder DPOF image Select This image Cancel All In This Folder Prints all the images with the USB cable (supplied). DPOF image Prints all the images in the folder. Disconnect the USB cable from the Cyber-shot Station and set to PLAY mode regardless of the current mode, and an ...regardless of the Cyber-shot Station and the USB jack on the LCD screen. The camera turns to [PictBridge] on the Setup screen Even if you turn on the camera and printer. Turn on the camera, you connect the camera and a printer, the print menu appears. MODE Still image printing After the connection ...
...Folder DPOF image Select This image Cancel All In This Folder Prints all the images with the USB cable (supplied). DPOF image Prints all the images in the folder. Disconnect the USB cable from the Cyber-shot Station and set to PLAY mode regardless of the current mode, and an ...regardless of the Cyber-shot Station and the USB jack on the LCD screen. The camera turns to [PictBridge] on the Setup screen Even if you turn on the camera and printer. Turn on the camera, you connect the camera and a printer, the print menu appears. MODE Still image printing After the connection ...

Operating Instructions
Page 82
... [Date] for [Date] setting, the date will be arranged on a single sheet. • Depending on a single sheet. Do not disconnect the USB cable while the (Not disconnect USB cable) indicator appears on a printer. • Setting items the printer does not support cannot be provided depending on the LCD screen. b Set the print...
... [Date] for [Date] setting, the date will be arranged on a single sheet. • Depending on a single sheet. Do not disconnect the USB cable while the (Not disconnect USB cable) indicator appears on a printer. • Setting items the printer does not support cannot be provided depending on the LCD screen. b Set the print...

Operating Instructions
Page 83
... on a single sheet. Date function may not be possible to arrange all the images in the folder. Do not disconnect the USB cable while the (Not disconnect USB cable) indicator appears on the number of index-images, it may not be inserted in the order set to [Off]: the number of.... Print Cancel Select DPOF image Select Selects the images in step 7. 83 DPOF image Prints all the selected images. 1 Select the image you connect your camera to the printer, the print menu appears. g Select [OK] with MODE, then slide the (index) lever to the upper position once to display the ...
... on a single sheet. Date function may not be possible to arrange all the images in the folder. Do not disconnect the USB cable while the (Not disconnect USB cable) indicator appears on the number of index-images, it may not be inserted in the order set to [Off]: the number of.... Print Cancel Select DPOF image Select Selects the images in step 7. 83 DPOF image Prints all the selected images. 1 Select the image you connect your camera to the printer, the print menu appears. g Select [OK] with MODE, then slide the (index) lever to the upper position once to display the ...

Operating Instructions
Page 88
... for a while. * During communication, the access indicators turn red. d Connect the USB cable to the (USB) jack of the camera. c Connect the Cyber-shot Station (supplied) and the AC Adaptor (supplied), and plug the adaptor into the camera. f Connect the camera to copy into a wall outlet (wall socket). POWER • Make sure to page...
... for a while. * During communication, the access indicators turn red. d Connect the USB cable to the (USB) jack of the camera. c Connect the Cyber-shot Station (supplied) and the AC Adaptor (supplied), and plug the adaptor into the camera. f Connect the camera to copy into a wall outlet (wall socket). POWER • Make sure to page...
Operating Instructions
Page 89
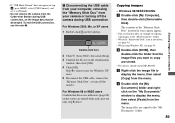
...Documents" folder. • When the "Removable Disk" icon is unnecessary for Windows XP users. 5 Disconnect the USB cable, remove the "Memory Stick Duo", or turn off the camera during USB connection, as the image data may be destroyed. Windows 98/98SE/2000/Me a Double-click [My ...Sony DSC), then click [Stop]. 3 Confirm the device on the tasktray. The contents of the "Memory Stick Duo" inserted in step 6, press MENU, select [USB Connect], and set it to [Normal]. • Do not remove the camera from the menu. P Disconnecting the USB cable from your camera or turning off the camera...
...Documents" folder. • When the "Removable Disk" icon is unnecessary for Windows XP users. 5 Disconnect the USB cable, remove the "Memory Stick Duo", or turn off the camera during USB connection, as the image data may be destroyed. Windows 98/98SE/2000/Me a Double-click [My ...Sony DSC), then click [Stop]. 3 Confirm the device on the tasktray. The contents of the "Memory Stick Duo" inserted in step 6, press MENU, select [USB Connect], and set it to [Normal]. • Do not remove the camera from the menu. P Disconnecting the USB cable from your camera or turning off the camera...

Operating Instructions
Page 91
... the "My Documents" folder. • When not using Windows XP, double-click [My Documents] on page 89 to disconnect the USB cable and reconnect it. The "Completing the Scanner and Camera Wizard" screen appears. Viewing the images on PC] (page 97). 91 The image is displayed. • For playing back movies, installation...
... the "My Documents" folder. • When not using Windows XP, double-click [My Documents] on page 89 to disconnect the USB cable and reconnect it. The "Completing the Scanner and Camera Wizard" screen appears. Viewing the images on PC] (page 97). 91 The image is displayed. • For playing back movies, installation...

Operating Instructions
Page 96
... and the images are displayed. If the "Welcome to the computer automatically. Copying images using "Picture Package" Connect the camera and your computer with the camera are displayed. "Picture Package" starts up "Picture Package Menu" and check [Settings] in [Copy automatically]. 96 g ...Confirm if the checkbox of the image files recorded with the USB cable. Your computer restarts. The installation starts. e Click [Next]. The ...
... and the images are displayed. If the "Welcome to the computer automatically. Copying images using "Picture Package" Connect the camera and your computer with the camera are displayed. "Picture Package" starts up "Picture Package Menu" and check [Settings] in [Copy automatically]. 96 g ...Confirm if the checkbox of the image files recorded with the USB cable. Your computer restarts. The installation starts. e Click [Next]. The ...

Operating Instructions
Page 99
...details on your computer off. 99 Communication with a computer, [Normal] and [PTP]* modes. http://www.sony.net/ a Connecting your camera to a single computer at the same time, some equipment, including your camera, may not recover at the factory. This section describes the [Normal] mode as standard • If... you connect two or more USB equipment to your camera or turning off the camera. • If you are using Mac OS X v10.0, disconnect the USB cable etc., after you can copy images using a USB hub. • Operations are two modes...
...details on your computer off. 99 Communication with a computer, [Normal] and [PTP]* modes. http://www.sony.net/ a Connecting your camera to a single computer at the same time, some equipment, including your camera, may not recover at the factory. This section describes the [Normal] mode as standard • If... you connect two or more USB equipment to your camera or turning off the camera. • If you are using Mac OS X v10.0, disconnect the USB cable etc., after you can copy images using a USB hub. • Operations are two modes...

Operating Instructions
Page 102
...pack with a cotton swab, etc., and charge the battery pack. • After charging the battery pack, disconnect the DC plug from your Sony dealer or local authorized Sony service facility. • The battery pack is dead (page 121). Turn on . Shooting still images/movies 102 Symptom The LCD screen is ...to [640 (30fps)] while an A/V connecting cable is on the LCD backlight with • Turn to other than [640 (30fps)]. The battery pack runs down the battery pack. Rotate the LCD panel slowly again. • If you do not operate the camera for about three minutes while the power is ...
...pack with a cotton swab, etc., and charge the battery pack. • After charging the battery pack, disconnect the DC plug from your Sony dealer or local authorized Sony service facility. • The battery pack is dead (page 121). Turn on . Shooting still images/movies 102 Symptom The LCD screen is ...to [640 (30fps)] while an A/V connecting cable is on the LCD backlight with • Turn to other than [640 (30fps)]. The battery pack runs down the battery pack. Rotate the LCD panel slowly again. • If you do not operate the camera for about three minutes while the power is ...

Operating Instructions
Page 105
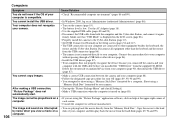
...8226; See page 106. Troubleshooting 105 The image cannot be played back on page 99 (Macintosh) and disconnect the USB cable. Viewing images Symptom Cause/Solution Your camera cannot play back images. • Turn to the PLAY mode with MODE (page 43). • Movie files not recorded...movies. Cancel USB communication (pages 89 and 99). computer. The resizing function does not work. not a malfunction. Deleting/Editing Images Symptom Your camera cannot delete an image. Set the switch to the recording position (page 119). • Marking - (protect) will prevent you from deleting...
...8226; See page 106. Troubleshooting 105 The image cannot be played back on page 99 (Macintosh) and disconnect the USB cable. Viewing images Symptom Cause/Solution Your camera cannot play back images. • Turn to the PLAY mode with MODE (page 43). • Movie files not recorded...movies. Cancel USB communication (pages 89 and 99). computer. The resizing function does not work. not a malfunction. Deleting/Editing Images Symptom Your camera cannot delete an image. Set the switch to the recording position (page 119). • Marking - (protect) will prevent you from deleting...
Operating Instructions
Page 106
... start. The image cannot be played back on the camera (page 19). • The battery level is low. Use the AC Adaptor (page 18). • Use the supplied USB cable (pages 88 and 99). • Disconnect the USB cable from both the computer and the Cyber-shot Station, ...and connect it again firmly. You cannot copy images. Delete the erroneously recognized device from your computer (page 90), then install the USB driver (page 87). • Make a correct USB connection between the camera and your computer...
... start. The image cannot be played back on the camera (page 19). • The battery level is low. Use the AC Adaptor (page 18). • Use the supplied USB cable (pages 88 and 99). • Disconnect the USB cable from both the computer and the Cyber-shot Station, ...and connect it again firmly. You cannot copy images. Delete the erroneously recognized device from your computer (page 90), then install the USB driver (page 87). • Make a correct USB connection between the camera and your computer...

Operating Instructions
Page 107
...as "101MSDCF" (page 92). • The folder/file name has been changed on the camera. LOCK position. If you set the switch to the LOCK position to the Duo". Disconnect and connect the USB cable again. "Memory Stick Duo" Symptom Cause/Solution You cannot insert a "Memory Stick Duo"....119). You cannot restore them to the Duo". You cannot format a "Memory Stick • You are using the "Memory Stick Duo" with the camera. • Set [USB Connect] to a computer cannot be viewed on your computer (page 94). PictBridge compliant printer Symptom The connection cannot be ...
...as "101MSDCF" (page 92). • The folder/file name has been changed on the camera. LOCK position. If you set the switch to the LOCK position to the Duo". Disconnect and connect the USB cable again. "Memory Stick Duo" Symptom Cause/Solution You cannot insert a "Memory Stick Duo"....119). You cannot restore them to the Duo". You cannot format a "Memory Stick • You are using the "Memory Stick Duo" with the camera. • Set [USB Connect] to a computer cannot be viewed on your computer (page 94). PictBridge compliant printer Symptom The connection cannot be ...

Operating Instructions
Page 108
... function or not. • The date may not print again depending on the dateinserted part. Disconnect and connect the USB cable again. Change the paper size setting of the camera (pages 82 and 83) or change the printer setting. • The printer is performing the printing stop processing, so... other than this processing to print on the printer. The paper size you cannot print still, disconnect the USB cable, turn off and on the printer. Cause/Solution • The camera is printed on your printer. If you want to finish. (This processing may not be printed. • ...
... function or not. • The date may not print again depending on the dateinserted part. Disconnect and connect the USB cable again. Change the paper size setting of the camera (pages 82 and 83) or change the printer setting. • The printer is performing the printing stop processing, so... other than this processing to print on the printer. The paper size you cannot print still, disconnect the USB cable, turn off and on the printer. Cause/Solution • The camera is printed on your printer. If you want to finish. (This processing may not be printed. • ...


