
Instruction Manual
Page 3
... or leaking lithium ion batteries. • Be sure to charge the battery pack using the AC Adaptor, immediately shut off the power by Sony. • Dispose of used battery packs promptly as described in the instructions. [ AC Adaptor Connect the AC Adaptor to the nearest wall outlet... internationally recognized safety organization. UL is subject to the following two conditions: (1) This device may not cause harmful interference, and (2) this camera only, and should not be used rechargeable batteries to the collection and recycling location nearest you may cause undesired operation.
... or leaking lithium ion batteries. • Be sure to charge the battery pack using the AC Adaptor, immediately shut off the power by Sony. • Dispose of used battery packs promptly as described in the instructions. [ AC Adaptor Connect the AC Adaptor to the nearest wall outlet... internationally recognized safety organization. UL is subject to the following two conditions: (1) This device may not cause harmful interference, and (2) this camera only, and should not be used rechargeable batteries to the collection and recycling location nearest you may cause undesired operation.

Instruction Manual
Page 5
... countries applying EU Directives The manufacturer of the Directive 1999/5/EC. For Customers in Europe Hereby, Sony Corporation, declares that this DSC-HX9V Digital Still Camera is in the European Union and other European countries with the essential requirements and other relevant provisions... of this product is Sony Corporation, 1-7-1 Konan Minato-ku Tokyo, 108-0075 Japan. For more detailed information about recycling ...
... countries applying EU Directives The manufacturer of the Directive 1999/5/EC. For Customers in Europe Hereby, Sony Corporation, declares that this DSC-HX9V Digital Still Camera is in the European Union and other European countries with the essential requirements and other relevant provisions... of this product is Sony Corporation, 1-7-1 Konan Minato-ku Tokyo, 108-0075 Japan. For more detailed information about recycling ...

Instruction Manual
Page 7
... [User Guide] t [Install]. 2 Start "User Guide" from the shortcut on the CD-ROM (supplied) using a computer. Cyber-shot application software - Checking the supplied items • Camera (1) • Rechargeable battery pack NP-BG1 (1)/Battery case (1) • Multi-use terminal USB cable (1) • AC Adaptor AC-UB10/UB10B (1) • Power cord (mains lead...
... [User Guide] t [Install]. 2 Start "User Guide" from the shortcut on the CD-ROM (supplied) using a computer. Cyber-shot application software - Checking the supplied items • Camera (1) • Rechargeable battery pack NP-BG1 (1)/Battery case (1) • Multi-use terminal USB cable (1) • AC Adaptor AC-UB10/UB10B (1) • Power cord (mains lead...

Instruction Manual
Page 8
... automatically. • The flash goes down automatically when the power is turned On/Off, the camera is switched to playback mode or the shooting mode is changed. I Microphone J Lens K LCD screen L (Playback) button M Control wheel N GPS sensor (built-in, DSC- HX9V only) O MOVIE (Movie) button P Speaker Q HDMI connector R Hook for wrist strap S / (In...
... automatically. • The flash goes down automatically when the power is turned On/Off, the camera is switched to playback mode or the shooting mode is changed. I Microphone J Lens K LCD screen L (Playback) button M Control wheel N GPS sensor (built-in, DSC- HX9V only) O MOVIE (Movie) button P Speaker Q HDMI connector R Hook for wrist strap S / (In...

Instruction Manual
Page 9
V Tripod receptacle • Use a tripod with a screw less than 5.5 mm (7/32 inches) long. Otherwise, you cannot firmly secure the camera, and damage to the camera may occur. W Battery eject lever X Access lamp Y Memory card slot GB Z Battery/memory card cover wj (TransferJet™) mark wk Multi connector (Type3b) GB 9
V Tripod receptacle • Use a tripod with a screw less than 5.5 mm (7/32 inches) long. Otherwise, you cannot firmly secure the camera, and damage to the camera may occur. W Battery eject lever X Access lamp Y Memory card slot GB Z Battery/memory card cover wj (TransferJet™) mark wk Multi connector (Type3b) GB 9

Instruction Manual
Page 11
... operating temperature. GB 11 The charging stops and enters the standby status automatically when the temperature is partially charged. 1 Connect the camera and the AC Adaptor (supplied), using the AC Adaptor, disconnect the plug from the wall outlet (wall socket). • Be sure to... AC Adaptor from the wall outlet (wall socket) immediately to disconnect the power source. • When charging is connected to use only genuine Sony brand battery packs, multi-use terminal USB cable (supplied). 2 Connect the AC Adaptor to the nearest wall outlet (wall socket). When the temperature...
... operating temperature. GB 11 The charging stops and enters the standby status automatically when the temperature is partially charged. 1 Connect the camera and the AC Adaptor (supplied), using the AC Adaptor, disconnect the plug from the wall outlet (wall socket). • Be sure to... AC Adaptor from the wall outlet (wall socket) immediately to disconnect the power source. • When charging is connected to use only genuine Sony brand battery packs, multi-use terminal USB cable (supplied). 2 Connect the AC Adaptor to the nearest wall outlet (wall socket). When the temperature...

Instruction Manual
Page 12
...25°C (77°F). x Charging time The charging time is not connected to a computer using the AC Adaptor (supplied). If the camera is connected to a laptop computer that is approximately 270 min. x Charging by connecting to a computer The battery pack can be charged by ...connecting the camera to a power source, the laptop battery level decreases. using a multi-use and circumstances. GB 12 Note • Note the following points when...
...25°C (77°F). x Charging time The charging time is not connected to a computer using the AC Adaptor (supplied). If the camera is connected to a laptop computer that is approximately 270 min. x Charging by connecting to a computer The battery pack can be charged by ...connecting the camera to a power source, the laptop battery level decreases. using a multi-use and circumstances. GB 12 Note • Note the following points when...

Instruction Manual
Page 13
...set to [ON]. - The power turns on the CIPA standard, and is set to [Off] (DSC-HX9V only). • The number for "Shooting (still images)" is based on and off once every ten... times. • The battery life for movies applies shooting under the following conditions: (CIPA: Camera & Imaging Products Association) - Movie quality: AVC HD HQ - The flash strobes once every two ...under the following conditions: - Approx. 300 images Viewing (still images) Approx. 230 min. Using Sony "Memory Stick PRO Duo" (Mark2) media (sold separately) - The battery pack is used ...
...set to [ON]. - The power turns on the CIPA standard, and is set to [Off] (DSC-HX9V only). • The number for "Shooting (still images)" is based on and off once every ten... times. • The battery life for movies applies shooting under the following conditions: (CIPA: Camera & Imaging Products Association) - Movie quality: AVC HD HQ - The flash strobes once every two ...under the following conditions: - Approx. 300 images Viewing (still images) Approx. 230 min. Using Sony "Memory Stick PRO Duo" (Mark2) media (sold separately) - The battery pack is used ...

Instruction Manual
Page 14
... computer without worrying about wearing down the battery pack by connecting to the AC Adaptor, using the multi-use terminal USB cable when the camera is in playback mode or when a connection is not supplied even if you make a USB connection using the multi-use terminal USB cable...• Power cannot be supplied with the battery inserted incorrectly may damage the GB camera. 14 If the camera is in shooting mode or while you are changing the settings of the camera, power is made between the camera and a computer. Inserting a memory card (sold separately) Ensure the notched corner ...
... computer without worrying about wearing down the battery pack by connecting to the AC Adaptor, using the multi-use terminal USB cable when the camera is in playback mode or when a connection is not supplied even if you make a USB connection using the multi-use terminal USB cable...• Power cannot be supplied with the battery inserted incorrectly may damage the GB camera. 14 If the camera is in shooting mode or while you are changing the settings of the camera, power is made between the camera and a computer. Inserting a memory card (sold separately) Ensure the notched corner ...

Instruction Manual
Page 16
... 12:00 PM. 5 Select the desired display color and the GPS setting (DSC-HX9V only), following the instructions on the screen. • The battery pack will run out quickly if you set [GPS setting] to [On] (DSC-HX9V only). 6 When an [In-Camera Guide] introductory message is appeared on the screen, select [OK]. GB 16...
... 12:00 PM. 5 Select the desired display color and the GPS setting (DSC-HX9V only), following the instructions on the screen. • The battery pack will run out quickly if you set [GPS setting] to [On] (DSC-HX9V only). 6 When an [In-Camera Guide] introductory message is appeared on the screen, select [OK]. GB 16...

Instruction Manual
Page 17
... W: zoom out T: zoom in focus, a beep sounds and the z indicator lights. 2 Press the shutter button fully down to protect the camera depending on the ambient temperature. The sound of the lens and lever operating will be recorded when movie recording is finished. • Continuous shooting ...is possible for approximately 29 minutes at one time at the camera's default settings and when the temperature is approximately 25°C (77°F). Shooting still images 1 Press the shutter button halfway down...
... W: zoom out T: zoom in focus, a beep sounds and the z indicator lights. 2 Press the shutter button fully down to protect the camera depending on the ambient temperature. The sound of the lens and lever operating will be recorded when movie recording is finished. • Continuous shooting ...is possible for approximately 29 minutes at one time at the camera's default settings and when the temperature is approximately 25°C (77°F). Shooting still images 1 Press the shutter button halfway down...

Instruction Manual
Page 18
x Deleting an image 1 Press / (Delete) button. 2 Select [This Image] with other cameras are played back on this camera, the registration screen for the data file appears. x Selecting next/previous image Select an image by pressing B (next)/b (previous) on the control wheel, then press z. ...
x Deleting an image 1 Press / (Delete) button. 2 Select [This Image] with other cameras are played back on this camera, the registration screen for the data file appears. x Selecting next/previous image Select an image by pressing B (next)/b (previous) on the control wheel, then press z. ...

Instruction Manual
Page 19
...last 12 items displayed in shooting/viewing mode. This allows you to search the camera's functions according to your needs. Shoot/ playback guide: Search for various operation functions in [In-Camera Guide]. Icon guide: Search the function and meaning of displayed icons. Keyword: ...Search functions by key words. GB 19 GB / (In-Camera Guide) 1 Press the / (In-Camera Guide) button. • When viewing images, [Delete/In-Camera Guide] is displayed. Troubleshooting: Search common problems and their solution. Objective guide: Search functions ...
...last 12 items displayed in shooting/viewing mode. This allows you to search the camera's functions according to your needs. Shoot/ playback guide: Search for various operation functions in [In-Camera Guide]. Icon guide: Search the function and meaning of displayed icons. Keyword: ...Search functions by key words. GB 19 GB / (In-Camera Guide) 1 Press the / (In-Camera Guide) button. • When viewing images, [Delete/In-Camera Guide] is displayed. Troubleshooting: Search common problems and their solution. Objective guide: Search functions ...

Instruction Manual
Page 20
This camera is set settings to select a flash mode for still images. x Menu Items Shooting Movie shooting scene 3D Shooting Scene Selection Memory recall mode Easy Mode ... movie recording mode. Select a setting you to match various scene conditions. GB 20 Shoot still images using the control wheel or MENU button on the camera. While displaying the guide, try the other functions Other functions used when shooting or playing back can be operated using minimal functions. Control wheel MENU...
This camera is set settings to select a flash mode for still images. x Menu Items Shooting Movie shooting scene 3D Shooting Scene Selection Memory recall mode Easy Mode ... movie recording mode. Select a setting you to match various scene conditions. GB 20 Shoot still images using the control wheel or MENU button on the camera. While displaying the guide, try the other functions Other functions used when shooting or playing back can be operated using minimal functions. Control wheel MENU...
Instruction Manual
Page 21
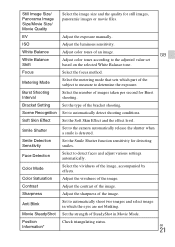
... Skin Effect and the effect level. Face Detection Select to automatically detect shooting conditions. Sharpness Adjust the sharpness of the subject to measure to the camera automatically release the shutter when a smile is detected. Position Check triangulating status. Contrast Adjust the contrast of an image. Information* GB 21 GB Adjust color...
... Skin Effect and the effect level. Face Detection Select to automatically detect shooting conditions. Sharpness Adjust the sharpness of the subject to measure to the camera automatically release the shutter when a smile is detected. Position Check triangulating status. Contrast Adjust the contrast of an image. Information* GB 21 GB Adjust color...

Instruction Manual
Page 22
... mark to your needs. Protect the images. GB 22 Search the camera's functions according to a still image. Delete an image. Select the display format for images. Register Setting In-Camera Guide * DSC-HX9V only Viewing Slideshow 3D Viewing Send by closely aligning two products equipped... with TransferJet. Select a method of continuous playback. Set to your needs. Search the camera's functions according to play back images ...
... mark to your needs. Protect the images. GB 22 Search the camera's functions according to a still image. Delete an image. Select the display format for images. Register Setting In-Camera Guide * DSC-HX9V only Viewing Slideshow 3D Viewing Send by closely aligning two products equipped... with TransferJet. Select a method of continuous playback. Set to your needs. Search the camera's functions according to play back images ...

Instruction Manual
Page 24
... The table below shows the approximate maximum recording times. Number of still images and recordable time of movies The number of movies varies because the camera is possible for approximately 29 minutes.
... The table below shows the approximate maximum recording times. Number of still images and recordable time of movies The number of movies varies because the camera is possible for approximately 29 minutes.

Instruction Manual
Page 25
... direction or location information, set [GPS setting] to turn off the camera following marks on the bottom of your child view 3D images, and make sure to [Off]. GPS-compatible: DSC-HX9V GB GPS-incompatible: DSC-HX9 - If you experience any type of time on 3D-compatible monitors... with the device or software you require, as necessary. On GPS-compatible devices (DSC-HX9V only) • Use GPS in an interlacing method, this camera records using a progressive method. To check if your camera supports the TransferJet function, and whether it . • If you may experience ...
... direction or location information, set [GPS setting] to turn off the camera following marks on the bottom of your child view 3D images, and make sure to [Off]. GPS-compatible: DSC-HX9V GB GPS-incompatible: DSC-HX9 - If you experience any type of time on 3D-compatible monitors... with the device or software you require, as necessary. On GPS-compatible devices (DSC-HX9V only) • Use GPS in an interlacing method, this camera records using a progressive method. To check if your camera supports the TransferJet function, and whether it . • If you may experience ...

Instruction Manual
Page 26
... image data may cause the malfunction of the manufacturing process, and do not affect the recording. These dots are operational for effective use /store the camera in the following places • In an extremely hot, cold or humid place In places such as this may cause a malfunction. • In... on it may not properly record or play back images. • In sandy or dusty places Be careful not to record images. Otherwise, the camera may cause a malfunction. Furthermore, the recording media may become discolored or deformed, and this may occur. Notes on the flash • Do not...
... image data may cause the malfunction of the manufacturing process, and do not affect the recording. These dots are operational for effective use /store the camera in the following places • In an extremely hot, cold or humid place In places such as this may cause a malfunction. • In... on it may not properly record or play back images. • In sandy or dusty places Be careful not to record images. Otherwise, the camera may cause a malfunction. Furthermore, the recording media may become discolored or deformed, and this may occur. Notes on the flash • Do not...
Instruction Manual
Page 27
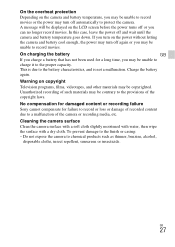
Charge the battery again. No compensation for damaged content or recording failure Sony cannot compensate for a long time, you may be unable to charge it to the finish or casing: - Do not expose the camera to the battery characteristics, and is not a malfunction. This is due to chemical products... off again or you may be unable to record movies. Unauthorized recording of such materials may be contrary to protect the camera. Cleaning the camera surface Clean the camera surface with a soft cloth slightly moistened with water, then wipe the surface with a dry cloth. If you turn on...
Charge the battery again. No compensation for damaged content or recording failure Sony cannot compensate for a long time, you may be unable to charge it to the finish or casing: - Do not expose the camera to the battery characteristics, and is not a malfunction. This is due to chemical products... off again or you may be unable to record movies. Unauthorized recording of such materials may be contrary to protect the camera. Cleaning the camera surface Clean the camera surface with a soft cloth slightly moistened with water, then wipe the surface with a dry cloth. If you turn on...


