
Instruction Manual
Page 2
.... Refer to it for the model name of your camera within the support page. • Check the model name on the control button. GB The shooting tip is equipped with a built-in -depth instructions on -line manual. Viewing the Guide This camera is displayed. 2 • You can scroll the screen using v/V and change shooting tips using b/B. http://www.sony.net/SonyInfo/Support/ 2 Select your country or region. 3 Search for in instruction guide.
.... Refer to it for the model name of your camera within the support page. • Check the model name on the control button. GB The shooting tip is equipped with a built-in -depth instructions on -line manual. Viewing the Guide This camera is displayed. 2 • You can scroll the screen using v/V and change shooting tips using b/B. http://www.sony.net/SonyInfo/Support/ 2 Select your country or region. 3 Search for in instruction guide.

Instruction Manual
Page 25
.... Adjusts the interval for showing the tracking of the camera when using the application. (Playback) Delete View Mode Image Index Slide Show Rotate Enlarge Image 4K Still Image PB Protect Motion Interval ADJ Specify Printing Deletes an image. Adds a print order mark to use. Sets whether to display the tile menu every time you want to a still image. (Setup) Monitor Brightness Volume Settings Audio signals GPS Settings (DSC-HX400V only) Upload Settings Tile Menu Sets the screen brightness. Outputs still images in [Motion Shot Video...
.... Adjusts the interval for showing the tracking of the camera when using the application. (Playback) Delete View Mode Image Index Slide Show Rotate Enlarge Image 4K Still Image PB Protect Motion Interval ADJ Specify Printing Deletes an image. Adds a print order mark to use. Sets whether to display the tile menu every time you want to a still image. (Setup) Monitor Brightness Volume Settings Audio signals GPS Settings (DSC-HX400V only) Upload Settings Tile Menu Sets the screen brightness. Outputs still images in [Motion Shot Video...

User Guide
Page 6
Playing back movies 96 Motion Shot Video...97 Playing back panoramic images 98 Specify Printing...98 Using viewing functions...6 View Mode...99 Slide Show...100 Rotate...100 Protect...101 4K Still Image PB...102 Viewing images on a TV...7 Viewing images on an HD TV 102 Viewing images on a "BRAVIA" Sync-compatible TV 104 Changing settings...7 Setup menu...7 Monitor Brightness...105 Volume Settings...105 Audio signals...106 GPS On/Off (DSC-HX400V 106 GPS Auto Time Cor. (DSC-HX400V 107 GPS Auto Area Adj. (DSC-HX400V 108 Use GPS Assist Data (DSC-HX400V 109...
Playing back movies 96 Motion Shot Video...97 Playing back panoramic images 98 Specify Printing...98 Using viewing functions...6 View Mode...99 Slide Show...100 Rotate...100 Protect...101 4K Still Image PB...102 Viewing images on a TV...7 Viewing images on an HD TV 102 Viewing images on a "BRAVIA" Sync-compatible TV 104 Changing settings...7 Setup menu...7 Monitor Brightness...105 Volume Settings...105 Audio signals...106 GPS On/Off (DSC-HX400V 106 GPS Auto Time Cor. (DSC-HX400V 107 GPS Auto Area Adj. (DSC-HX400V 108 Use GPS Assist Data (DSC-HX400V 109...

User Guide
Page 54
... Adjust the focus and shoot the subject. When the amount of ambient light exceeds the metering range of the image on the center of the control button. 1. The (SteadyShot warning) indicator does not appear in manual exposure mode. Set the mode dial to M (Manual Exposure). 2. Note [ISO AUTO] cannot be selected for [ISO] in manual exposure mode. Check the exposure value at "MM" (metered manual). Toward − : Images become brighter. Set the mode dial to 1 or 2 (Memory recall). 2. Change...
... Adjust the focus and shoot the subject. When the amount of ambient light exceeds the metering range of the image on the center of the control button. 1. The (SteadyShot warning) indicator does not appear in manual exposure mode. Set the mode dial to M (Manual Exposure). 2. Note [ISO AUTO] cannot be selected for [ISO] in manual exposure mode. Check the exposure value at "MM" (metered manual). Toward − : Images become brighter. Set the mode dial to 1 or 2 (Memory recall). 2. Change...

User Guide
Page 115
... Use Changing settings Setup menu Volume Settings Adjusts the sound volume. 1. How to Use Changing settings Setup menu Monitor Brightness You can provide SYNC MENU operations. How to the operating instructions supplied with the TV. Adjusting the volume during playback Press the bottom of the screen. 1. Note Only TVs that support "BRAVIA" Sync can adjust the brightness of the control button while playing back movies to display the operation panel, 105 If the product performs unwanted operations in response to the TV Remote Control...
... Use Changing settings Setup menu Volume Settings Adjusts the sound volume. 1. How to Use Changing settings Setup menu Monitor Brightness You can provide SYNC MENU operations. How to the operating instructions supplied with the TV. Adjusting the volume during playback Press the bottom of the screen. 1. Note Only TVs that support "BRAVIA" Sync can adjust the brightness of the control button while playing back movies to display the operation panel, 105 If the product performs unwanted operations in response to the TV Remote Control...

User Guide
Page 116
... viewing them on a map which shows their shooting location. Off (default setting): 106 Menu item details On: The GPS function is operated. then adjust the volume. Menu item details On (default setting): Produces sound when the focus is achieved or the self-timer is activated. Off: Does not produce sound. Using the supplied software PlayMemories Home, you can import the images recorded with the location information to Use Changing settings Setup menu GPS On/Off (DSC-HX400V) You can record...
... viewing them on a map which shows their shooting location. Off (default setting): 106 Menu item details On: The GPS function is operated. then adjust the volume. Menu item details On (default setting): Produces sound when the focus is achieved or the self-timer is activated. Off: Does not produce sound. Using the supplied software PlayMemories Home, you can import the images recorded with the location information to Use Changing settings Setup menu GPS On/Off (DSC-HX400V) You can record...

User Guide
Page 118
... disabled. Menu item details On: Corrects the time difference automatically. Off (default setting): Does not correct the time difference automatically. In that case, set [Date/Time Setup]. Before using the [GPS Auto Time Cor.] function, set 108 Set [Date/Time Setup] in some areas. The corrected time may differ from the actual time for maintaining the accurate time setting. MENU → (Setup) → [GPS Auto Area Adj.] → desired setting. Note When [GPS On/Off] is set to Use Changing settings Setup menu...
... disabled. Menu item details On: Corrects the time difference automatically. Off (default setting): Does not correct the time difference automatically. In that case, set [Date/Time Setup]. Before using the [GPS Auto Time Cor.] function, set 108 Set [Date/Time Setup] in some areas. The corrected time may differ from the actual time for maintaining the accurate time setting. MENU → (Setup) → [GPS Auto Area Adj.] → desired setting. Note When [GPS On/Off] is set to Use Changing settings Setup menu...
User Guide
Page 119
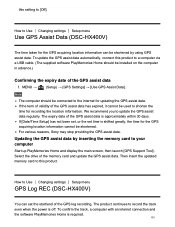
... assist data. To update the GPS assist data automatically, connect this product to a computer via a USB cable. (The supplied software PlayMemories Home should be shortened by inserting the memory card to the internet for recording the location information. We recommend you to record the track even when the power is shifted greatly, the time for the GPS acquiring location information can set time is off. How to Use Changing settings Setup menu...
... assist data. To update the GPS assist data automatically, connect this product to a computer via a USB cable. (The supplied software PlayMemories Home should be shortened by inserting the memory card to the internet for recording the location information. We recommend you to record the track even when the power is shifted greatly, the time for the GPS acquiring location information can set time is off. How to Use Changing settings Setup menu...

User Guide
Page 120
...]. 1. MENU → (Setup) → [GPS Settings] → [Delete GPS log data]. Off (default setting): Ends the GPS log recording. Sony does not collect the location information and the track information. How to Use Changing settings Setup menu Upload Settings(Eye-Fi) Sets whether to Use Changing settings Setup menu Delete GPS log data (DSC-HX400V) You can be recorded at one time. When the recorded time of GPS log data can be displayed on a map on the memory card, the product cannot save the GPS log data.
...]. 1. MENU → (Setup) → [GPS Settings] → [Delete GPS log data]. Off (default setting): Ends the GPS log recording. Sony does not collect the location information and the track information. How to Use Changing settings Setup menu Upload Settings(Eye-Fi) Sets whether to Use Changing settings Setup menu Delete GPS log data (DSC-HX400V) You can be recorded at one time. When the recorded time of GPS log data can be displayed on a map on the memory card, the product cannot save the GPS log data.

User Guide
Page 123
... not activated during playing back slideshow or recording movies, or when connected to a computer. How to Use Changing settings Setup menu PAL/NTSC Selector 113 Display Quality You can set . Standard: Displays in high quality. MENU → (Setup) → [Pwr Save Start Time] → desired setting. Menu item details High: Displays in standard quality. Menu item details 30 Min/5 Min/2 Min (default setting)/1 Min Note The power save function is set the time by which the power goes off...
... not activated during playing back slideshow or recording movies, or when connected to a computer. How to Use Changing settings Setup menu PAL/NTSC Selector 113 Display Quality You can set . Standard: Displays in high quality. MENU → (Setup) → [Pwr Save Start Time] → desired setting. Menu item details High: Displays in standard quality. Menu item details 30 Min/5 Min/2 Min (default setting)/1 Min Note The power save function is set the time by which the power goes off...

User Guide
Page 124
... memory card automatically (demonstration), when the camera has not been operated for about one minute. Set the view mode to Use Changing settings Setup menu Demo Mode The [Demo Mode] function displays the movies recorded on NTSC." When the NTSC mode is not provided with 1080 50i-compatible devices only. Off (default setting): Does not show the demonstration. When you record using the NTSC system, re-format the memory card or use another memory card. How to [AVCHD View], and protect the movie file...
... memory card automatically (demonstration), when the camera has not been operated for about one minute. Set the view mode to Use Changing settings Setup menu Demo Mode The [Demo Mode] function displays the movies recorded on NTSC." When the NTSC mode is not provided with 1080 50i-compatible devices only. Off (default setting): Does not show the demonstration. When you record using the NTSC system, re-format the memory card or use another memory card. How to [AVCHD View], and protect the movie file...
User Guide
Page 125
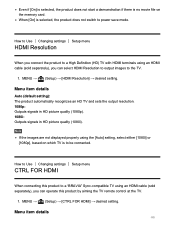
... using an HDMI cable (sold separately), you can operate this product to power save mode. Note If the images are not displayed properly using the [Auto] setting, select either [1080i] or [1080p], based on the memory card. Menu item details 115 How to Use Changing settings Setup menu CTRL FOR HDMI When connecting this product by aiming the TV remote control at the TV. 1. When [On] is to the TV. 1. Menu item details Auto (default setting...
... using an HDMI cable (sold separately), you can operate this product to power save mode. Note If the images are not displayed properly using the [Auto] setting, select either [1080i] or [1080p], based on the memory card. Menu item details 115 How to Use Changing settings Setup menu CTRL FOR HDMI When connecting this product by aiming the TV remote control at the TV. 1. When [On] is to the TV. 1. Menu item details Auto (default setting...

User Guide
Page 126
... functions are enabled for use . MENU → (Setup) → [USB Connection] → desired setting. Note [CTRL FOR HDMI] is available only with a TV's remote control. Note If Device Stage* is not displayed with a TV's remote control. Menu item details Auto (default setting): Establishes a Mass Storage or MTP connection automatically, depending on the computer or other USB devices. On (default setting): You can operate this product with Windows 7 or Windows 8, set [USB Connection] to [Auto]. * Device Stage is a menu screen used...
... functions are enabled for use . MENU → (Setup) → [USB Connection] → desired setting. Note [CTRL FOR HDMI] is available only with a TV's remote control. Note If Device Stage* is not displayed with a TV's remote control. Menu item details Auto (default setting): Establishes a Mass Storage or MTP connection automatically, depending on the computer or other USB devices. On (default setting): You can operate this product with Windows 7 or Windows 8, set [USB Connection] to [Auto]. * Device Stage is a menu screen used...

User Guide
Page 127
... (default setting): Power is supplied to the product via a micro USB cable when the product is connected to a computer, etc. Off: Power is not supplied to the product via a micro USB cable when the product is connected to a computer, etc. How to Use Changing settings Setup menu Language 117 MENU → (Setup) → [USB LUN Setting] → desired setting. How to Use Changing settings Setup menu USB LUN Setting Enhances compatibility by limiting of USB connection functions. 1. MENU → (Setup) → [USB Power Supply] → desired setting.
... (default setting): Power is supplied to the product via a micro USB cable when the product is connected to a computer, etc. Off: Power is not supplied to the product via a micro USB cable when the product is connected to a computer, etc. How to Use Changing settings Setup menu Language 117 MENU → (Setup) → [USB LUN Setting] → desired setting. How to Use Changing settings Setup menu USB LUN Setting Enhances compatibility by limiting of USB connection functions. 1. MENU → (Setup) → [USB Power Supply] → desired setting.

User Guide
Page 128
...Use Changing settings Setup menu Area Setting Sets the area where you are using the product. 1. Menu item details Daylight Savings: Selects Daylight Savings [On]/[Off]. How to Use Changing settings Setup menu 118 Date Format: Selects the date and time display format. MENU → (Setup) → [Area Setting] → desired area. How to be used in the menu items, warnings and messages. 1. Selects the language to Use Changing settings Setup menu Date/Time Setup Sets the date and time again. 1. MENU → (Setup) → [Date/Time Setup] → desired setting. MENU → (Setup...
...Use Changing settings Setup menu Area Setting Sets the area where you are using the product. 1. Menu item details Daylight Savings: Selects Daylight Savings [On]/[Off]. How to Use Changing settings Setup menu 118 Date Format: Selects the date and time display format. MENU → (Setup) → [Area Setting] → desired area. How to be used in the menu items, warnings and messages. 1. Selects the language to Use Changing settings Setup menu Date/Time Setup Sets the date and time again. 1. MENU → (Setup) → [Date/Time Setup] → desired setting. MENU → (Setup...
User Guide
Page 130
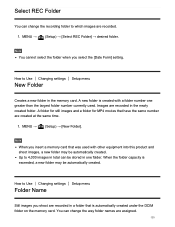
... Use Changing settings Setup menu Folder Name Still images you select the [Date Form] setting. Note When you insert a memory card that have the same number are recorded in the newly created folder. How to which images are recorded. 1. When the folder capacity is exceeded, a new folder may be automatically created. Note You cannot select the folder when you shoot are created at the same time. 1. A folder for still images and a folder for MP4 movies...
... Use Changing settings Setup menu Folder Name Still images you select the [Date Form] setting. Note When you insert a memory card that have the same number are recorded in the newly created folder. How to which images are recorded. 1. When the folder capacity is exceeded, a new folder may be automatically created. Note You cannot select the folder when you shoot are created at the same time. 1. A folder for still images and a folder for MP4 movies...

User Guide
Page 131
... fixed as follows: folder number + Y (the last digit)/MM/DD. MENU → (Setup) → [Folder Name] → desired setting. In such cases, the images on the memory card will not be played back on a computer, problems may occur in the image database file. How to Use Changing settings Setup menu Recover Image DB If image files were processed on this product. Low battery power during repairing can cause damage to data. Displays the recordable time of movies and the number of recordable still images...
... fixed as follows: folder number + Y (the last digit)/MM/DD. MENU → (Setup) → [Folder Name] → desired setting. In such cases, the images on the memory card will not be played back on a computer, problems may occur in the image database file. How to Use Changing settings Setup menu Recover Image DB If image files were processed on this product. Low battery power during repairing can cause damage to data. Displays the recordable time of movies and the number of recordable still images...
User Guide
Page 132
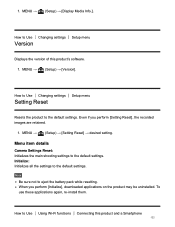
...-Fi functions Connecting this product's software. 1. Note Be sure not to the default settings. MENU → (Setup) → [Display Media Info.]. Even if you perform [Initialize], downloaded applications on the product may be uninstalled. When you perform [Setting Reset], the recorded images are retained. 1. How to Use Changing settings Setup menu Version Displays the version of this product and a Smartphone 122 Menu item details Camera Settings Reset: Initializes the main shooting settings to eject the battery...
...-Fi functions Connecting this product's software. 1. Note Be sure not to the default settings. MENU → (Setup) → [Display Media Info.]. Even if you perform [Initialize], downloaded applications on the product may be uninstalled. When you perform [Setting Reset], the recorded images are retained. 1. How to Use Changing settings Setup menu Version Displays the version of this product and a Smartphone 122 Menu item details Camera Settings Reset: Initializes the main shooting settings to eject the battery...

User Guide
Page 141
... communication technology. Set [Airplane Mode] to the smartphone from [Original], [2M], or [VGA]. NFC makes data communication simpler with just a touch on the product, you cannot make backup copies using the NFC function. Note You can transfer images stored in a case, remove it . If you cannot transfer images using this operation, install PlayMemories Home on the smartphone. Before starting this operation. To transfer two or more images, select MENU → (Wireless...
... communication technology. Set [Airplane Mode] to the smartphone from [Original], [2M], or [VGA]. NFC makes data communication simpler with just a touch on the product, you cannot make backup copies using the NFC function. Note You can transfer images stored in a case, remove it . If you cannot transfer images using this operation, install PlayMemories Home on the smartphone. Before starting this operation. To transfer two or more images, select MENU → (Wireless...

User Guide
Page 191
You can print images with the date superimposed if the printer or the software can print images with the date, use [Print Setting] under [Specify Printing]. cannot delete the date from the image on again. If you ask them to print images with the date without recording the date. When you print images at a shop, images can be printed with the lens portion extended./The product turns off the product and leave it for a long time. This is...
You can print images with the date superimposed if the printer or the software can print images with the date, use [Print Setting] under [Specify Printing]. cannot delete the date from the image on again. If you ask them to print images with the date without recording the date. When you print images at a shop, images can be printed with the lens portion extended./The product turns off the product and leave it for a long time. This is...


