Instruction Manual
Page 2
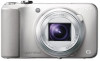
Checking the supplied items The number in parentheses indicates the number of your camera within the support page. • Check the model name on -line manual. http://www.sony.net/SonyInfo/Support/ 2 Select your country or region. 3 Search for in the USA and Canada) (1) • Wrist strap (1)... • Instruction Manual (this manual) (1) GB 2 English Learning more about the camera ("Cyber-shot User Guide") "Cyber-shot User...
Checking the supplied items The number in parentheses indicates the number of your camera within the support page. • Check the model name on -line manual. http://www.sony.net/SonyInfo/Support/ 2 Select your country or region. 3 Search for in the USA and Canada) (1) • Wrist strap (1)... • Instruction Manual (this manual) (1) GB 2 English Learning more about the camera ("Cyber-shot User Guide") "Cyber-shot User...

Instruction Manual
Page 4
...mains lead), if supplied, is subject to the following two conditions: (1) This device may not cause harmful interference, and (2) this camera only, and should not be used with Canadian ICES-003. This Class B digital apparatus complies with other electrical equipment. You can charge...Caution: Do not handle damaged or leaking Lithium-Ion batteries. [ Battery pack This device complies with the same or equivalent type recommended by Sony. • Dispose of the FCC Rules. and Canada [ RECYCLING LITHIUM-ION BATTERIES Lithium-Ion batteries are recyclable. For Customers in the ...
...mains lead), if supplied, is subject to the following two conditions: (1) This device may not cause harmful interference, and (2) this camera only, and should not be used with Canadian ICES-003. This Class B digital apparatus complies with other electrical equipment. You can charge...Caution: Do not handle damaged or leaking Lithium-Ion batteries. [ Battery pack This device complies with the same or equivalent type recommended by Sony. • Dispose of the FCC Rules. and Canada [ RECYCLING LITHIUM-ION BATTERIES Lithium-Ion batteries are recyclable. For Customers in the ...

Instruction Manual
Page 6
...application or disconnect and connect the communication cable (USB, etc.) again. [ Disposal of electrical and electronic equipment. Operation is Sony Deutschland GmbH, Hedelfinger Strasse 61, 70327 Stuttgart, Germany. This product has been tested and found compliant with the limits set ...essential requirements and other relevant provisions of materials will help to the addresses given in Europe Hereby, Sony Corporation, declares that this DSC-HX10V Digital Still Camera is disposed of correctly, you purchased the product. The recycling of the Directive 1999/5/EC. The...
...application or disconnect and connect the communication cable (USB, etc.) again. [ Disposal of electrical and electronic equipment. Operation is Sony Deutschland GmbH, Hedelfinger Strasse 61, 70327 Stuttgart, Germany. This product has been tested and found compliant with the limits set ...essential requirements and other relevant provisions of materials will help to the addresses given in Europe Hereby, Sony Corporation, declares that this DSC-HX10V Digital Still Camera is disposed of correctly, you purchased the product. The recycling of the Directive 1999/5/EC. The...
Instruction Manual
Page 8
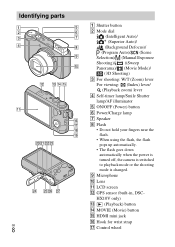
HX10V only) M (Playback) button N MOVIE (Movie) button O HDMI mini jack P Hook for wrist strap Q Control wheel I Microphone J Lens K LCD screen L GPS sensor (built-in, DSC- Identifying parts GB 8 A Shutter button B Mode dial (Intelligent Auto)/ (Superior Auto)/ (Background Defocus)/ (Program Auto)/ (Scene Selection)/ (Manual Exposure Shooting)/ (iSweep Panorama)/ (Movie Mode)/ ...flash. • When using the flash, the flash pops up automatically. • The flash goes down automatically when the power is turned off, the camera is switched to playback mode or the shooting mode is changed.
HX10V only) M (Playback) button N MOVIE (Movie) button O HDMI mini jack P Hook for wrist strap Q Control wheel I Microphone J Lens K LCD screen L GPS sensor (built-in, DSC- Identifying parts GB 8 A Shutter button B Mode dial (Intelligent Auto)/ (Superior Auto)/ (Background Defocus)/ (Program Auto)/ (Scene Selection)/ (Manual Exposure Shooting)/ (iSweep Panorama)/ (Movie Mode)/ ...flash. • When using the flash, the flash pops up automatically. • The flash goes down automatically when the power is turned off, the camera is switched to playback mode or the shooting mode is changed.
Instruction Manual
Page 9
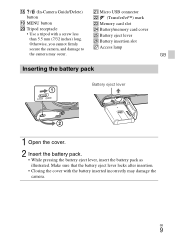
... damage to Y Battery eject lever Z Battery insertion slot wj Access lamp the camera may damage the camera. GB Inserting the battery pack Battery eject lever 1 Open the cover. 2 Insert the battery pack. • While pressing the battery eject lever...illustrated. Make sure that the battery eject lever locks after insertion. • Closing the cover with a screw less than 5.5 mm (7/32 inches) long. R / (In-Camera Guide/Delete) U Micro USB connector button V (TransferJet™) mark S MENU button T Tripod receptacle W Memory card slot X Battery/memory card cover • Use a tripod...
... damage to Y Battery eject lever Z Battery insertion slot wj Access lamp the camera may damage the camera. GB Inserting the battery pack Battery eject lever 1 Open the cover. 2 Insert the battery pack. • While pressing the battery eject lever...illustrated. Make sure that the battery eject lever locks after insertion. • Closing the cover with a screw less than 5.5 mm (7/32 inches) long. R / (In-Camera Guide/Delete) U Micro USB connector button V (TransferJet™) mark S MENU button T Tripod receptacle W Memory card slot X Battery/memory card cover • Use a tripod...
Instruction Manual
Page 10
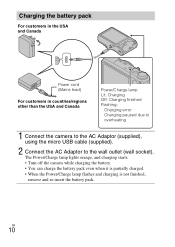
...other than the USA and Canada Power/Charge lamp Lit: Charging Off: Charging finished Flashing: Charging error Charging paused due to overheating 1 Connect the camera to the AC Adaptor (supplied), using the micro USB cable (supplied). 2 Connect the AC Adaptor to the wall outlet (wall socket). The ...Power/Charge lamp lights orange, and charging starts. • Turn off the camera while charging the battery. • You can charge the battery pack even when it is partially charged. • When the Power/Charge lamp flashes...
...other than the USA and Canada Power/Charge lamp Lit: Charging Off: Charging finished Flashing: Charging error Charging paused due to overheating 1 Connect the camera to the AC Adaptor (supplied), using the micro USB cable (supplied). 2 Connect the AC Adaptor to the wall outlet (wall socket). The ...Power/Charge lamp lights orange, and charging starts. • Turn off the camera while charging the battery. • You can charge the battery pack even when it is partially charged. • When the Power/Charge lamp flashes...
Instruction Manual
Page 11
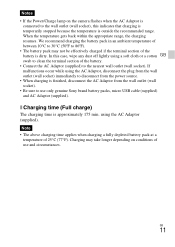
...AC Adaptor from the wall outlet (wall socket). • Be sure to 86ºF). • The battery pack may take longer depending on the camera flashes when the AC Adaptor is connected to the wall outlet (wall socket), this case, wipe any dust off lightly using a soft cloth or a...terminal section of the battery is dirty. using the AC Adaptor (supplied). Notes • If the Power/Charge lamp on conditions of use only genuine Sony brand battery packs, micro USB cable (supplied) and AC Adaptor (supplied). Note • The above charging time applies when charging a fully depleted ...
...AC Adaptor from the wall outlet (wall socket). • Be sure to 86ºF). • The battery pack may take longer depending on the camera flashes when the AC Adaptor is connected to the wall outlet (wall socket), this case, wipe any dust off lightly using a soft cloth or a...terminal section of the battery is dirty. using the AC Adaptor (supplied). Notes • If the Power/Charge lamp on conditions of use only genuine Sony brand battery packs, micro USB cable (supplied) and AC Adaptor (supplied). Note • The above charging time applies when charging a fully depleted ...
Instruction Manual
Page 12
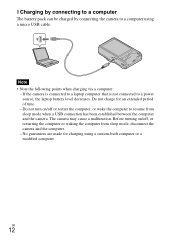
... connecting to a computer The battery pack can be charged by connecting the camera to a computer using a custom-built computer or a modified computer. If the camera is connected to a laptop computer that is not connected to resume from sleep mode, disconnect the camera and the computer. - Do not charge for charging using a micro USB... turning on /off , or restarting the computer or waking the computer from sleep mode when a USB connection has been established between the computer and the camera. Note • Note the following points when charging via a computer: - The...
... connecting to a computer The battery pack can be charged by connecting the camera to a computer using a custom-built computer or a modified computer. If the camera is connected to a laptop computer that is not connected to resume from sleep mode, disconnect the camera and the computer. - Do not charge for charging using a micro USB... turning on /off , or restarting the computer or waking the computer from sleep mode when a USB connection has been established between the computer and the camera. Note • Note the following points when charging via a computer: - The...
Instruction Manual
Page 13
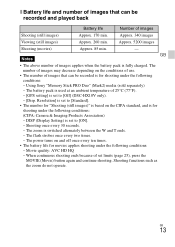
... is set to [Off] (DSC-HX10V only). - [Disp. Shooting functions such as the zoom do not operate. x Battery life and number of images that can be recorded is set to [Standard]. • The number for shooting under the following conditions: (CIPA: Camera & Imaging Products Association) - ...The zoom is for "Shooting (still images)" is based on the CIPA standard, and is switched alternately between the W and T ends. - Movie quality: AVC HD HQ - When continuous shooting ends because of set to [ON]. - Using Sony "Memory Stick...
... is set to [Off] (DSC-HX10V only). - [Disp. Shooting functions such as the zoom do not operate. x Battery life and number of images that can be recorded is set to [Standard]. • The number for shooting under the following conditions: (CIPA: Camera & Imaging Products Association) - ...The zoom is for "Shooting (still images)" is based on the CIPA standard, and is switched alternately between the W and T ends. - Movie quality: AVC HD HQ - When continuous shooting ends because of set to [ON]. - Using Sony "Memory Stick...
Instruction Manual
Page 14
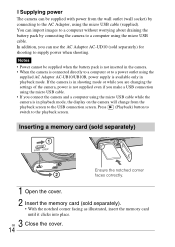
...the cover. 14 Press (Playback) button to switch to the USB connection screen. x Supplying power The camera can be supplied when the battery pack is not inserted in the camera. • When the camera is connected directly to a computer or to a power outlet using the supplied AC Adaptor AC-UB10/UB10B,...battery pack by connecting to the AC Adaptor, using the micro USB cable while the camera is in playback mode, the display on the camera will change from the wall outlet (wall socket) by connecting the camera to supply power when shooting. Notes • Power cannot be supplied with power ...
...the cover. 14 Press (Playback) button to switch to the USB connection screen. x Supplying power The camera can be supplied when the battery pack is not inserted in the camera. • When the camera is connected directly to a computer or to a power outlet using the supplied AC Adaptor AC-UB10/UB10B,...battery pack by connecting to the AC Adaptor, using the micro USB cable while the camera is in playback mode, the display on the camera will change from the wall outlet (wall socket) by connecting the camera to supply power when shooting. Notes • Power cannot be supplied with power ...
Instruction Manual
Page 15
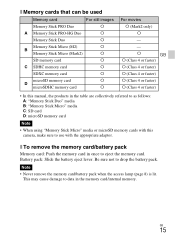
a GB a (Class 4 or faster) a (Class 4 or faster) a (Class 4 or faster) a (Class 4 or faster) a (Class 4 or faster) • In this camera, make sure to drop the battery pack. Be sure not to use with this manual, the products in the memory card/internal memory. x Memory cards ...
a GB a (Class 4 or faster) a (Class 4 or faster) a (Class 4 or faster) a (Class 4 or faster) a (Class 4 or faster) • In this camera, make sure to drop the battery pack. Be sure not to use with this manual, the products in the memory card/internal memory. x Memory cards ...
Instruction Manual
Page 16
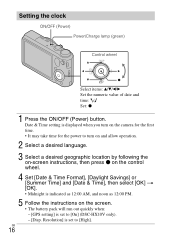
GB 16 Date & Time setting is displayed when you turn on the camera for the first time. • It may take time for the power to turn on and allow operation. 2 Select a desired language. 3 Select a desired geographic location ... (green) Control wheel Select items: v/V/b/B Set the numeric value of date and time: / Set: z 1 Press the ON/OFF (Power) button. Resolution] is set to [On] (DSC-HX10V only). - [Disp.
GB 16 Date & Time setting is displayed when you turn on the camera for the first time. • It may take time for the power to turn on and allow operation. 2 Select a desired language. 3 Select a desired geographic location ... (green) Control wheel Select items: v/V/b/B Set the numeric value of date and time: / Set: z 1 Press the ON/OFF (Power) button. Resolution] is set to [On] (DSC-HX10V only). - [Disp.

Instruction Manual
Page 17
... and the z indicator lights. 2 Press the shutter button fully down to shoot an image. Notes • Do not push down to protect the camera depending on the GB ambient temperature. 17 Shooting movies 1 Press the MOVIE (Movie) button to start recording. • Use the W/T (zoom) lever... operating will be recorded when movie recording is finished. • Continuous shooting is possible for approximately 29 minutes at one time at the camera's default settings and when the temperature is approximately 25°C (77°F). When movie recording is in Do not cover the flash (A)....
... and the z indicator lights. 2 Press the shutter button fully down to shoot an image. Notes • Do not push down to protect the camera depending on the GB ambient temperature. 17 Shooting movies 1 Press the MOVIE (Movie) button to start recording. • Use the W/T (zoom) lever... operating will be recorded when movie recording is finished. • Continuous shooting is possible for approximately 29 minutes at one time at the camera's default settings and when the temperature is approximately 25°C (77°F). When movie recording is in Do not cover the flash (A)....
Instruction Manual
Page 18
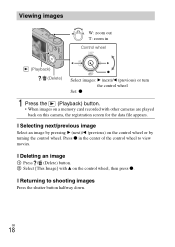
... center of the control wheel to shooting images Press the shutter button halfway down. x Deleting an image 1 Press / (Delete) button. 2 Select [This Image] with other cameras are played back on this camera, the registration screen for the data file appears. x Returning to view movies.
... center of the control wheel to shooting images Press the shutter button halfway down. x Deleting an image 1 Press / (Delete) button. 2 Select [This Image] with other cameras are played back on this camera, the registration screen for the data file appears. x Returning to view movies.
Instruction Manual
Page 19
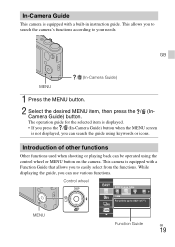
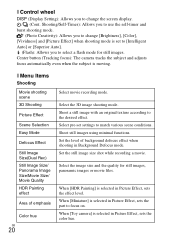
... using keywords or icons. While displaying the guide, you to search the camera's functions according to easily select from the functions. In-Camera Guide This camera is equipped with a built-in instruction guide. This camera is equipped with a Function Guide that allows you to your needs. This... allows you can search the guide using the control wheel or MENU button on the camera. GB MENU / (In-Camera Guide) 1 Press the MENU button. 2 Select the desired MENU item, then press the / (InCamera Guide) button. The operation...
... using keywords or icons. While displaying the guide, you to search the camera's functions according to easily select from the functions. In-Camera Guide This camera is equipped with a built-in instruction guide. This camera is equipped with a Function Guide that allows you to your needs. This... allows you can search the guide using the control wheel or MENU button on the camera. GB MENU / (In-Camera Guide) 1 Press the MENU button. 2 Select the desired MENU item, then press the / (InCamera Guide) button. The operation...
Instruction Manual
Page 20
Select the image size and the quality for still images. When [Toy camera] is selected in Background Defocus mode. x Menu Items Shooting Movie shooting scene 3D Shooting Picture Effect Scene Selection Easy Mode Defocus Effect Still Image Size(... moving. Select the 3D image shooting mode. x Control wheel DISP (Display Setting): Allows you to change the screen display. / (Cont. Center button (Tracking focus): The camera tracks the subject and adjusts focus automatically even when the subject is selected in Picture Effect, sets the color hue. Set the still image size...
Select the image size and the quality for still images. When [Toy camera] is selected in Background Defocus mode. x Menu Items Shooting Movie shooting scene 3D Shooting Picture Effect Scene Selection Easy Mode Defocus Effect Still Image Size(... moving. Select the 3D image shooting mode. x Control wheel DISP (Display Setting): Allows you to change the screen display. / (Cont. Center button (Tracking focus): The camera tracks the subject and adjusts focus automatically even when the subject is selected in Picture Effect, sets the color hue. Set the still image size...
Instruction Manual
Page 21
... and select image in Picture Effect, sets the effect level. Anti Blink Set to detect faces and adjust various settings automatically. In-Camera Guide * DSC-HX10V only Search the camera's functions according to automatically detect shooting conditions. Illustration Effect When [Illustration] is selected in which part of the bracket shooting. Bracket ... SteadyShot Set the strength of view will change the setting for detecting smiles. GPS Log REC* Record the route taken while carrying the camera. Extracted Color When [Partial Color] is detected. GB 21
... and select image in Picture Effect, sets the effect level. Anti Blink Set to detect faces and adjust various settings automatically. In-Camera Guide * DSC-HX10V only Search the camera's functions according to automatically detect shooting conditions. Illustration Effect When [Illustration] is selected in which part of the bracket shooting. Bracket ... SteadyShot Set the strength of view will change the setting for detecting smiles. GPS Log REC* Record the route taken while carrying the camera. Extracted Color When [Partial Color] is detected. GB 21
Instruction Manual
Page 22
... shot in groups or display all images during playback. Protect the images. Shooting Group Protect Print (DPOF) Rotate In-Camera Guide Select a method of continuous playback. Select to a still image. Search the camera's functions according to the left. Add a print order mark to display burst images in 3D mode on images. Viewing...
... shot in groups or display all images during playback. Protect the images. Shooting Group Protect Print (DPOF) Rotate In-Camera Guide Select a method of continuous playback. Select to a still image. Search the camera's functions according to the left. Add a print order mark to display burst images in 3D mode on images. Viewing...

Instruction Manual
Page 24
If you play back images on this camera even if you do not install "PlayMemories Home", however, "PlayMemories Home" is not compatible to a computer. (Expanded Feature) GB 24 For details, see http://www.sony.co.jp/imsoft/Mac/ x Features of the various "PlayMemories Home" ... a computer and display them . Note • "PlayMemories Home" is required to import AVCHD movies to your computer. 1 Connect the camera to a computer. 2 Windows 7: [Computer] t camera icon t media icon t Double-click [PMHOME.EXE] Windows XP/Vista: [Computer] (in Windows XP, [My Computer]) t [PMHOME] t Double...
If you play back images on this camera even if you do not install "PlayMemories Home", however, "PlayMemories Home" is not compatible to a computer. (Expanded Feature) GB 24 For details, see http://www.sony.co.jp/imsoft/Mac/ x Features of the various "PlayMemories Home" ... a computer and display them . Note • "PlayMemories Home" is required to import AVCHD movies to your computer. 1 Connect the camera to a computer. 2 Windows 7: [Computer] t camera icon t media icon t Double-click [PMHOME.EXE] Windows XP/Vista: [Computer] (in Windows XP, [My Computer]) t [PMHOME] t Double...

Instruction Manual
Page 25
... depending on the shooting conditions and the memory card. Number of still images and recordable time of movies The number of movies varies because the camera is equipped with VBR (Variable Bit Rate), which automatically adjusts image quality depending on the shooting scene. These are the total times for recording. The...
... depending on the shooting conditions and the memory card. Number of still images and recordable time of movies The number of movies varies because the camera is equipped with VBR (Variable Bit Rate), which automatically adjusts image quality depending on the shooting scene. These are the total times for recording. The...


