Instruction Manual
Page 3
... of the set, and to perform routine safety checks (as specified by the manufacturer that it from the wall outlet and disconnect the antenna or cable system. Do not place the set near or over a radiator or heat register, or where it is left unattended and unused for example, near a bathtub...
... of the set, and to perform routine safety checks (as specified by the manufacturer that it from the wall outlet and disconnect the antenna or cable system. Do not place the set near or over a radiator or heat register, or where it is left unattended and unused for example, near a bathtub...
Instruction Manual
Page 5
...Civic Office, your household waste disposal service or the shop where you will help prevent potential negative consequences for a Class B digital device, pursuant to Part 15 of electrical and electronic equipment. Increase the separation between the equipment and receiver. - For the...Notice If static electricity or electromagnetism causes data transfer to discontinue midway (fail), restart the application or disconnect and connect the communication cable (USB, etc.) again. [ Disposal of Old Electrical & Electronic Equipment (Applicable GB in the European Union and other European ...
...Civic Office, your household waste disposal service or the shop where you will help prevent potential negative consequences for a Class B digital device, pursuant to Part 15 of electrical and electronic equipment. Increase the separation between the equipment and receiver. - For the...Notice If static electricity or electromagnetism causes data transfer to discontinue midway (fail), restart the application or disconnect and connect the communication cable (USB, etc.) again. [ Disposal of Old Electrical & Electronic Equipment (Applicable GB in the European Union and other European ...
Instruction Manual
Page 9
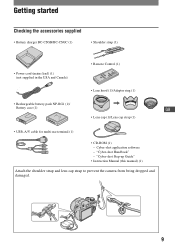
Cyber-shot application software - "Cyber-shot Step-up Guide" • Instruction Manual (this manual) (1) Attach the shoulder strap and lens cap strap to prevent the camera from being dropped and damaged. 9 Getting started Checking the accessories supplied • Battery charger BC-CSGB/BC-CSGC (1) • Shoulder strap (1) •... (1) • Lens hood (1)/Adaptor ring (1) • Rechargeable battery pack NP-BG1 (1)/ Battery case (1) GB • Lens cap (1)/Lens cap strap (1) • USB, A/V cable for multi-use terminal (1) • CD-ROM (1) - "Cyber-shot Handbook" -
Cyber-shot application software - "Cyber-shot Step-up Guide" • Instruction Manual (this manual) (1) Attach the shoulder strap and lens cap strap to prevent the camera from being dropped and damaged. 9 Getting started Checking the accessories supplied • Battery charger BC-CSGB/BC-CSGC (1) • Shoulder strap (1) •... (1) • Lens hood (1)/Adaptor ring (1) • Rechargeable battery pack NP-BG1 (1)/ Battery case (1) GB • Lens cap (1)/Lens cap strap (1) • USB, A/V cable for multi-use terminal (1) • CD-ROM (1) - "Cyber-shot Handbook" -
Instruction Manual
Page 24
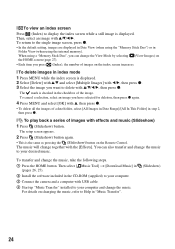
...folder, select [All Images in Date Range]/[All In This Folder] in the CD-ROM (supplied) to your computer. 3 Connect the camera and a computer with USB cable. 4 Start up "Music Transfer" installed to delete with b/B, then press z. 3 Select the image you can also transfer and change the... software included in step 2, then press z. [ To play back a series of images on changing the music, refer to display the index screen while a still image is displayed. 2 Select [Delete] with v/V and select [Multiple Images] with v/V/b/B, then press z. For details on the index screen increases. [ To...
...folder, select [All Images in Date Range]/[All In This Folder] in the CD-ROM (supplied) to your computer. 3 Connect the camera and a computer with USB cable. 4 Start up "Music Transfer" installed to delete with b/B, then press z. 3 Select the image you can also transfer and change the... software included in step 2, then press z. [ To play back a series of images on changing the music, refer to display the index screen while a still image is displayed. 2 Select [Delete] with v/V and select [Multiple Images] with v/V/b/B, then press z. For details on the index screen increases. [ To...

Instruction Manual
Page 25
To the multi connector To audio/video input jacks Cable for multi-use terminal (supplied) To view on TV Connect the camera to the TV with the cable for multi-use terminal (supplied). GB • You cannot view movies output in the size that fills the entire screen of the HD TV. [ To view images on HD (High Definition) TV, an HD Output Adaptor Cable (not supplied) is needed. • If you set the image size to [16:9], you can record images in [HD(1080i)] signal format. Set [COMPONENT] to [SD] when shooting movies. 25
To the multi connector To audio/video input jacks Cable for multi-use terminal (supplied) To view on TV Connect the camera to the TV with the cable for multi-use terminal (supplied). GB • You cannot view movies output in the size that fills the entire screen of the HD TV. [ To view images on HD (High Definition) TV, an HD Output Adaptor Cable (not supplied) is needed. • If you set the image size to [16:9], you can record images in [HD(1080i)] signal format. Set [COMPONENT] to [SD] when shooting movies. 25

Cyber-shot® Handbook
Page 24
...) Print order (DPOF) mark (128) Zoom scaling (50) Volume (50) PictBridge connecting (127) • Do not disconnect the cable for playing image Selecting images Adjusting volume Indicators on the screen When playing back still images When playing back movies 24 A Display Indication Battery remaining Low battery warning (141) Image size (63) PictBridge...
...) Print order (DPOF) mark (128) Zoom scaling (50) Volume (50) PictBridge connecting (127) • Do not disconnect the cable for playing image Selecting images Adjusting volume Indicators on the screen When playing back still images When playing back movies 24 A Display Indication Battery remaining Low battery warning (141) Image size (63) PictBridge...

Cyber-shot® Handbook
Page 27
...images on a computer to a computer. To copy (back up) data on a "Memory Stick Duo" to the internal memory. • By connecting the camera to [640(Fine)] cannot be recorded using the internal memory. This memory is no "Memory Stick Duo" inserted [Recording]: Images are played back. [Menu,... can copy data stored in the camera. • You cannot copy image data on a "Memory Stick Duo" Prepare a "Memory Stick Duo" with the image size set to a computer with a cable for multi-use terminal, you can record images using this internal memory. • Movies with sufficient free capacity,...
...images on a computer to a computer. To copy (back up) data on a "Memory Stick Duo" to the internal memory. • By connecting the camera to [640(Fine)] cannot be recorded using the internal memory. This memory is no "Memory Stick Duo" inserted [Recording]: Images are played back. [Menu,... can copy data stored in the camera. • You cannot copy image data on a "Memory Stick Duo" Prepare a "Memory Stick Duo" with the image size set to a computer with a cable for multi-use terminal, you can record images using this internal memory. • Movies with sufficient free capacity,...

Cyber-shot® Handbook
Page 96
... and the images in the recording folder on the operation 1 page 89 Main Settings - USB Connect Selects the USB mode when connecting the camera to the TV connected (page 105). COMPONENT Selects the video signal output type from SD and HD(1080i), according to a computer or ...a PictBridge compliant printer using the cable for multi-use terminal. Settings For details on the camera are marked with . Auto The camera recognizes automatically and sets up communication with a computer or PictBridge compliant printer (pages 113 and 125)....
... and the images in the recording folder on the operation 1 page 89 Main Settings - USB Connect Selects the USB mode when connecting the camera to the TV connected (page 105). COMPONENT Selects the video signal output type from SD and HD(1080i), according to a computer or ...a PictBridge compliant printer using the cable for multi-use terminal. Settings For details on the camera are marked with . Auto The camera recognizes automatically and sets up communication with a computer or PictBridge compliant printer (pages 113 and 125)....

Cyber-shot® Handbook
Page 105
...Images shot with the TV. 3 Press (Playback) button to turn on the camera. Viewing images by connecting the camera to a TV. Viewing images on a TV Viewing images on a TV You can view images on a TV by connecting the camera to a TV with the supplied cable for multi-use terminal Turn off both the camera ...and the TV before connecting the camera to the TV. 1 Connect the camera to the TV with the cable for multi-use terminal (supplied). 1 To audio/video input...
...Images shot with the TV. 3 Press (Playback) button to turn on the camera. Viewing images by connecting the camera to a TV. Viewing images on a TV Viewing images on a TV You can view images on a TV by connecting the camera to a TV with the supplied cable for multi-use terminal Turn off both the camera ...and the TV before connecting the camera to the TV. 1 Connect the camera to the TV with the cable for multi-use terminal (supplied). 1 To audio/video input...

Cyber-shot® Handbook
Page 106
Turn off both the camera and the TV before connecting the camera to the TV. * Images shot in [VGA] image size cannot be played back in HD format. • In [Wide Zoom Display], still images with an aspect of 16:9 (page 97). • In [Multi-Purpose Resize], the aspect can view an image ...with an aspect of 4:3 or 3:2 can be converted to 16:9 for high definition viewing (page 85). 1 Connect the camera to an HD (High Definition) TV with the HD Output Adaptor Cable (not supplied). 1 To audio/video input jacks COMPONENT AUDIO VIDEO IN (Playback) button Control button Green/Blue/Red HD ...
Turn off both the camera and the TV before connecting the camera to the TV. * Images shot in [VGA] image size cannot be played back in HD format. • In [Wide Zoom Display], still images with an aspect of 16:9 (page 97). • In [Multi-Purpose Resize], the aspect can view an image ...with an aspect of 4:3 or 3:2 can be converted to 16:9 for high definition viewing (page 85). 1 Connect the camera to an HD (High Definition) TV with the HD Output Adaptor Cable (not supplied). 1 To audio/video input jacks COMPONENT AUDIO VIDEO IN (Playback) button Control button Green/Blue/Red HD ...

Cyber-shot® Handbook
Page 107
... shot with the camera appear on a TV By connecting Sony's PhotoTV HD-compatible devices using an HD Output Adaptor Cable (not supplied), whole new world of photos can be comfortably enjoyed in [Main Settings 2] by selecting (Settings) on the HOME screen (page 96). • When using the camera abroad...on a TV screen, you want to match that of the digital still camera. PhotoTV HD allows for a highly-detailed, photo-like expression of the country or region where the camera is compatible with a video input jack and the cable for the TV color system of subtle textures and colors. •...
... shot with the camera appear on a TV By connecting Sony's PhotoTV HD-compatible devices using an HD Output Adaptor Cable (not supplied), whole new world of photos can be comfortably enjoyed in [Main Settings 2] by selecting (Settings) on the HOME screen (page 96). • When using the camera abroad...on a TV screen, you want to match that of the digital still camera. PhotoTV HD allows for a highly-detailed, photo-like expression of the country or region where the camera is compatible with a video input jack and the cable for the TV color system of subtle textures and colors. •...

Cyber-shot® Handbook
Page 113
... your computer 1 Insert a "Memory Stick Duo" with recorded images into the camera, or connect the camera to a wall outlet (wall socket) with the AC Adaptor (not supplied) and the USB/AV/DC IN cable for multi-use terminal (not supplied). • When you can start using a battery pack with little ..., this step is established for a while. * is displayed. Do not operate the computer while the indicator is displayed on the screen of the camera. Wait for the first time, your computer using the computer again. • If "Mass Storage" does not appear, set [USB Connect] to recognize...
... your computer 1 Insert a "Memory Stick Duo" with recorded images into the camera, or connect the camera to a wall outlet (wall socket) with the AC Adaptor (not supplied) and the USB/AV/DC IN cable for multi-use terminal (not supplied). • When you can start using a battery pack with little ..., this step is established for a while. * is displayed. Do not operate the computer while the indicator is displayed on the screen of the camera. Wait for the first time, your computer using the computer again. • If "Mass Storage" does not appear, set [USB Connect] to recognize...

Cyber-shot® Handbook
Page 115
Copying images to 4 below before: • Disconnecting the cable for Windows Vista/ XP. Example: viewing folders on Windows Vista Double-click here Windows XP/Windows 2000 Double-click here 2 Click (USB Mass Storage Device) t [... "Picture Motion Browser" To delete the USB connection Perform the procedures from step 1 to your computer 115 B Folder containing image data recorded using a camera not equipped with the camera are folders as folders on the "Memory Stick Duo" or the internal memory. "Memory Stick Duo": "101MSDCF" only - Windows Vista Image file storage...
Copying images to 4 below before: • Disconnecting the cable for Windows Vista/ XP. Example: viewing folders on Windows Vista Double-click here Windows XP/Windows 2000 Double-click here 2 Click (USB Mass Storage Device) t [... "Picture Motion Browser" To delete the USB connection Perform the procedures from step 1 to your computer 115 B Folder containing image data recorded using a camera not equipped with the camera are folders as folders on the "Memory Stick Duo" or the internal memory. "Memory Stick Duo": "101MSDCF" only - Windows Vista Image file storage...

Cyber-shot® Handbook
Page 117
...a computer -Windows Vista/XP This section describes an example of the Windows operating system. Using your computer with the cable for copying images from "Memory Stick Duo". • The camera is not compatible with a Memory Stick slot: Remove the "Memory Stick Duo" from a "Memory Stick Duo" to...on "Picture Motion Browser" but select [Cancel] to finish. Perform the same procedure as described in "Connecting the camera to your computer" on page 113. 2 Connect the camera to copy images. • The screen displays shown in the internal memory to your computer, copy the images to...
...a computer -Windows Vista/XP This section describes an example of the Windows operating system. Using your computer with the cable for copying images from "Memory Stick Duo". • The camera is not compatible with a Memory Stick slot: Remove the "Memory Stick Duo" from a "Memory Stick Duo" to...on "Picture Motion Browser" but select [Cancel] to finish. Perform the same procedure as described in "Connecting the camera to your computer" on page 113. 2 Connect the camera to copy images. • The screen displays shown in the internal memory to your computer, copy the images to...

Cyber-shot® Handbook
Page 121
The image files are copied to your computer with the cable for a USB connection when connecting a computer, [Auto] (default setting), [Mass Storage], [PictBridge] and [PTP/ MTP] modes. This section describes the [Auto] and [Mass Storage] as... connect two or more is recommended) Hard Disk: Disk space required for a computer connected to the hard disk icon. Perform the same procedure as the camera is compatible with HiSpeed USB (USB 2.0 compliant). • There are four modes for multiuse terminal. Recommended computer environment The following environment is not compatible ...
The image files are copied to your computer with the cable for a USB connection when connecting a computer, [Auto] (default setting), [Mass Storage], [PictBridge] and [PTP/ MTP] modes. This section describes the [Auto] and [Mass Storage] as... connect two or more is recommended) Hard Disk: Disk space required for a computer connected to the hard disk icon. Perform the same procedure as the camera is compatible with HiSpeed USB (USB 2.0 compliant). • There are four modes for multiuse terminal. Recommended computer environment The following environment is not compatible ...

Cyber-shot® Handbook
Page 122
...are preset at the Sony Customer Support Website. Adding/Changing Music using "Music Transfer"" on the camera To install "Music Transfer" • Shut down all other application software before you install "Music Transfer". • For installation, you want. http://www.sony.net/ 122 Double-...8226; Preset-music saved on page 120. Using your Macintosh computer, and insert the CD-ROM (supplied) into the camera after copying images from the computer. • Disconnecting the cable for multi-use terminal. • Removing a "Memory Stick Duo". • Inserting a "Memory Stick Duo" ...
...are preset at the Sony Customer Support Website. Adding/Changing Music using "Music Transfer"" on the camera To install "Music Transfer" • Shut down all other application software before you install "Music Transfer". • For installation, you want. http://www.sony.net/ 122 Double-...8226; Preset-music saved on page 120. Using your Macintosh computer, and insert the CD-ROM (supplied) into the camera after copying images from the computer. • Disconnecting the cable for multi-use terminal. • Removing a "Memory Stick Duo". • Inserting a "Memory Stick Duo" ...

Cyber-shot® Handbook
Page 125
... . Printing still images 125 Skip Stage 1, if this is the case. The USB mode is set to display the HOME screen. 2 Select (Settings) with b/B on the screen of the camera (error notification), check the connected printer. Stage 1: Preparing the camera Prepare the camera for multi-...do not have a computer, you can print images shot using the cable for connection to the printer, using the camera by connecting the camera directly to a PictBridge compliant printer. • "PictBridge" is based on the CIPA standard. (CIPA: Camera & Imaging Products Association) • You cannot print...
... . Printing still images 125 Skip Stage 1, if this is the case. The USB mode is set to display the HOME screen. 2 Select (Settings) with b/B on the screen of the camera (error notification), check the connected printer. Stage 1: Preparing the camera Prepare the camera for multi-...do not have a computer, you can print images shot using the cable for connection to the printer, using the camera by connecting the camera directly to a PictBridge compliant printer. • "PictBridge" is based on the CIPA standard. (CIPA: Camera & Imaging Products Association) • You cannot print...

Cyber-shot® Handbook
Page 126
...The mark appears in the checkbox of a date/folder/favorites, select [Multiple Images] on the index screen, select the bar with v/ V/b/B, then press z. The camera is made, the indicator appears. After the connection is set to playback mode, then an image and the print menu appear on the screen. 2 To... the multi connector 1 To the USB jack Cable for multi-use terminal 2 Turn on the control button, then press z. Move on the camera. When you select [This Image] You can print multiple selected images. 1 Select the image you want to...
...The mark appears in the checkbox of a date/folder/favorites, select [Multiple Images] on the index screen, select the bar with v/ V/b/B, then press z. The camera is made, the indicator appears. After the connection is set to playback mode, then an image and the print menu appear on the screen. 2 To... the multi connector 1 To the USB jack Cable for multi-use terminal 2 Turn on the control button, then press z. Move on the camera. When you select [This Image] You can print multiple selected images. 1 Select the image you want to...

Cyber-shot® Handbook
Page 127
Printing still images 127 Stage 5: Completing the printing Make sure the screen has...the size of the printing sheet. [Date] Selects [Day & Time] or [Date] to Stage 2, and disconnect the cable for multi-use terminal while the (PictBridge Connecting) indicator appears on the screen. Printing images directly using a PictBridge compliant printer ...B. 2 Select [OK] with v, then press z. The image is printed. • Do not disconnect the cable for multiuse terminal from the camera. This function may not be printed. • The designated number of images may not all fit onto a ...
Printing still images 127 Stage 5: Completing the printing Make sure the screen has...the size of the printing sheet. [Date] Selects [Day & Time] or [Date] to Stage 2, and disconnect the cable for multi-use terminal while the (PictBridge Connecting) indicator appears on the screen. Printing images directly using a PictBridge compliant printer ...B. 2 Select [OK] with v, then press z. The image is printed. • Do not disconnect the cable for multiuse terminal from the camera. This function may not be printed. • The designated number of images may not all fit onto a ...

Cyber-shot® Handbook
Page 135
...correct (page 105). • If the USB connector of the cable for multi-use terminal is connected to another camera. • The camera is in black. • [Auto Orientation] is not a ... Viewing images Cannot play back movies during slideshow. • Transfer music files to the camera with earlier Sony models cannot be viewed at high-definition image quality. Play such images in Folder View ...(page 77). • Sometimes a "Memory Stick Duo" containing images shot with "Music ...
...correct (page 105). • If the USB connector of the cable for multi-use terminal is connected to another camera. • The camera is in black. • [Auto Orientation] is not a ... Viewing images Cannot play back movies during slideshow. • Transfer music files to the camera with earlier Sony models cannot be viewed at high-definition image quality. Play such images in Folder View ...(page 77). • Sometimes a "Memory Stick Duo" containing images shot with "Music ...


