Operating Instructions
Page 9
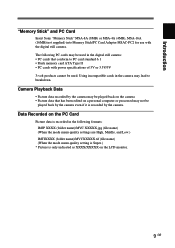
..."Memory Stick" and PC Card Insert Sony "Memory Stick" MSA-8A (8MB) or MSA-4A (4MB), MSA-16A (16MB)(not supplied) into Memory Stick/PC Card Adaptor MSAC-PC2 for use with power specifications of 5V or 3.3V/5V 3-volt products cannot be used. Data Recorded on the PC Card ...Picture data is recorded in the following PC cards may be used in the camera may lead to PC card standard 6.1 • Flash memory card ATA Type II • PC cards with the digital still camera. Using incompatible cards in the digital still camera: • PC cards that has been edited on ...
..."Memory Stick" and PC Card Insert Sony "Memory Stick" MSA-8A (8MB) or MSA-4A (4MB), MSA-16A (16MB)(not supplied) into Memory Stick/PC Card Adaptor MSAC-PC2 for use with power specifications of 5V or 3.3V/5V 3-volt products cannot be used. Data Recorded on the PC Card ...Picture data is recorded in the following PC cards may be used in the camera may lead to PC card standard 6.1 • Flash memory card ATA Type II • PC cards with the digital still camera. Using incompatible cards in the digital still camera: • PC cards that has been edited on ...
Operating Instructions
Page 10
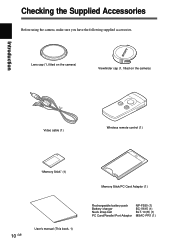
Checking the Supplied Accessories Before using the camera, make sure you have the following supplied accessories. Lens cap (1, fitted on the camera) Viewfinder cap (1, fitted on the camera) Introduction Video cable (1) Wireless remote control (1) "Memory Stick" (1) 10 GB User's manual (This book, 1) Memory Stick/PC Card Adaptor (1) Rechargeable battery pack Battery charger Neck strap belt PC Card/Parallel Port Adaptor NP-F550 (1) BC-V615 (1) BLT-10(H) (1) MSAC-PR1 (1)
Checking the Supplied Accessories Before using the camera, make sure you have the following supplied accessories. Lens cap (1, fitted on the camera) Viewfinder cap (1, fitted on the camera) Introduction Video cable (1) Wireless remote control (1) "Memory Stick" (1) 10 GB User's manual (This book, 1) Memory Stick/PC Card Adaptor (1) Rechargeable battery pack Battery charger Neck strap belt PC Card/Parallel Port Adaptor NP-F550 (1) BC-V615 (1) BLT-10(H) (1) MSAC-PR1 (1)
Operating Instructions
Page 12
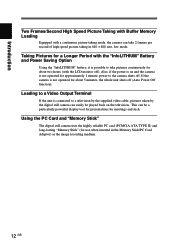
.... Taking Pictures for a Longer Period with a continuous picture taking in the Memory Stick/PC Card Adaptor) as the image recording medium. 12 GB Using the PC Card and "Memory Stick" The digital still camera uses the highly reliable PC card (PCMCIA ATA TYPE II) and long-lasting "Memory Stick" (for about two hours (with the LCD monitor off (Auto...
.... Taking Pictures for a Longer Period with a continuous picture taking in the Memory Stick/PC Card Adaptor) as the image recording medium. 12 GB Using the PC Card and "Memory Stick" The digital still camera uses the highly reliable PC card (PCMCIA ATA TYPE II) and long-lasting "Memory Stick" (for about two hours (with the LCD monitor off (Auto...

Operating Instructions
Page 15
...Memory Stick/PC Card Adaptor are both referred to here as CARD. 8 LCD Button Switches the LCD monitor on and off . !¡ LCD Monitor Lets you read necessary picture taking information, frame shots, and view recorded pictures. !™ MENU Button Brings up the menu on the LCD monitor to change the settings of the camera... or cards. !£ EXECUTE Button Lets you choose items when adjusting ...
...Memory Stick/PC Card Adaptor are both referred to here as CARD. 8 LCD Button Switches the LCD monitor on and off . !¡ LCD Monitor Lets you read necessary picture taking information, frame shots, and view recorded pictures. !™ MENU Button Brings up the menu on the LCD monitor to change the settings of the camera... or cards. !£ EXECUTE Button Lets you choose items when adjusting ...

Operating Instructions
Page 28
... the "Memory Stick" in the Memory Stick/PC Card Adaptor and then insert the adaptor into the Memory Stick/PC Card Adaptor until it into the camera. In this guide the "Memory Stick", when inserted in the Memory Stick/PC Card Adaptor, and the PC Card are referred to as Card. To Take out the "Memory Stick" from the Memory Stick/PC Card Adaptor...
... the "Memory Stick" in the Memory Stick/PC Card Adaptor and then insert the adaptor into the Memory Stick/PC Card Adaptor until it into the camera. In this guide the "Memory Stick", when inserted in the Memory Stick/PC Card Adaptor, and the PC Card are referred to as Card. To Take out the "Memory Stick" from the Memory Stick/PC Card Adaptor...

Operating Instructions
Page 35
You may damage the PC Card or "Memory Stick". 35 continued on the card. QUAL USESIRZE DRIVE 2000 5.6 AF LOCK Indicator 9 Press the release button completely. EV ISO AE-LOCK R-REVIEW The AF LOCK indicator in the center of ... picture is being recorded on next page GB Caution When the access lamp is lit, do not remove the card or turn off . 6 Center the subject on the card is completed and the camera is ready to focus in the viewfinder flashes. Taking a Picture AE WB 2000 5.6 7 Adjust the zoom by rotating the...
You may damage the PC Card or "Memory Stick". 35 continued on the card. QUAL USESIRZE DRIVE 2000 5.6 AF LOCK Indicator 9 Press the release button completely. EV ISO AE-LOCK R-REVIEW The AF LOCK indicator in the center of ... picture is being recorded on next page GB Caution When the access lamp is lit, do not remove the card or turn off . 6 Center the subject on the card is completed and the camera is ready to focus in the viewfinder flashes. Taking a Picture AE WB 2000 5.6 7 Adjust the zoom by rotating the...

Operating Instructions
Page 50
...is checked, the README document is not flashing. Note When using the "Memory Stick", insert the "Memory Stick" into the card insertion slot. 50 GB Viewing 10 Click [Finish]. Caution If you may damage the PC Card or "Memory Stick". 2 2 Make sure the 4 mark is recognized. Installation is ...complete. 9 Confirm the drive name of the "Install Driver" directions (page 49) is facing up and slowly slide the card into the Memory Stick/PC Card Adaptor. 1 1 Make sure ...
...is checked, the README document is not flashing. Note When using the "Memory Stick", insert the "Memory Stick" into the card insertion slot. 50 GB Viewing 10 Click [Finish]. Caution If you may damage the PC Card or "Memory Stick". 2 2 Make sure the 4 mark is recognized. Installation is ...complete. 9 Confirm the drive name of the "Install Driver" directions (page 49) is facing up and slowly slide the card into the Memory Stick/PC Card Adaptor. 1 1 Make sure ...

Operating Instructions
Page 51
...open [Program] from the [Start] menu and click on [Sony MSAC-PR1]-[Uninstall]. Doing so may remove it from your PC Card or 2 "Memory Stick". 2 Press the eject button and slowly pull out the card. Caution Do not take out the card when the power/ access lamp is not flashing. The uninstall... program starts. Viewing Taking Out the Card 1 1 Make sure the power/access lamp...
...open [Program] from the [Start] menu and click on [Sony MSAC-PR1]-[Uninstall]. Doing so may remove it from your PC Card or 2 "Memory Stick". 2 Press the eject button and slowly pull out the card. Caution Do not take out the card when the power/ access lamp is not flashing. The uninstall... program starts. Viewing Taking Out the Card 1 1 Make sure the power/access lamp...

Operating Instructions
Page 72
... • Attach serial numbers on , and the menu is automatically attached as a file name to the picture. Mem" using the 4(UP)/$(DOWN) buttons. CAMERA MENU Custom PC Card INIT User File Save New Folder ID Set File No. FILE NO. The LCD monitor turns on an individual... card. • Attach serial numbers consecutively, even if the card is displayed. Advanced Operations Settings Choosing a Method to Attach a File Name to a Picture When a picture is taken, a number from 00001-99999 is ...
... • Attach serial numbers on , and the menu is automatically attached as a file name to the picture. Mem" using the 4(UP)/$(DOWN) buttons. CAMERA MENU Custom PC Card INIT User File Save New Folder ID Set File No. FILE NO. The LCD monitor turns on an individual... card. • Attach serial numbers consecutively, even if the card is displayed. Advanced Operations Settings Choosing a Method to Attach a File Name to a Picture When a picture is taken, a number from 00001-99999 is ...

Operating Instructions
Page 73
... the last recorded picture. Note • You can now change the "Memory" setting. 6 Select either "off Serial numbers are attached as file names and continue in consecutive order even if a new card is inserted and pictures are recorded on Serial numbers are attached starting number....99999. Advanced Operations Settings 7 Choose "Start No." 5 Select "Memory" using the 4(UP)/ $(DOWN) buttons and press the EXECUTE button. When a card is inserted. using the 4(UP)/ $(DOWN) buttons and press the EXECUTE button. on that card, file names are attached as file names on next page GB ...
... the last recorded picture. Note • You can now change the "Memory" setting. 6 Select either "off Serial numbers are attached as file names and continue in consecutive order even if a new card is inserted and pictures are recorded on Serial numbers are attached starting number....99999. Advanced Operations Settings 7 Choose "Start No." 5 Select "Memory" using the 4(UP)/ $(DOWN) buttons and press the EXECUTE button. When a card is inserted. using the 4(UP)/ $(DOWN) buttons and press the EXECUTE button. on that card, file names are attached as file names on next page GB ...

Operating Instructions
Page 93
... is displayed on next page GB Caution Do not remove the card during picture deletion. Erasing Selected Pictures You can erase selected saved pictures, with the exception of protected ...pictures, from the card. 1 1 While pressing the mode lock (green), turn the power/mode dial to the state shown in step 1. Delete 1 shot Select All 93 continued on the LCD monitor.... 8 EXIT 3 Choose "Delete" using the 4(UP)/$(DOWN) buttons. PLAY MENU Rotate D.Zoom Auto Play Protect Delete PC Card INIT ID Set ...
... is displayed on next page GB Caution Do not remove the card during picture deletion. Erasing Selected Pictures You can erase selected saved pictures, with the exception of protected ...pictures, from the card. 1 1 While pressing the mode lock (green), turn the power/mode dial to the state shown in step 1. Delete 1 shot Select All 93 continued on the LCD monitor.... 8 EXIT 3 Choose "Delete" using the 4(UP)/$(DOWN) buttons. PLAY MENU Rotate D.Zoom Auto Play Protect Delete PC Card INIT ID Set ...

Operating Instructions
Page 95
... Operations Erasing 9 Press the EXECUTE button. Picture erasing begins. MENU EXCUTE 11 Press the EXIT button. The menu disappears. Caution Do not remove the card during playback. Erasing Pictures during Playback You can erase pictures shown on the LCD monitor. EXIT 95 continued on . •CAM 3~ 5 •...;PLAY MENU 2 2 Press the MENU button. Damage to the "Memory Stick" or PC Card may occur. 10 Press the EXIT button. •OFF •CAM •PLAY The LCD monitor display returns to PLAY. •OFF ...
... Operations Erasing 9 Press the EXECUTE button. Picture erasing begins. MENU EXCUTE 11 Press the EXIT button. The menu disappears. Caution Do not remove the card during playback. Erasing Pictures during Playback You can erase pictures shown on the LCD monitor. EXIT 95 continued on . •CAM 3~ 5 •...;PLAY MENU 2 2 Press the MENU button. Damage to the "Memory Stick" or PC Card may occur. 10 Press the EXIT button. •OFF •CAM •PLAY The LCD monitor display returns to PLAY. •OFF ...

Operating Instructions
Page 96
... 4(UP)/$(DOWN) buttons. Delete 1 Shot Select All The message "Do you delete this image?" Picture erasing begins. Damage to the state shown in step 4. Caution Do not remove the card during picture deletion. The Delete menu is finished, the LCD monitor returns to the "Memory Stick" or PC Card may occur. appears. Note To...
... 4(UP)/$(DOWN) buttons. Delete 1 Shot Select All The message "Do you delete this image?" Picture erasing begins. Damage to the state shown in step 4. Caution Do not remove the card during picture deletion. The Delete menu is finished, the LCD monitor returns to the "Memory Stick" or PC Card may occur. appears. Note To...
Operating Instructions
Page 107
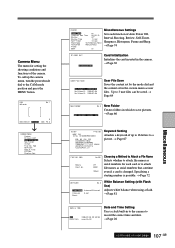
... 3 user files can be saved. → Page 64 NEW FOLDER No.2 Add No.0002 Folder OK? MEM Memory Start No. Specifying a starting number is changed. Card Initialization Initializes the card inserted in the camera. → Page 30 USER FILE SAVE No.1(User1) 1999-07-04 No.2(User2) 1999-07-04 No.3(User3)... Initialize OK? CAM WB-auto No.1 0001/00172 +0.50EV ↓ 0 300 F3.4 CAMERA MENU Custom PC Card INIT User File Save New Folder ID Set File No. Camera Menu The menu for each function of the camera. To call up to 16 letters to record the correct time and date. → ...
... 3 user files can be saved. → Page 64 NEW FOLDER No.2 Add No.0002 Folder OK? MEM Memory Start No. Specifying a starting number is changed. Card Initialization Initializes the card inserted in the camera. → Page 30 USER FILE SAVE No.1(User1) 1999-07-04 No.2(User2) 1999-07-04 No.3(User3)... Initialize OK? CAM WB-auto No.1 0001/00172 +0.50EV ↓ 0 300 F3.4 CAMERA MENU Custom PC Card INIT User File Save New Folder ID Set File No. Camera Menu The menu for each function of the camera. To call up to 16 letters to record the correct time and date. → ...

Operating Instructions
Page 120
JPEG (compression) PCMCIA ATA TYPE II card Sony "Memory Stick" (for the whole area) F2 to F11 (wide angle) F2.4 to F11 (telephoto) variable ...VQ800 (not supplied) 0.9 A, DC7.2 V when shooting (with LCD monitor on) 0.6 A, DC7.2 V when playing back (with Memory Stick/PC Card Adapter) 1/2 inch single-plate, solid-state picture element (all elements read) Total dot number: 1,500,000 pixels approx. Focusing screen... 150mm (51/5× 4× 6inches)(W× H× L) 820 g approx. (excluding the battery pack and PC Card) Digital still camera Super - TIFF (Non compression) High, Middle, Low -
JPEG (compression) PCMCIA ATA TYPE II card Sony "Memory Stick" (for the whole area) F2 to F11 (wide angle) F2.4 to F11 (telephoto) variable ...VQ800 (not supplied) 0.9 A, DC7.2 V when shooting (with LCD monitor on) 0.6 A, DC7.2 V when playing back (with Memory Stick/PC Card Adapter) 1/2 inch single-plate, solid-state picture element (all elements read) Total dot number: 1,500,000 pixels approx. Focusing screen... 150mm (51/5× 4× 6inches)(W× H× L) 820 g approx. (excluding the battery pack and PC Card) Digital still camera Super - TIFF (Non compression) High, Middle, Low -
Operating Instructions
Page 122
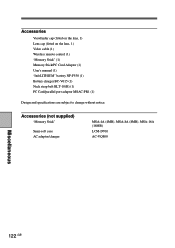
Accessories Viewfinder cap (fitted on the lens, 1) Lens cap (fitted on the lens, 1) Video cable (1) Wireless remote control (1) "Memory Stick" (1) Memory Stick/PC Card Adaptor (1) User's manual (1) "InfoLITHIUM" battery NP-F550 (1) Battery charger BC-V615 (1) Neck strap belt BLT-10(H) (1) PC Card/parallel port adaptor MSAC-PR1 (1) Design and specifications are subject to change without notice. Accessories (not supplied) "Memory Stick" Semi-soft case AC adaptor/charger MSA-4A (4MB), MSA-8A (8MB), MSA-16A (16MB) LCM-D700 AC-VQ800 Miscellaneous 122 GB
Accessories Viewfinder cap (fitted on the lens, 1) Lens cap (fitted on the lens, 1) Video cable (1) Wireless remote control (1) "Memory Stick" (1) Memory Stick/PC Card Adaptor (1) User's manual (1) "InfoLITHIUM" battery NP-F550 (1) Battery charger BC-V615 (1) Neck strap belt BLT-10(H) (1) PC Card/parallel port adaptor MSAC-PR1 (1) Design and specifications are subject to change without notice. Accessories (not supplied) "Memory Stick" Semi-soft case AC adaptor/charger MSA-4A (4MB), MSA-8A (8MB), MSA-16A (16MB) LCM-D700 AC-VQ800 Miscellaneous 122 GB

Operating Instructions
Page 123
... Set 101 Lens Cap 10 Light Meter Method 61 Lithium Button Battery 27 M Maintenance 111 Manual Exposure 52 Manual Focus 38 Memory Stick 28 Memory Stick/PC Card Adaptor 28 Menus 106 P PC Card 28 Picture Quality Mode 55 Picture Size 54 Playback 40, 88 Power Battery 23, 24 Wall Socket 104 Power Save...
... Set 101 Lens Cap 10 Light Meter Method 61 Lithium Button Battery 27 M Maintenance 111 Manual Exposure 52 Manual Focus 38 Memory Stick 28 Memory Stick/PC Card Adaptor 28 Menus 106 P PC Card 28 Picture Quality Mode 55 Picture Size 54 Playback 40, 88 Power Battery 23, 24 Wall Socket 104 Power Save...


