Operating Instructions
Page 1
Owner's Record The model and serial numbers are located on the bottom. Record the serial number in the space provided below. Model No. DSC-D770 © 1999 by Sony Corporation DSC-D770 Serial No. DSC-D770 3-867-444-11 (1) Digital Still Camera Operating Instructions Before operating the unit, please read this product. Refer to these numbers whenever you call upon your Sony dealer regarding this manual thoroughly, and retain it for future reference.
Owner's Record The model and serial numbers are located on the bottom. Record the serial number in the space provided below. Model No. DSC-D770 © 1999 by Sony Corporation DSC-D770 Serial No. DSC-D770 3-867-444-11 (1) Digital Still Camera Operating Instructions Before operating the unit, please read this product. Refer to these numbers whenever you call upon your Sony dealer regarding this manual thoroughly, and retain it for future reference.
Operating Instructions
Page 2
... between the equipment and receiver. - DISPOSE OF PROPERLY. Refer servicing to your nearest Sony Service Center or Factory Service Center. For the customers in a particular installation. Connect ...trash may cause harmful interference to provide reasonable protection against harmful interference in this manual could void your unwanted lithium ion batteries to qualified personnel only. To avoid... moisture. Consult the dealer or an experienced radio/TV technician for a Class B digital device, pursuant to comply with the same or equivalent type recommended by turning the...
... between the equipment and receiver. - DISPOSE OF PROPERLY. Refer servicing to your nearest Sony Service Center or Factory Service Center. For the customers in a particular installation. Connect ...trash may cause harmful interference to provide reasonable protection against harmful interference in this manual could void your unwanted lithium ion batteries to qualified personnel only. To avoid... moisture. Consult the dealer or an experienced radio/TV technician for a Class B digital device, pursuant to comply with the same or equivalent type recommended by turning the...
Operating Instructions
Page 3
Contents Introduction Battery Safety Precautions ...... 5 Operation Precautions 7 To Maintain the Efficiency of the Camera 7 Please Read This 8 Checking the Supplied Accessories 10 Features 11 Locations and Functions of Parts Front 13 Rear 14 Top 17 Bottom 19 ... Initializing a Card 30 Attaching the Viewfinder Cap 31 Attaching the Neck Strap Belt 32 Putting the Camera in a Semi-Soft Case ........ 33 Taking a Picture Taking Pictures 34 Locking the Focus 37 Setting the Focus Manually 38 Viewing Checking the Picture Content 40 Viewing Pictures on a Television 45 Using a PC Card ...
Contents Introduction Battery Safety Precautions ...... 5 Operation Precautions 7 To Maintain the Efficiency of the Camera 7 Please Read This 8 Checking the Supplied Accessories 10 Features 11 Locations and Functions of Parts Front 13 Rear 14 Top 17 Bottom 19 ... Initializing a Card 30 Attaching the Viewfinder Cap 31 Attaching the Neck Strap Belt 32 Putting the Camera in a Semi-Soft Case ........ 33 Taking a Picture Taking Pictures 34 Locking the Focus 37 Setting the Focus Manually 38 Viewing Checking the Picture Content 40 Viewing Pictures on a Television 45 Using a PC Card ...
Operating Instructions
Page 10
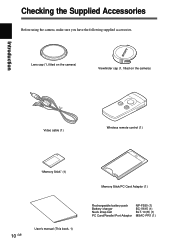
Checking the Supplied Accessories Before using the camera, make sure you have the following supplied accessories. Lens cap (1, fitted on the camera) Viewfinder cap (1, fitted on the camera) Introduction Video cable (1) Wireless remote control (1) "Memory Stick" (1) 10 GB User's manual (This book, 1) Memory Stick/PC Card Adaptor (1) Rechargeable battery pack Battery charger Neck strap belt PC Card/Parallel Port Adaptor NP-F550 (1) BC-V615 (1) BLT-10(H) (1) MSAC-PR1 (1)
Checking the Supplied Accessories Before using the camera, make sure you have the following supplied accessories. Lens cap (1, fitted on the camera) Viewfinder cap (1, fitted on the camera) Introduction Video cable (1) Wireless remote control (1) "Memory Stick" (1) 10 GB User's manual (This book, 1) Memory Stick/PC Card Adaptor (1) Rechargeable battery pack Battery charger Neck strap belt PC Card/Parallel Port Adaptor NP-F550 (1) BC-V615 (1) BLT-10(H) (1) MSAC-PR1 (1)
Operating Instructions
Page 11
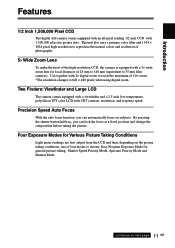
...focal distances of 28 mm to 140 mm (equivalent to 35 mm film cameras). Introduction Features 1/2 Inch 1,500,000 Pixel CCD The digital still camera comes equipped with an all-pixel reading 1/2 inch CCD with 2× digital zoom to reach the maximum of 10× zoom. *The resolution changes... 480 pixels when using digital zoom. Use together with 1,500,000 effective picture dots. By pressing the shutter button halfway, you can lock the focus at a fixed position and change the composition before taking , Shutter Speed Priority Mode, Aperture Priority Mode and Manual Mode. 11 continued on...
...focal distances of 28 mm to 140 mm (equivalent to 35 mm film cameras). Introduction Features 1/2 Inch 1,500,000 Pixel CCD The digital still camera comes equipped with an all-pixel reading 1/2 inch CCD with 2× digital zoom to reach the maximum of 10× zoom. *The resolution changes... 480 pixels when using digital zoom. Use together with 1,500,000 effective picture dots. By pressing the shutter button halfway, you can lock the focus at a fixed position and change the composition before taking , Shutter Speed Priority Mode, Aperture Priority Mode and Manual Mode. 11 continued on...

Operating Instructions
Page 13
...time draws near, the intervals between flashes become gradually shorter. Locations and Functions of Parts Locations and Functions of Parts Front 1 2 6 5 3 WB 4 1 Flash The camera has a built-in the WB (white balance) mode, white balance can manually adjust the zoom lens (28 mm to 140 mm (5×) on a 35 mm film... camera) by rotating the zoom ring. After adjusting the zoom, manually adjust the focus with the focus ring. 4 White Balance Button When HOLD is pressed. The flash is released when the light becomes constant. 6 ...
...time draws near, the intervals between flashes become gradually shorter. Locations and Functions of Parts Locations and Functions of Parts Front 1 2 6 5 3 WB 4 1 Flash The camera has a built-in the WB (white balance) mode, white balance can manually adjust the zoom lens (28 mm to 140 mm (5×) on a 35 mm film... camera) by rotating the zoom ring. After adjusting the zoom, manually adjust the focus with the focus ring. 4 White Balance Button When HOLD is pressed. The flash is released when the light becomes constant. 6 ...
Operating Instructions
Page 17
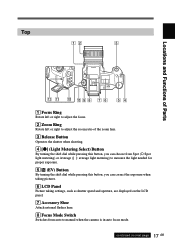
..., such as shutter speed and aperture, are displayed on the LCD panel. 7 Accessory Shoe Attach external flashes here. 8 Focus Mode Switch Switches from auto to manual when the camera is in auto focus mode. 17 continued on next page GB
..., such as shutter speed and aperture, are displayed on the LCD panel. 7 Accessory Shoe Attach external flashes here. 8 Focus Mode Switch Switches from auto to manual when the camera is in auto focus mode. 17 continued on next page GB
Operating Instructions
Page 34
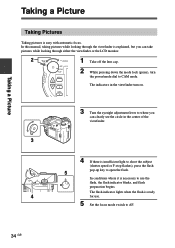
... eyesight adjustment lever to where you can clearly see the circle in the viewfinder turn MENU the power/mode dial to CAM mode. In this manual, taking pictures while looking through the viewfinder is easy with automatic focus. DRIVE Taking a Picture Taking a Picture Taking Pictures Taking pictures is explained, but you...
... eyesight adjustment lever to where you can clearly see the circle in the viewfinder turn MENU the power/mode dial to CAM mode. In this manual, taking pictures while looking through the viewfinder is easy with automatic focus. DRIVE Taking a Picture Taking a Picture Taking Pictures Taking pictures is explained, but you...
Operating Instructions
Page 37
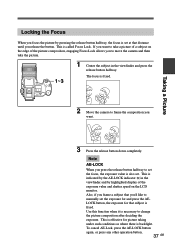
... under such conditions as where there is called Focus Lock. This is backlight. EV ISO AE-LOCK R-REVIEW QUAL USESIRZE DRIVE 2 Move the camera to manually set the exposure for that distance until you release the button. If you want . To cancel AE-Lock, press the AE-LOCK button again...is fixed. Locking the Focus When you focus the picture by highlighted display of the picture composition, engaging Focus Lock allows you to move the camera and then take a picture of a subject on the edge of the exposure value and shutter speed on the LCD monitor. LOCK button, the...
... under such conditions as where there is called Focus Lock. This is backlight. EV ISO AE-LOCK R-REVIEW QUAL USESIRZE DRIVE 2 Move the camera to manually set the exposure for that distance until you release the button. If you want . To cancel AE-Lock, press the AE-LOCK button again...is fixed. Locking the Focus When you focus the picture by highlighted display of the picture composition, engaging Focus Lock allows you to move the camera and then take a picture of a subject on the edge of the exposure value and shutter speed on the LCD monitor. LOCK button, the...
Operating Instructions
Page 38
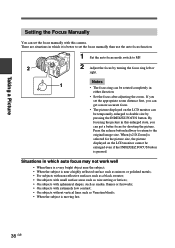
... 2 2 Adjust the focus by pressing the INDEX/EZ.FOCUS button. If you set the focus manually with extremely low contrast; • On subjects without vertical lines such as Venetian blinds; • ...When the subject is better to set the focus manually than use the auto focus function. 1 Set the auto focus mode switch to double size ... the original image size. When [x2 D.Zoom] is pressed. DRWIVBE Taking a Picture Setting the Focus Manually You can set the appropriate zoom distance first, you can get a more accurate focus. • The...
... 2 2 Adjust the focus by pressing the INDEX/EZ.FOCUS button. If you set the focus manually with extremely low contrast; • On subjects without vertical lines such as Venetian blinds; • ...When the subject is better to set the focus manually than use the auto focus function. 1 Set the auto focus mode switch to double size ... the original image size. When [x2 D.Zoom] is pressed. DRWIVBE Taking a Picture Setting the Focus Manually You can set the appropriate zoom distance first, you can get a more accurate focus. • The...

Operating Instructions
Page 39
Taking a Picture Situations in which it is better to focus manually • When the subject and its surroundings are both dark; • When the subject offers little contrast on the screen, such as with walls or ... a wire fence in front of the subject; • When the subject is bright, emits or reflects light; • When you want to take pictures of still subjects with a tripod. 39 GB
Taking a Picture Situations in which it is better to focus manually • When the subject and its surroundings are both dark; • When the subject offers little contrast on the screen, such as with walls or ... a wire fence in front of the subject; • When the subject is bright, emits or reflects light; • When you want to take pictures of still subjects with a tripod. 39 GB
Operating Instructions
Page 45
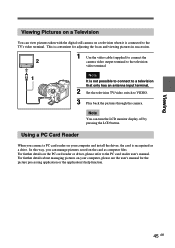
...Note It is connected to the PC card reader user's manual. Note You can turn the LCD monitor display off by pressing the LCD button. Viewing DRWIVBE Viewing Pictures on a Television You can view pictures taken with the digital still camera on a television when it is not possible to connect to... a television that only has an antenna input terminal. 2 Set the television TV/video switch to VIDEO. 3 Play back the pictures through the camera. For further details on the PC card...
...Note It is connected to the PC card reader user's manual. Note You can turn the LCD monitor display off by pressing the LCD button. Viewing DRWIVBE Viewing Pictures on a Television You can view pictures taken with the digital still camera on a television when it is not possible to connect to... a television that only has an antenna input terminal. 2 Set the television TV/video switch to VIDEO. 3 Play back the pictures through the camera. For further details on the PC card...

Operating Instructions
Page 46
...card as computer files. In this guide. In such cases, use the PC card slot on your computer, please see the user's manual for the picture processing application or the application's help function. Be sure the computer is recognized as the computer keyboard connection terminal. &#...port adaptor uses energy supplied by the computer keyboard. D-sub 25 pin connector (male) Computer Printer cable D-sub 25 pin connector (female) Camera (PC card/ parallel port adaptor) Keyboard connection terminal Power/access lamp Eject button PC card insertion slot DC plug DC jack Power (connection...
...card as computer files. In this guide. In such cases, use the PC card slot on your computer, please see the user's manual for the picture processing application or the application's help function. Be sure the computer is recognized as the computer keyboard connection terminal. &#...port adaptor uses energy supplied by the computer keyboard. D-sub 25 pin connector (male) Computer Printer cable D-sub 25 pin connector (female) Camera (PC card/ parallel port adaptor) Keyboard connection terminal Power/access lamp Eject button PC card insertion slot DC plug DC jack Power (connection...

Operating Instructions
Page 52
... from the choices Program AE (Program), Aperture Priority AE (Aperture), Shutter Speed Priority AE (Shutter) or Manual Exposure (Manual). 1 1 While pressing the mode lock (green), turn the LCD monitor ON. CAM AE MODE Program Aperture Shutter Manual Program (Program AE) In this step is displayed. 4 While pressing the shift button, rotate the shift...
... from the choices Program AE (Program), Aperture Priority AE (Aperture), Shutter Speed Priority AE (Shutter) or Manual Exposure (Manual). 1 1 While pressing the mode lock (green), turn the LCD monitor ON. CAM AE MODE Program Aperture Shutter Manual Program (Program AE) In this step is displayed. 4 While pressing the shift button, rotate the shift...

Operating Instructions
Page 53
...explained below. The camera is set, exit the menu. Program AE Turn the shift dial to the desired aperture. Note After deciding the exposure mode, select the shutter speed and/or aperture as P (Program AE), A (Aperture priority AE), S (Shutter Speed priority AE), and M (Manual Exposure). 5 ...aperture combination. While pressing the button, turn the shift dial to choose the shutter speed. Manual (Manual Exposure) You can decide the exposure by setting the shutter speed and aperture manually. Manual Exposure Turn the shift dial to choose the aperture. 53 GB When the exposure mode ...
...explained below. The camera is set, exit the menu. Program AE Turn the shift dial to the desired aperture. Note After deciding the exposure mode, select the shutter speed and/or aperture as P (Program AE), A (Aperture priority AE), S (Shutter Speed priority AE), and M (Manual Exposure). 5 ...aperture combination. While pressing the button, turn the shift dial to choose the shutter speed. Manual (Manual Exposure) You can decide the exposure by setting the shutter speed and aperture manually. Manual Exposure Turn the shift dial to choose the aperture. 53 GB When the exposure mode ...

Operating Instructions
Page 57
... WB 57 GB Note Settings can also be confirmed on the LCD monitor. Choosing the Picture Taking Brightness (EV compensation) When a exposure mode other than manual exposure (Manual) is chosen, you can adjust the brightness to fit the shooting conditions. 1 •OFF •CAM •PLAY •OFF •CAM •PLAY...
... WB 57 GB Note Settings can also be confirmed on the LCD monitor. Choosing the Picture Taking Brightness (EV compensation) When a exposure mode other than manual exposure (Manual) is chosen, you can adjust the brightness to fit the shooting conditions. 1 •OFF •CAM •PLAY •OFF •CAM •PLAY...

Operating Instructions
Page 75
... 2 more minutes (in CAM mode; When the histogram setting is set to "Auto", the histogram for that time, and power to the entire camera is not operated during shooting, the set interval may not be set within the range of picture display directly after approximately 1 minute (in PLAY mode... power will not turn off Review Time 5 sec Self-Timer 10 sec Sharpness Soft/Normal/Hard Histogram Manual/Auto Frame Beep on next page GB approximately 3 minutes in PLAY mode) if the camera is turned off after approximately 4 more minutes in CAM mode; The CUSTOM menu is set in one...
... 2 more minutes (in CAM mode; When the histogram setting is set to "Auto", the histogram for that time, and power to the entire camera is not operated during shooting, the set interval may not be set within the range of picture display directly after approximately 1 minute (in PLAY mode... power will not turn off Review Time 5 sec Self-Timer 10 sec Sharpness Soft/Normal/Hard Histogram Manual/Auto Frame Beep on next page GB approximately 3 minutes in PLAY mode) if the camera is turned off after approximately 4 more minutes in CAM mode; The CUSTOM menu is set in one...

Operating Instructions
Page 76
... blurred. • When set to NORMAL, the picture is being displayed with the review function "on" or when the REVIEW button is pressed. • When "Manual" is displayed on the LCD monitor.
... blurred. • When set to NORMAL, the picture is being displayed with the review function "on" or when the REVIEW button is pressed. • When "Manual" is displayed on the LCD monitor.

Operating Instructions
Page 80
... conditions of insufficient light, the flash automatically goes off , for situations such as appropriate. • When shots are taken at the telephoto setting (f = 26 mm) of a subject range of less than 1 meter...the zoom setting or use the flash. This is backlit. The flash mode is set to manual exposure, the shutter speed indicator or the aperture indicator flashes when it is necessary to use the... optional external flash unit, as taking a picture of a subject far from the camera and the light from the flash can occur under the following circumstances, resulting in flash, or ...
... conditions of insufficient light, the flash automatically goes off , for situations such as appropriate. • When shots are taken at the telephoto setting (f = 26 mm) of a subject range of less than 1 meter...the zoom setting or use the flash. This is backlit. The flash mode is set to manual exposure, the shutter speed indicator or the aperture indicator flashes when it is necessary to use the... optional external flash unit, as taking a picture of a subject far from the camera and the light from the flash can occur under the following circumstances, resulting in flash, or ...

Operating Instructions
Page 84
CAM DRIVE 1Shot Cont1 Cont2 Self Timer Interval Rec Cont1 In this mode than manual exposure, the exposure is automatically adjusted every time a picture is taken. Cont2 In this mode, the settings of the first picture are kept as pictures ...
CAM DRIVE 1Shot Cont1 Cont2 Self Timer Interval Rec Cont1 In this mode than manual exposure, the exposure is automatically adjusted every time a picture is taken. Cont2 In this mode, the settings of the first picture are kept as pictures ...


