
Operating Instructions
Page 3
... Accessories 5 About the Printing Pack 6 Names of Parts 7 Preparations 9 1 Power Connection 9 2 Loading the Print Cartridge ....... 10 3 Loading the Print Paper 11 4 Inserting the "Memory Stick" .... 13 Printing 14 Operation During Printing 14 Printing Images With Print Mark (DPOF Print 15 Assigning a Print Mark 15 ...21 PC Interface Kit 23 Preparation 23 Printing 24 Others 25 Precautions 25 Print Cartridge Storage Precautions . 26 Print Paper Storage Precautions ....... 26 "Memory Stick 27 Image Files and File Names 28 Troubleshooting 29 Warranty and Service 33 Specifications 33 GB...
... Accessories 5 About the Printing Pack 6 Names of Parts 7 Preparations 9 1 Power Connection 9 2 Loading the Print Cartridge ....... 10 3 Loading the Print Paper 11 4 Inserting the "Memory Stick" .... 13 Printing 14 Operation During Printing 14 Printing Images With Print Mark (DPOF Print 15 Assigning a Print Mark 15 ...21 PC Interface Kit 23 Preparation 23 Printing 24 Others 25 Precautions 25 Print Cartridge Storage Precautions . 26 Print Paper Storage Precautions ....... 26 "Memory Stick 27 Image Files and File Names 28 Troubleshooting 29 Warranty and Service 33 Specifications 33 GB...

Operating Instructions
Page 5
Before Use Before Use Supplied Accessories After unpacking the unit, make sure that the accessories shown below are complete. • AC adapter • Card size color printing pack (SVM-24CS) • Clamp filter (3) • Power cord - U.S.A. and Canada - Europe • Paper tray • PC interface kit - CD-ROM • Carrying pouch (1) • Operating Instructions (1) • Owner registration card (1) • Warranty (1) • Sony End User Software License Agreement (1) 5 GB USB cable -
Before Use Before Use Supplied Accessories After unpacking the unit, make sure that the accessories shown below are complete. • AC adapter • Card size color printing pack (SVM-24CS) • Clamp filter (3) • Power cord - U.S.A. and Canada - Europe • Paper tray • PC interface kit - CD-ROM • Carrying pouch (1) • Operating Instructions (1) • Owner registration card (1) • Warranty (1) • Sony End User Software License Agreement (1) 5 GB USB cable -

Operating Instructions
Page 6
About the Printing Pack To print with this unit. • Do not try to use only the dedicated printing packs for 24 prints Note • Be sure to reinsert used print paper or print cartridges. Printing pack Application SVM-24CS Photo paper 12-pack × 2 / print cartridge for this unit, the dedicated printing pack is required. Otherwise paper jam or malfunction can occur. 6 GB
About the Printing Pack To print with this unit. • Do not try to use only the dedicated printing packs for 24 prints Note • Be sure to reinsert used print paper or print cartridges. Printing pack Application SVM-24CS Photo paper 12-pack × 2 / print cartridge for this unit, the dedicated printing pack is required. Otherwise paper jam or malfunction can occur. 6 GB

Operating Instructions
Page 7
Before Use Names of Parts For detailed information, refer to the pages shown in brackets. 5 6 789 0qaqsqd 1 234 1 Power switch (pages 15, 19) 2 Paper tray 3 Paper tray insertion door (page 12) 4 Ventilation openings 5 Display (page 8) 6 SELECT (-/+) buttons 7 ENTER/OPTION button 8 DPOF button (page 16) 9 PRINT/STOP button (pages 16, 20) 0 Memory Stick slot (page 13) qa Print cartridge door (page 10) qs Print cartridge door latch (page 10) qd USB port Continued 7 GB
Before Use Names of Parts For detailed information, refer to the pages shown in brackets. 5 6 789 0qaqsqd 1 234 1 Power switch (pages 15, 19) 2 Paper tray 3 Paper tray insertion door (page 12) 4 Ventilation openings 5 Display (page 8) 6 SELECT (-/+) buttons 7 ENTER/OPTION button 8 DPOF button (page 16) 9 PRINT/STOP button (pages 16, 20) 0 Memory Stick slot (page 13) qa Print cartridge door (page 10) qs Print cartridge door latch (page 10) qd USB port Continued 7 GB

Operating Instructions
Page 8
qf qg qh qf Paper exit slot qg DC 12V connector (page 9) qh Battery terminal cover Display 1 2 3 45 6 SHARP BRIGHT DATE FIT MULTI 2 4 8 USB TIFF DPOF 7 8 90 1 Battery capacity indicator 2 Print setting display (page 22) 3 USB cable connection indicator 4 DPOF indicator (page 16) 5 ERROR indicator (page 30) 6 MS ACCESS indicator (page 13) 7 Folder number display (pages 16, 19) 8 File number display (pages 16, 19) 9 TIFF image indicator (page 20) 0 Print count display (pages 16, 19) 8 GB
qf qg qh qf Paper exit slot qg DC 12V connector (page 9) qh Battery terminal cover Display 1 2 3 45 6 SHARP BRIGHT DATE FIT MULTI 2 4 8 USB TIFF DPOF 7 8 90 1 Battery capacity indicator 2 Print setting display (page 22) 3 USB cable connection indicator 4 DPOF indicator (page 16) 5 ERROR indicator (page 30) 6 MS ACCESS indicator (page 13) 7 Folder number display (pages 16, 19) 8 File number display (pages 16, 19) 9 TIFF image indicator (page 20) 0 Print count display (pages 16, 19) 8 GB

Operating Instructions
Page 11
... and then reinsert it on the tray. Note Do not separate along the perforated lines before printing. Protective sheet You can become hot. Align the paper and place it . Do not put your fingers or other objects into the print cartridge slot. 3 Loading the Print... Paper The print paper is slack, rotate the spool of the cartridge in place and facing up the slack. 1 Open the cover of the printing pack (page 6). Continued 11 ...
... and then reinsert it on the tray. Note Do not separate along the perforated lines before printing. Protective sheet You can become hot. Align the paper and place it . Do not put your fingers or other objects into the print cartridge slot. 3 Loading the Print... Paper The print paper is slack, rotate the spool of the cartridge in place and facing up the slack. 1 Open the cover of the printing pack (page 6). Continued 11 ...

Operating Instructions
Page 12
...If there are fingerprints or dust on the image side of the paper, use only the dedicated print paper for 24 prints and 2 × 12-pack print paper. Make sure that the paper tray cover is not loaded properly, the paper tray cover cannot be degraded. • Be sure to write ...out the protective sheet. 5 Pull the paper tray door open, and insert the paper tray into this unit. 3 Close the paper tray cover. Only load half of the print paper at one time. • When adding print paper to the paper tray, take care not to the print paper before printing. • When handling the...
...If there are fingerprints or dust on the image side of the paper, use only the dedicated print paper for 24 prints and 2 × 12-pack print paper. Make sure that the paper tray cover is not loaded properly, the paper tray cover cannot be degraded. • Be sure to write ...out the protective sheet. 5 Pull the paper tray door open, and insert the paper tray into this unit. 3 Close the paper tray cover. Only load half of the print paper at one time. • When adding print paper to the paper tray, take care not to the print paper before printing. • When handling the...

Operating Instructions
Page 14
... the smooth exit of at least 12 cm. • Do not place any objects on again and repeat the procedure. When printing is completed, the paper is for printing. If there is ejected from the unit during printing. • Never move the unit during printing, and do not turn the power... on top of the paper tray. • Do not touch the paper during printing, and do not try to print, make sure that there are no obstructions behind the unit...
... the smooth exit of at least 12 cm. • Do not place any objects on again and repeat the procedure. When printing is completed, the paper is for printing. If there is ejected from the unit during printing. • Never move the unit during printing, and do not turn the power... on top of the paper tray. • Do not touch the paper during printing, and do not try to print, make sure that there are no obstructions behind the unit...

Operating Instructions
Page 16
...Insert the "Memory Stick" into the unit. The unit enters the DPOF mode, and the indication "DPOF" appears on the display. 6 Remove the printed paper. During printing, the indication "PRINT" is shown on the display. Turning the power off • Push down the power switch and slide it to ... display for image quality, print format, etc. If only one folder is inserted, the folder number is shown. (Folder number) Number of the paper and remove them along the perforated lines. If you do not use the SELECT (-/+) buttons to start printing. The total number of specified prints is...
...Insert the "Memory Stick" into the unit. The unit enters the DPOF mode, and the indication "DPOF" appears on the display. 6 Remove the printed paper. During printing, the indication "PRINT" is shown on the display. Turning the power off • Push down the power switch and slide it to ... display for image quality, print format, etc. If only one folder is inserted, the folder number is shown. (Folder number) Number of the paper and remove them along the perforated lines. If you do not use the SELECT (-/+) buttons to start printing. The total number of specified prints is...
Operating Instructions
Page 17
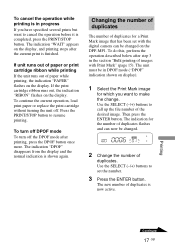
... indication is now active. Changing the number of duplicates The number of paper while printing, the indication "PAPER" flashes on the display. The new number of images with the digital camera can now be changed on the DPP-MP1. To cancel the operation while printing is in progress If you want ... of duplicates flashes and can be in the section "Bulk printing of duplicates is shown again. To continue the current operation, load print paper or replace the print cartridge without turning the unit off the DPOF mode after the current print is completed, press the PRINT/STOP button....
... indication is now active. Changing the number of duplicates The number of paper while printing, the indication "PAPER" flashes on the display. The new number of images with the digital camera can now be changed on the DPP-MP1. To cancel the operation while printing is in progress If you want ... of duplicates flashes and can be in the section "Bulk printing of duplicates is shown again. To continue the current operation, load print paper or replace the print cartridge without turning the unit off the DPOF mode after the current print is completed, press the PRINT/STOP button....

Operating Instructions
Page 20
... "WAIT" appears on the display, and printing stops after about 3 minutes (auto power-off . To continue the current operation, load print paper or replace the print cartridge without turning the unit off function). Press the PRINT/STOP button to the left until the indication on the display.... During printing, the indication "PRINT" is a TIFF image, the indication "TIFF" appears on the display. 8 Remove the printed paper. Printing images in TIFF (noncompressed) format If the image specified in progress If you do not use the power switch, the unit will automatically turn...
... "WAIT" appears on the display, and printing stops after about 3 minutes (auto power-off . To continue the current operation, load print paper or replace the print cartridge without turning the unit off function). Press the PRINT/STOP button to the left until the indication on the display.... During printing, the indication "PRINT" is a TIFF image, the indication "TIFF" appears on the display. 8 Remove the printed paper. Printing images in TIFF (noncompressed) format If the image specified in progress If you do not use the power switch, the unit will automatically turn...

Operating Instructions
Page 22
...is made . (x indicates the default setting.) Setting item SHARP (Sharpness) BRIGHT (Brightness) DATE FIT MULTI Setting content ON Images are printed on the paper and no section is cut off . (There is a rim around the image.) x OFF The image is printed as is scaled so that the entire... ON The image is , to the maximum printable range. Note A date inserted with enhanced outline sharpness. x OFF The image is printed with the Sony CyberShot digital camera or Handycam camcorder, the date will be made brighter for printing. x OFF Division is taken from the date at which the image...
...is made . (x indicates the default setting.) Setting item SHARP (Sharpness) BRIGHT (Brightness) DATE FIT MULTI Setting content ON Images are printed on the paper and no section is cut off . (There is a rim around the image.) x OFF The image is printed as is scaled so that the entire... ON The image is , to the maximum printable range. Note A date inserted with enhanced outline sharpness. x OFF The image is printed with the Sony CyberShot digital camera or Handycam camcorder, the date will be made brighter for printing. x OFF Division is taken from the date at which the image...

Operating Instructions
Page 26
Print Paper Storage Precautions • Avoid exposure to high temperatures or humidity, high levels of dust, and direct sunlight. • Do not store two sheets with the .... Print Cartridge Storage Precautions • Avoid exposure to high temperatures or humidity, high levels of dust, and direct sunlight. • When removing a partly used print paper from the unit for long-term storage, return it to the original packing bag or another suitable container. On restrictions on duplication If duplicating documents...
Print Paper Storage Precautions • Avoid exposure to high temperatures or humidity, high levels of dust, and direct sunlight. • Do not store two sheets with the .... Print Cartridge Storage Precautions • Avoid exposure to high temperatures or humidity, high levels of dust, and direct sunlight. • When removing a partly used print paper from the unit for long-term storage, return it to the original packing bag or another suitable container. On restrictions on duplication If duplicating documents...
Operating Instructions
Page 29
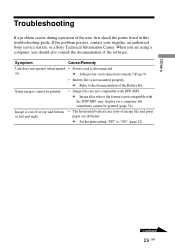
... mounted properly. on a computer but sometimes cannot be printed. • Image files are not compatible with the DPP-MP1 may display on . c Is the power cord connected correctly? (Page 9) • Battery Kit is not compatible with DPP-MP1. paper are using a computer, you should also consult the documentation of the Battery Kit. c Set the print... horizontal/vertical size ratio of the unit, first check the points listed in this troubleshooting guide. If the problem persists, contact your supplier, an authorized Sony service station, or a Sony Technical Information Center.
... mounted properly. on a computer but sometimes cannot be printed. • Image files are not compatible with the DPP-MP1 may display on . c Is the power cord connected correctly? (Page 9) • Battery Kit is not compatible with DPP-MP1. paper are using a computer, you should also consult the documentation of the Battery Kit. c Set the print... horizontal/vertical size ratio of the unit, first check the points listed in this troubleshooting guide. If the problem persists, contact your supplier, an authorized Sony service station, or a Sony Technical Information Center.

Operating Instructions
Page 30
...select an image for printing. Or, there are as follows. c Image cannot be printed due to a problem with paper (page 11). 30 GB When this unit. Message WAIT RIBON PAPER Meaning • Printing was stopped. c The indication is shown while the last image is used up . c Insert ...or replace the print cartridge (page 10). • No paper tray is inserted, or the print paper is being printed. Condition Folder number File number Meaning and remedy • You cannot select the image for printing. c Wait until...
...select an image for printing. Or, there are as follows. c Image cannot be printed due to a problem with paper (page 11). 30 GB When this unit. Message WAIT RIBON PAPER Meaning • Printing was stopped. c The indication is shown while the last image is used up . c Insert ...or replace the print cartridge (page 10). • No paper tray is inserted, or the print paper is being printed. Condition Folder number File number Meaning and remedy • You cannot select the image for printing. c Wait until...

Operating Instructions
Page 32
... and check whether the ribbon is a problem with the print cartridge. The paper should be automatically ejected. If you still cannot remove the paper, contact your supplier, an authorized Sony service station, or a Sony Technical Information Center. 32 GB c Try turning the unit off and then on... again, so that the paper will be ejected automatically. • An internal error has ...
... and check whether the ribbon is a problem with the print cartridge. The paper should be automatically ejected. If you still cannot remove the paper, contact your supplier, an authorized Sony service station, or a Sony Technical Information Center. 32 GB c Try turning the unit off and then on... again, so that the paper will be ejected automatically. • An internal error has ...
Operating Instructions
Page 34
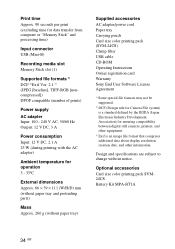
...) Supplied accessories AC adapter/power cord Paper tray Carrying pouch Card size color printing pack (SVM-24CS) Clamp filter USB cable CD-ROM Operating Instructions Owner registration card Warranty Sony End User Software License Agreement 1) Some special file formats may not be supported. 2)...(Japan Electronic Industry Development Association) for operation 5 - 35ºC External dimensions Approx. 66 × 39 × 111 (W/H/D) mm (without paper tray and protruding parts) Mass Approx. 260 g (without notice. Print time Approx. 90 seconds per print (excluding time for data transfer from ...
...) Supplied accessories AC adapter/power cord Paper tray Carrying pouch Card size color printing pack (SVM-24CS) Clamp filter USB cable CD-ROM Operating Instructions Owner registration card Warranty Sony End User Software License Agreement 1) Some special file formats may not be supported. 2)...(Japan Electronic Industry Development Association) for operation 5 - 35ºC External dimensions Approx. 66 × 39 × 111 (W/H/D) mm (without paper tray and protruding parts) Mass Approx. 260 g (without notice. Print time Approx. 90 seconds per print (excluding time for data transfer from ...


