
Instruction Manual
Page 1
Model No. Record the serial number in the space provided below. Refer to these numbers whenever you call upon your Sony dealer regarding this manual thoroughly and retain it for future reference. Digital Photo Printer DPP-FPHD1 Operating Instructions Before operating this printer, please read this product. DPP-FPHD1 Serial No © 2007 Sony Corporation 3-198-774-11(1) Owner's Record The model and serial numbers are located on the bottom.
Model No. Record the serial number in the space provided below. Refer to these numbers whenever you call upon your Sony dealer regarding this manual thoroughly and retain it for future reference. Digital Photo Printer DPP-FPHD1 Operating Instructions Before operating this printer, please read this product. DPP-FPHD1 Serial No © 2007 Sony Corporation 3-198-774-11(1) Owner's Record The model and serial numbers are located on the bottom.

Instruction Manual
Page 2
... This product has been tested and found to which can radiate radio frequency energy and, if not installed and used in accordance with the limits for a Class B digital device, pursuant to provide reasonable protection against harmful interference in the EMC Directive for help. However, there is encouraged to try to correct the interference by turning the equipment off...
... This product has been tested and found to which can radiate radio frequency energy and, if not installed and used in accordance with the limits for a Class B digital device, pursuant to provide reasonable protection against harmful interference in the EMC Directive for help. However, there is encouraged to try to correct the interference by turning the equipment off...
Instruction Manual
Page 3
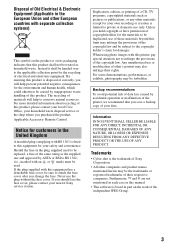
...work of the independent JPEG Group. 3 Applicable Accessory: Remote Control Notice for customers in the plug supplied need to be caused by ASTA or BSI to BS 1362, (i.e., marked with this printer, pay special attention not to the copyright holder's claim for damages. If the plug supplied with BS 1363 is fitted to be duplicated, use...; are not mentioned in each case in part on its packaging indicates that you save a backup copy of the same rating as pictures or publications, or any other materials except for your nearest Sony service station. By ensuring this product is based in ...
...work of the independent JPEG Group. 3 Applicable Accessory: Remote Control Notice for customers in the plug supplied need to be caused by ASTA or BSI to BS 1362, (i.e., marked with this printer, pay special attention not to the copyright holder's claim for damages. If the plug supplied with BS 1363 is fitted to be duplicated, use...; are not mentioned in each case in part on its packaging indicates that you save a backup copy of the same rating as pictures or publications, or any other materials except for your nearest Sony service station. By ensuring this product is based in ...

Instruction Manual
Page 4
AC adaptor (AC-S2422) (1) A/V connecting cable (1) Component video cable (1) AC power cord * (1) Paper protector (1) * The AC power cord illustrated is for 120V only. Checking the contents of the AC power cord differ depending on the region you purchased the printer. The plug shape and specifications of the package Make sure that the following accessories are supplied with your printer. Cleaning cartridge (1) / Cleaning sheet (1) • Sample color print pack (Post card size) • Operating Instructions (this manual, 1) Remote Control (1) Vertical stand attachment (2) 4
AC adaptor (AC-S2422) (1) A/V connecting cable (1) Component video cable (1) AC power cord * (1) Paper protector (1) * The AC power cord illustrated is for 120V only. Checking the contents of the AC power cord differ depending on the region you purchased the printer. The plug shape and specifications of the package Make sure that the following accessories are supplied with your printer. Cleaning cartridge (1) / Cleaning sheet (1) • Sample color print pack (Post card size) • Operating Instructions (this manual, 1) Remote Control (1) Vertical stand attachment (2) 4

Instruction Manual
Page 6
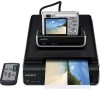
What you can enjoy viewing images on a high definition TV and print the desired image instantly using the DSC-W80. Setting Place the camera on how to use the DSC-W80, refer to the Instruction Manual supplied with this printer You can do with the camera and the Cyber-shot Handbook (PDF). Shooting Shoot images using the digital photo printer DPP-FPHD1. For details on the camera adaptor. 6
What you can enjoy viewing images on a high definition TV and print the desired image instantly using the DSC-W80. Setting Place the camera on how to use the DSC-W80, refer to the Instruction Manual supplied with this printer You can do with the camera and the Cyber-shot Handbook (PDF). Shooting Shoot images using the digital photo printer DPP-FPHD1. For details on the camera adaptor. 6
Instruction Manual
Page 8
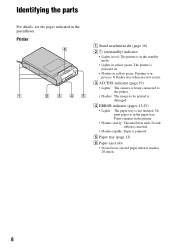
... connected to the printer. • Flashes: The image to be printed is in the paper tray. No print paper is damaged. No ink ribbon is inserted. • Flashes rapidly: Paper is in yellow green: Printing is jammed. Identifying the parts For details, see the pages indicated in the printer. • Flashes slowly: The ink ribbon ends. It flashes also when an error occurs. Printer F A B C DE A Stand attachment slit (page 16) B 1 (on/standby) indicator • Lights in red: The printer...
... connected to the printer. • Flashes: The image to be printed is in the paper tray. No print paper is damaged. No ink ribbon is inserted. • Flashes rapidly: Paper is in yellow green: Printing is jammed. Identifying the parts For details, see the pages indicated in the printer. • Flashes slowly: The ink ribbon ends. It flashes also when an error occurs. Printer F A B C DE A Stand attachment slit (page 16) B 1 (on/standby) indicator • Lights in red: The printer...

Instruction Manual
Page 10
... a button type lithium battery (CR2025) built in. E (Index) button • Press the screen. Insulation sheet • Point the remote control towards the remote sensor on the camera adaptor to instructions. Dispose of used . WARNING Battery may explode if mistreated. Remote control A D B E C F A SLIDE SHOW button (page 17) B PRINT button (page 18) C MENU button* • Functions operate the same as the MENU buttons on the 1 indicator in red. To change the battery of the Viewing menu...
... a button type lithium battery (CR2025) built in. E (Index) button • Press the screen. Insulation sheet • Point the remote control towards the remote sensor on the camera adaptor to instructions. Dispose of used . WARNING Battery may explode if mistreated. Remote control A D B E C F A SLIDE SHOW button (page 17) B PRINT button (page 18) C MENU button* • Functions operate the same as the MENU buttons on the 1 indicator in red. To change the battery of the Viewing menu...

Instruction Manual
Page 11
... the printer. The sample color print pack contains a set of 5 sheets of 4 × 6 inch print paper (20- sheet-pack × 6) • 3 ink ribbons each for the printer. Doing so could result in all countries or regions. If you need a print pack designed for 40 prints PNote Not all models are going to store a partially-used sheets of print paper or attempt to high temperature, high humidity, excessive dust, or direct sunlight. • Use print pack within...
... the printer. The sample color print pack contains a set of 5 sheets of 4 × 6 inch print paper (20- sheet-pack × 6) • 3 ink ribbons each for the printer. Doing so could result in all countries or regions. If you need a print pack designed for 40 prints PNote Not all models are going to store a partially-used sheets of print paper or attempt to high temperature, high humidity, excessive dust, or direct sunlight. • Use print pack within...

Instruction Manual
Page 12
... used ink ribbon. PNotes • Use the ink ribbon contained in the same box with the print paper. • Do not touch the ink ribbon or place the ink ribbon in imperfect printing. Ink ribbon 3 Close the ink ribbon compartment cover. 12 Loading the ink ribbon 1 Pull and open the ink ribbon compartment cover. Fingerprints or dust on the ink ribbon may result in a dusty location. Removing the ink ribbon When the ink ribbon runs out, the ERROR indicator will flash slowly. Eject lever 2 Insert...
... used ink ribbon. PNotes • Use the ink ribbon contained in the same box with the print paper. • Do not touch the ink ribbon or place the ink ribbon in imperfect printing. Ink ribbon 3 Close the ink ribbon compartment cover. 12 Loading the ink ribbon 1 Pull and open the ink ribbon compartment cover. Fingerprints or dust on the ink ribbon may result in a dusty location. Removing the ink ribbon When the ink ribbon runs out, the ERROR indicator will flash slowly. Eject lever 2 Insert...

Instruction Manual
Page 14
... print paper. Then insert the print paper with its printing surface (the side with the back of print paper PNote Do not touch the printing surface. Paper feeding direction • Set the print paper toward the paper feeding direction with no protective sheet: Riffle the print paper thoroughly. The back of paper with the protective sheet at the top. 3 Set the print paper into the tray, with the SONY logo facing down. You can set up . 4 Remove the protective sheet. Riffle the print paper...
... print paper. Then insert the print paper with its printing surface (the side with the back of print paper PNote Do not touch the printing surface. Paper feeding direction • Set the print paper toward the paper feeding direction with no protective sheet: Riffle the print paper thoroughly. The back of paper with the protective sheet at the top. 3 Set the print paper into the tray, with the SONY logo facing down. You can set up . 4 Remove the protective sheet. Riffle the print paper...
Instruction Manual
Page 15
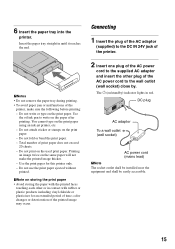
.... - 6 Insert the paper tray into the printer. You cannot type on /standby) indicator lights in contact with the printed faces touching each other plug of the printer, make the printed image thicker. - The 1 (on the print paper using an ink-jet printer, etc. - color changes or deterioration of the printed image may occur. 2 Insert one plug of time; Insert the paper tray straight in until it reaches the end. Connecting 1 Insert the plug of the AC adaptor (supplied...
.... - 6 Insert the paper tray into the printer. You cannot type on /standby) indicator lights in contact with the printed faces touching each other plug of the printer, make the printed image thicker. - The 1 (on the print paper using an ink-jet printer, etc. - color changes or deterioration of the printed image may occur. 2 Insert one plug of time; Insert the paper tray straight in until it reaches the end. Connecting 1 Insert the plug of the AC adaptor (supplied...

Instruction Manual
Page 17
.... • When connecting with the component video cable, set the "COMPONENT" setting of the camera to "HD(1080i)" beforehand. Viewing images on the TV PNote Check the "USB Connect" setting of the camera is designed for the DSC-W80 only. 2 Turn on the TV and set the TV/ Video switch to "Video". • For details, refer to the operating instructions supplied with the TV...
.... • When connecting with the component video cable, set the "COMPONENT" setting of the camera to "HD(1080i)" beforehand. Viewing images on the TV PNote Check the "USB Connect" setting of the camera is designed for the DSC-W80 only. 2 Turn on the TV and set the TV/ Video switch to "Video". • For details, refer to the operating instructions supplied with the TV...
Instruction Manual
Page 18
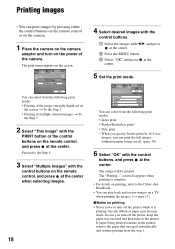
The image will be printed. the ink ribbon or paper may become stuck. You can select from the following print modes: • Index print • Border/Borderless print* • Date print * When you specify border print for 16:9 size images, you turn off the power, keep the paper tray inserted and then turn on the printer. screen disappears when printing is printing; If paper being cut off. (page 30) 6 Select "OK" with the control buttons, and press at the center. Proceed to...
The image will be printed. the ink ribbon or paper may become stuck. You can select from the following print modes: • Index print • Border/Borderless print* • Date print * When you specify border print for 16:9 size images, you turn off the power, keep the paper tray inserted and then turn on the printer. screen disappears when printing is printing; If paper being cut off. (page 30) 6 Select "OK" with the control buttons, and press at the center. Proceed to...
Instruction Manual
Page 22
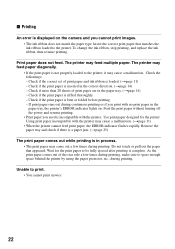
... folded before printing. - Feed the print paper without turning off the power and resume printing. • Print paper you cannot print images. • The ink ribbon does not match the paper type. Wait for the printer. The printer may feed paper diagonally. • If the print paper is not properly loaded to be fully ejected after printing is complete. Check if the print paper is inserted in the paper tray. (tpage 14) - Check if more than 20 sheets of print paper are in the correct direction. (tpage...
... folded before printing. - Feed the print paper without turning off the power and resume printing. • Print paper you cannot print images. • The ink ribbon does not match the paper type. Wait for the printer. The printer may feed paper diagonally. • If the print paper is not properly loaded to be fully ejected after printing is complete. Check if the print paper is inserted in the paper tray. (tpage 14) - Check if more than 20 sheets of print paper are in the correct direction. (tpage...

Instruction Manual
Page 23
... printing surface (the glossy side with the camera, and set the "COMPONENT" setting correctly. The printed image is crooked. • The paper tray is connected to the operating instructions supplied with no imprint). The image is being used again. Printing an image twice on the image size. Fingerprints on the printing surface may cause a malfunction. The picture quality and colors of the image previewed on the screen of the monitor or the LCD screen. x Printed results The printed pictures...
... printing surface (the glossy side with the camera, and set the "COMPONENT" setting correctly. The printed image is crooked. • The paper tray is connected to the operating instructions supplied with no imprint). The image is being used again. Printing an image twice on the image size. Fingerprints on the printing surface may cause a malfunction. The picture quality and colors of the image previewed on the screen of the monitor or the LCD screen. x Printed results The printed pictures...
Instruction Manual
Page 24
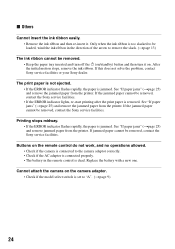
... is jammed. If the jammed paper cannot be removed. • Keep the paper tray inserted and turn off the 1 (on the remote control do not work, and no operations allowed. • Check if the camera is connected to remove the slack. (tpage 13) The ink ribbon cannot be removed, contact the Sony service facilities. • If the ERROR indicator lights, re-start printing after the print paper is removed. Replace the battery with a new one. Buttons on /standby) button and then turn...
... is jammed. If the jammed paper cannot be removed. • Keep the paper tray inserted and turn off the 1 (on the remote control do not work, and no operations allowed. • Check if the camera is connected to remove the slack. (tpage 13) The ink ribbon cannot be removed, contact the Sony service facilities. • If the ERROR indicator lights, re-start printing after the print paper is removed. Replace the battery with a new one. Buttons on /standby) button and then turn...
Instruction Manual
Page 25
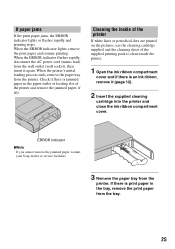
... tray, remove the print paper from the wall outlet (wall socket), then insert it (page 12). 2 Insert the supplied cleaning cartridge into the printer and close the ink ribbon compartment cover. When the ERROR indicator lights, remove the print paper and resume printing. Cleaning the inside of the printer If white lines or periodical dots are printed on the pictures, use the cleaning cartridge supplied and the cleaning sheet of the printer and remove the jammed paper, if any. If paper jams If the print paper jams, the ERROR indicator lights or flashes...
... tray, remove the print paper from the wall outlet (wall socket), then insert it (page 12). 2 Insert the supplied cleaning cartridge into the printer and close the ink ribbon compartment cover. When the ERROR indicator lights, remove the print paper and resume printing. Cleaning the inside of the printer If white lines or periodical dots are printed on the pictures, use the cleaning cartridge supplied and the cleaning sheet of the printer and remove the jammed paper, if any. If paper jams If the print paper jams, the ERROR indicator lights or flashes...
Instruction Manual
Page 26
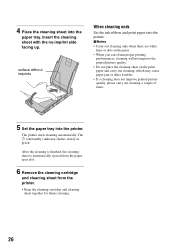
... When cleaning ends Set the ink ribbon and print paper into the paper tray. After the cleaning is finished, the cleaning sheet is automatically ejected from the paper eject slot. 6 Remove the cleaning cartridge and cleaning sheet from the printer. • Keep the cleaning cartridge and cleaning sheet together for future cleaning. 26 The printer starts cleaning automatically. PNotes • Carry out cleaning only when there are white lines or dots on the print. • When you can obtain proper printing performances, cleaning will not improve the printed picture quality. •...
... When cleaning ends Set the ink ribbon and print paper into the paper tray. After the cleaning is finished, the cleaning sheet is automatically ejected from the paper eject slot. 6 Remove the cleaning cartridge and cleaning sheet from the printer. • Keep the cleaning cartridge and cleaning sheet together for future cleaning. 26 The printer starts cleaning automatically. PNotes • Carry out cleaning only when there are white lines or dots on the print. • When you can obtain proper printing performances, cleaning will not improve the printed picture quality. •...

Instruction Manual
Page 27
... ink ribbon, paper tray or AC adaptor, from a cold location to a warm location or placed in the instructed way. extremely high or low temperatures • Do not use any longer, as this printer with a mild detergent solution. On the AC adaptor • Be sure to : - If you no longer have it out by qualified personnel before cleaning and servicing the printer. Never operate...
... ink ribbon, paper tray or AC adaptor, from a cold location to a warm location or placed in the instructed way. extremely high or low temperatures • Do not use any longer, as this printer with a mild detergent solution. On the AC adaptor • Be sure to : - If you no longer have it out by qualified personnel before cleaning and servicing the printer. Never operate...
Instruction Manual
Page 29
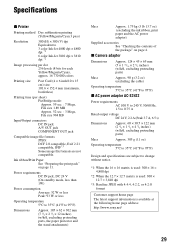
....7 oz) (excluding the ink ribbon, print paper and the AC power adaptor) Supplied accessories See "Checking the contents of the package" on page 11. Specifications x Printer Printing method Dye sublimation printing (Yellow/Magenta/Cyan 3 pass) Resolution 300 (H) × 300 (V) dpi Equivalent to 3 color Ink-Jet 4800 dpi × 4800 dpi *1 6 color Ink-Jet 3810 dpi × 3810 dpi *2 Image processing per dot 256 levels (8 bits for each Yellow...
....7 oz) (excluding the ink ribbon, print paper and the AC power adaptor) Supplied accessories See "Checking the contents of the package" on page 11. Specifications x Printer Printing method Dye sublimation printing (Yellow/Magenta/Cyan 3 pass) Resolution 300 (H) × 300 (V) dpi Equivalent to 3 color Ink-Jet 4800 dpi × 4800 dpi *1 6 color Ink-Jet 3810 dpi × 3810 dpi *2 Image processing per dot 256 levels (8 bits for each Yellow...

