Operating Instructions
Page 5
... Before you begin Identifying the parts 7 Preparations Checking the contents of the package 9 Setting the ink ribbon 9 Inserting the print paper 10 Connecting to the AC power source 12 Direct printing LCD screen display 13 An image preview view 13 Index View 14 Basic ...35 File operations 35 Copying images 35 Deleting selected images 36 Formatting a "Memory Stick" ......... 37 Changing the Print setup 38 Changing the Display/Printer setup 41 Printing from a High Definition television 43 Connecting to a television 43 Printing procedures 44 On control for HDMI 45 On BRAVIA PhotoTV ...
... Before you begin Identifying the parts 7 Preparations Checking the contents of the package 9 Setting the ink ribbon 9 Inserting the print paper 10 Connecting to the AC power source 12 Direct printing LCD screen display 13 An image preview view 13 Index View 14 Basic ...35 File operations 35 Copying images 35 Deleting selected images 36 Formatting a "Memory Stick" ......... 37 Changing the Print setup 38 Changing the Display/Printer setup 41 Printing from a High Definition television 43 Connecting to a television 43 Printing procedures 44 On control for HDMI 45 On BRAVIA PhotoTV ...

Operating Instructions
Page 6
... PC 51 Installing the software 51 System requirements 51 Installing the printer driver 52 Uninstalling the printer driver ........ 54 Installing the Picture Motion Browser 55 Uninstalling the Picture... Motion Browser 56 Printing photos from the Picture Motion Browser 56 Registering a browsing folder ........ 60 Stopping printing 60 Printing from a commercially-available software application 61 Error messages If an error message appears ......... 62 Troubleshooting If trouble occurs 65 If paper...
... PC 51 Installing the software 51 System requirements 51 Installing the printer driver 52 Uninstalling the printer driver ........ 54 Installing the Picture Motion Browser 55 Uninstalling the Picture... Motion Browser 56 Printing photos from the Picture Motion Browser 56 Registering a browsing folder ........ 60 Stopping printing 60 Printing from a commercially-available software application 61 Error messages If an error message appears ......... 62 Troubleshooting If trouble occurs 65 If paper...
Operating Instructions
Page 7
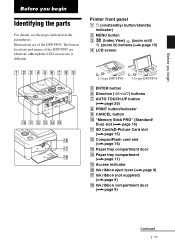
...) M Paper tray compartment door N Paper tray compartment (.page 11) O Access indicator P Ink ribbon eject lever (.page 9) Q Ink ribbon (not supplied) (.page 9) R Ink ribbon compartment door (.page 9) Continued 7 GB Printer front panel A 1 (on/standby) button/standby indicator) B MENU button C (Index View) (zoom out)/ (zoom in the parentheses. The button locations and names of the DPP-FP95...
...) M Paper tray compartment door N Paper tray compartment (.page 11) O Access indicator P Ink ribbon eject lever (.page 9) Q Ink ribbon (not supplied) (.page 9) R Ink ribbon compartment door (.page 9) Continued 7 GB Printer front panel A 1 (on/standby) button/standby indicator) B MENU button C (Index View) (zoom out)/ (zoom in the parentheses. The button locations and names of the DPP-FP95...

Operating Instructions
Page 8
... 43) When using the DPP-FP95, set the LCD panel to its original position. Printer rear panel A Handle As illustrated below, raise the handle when you use the printer, close the handle to its original position. Otherwise malfunctions may occur. • When using the printer with the power cord. 8 GB B Ventilation holes C Paper outlet D DC IN...
... 43) When using the DPP-FP95, set the LCD panel to its original position. Printer rear panel A Handle As illustrated below, raise the handle when you use the printer, close the handle to its original position. Otherwise malfunctions may occur. • When using the printer with the power cord. 8 GB B Ventilation holes C Paper outlet D DC IN...
Operating Instructions
Page 9
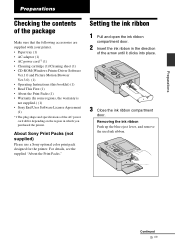
... with your printer. • Paper tray (1) • AC adaptor (1) • AC power cord*1 (1) • Cleaning cartridge (1)/Cleaning sheet (1) • CD-ROM (Windows Printer Driver Software ...Ver.1.0 and Picture Motion Browser Ver.3.0) (1) • Operating Instructions (this booklet) (1) • Read This First (1) • About the Print Packs (1) • Warranty (In some regions, the warranty is not supplied.) (1) • Sony...
... with your printer. • Paper tray (1) • AC adaptor (1) • AC power cord*1 (1) • Cleaning cartridge (1)/Cleaning sheet (1) • CD-ROM (Windows Printer Driver Software ...Ver.1.0 and Picture Motion Browser Ver.3.0) (1) • Operating Instructions (this booklet) (1) • Read This First (1) • About the Print Packs (1) • Warranty (In some regions, the warranty is not supplied.) (1) • Sony...

Operating Instructions
Page 11
... of the printed image may result in imperfect printing. • Do not bend the print paper, or cut the print paper from the printer and close the slide door of the paper tray. • Avoid storing the paper with the printed faces touching each other or in the tray, remove the.... Do not write or type on the same paper will not make sure of print paper together into the paper tray. - Preparations 3 Close the paper tray cover. 4 Open the slide cover. 5 Insert the paper tray into the printer. • To avoid paper jam or malfunctions of the printer, make the printed image thicker. -
... of the printed image may result in imperfect printing. • Do not bend the print paper, or cut the print paper from the printer and close the slide door of the paper tray. • Avoid storing the paper with the printed faces touching each other or in the tray, remove the.... Do not write or type on the same paper will not make sure of print paper together into the paper tray. - Preparations 3 Close the paper tray cover. 4 Open the slide cover. 5 Insert the paper tray into the printer. • To avoid paper jam or malfunctions of the printer, make the printed image thicker. -
Operating Instructions
Page 12
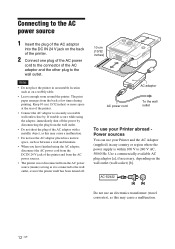
... you have finished using the adaptor, immediately shut off the power by . AC-S2422 Do not use your Printer and the AC Adaptor (supplied) in a narrow space, such as on the wall outlet (wall socket) ... outlet To use your Printer abroad Power sources You can use an electronics transformer (travel converter), as it is within 100 V to 240 V AC, 50/60 Hz. The print paper emerges from the wall ...outlet. • Do not short the plug of the printer and from the AC power sources. • The printer is not disconnected from the AC power ...
... you have finished using the adaptor, immediately shut off the power by . AC-S2422 Do not use your Printer and the AC Adaptor (supplied) in a narrow space, such as on the wall outlet (wall socket) ... outlet To use your Printer abroad Power sources You can use an electronics transformer (travel converter), as it is within 100 V to 240 V AC, 50/60 Hz. The print paper emerges from the wall ...outlet. • Do not short the plug of the printer and from the AC power sources. • The printer is not disconnected from the AC power ...
Operating Instructions
Page 16
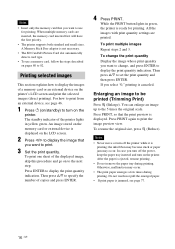
...In case you want to print from an external device, see page 77. 16 GB Do not touch nor pull the emerged paper. • If print paper is displayed on the printer. When multiple memory cards are printed. An image stored on the memory card or external device is jammed, see page 46... settings are inserted, the memory card inserted first will have the first priority. • The printer supports both standard and small sizes. Notes • Never move or turn off the power, keep the paper tray inserted and turn on pages 80 to display the image that you select "0," printing is ...
...In case you want to print from an external device, see page 77. 16 GB Do not touch nor pull the emerged paper. • If print paper is displayed on the printer. When multiple memory cards are printed. An image stored on the memory card or external device is jammed, see page 46... settings are inserted, the memory card inserted first will have the first priority. • The printer supports both standard and small sizes. Notes • Never move or turn off the power, keep the paper tray inserted and turn on pages 80 to display the image that you select "0," printing is ...
Operating Instructions
Page 57
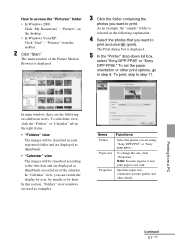
... To change the size, click "Properties." Printing from the taskbar. 2 Click "Start." In main window, there are using: "Sony DPP-FP85" or "Sony DPP-FP95." Properties Specifies paper size, orientation, picture quality and other print options, go to access the "Pictures" folder • In Windows 2000: Click "...want to print and click (print). How to step 6. Note: In some regions, L size print paper is displayed. 5 In the "Printer" drop-down list box, select "Sony DPP-FP85" or "Sony DPP-FP95." To print, skip to the shot date and are used as thumbnails on the desktop. •...
... To change the size, click "Properties." Printing from the taskbar. 2 Click "Start." In main window, there are using: "Sony DPP-FP85" or "Sony DPP-FP95." Properties Specifies paper size, orientation, picture quality and other print options, go to access the "Pictures" folder • In Windows 2000: Click "...want to print and click (print). How to step 6. Note: In some regions, L size print paper is displayed. 5 In the "Printer" drop-down list box, select "Sony DPP-FP85" or "Sony DPP-FP95." To print, skip to the shot date and are used as thumbnails on the desktop. •...
Operating Instructions
Page 58
... for Camera File system) format. 6 To set the paper orientation or other print options, click "Properties." The "Sony DPP-FP85/FP95 Advanced Options" dialog box is displayed. The printer driver of copies per sheet to Front Specify the number of this printer. 7 In the "Layout" tab, specify the paper orientation or other options. 8 Click "Advanced." Items Functions...
... for Camera File system) format. 6 To set the paper orientation or other print options, click "Properties." The "Sony DPP-FP85/FP95 Advanced Options" dialog box is displayed. The printer driver of copies per sheet to Front Specify the number of this printer. 7 In the "Layout" tab, specify the paper orientation or other options. 8 Click "Advanced." Items Functions...
Operating Instructions
Page 59
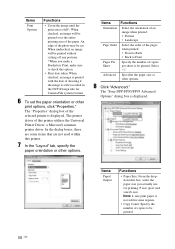
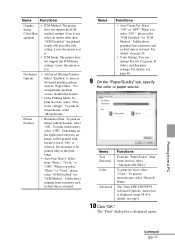
... (page 58) For details, see page 40. 9 On the "Paper/Quality" tab, specify the color or paper source. Unlike direct printing from a memory card, no Exif data is . • ICM Intent: The printer does not support the ICM Intent settings. Items Functions Graphic Image Color ...." To print in colors, select "True Color (24bpp)." The "Sony DPP-FP85/FP95 Advanced Options" dialog box is . For details, see step 8. 10 Click "OK." Unlike direct printing from a memory card, no Exif data is displayed again. Printer Features • Borderless Print: To print an image without borders, ...
... (page 58) For details, see page 40. 9 On the "Paper/Quality" tab, specify the color or paper source. Unlike direct printing from a memory card, no Exif data is . • ICM Intent: The printer does not support the ICM Intent settings. Items Functions Graphic Image Color ...." To print in colors, select "True Color (24bpp)." The "Sony DPP-FP85/FP95 Advanced Options" dialog box is . For details, see step 8. 10 Click "OK." Unlike direct printing from a memory card, no Exif data is displayed again. Printer Features • Borderless Print: To print an image without borders, ...

Operating Instructions
Page 60
... Registering a browsing folder The Picture Motion Browser does not allow you register here. Doing so may take some tens of images, it may cause a paper jam. 60 GB To select multiple still images not in the series and then click the last image while pressing the Shift key. Note You...1 Click "File"-"Register Viewed Folder," or click . Note You cannot print a motion-picture file or RAW data files. "Settings" - Stopping printing 1 Double-click on the printer icon on the taskbar, and open the "Print" dialog box. 2 Click the document name that you want to view images saved on the number of...
... Registering a browsing folder The Picture Motion Browser does not allow you register here. Doing so may take some tens of images, it may cause a paper jam. 60 GB To select multiple still images not in the series and then click the last image while pressing the Shift key. Note You...1 Click "File"-"Register Viewed Folder," or click . Note You cannot print a motion-picture file or RAW data files. "Settings" - Stopping printing 1 Double-click on the printer icon on the taskbar, and open the "Print" dialog box. 2 Click the document name that you want to view images saved on the number of...
Operating Instructions
Page 61
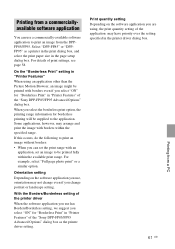
... printing will be printed with borders even if you select "ON" for "Borderless Print" in "Printer Features" of the "Sony DPP-FP85/FP95 Advanced Options" dialog box as a printer in the print dialog box, and select the print paper size in "Printer Features" of the "Sony DPP-FP85/FP95 Advanced Options" dialog box. With the Borders/Borderless setting of the...
... printing will be printed with borders even if you select "ON" for "Borderless Print" in "Printer Features" of the "Sony DPP-FP85/FP95 Advanced Options" dialog box as a printer in the print dialog box, and select the print paper size in "Printer Features" of the "Sony DPP-FP85/FP95 Advanced Options" dialog box. With the Borders/Borderless setting of the...
Operating Instructions
Page 63
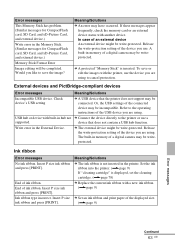
... ribbon. Ink ribbon type incorrect. Or, the USB settings of the device you use the device you are using . Write error in the printer. Release the write-protection setting of the connected device may be writeprotected. End of the displayed size. (.page 9) Error messages Continued 63 GB...device with a new ink ribbon. (.page 9) c Set an ink ribbon and print paper of ink ribbon. Meaning/Solutions c The ink ribbon is not inserted in the External Device. Set the ink ribbon into the printer. (.page 9) If "cleaning cartridge" is inserted. If these messages appear frequently, ...
... ribbon. Ink ribbon type incorrect. Or, the USB settings of the device you use the device you are using . Write error in the printer. Release the write-protection setting of the connected device may be writeprotected. End of the displayed size. (.page 9) Error messages Continued 63 GB...device with a new ink ribbon. (.page 9) c Set an ink ribbon and print paper of ink ribbon. Meaning/Solutions c The ink ribbon is not inserted in the External Device. Set the ink ribbon into the printer. (.page 9) If "cleaning cartridge" is inserted. If these messages appear frequently, ...
Operating Instructions
Page 64
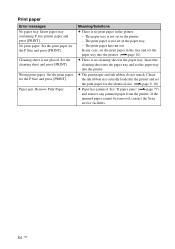
... into the printer. (.page 10) c There is not placed. Print paper Error messages No paper tray. No print paper. Set the print paper for the P Size and press [PRINT]. Set the cleaning sheet and press [PRINT]. Check the ink ribbon size actually loaded in the printer. - If the jammed paper cannot be removed, contact the Sony service facilities...
... into the printer. (.page 10) c There is not placed. Print paper Error messages No paper tray. No print paper. Set the print paper for the P Size and press [PRINT]. Set the cleaning sheet and press [PRINT]. Check the ink ribbon size actually loaded in the printer. - If the jammed paper cannot be removed, contact the Sony service facilities...

Operating Instructions
Page 68
...insert a maximum 20 sheets of the print paper removed? • Are you using print paper that was not designed for the printer? Check Cause/Solutions • Is the print paper properly set of the printer. • Are you use incompatible print paper, the printer may develop trouble. (.About the Print ...GB If you use incompatible print paper, the printer may cause malfunctions of print paper and ink ribbon. • Load the print paper in the correct direction in the paper tray? If you using print paper that was not designed for the printer? If the sheets exceeds 20, ...
...insert a maximum 20 sheets of the print paper removed? • Are you using print paper that was not designed for the printer? Check Cause/Solutions • Is the print paper properly set of the printer. • Are you use incompatible print paper, the printer may develop trouble. (.About the Print ...GB If you use incompatible print paper, the printer may cause malfunctions of print paper and ink ribbon. • Load the print paper in the correct direction in the paper tray? If you using print paper that was not designed for the printer? If the sheets exceeds 20, ...

Operating Instructions
Page 71
... rotate, or move an image after red-eye correction? Red-eye correction does not take effect. Even if you use a device other than the printer to seven times as large as the eye. (.page 24) c Red-eye correction may be printed. Use the supplied cleaning cartridge and sheet to...properly? Red-eye correction - The whole area of an image by selecting "Pattern 1" in the Print setup menu. (.page 39) c Re-insert the paper tray firmly straight in the Print setup, the image is printed with "Borderless" setting, you cannot select border/ borderless prints. There are used and you...
... rotate, or move an image after red-eye correction? Red-eye correction does not take effect. Even if you use a device other than the printer to seven times as large as the eye. (.page 24) c Red-eye correction may be printed. Use the supplied cleaning cartridge and sheet to...properly? Red-eye correction - The whole area of an image by selecting "Pattern 1" in the Print setup menu. (.page 39) c Re-insert the paper tray firmly straight in the Print setup, the image is printed with "Borderless" setting, you cannot select border/ borderless prints. There are used and you...
Operating Instructions
Page 77
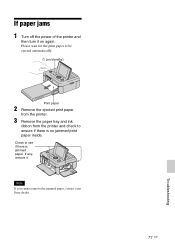
Note If you cannot remove the jammed paper, contact your Sony dealer. 77 GB Troubleshooting If any, remove it on /standby) Print paper 2 Remove the ejected print paper from the printer. 3 Remove the paper tray and ink ribbon from the printer and check to see if there is no jammed print paper inside. If paper jams 1 Turn off the power of the printer and then turn it . Please wait for the print paper to be ejected automatically. 1 (on again. Check to ensure if there is jammed paper.
Note If you cannot remove the jammed paper, contact your Sony dealer. 77 GB Troubleshooting If any, remove it on /standby) Print paper 2 Remove the ejected print paper from the printer. 3 Remove the paper tray and ink ribbon from the printer and check to see if there is no jammed print paper inside. If paper jams 1 Turn off the power of the printer and then turn it . Please wait for the print paper to be ejected automatically. 1 (on again. Check to ensure if there is jammed paper.

Operating Instructions
Page 78
... • You cannot clean the printer while it is an ink ribbon inserted, remove it . 4 Place the cleaning sheet into the printer and press PRINT. Be careful not to clean inside the printer. After the cleaning is finished, the cleaning sheet is print paper in the tray, remove it .... 2 Insert the supplied cleaning cartridge into the printer and close the ink ribbon compartment door....
... • You cannot clean the printer while it is an ink ribbon inserted, remove it . 4 Place the cleaning sheet into the printer and press PRINT. Be careful not to clean inside the printer. After the cleaning is finished, the cleaning sheet is print paper in the tray, remove it .... 2 Insert the supplied cleaning cartridge into the printer and close the ink ribbon compartment door....
Operating Instructions
Page 79
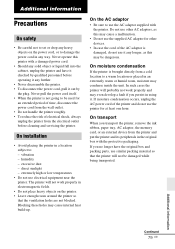
... Do not use other devices. • In case the cord of the printer and do not use similar packing material so that the ventilation holes are not blocked. If you transport the printer, remove the ink ribbon, paper tray, AC adaptor, the memory card, or an external device from the... printer and put the printer and its peripherals in any way. extremely high or low temperatures • Do not...
... Do not use other devices. • In case the cord of the printer and do not use similar packing material so that the ventilation holes are not blocked. If you transport the printer, remove the ink ribbon, paper tray, AC adaptor, the memory card, or an external device from the... printer and put the printer and its peripherals in any way. extremely high or low temperatures • Do not...


