
Instruction Manual
Page 1
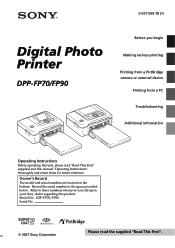
... Instructions Before operating this unit, please read the supplied "Read This First". 3-097-069-13 (1) Digital Photo Printer DPP-FP70/FP90 Before you call upon your Sony dealer regarding this manual "Operating Instructions" thoroughly and retain them for future reference. DPP-FP70/FP90 Serial No. 2007 Sony Corporation Please read "Read This First" supplied and this product.
... Instructions Before operating this unit, please read the supplied "Read This First". 3-097-069-13 (1) Digital Photo Printer DPP-FP70/FP90 Before you call upon your Sony dealer regarding this manual "Operating Instructions" thoroughly and retain them for future reference. DPP-FP70/FP90 Serial No. 2007 Sony Corporation Please read "Read This First" supplied and this product.
Instruction Manual
Page 2
...SONY (7669) The number below is subject to the following two conditions: (1) this device may cause undesired operation. 2 GB Note: This equipment has been tested and found compliant with separate collection systems) This symbol on the product or on a circuit different from that may influence the picture...if not installed and used in accordance with part 15 of Conformity Trade Name: SONY Model No.: DPP-FP70 Responsible Party: Address: Sony Electronics Inc. 16530 Via Esprillo, San Diego, CA 92127 U.S.A. Attention The ... etc) again. By ensuring this digital photo printer.
...SONY (7669) The number below is subject to the following two conditions: (1) this device may cause undesired operation. 2 GB Note: This equipment has been tested and found compliant with separate collection systems) This symbol on the product or on a circuit different from that may influence the picture...if not installed and used in accordance with part 15 of Conformity Trade Name: SONY Model No.: DPP-FP70 Responsible Party: Address: Sony Electronics Inc. 16530 Via Esprillo, San Diego, CA 92127 U.S.A. Attention The ... etc) again. By ensuring this digital photo printer.
Instruction Manual
Page 3
...you hold copyright or have permission of Sony Corporation. • This unit is manufactured using photo images with this equipment for damages. ... the printed image because phosphor methods or profiles differ. Please regard the displayed image as pictures or publications, or any accidental or consequential damages or loss of the recording contents which ...be caused by accidental operation or malfunction of the printer, we recommend that you should lose the fuse cover, please contact your nearest Sony service station. NOTICE FOR CUSTOMERS IN THE UNITED KINGDOM A moulded...
...you hold copyright or have permission of Sony Corporation. • This unit is manufactured using photo images with this equipment for damages. ... the printed image because phosphor methods or profiles differ. Please regard the displayed image as pictures or publications, or any accidental or consequential damages or loss of the recording contents which ...be caused by accidental operation or malfunction of the printer, we recommend that you should lose the fuse cover, please contact your nearest Sony service station. NOTICE FOR CUSTOMERS IN THE UNITED KINGDOM A moulded...
Instruction Manual
Page 5
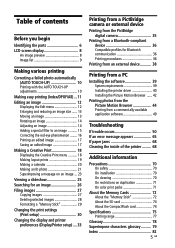
... procedures 36 Printing from an external device 38 Printing from a PC Installing the software 39 System requirements 39 Installing the printer driver 40 Installing the Picture Motion Browser ...... 42 Printing photos from the Picture Motion Browser 44 Printing from a commercially-available application software 49 Troubleshooting If trouble occurs 50 If an error message appears...
... procedures 36 Printing from an external device 38 Printing from a PC Installing the software 39 System requirements 39 Installing the printer driver 40 Installing the Picture Motion Browser ...... 42 Printing photos from the Picture Motion Browser 44 Printing from a commercially-available application software 49 Troubleshooting If trouble occurs 50 If an error message appears...
Instruction Manual
Page 7
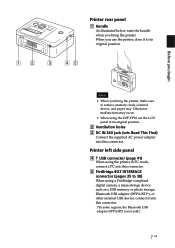
...printer. When you use the printer, close it into this connector. 5 PictBridge/EXT INTERFACE connector (pages 35 to 38) When using the DPP-FP90, set the LCD panel to its original position. Otherwise malfunctions may occur. • When using a PictBridge-compliant digital camera, a mass-storage device such as a USB memory or photo... you begin Printer rear panel 1 Handle As illustrated below, raise the handle when you bring the printer, make sure to remove memory cards, external device, and paper tray. Printer left side panel 4 USB connector (page 41) When using the printer in PC ...
...printer. When you use the printer, close it into this connector. 5 PictBridge/EXT INTERFACE connector (pages 35 to 38) When using the DPP-FP90, set the LCD panel to its original position. Otherwise malfunctions may occur. • When using a PictBridge-compliant digital camera, a mass-storage device such as a USB memory or photo... you begin Printer rear panel 1 Handle As illustrated below, raise the handle when you bring the printer, make sure to remove memory cards, external device, and paper tray. Printer left side panel 4 USB connector (page 41) When using the printer in PC ...

Instruction Manual
Page 10
... Press g/G repeatedly until the desired image is "AUTO TOUCH-UP" feature? The adjustment results will not be automatically detected. Making various printing Correcting a failed photo automatically (AUTO TOUCH-UP) What is displayed. Printing of the selected image(s) starts. The automatic red-eye correction of this case, use the Edit-Adjust... as adjustments process. 10 GB To check the adjustment result more clearly: Press to be displayed on the image being printed. In this printer uses the technology of -focus level automatically and corrects the image in the U.S.A.
... Press g/G repeatedly until the desired image is "AUTO TOUCH-UP" feature? The adjustment results will not be automatically detected. Making various printing Correcting a failed photo automatically (AUTO TOUCH-UP) What is displayed. Printing of the selected image(s) starts. The automatic red-eye correction of this case, use the Edit-Adjust... as adjustments process. 10 GB To check the adjustment result more clearly: Press to be displayed on the image being printed. In this printer uses the technology of -focus level automatically and corrects the image in the U.S.A.
Instruction Manual
Page 19
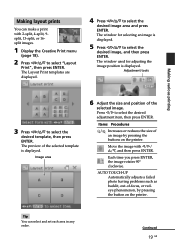
... ENTER, the image rotates 90° clockwise. Items Procedures / Increases or reduces the size of -focus, or redeye phenomenon, by pressing the buttons on the printer. Move the image with 2-split, 4-split, 9split, 13-split, or 16split images. 1 Display the Creative Print menu (page 18). 2 Press g/G/f/F to select the desired image...image is displayed. The preview of the selected image. Press g/G to select the desired adjustment item, then press ENTER. AUTO TOUCH-UP Automatically adjusts a failed photo having problems such as backlit, out-of an image by pressing the button on the...
... ENTER, the image rotates 90° clockwise. Items Procedures / Increases or reduces the size of -focus, or redeye phenomenon, by pressing the buttons on the printer. Move the image with 2-split, 4-split, 9split, 13-split, or 16split images. 1 Display the Creative Print menu (page 18). 2 Press g/G/f/F to select the desired image...image is displayed. The preview of the selected image. Press g/G to select the desired adjustment item, then press ENTER. AUTO TOUCH-UP Automatically adjusts a failed photo having problems such as backlit, out-of an image by pressing the button on the...
Instruction Manual
Page 22
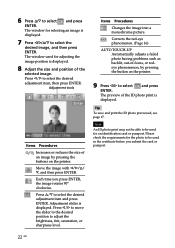
...Press g/G to adjust the brightness, tint, saturation, or sharpness level. The preview of an image by pressing the button on the printer. Note An ID photo print may not be able to be used for selecting an image is displayed. Corrects the red-eye phenomenon. (Page 16) AUTO ...you press ENTER, the image rotates 90° clockwise. Items Procedures Changes the image into a monochrome picture. Move the image with g/G/f/ F, and then press ENTER. Tip To save and print the ID photo previewed, see page 17. Adjustment slider is displayed. 8 Adjust the size and position of -focus,...
...Press g/G to adjust the brightness, tint, saturation, or sharpness level. The preview of an image by pressing the button on the printer. Note An ID photo print may not be able to be used for selecting an image is displayed. Corrects the red-eye phenomenon. (Page 16) AUTO ...you press ENTER, the image rotates 90° clockwise. Items Procedures Changes the image into a monochrome picture. Move the image with g/G/f/ F, and then press ENTER. Tip To save and print the ID photo previewed, see page 17. Adjustment slider is displayed. 8 Adjust the size and position of -focus,...
Instruction Manual
Page 31
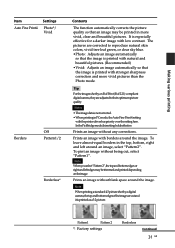
...;Vivid: Adjusts an image automatically so that an image may be printed in more vivid pictures than the Photo mode. Notes • Theimagedataisnotcorrected. • WhenprintinginPCmode,theAutoFinePrint4setting with borders around an image, select "Pattern2". Prints an image with the printer driver has priority over the setting here. Prints an image without being cut and...
...;Vivid: Adjusts an image automatically so that an image may be printed in more vivid pictures than the Photo mode. Notes • Theimagedataisnotcorrected. • WhenprintinginPCmode,theAutoFinePrint4setting with borders around an image, select "Pattern2". Prints an image with the printer driver has priority over the setting here. Prints an image without being cut and...

Instruction Manual
Page 34
.../ Portuguese/Arabian/Persian *: Factory settings 34 GB Unit In the Creative Print ID photo menu, you can select the language to explain the functions of the printer starts automatically after the printer has been left unused for about 5 seconds without thumbnail (miniature image used as index..., the images without thumbnail (miniature image used as index) data will be displayed as follows: • cm* • inch Printer Information Version of the firmware and total print number will be displayed. Item Settings Contents Listing Order Ascending* In the image list window...
.../ Portuguese/Arabian/Persian *: Factory settings 34 GB Unit In the Creative Print ID photo menu, you can select the language to explain the functions of the printer starts automatically after the printer has been left unused for about 5 seconds without thumbnail (miniature image used as index..., the images without thumbnail (miniature image used as index) data will be displayed as follows: • cm* • inch Printer Information Version of the firmware and total print number will be displayed. Item Settings Contents Listing Order Ascending* In the image list window...
Instruction Manual
Page 38
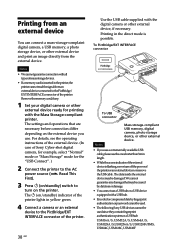
... details, see the operating instructions of the external device. (In case of Sony Cyber-shot digital camera, for example, select "Normal" mode or "Mass Storage" mode for printing with the Mass Storage-compliant printer. Printing from an external device You can connect a mass-storage-complaint digital ...EXT INTERFACE connector To USB connector Mass-storage-compliant USB memory, digital camera, photo storage device, or other external device ready for the "USB Connect". ) 2 Connect the printer to turn off the power of the printer. 38 GB Use the USB cable supplied with a USB hub. •...
... details, see the operating instructions of the external device. (In case of Sony Cyber-shot digital camera, for example, select "Normal" mode or "Mass Storage" mode for printing with the Mass Storage-compliant printer. Printing from an external device You can connect a mass-storage-complaint digital ...EXT INTERFACE connector To USB connector Mass-storage-compliant USB memory, digital camera, photo storage device, or other external device ready for the "USB Connect". ) 2 Connect the printer to turn off the power of the printer. 38 GB Use the USB cable supplied with a USB hub. •...
Instruction Manual
Page 45
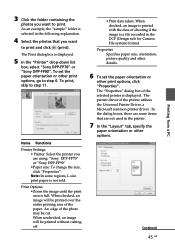
...image will be cut. Properties Specifies paper size, orientation, picture quality and other details. 6 To set the paper orientation or other print options, click "Properties". The Print dialog box is a file recorded in the printer. 7 In the "Layout" tab, specify the paper...5 In the "Printer" drop-down list box, select "Sony DPP-FP70" or "Sony DPP-FP90". Items Functions Printer Settings • Printer: Select the printer you want to print. Print Options •Zoom the image until the print area is selected in the following explanation. 4 Select the photos that are some ...
...image will be cut. Properties Specifies paper size, orientation, picture quality and other details. 6 To set the paper orientation or other print options, click "Properties". The Print dialog box is a file recorded in the printer. 7 In the "Layout" tab, specify the paper...5 In the "Printer" drop-down list box, select "Sony DPP-FP70" or "Sony DPP-FP90". Items Functions Printer Settings • Printer: Select the printer you want to print. Print Options •Zoom the image until the print area is selected in the following explanation. 4 Select the photos that are some ...
Instruction Manual
Page 47
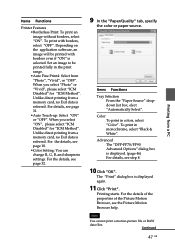
... For details, see step 8. 10 Click "OK". Note You cannot print a motion-picture file or RAW data files. To print with borders even if "ON" is selected.... data is referred. Color To print in monochrome, select "Black & White". Items Functions Printer Features •Borderless Print: To print an image without borders, select "ON". When you...Photo" or "Vivid", please select "ICM Disabled" for "ICM Method". Set an image to be printed with borders, select "OFF". Items Functions Tray Selection From the "Paper Source" dropdown list box, elect "Automatically Select". Advanced The "DPP-FP70...
... For details, see step 8. 10 Click "OK". Note You cannot print a motion-picture file or RAW data files. To print with borders even if "ON" is selected.... data is referred. Color To print in monochrome, select "Black & White". Items Functions Printer Features •Borderless Print: To print an image without borders, select "ON". When you...Photo" or "Vivid", please select "ICM Disabled" for "ICM Method". Set an image to be printed with borders, select "OFF". Items Functions Tray Selection From the "Paper Source" dropdown list box, elect "Automatically Select". Advanced The "DPP-FP70...
Instruction Manual
Page 49
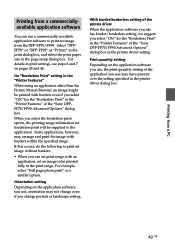
On "Borderless Print" setting in the "Printer Features" When using an application other than the Picture Motion Browser, an image might be printed...even if you select "ON" for the "Borderless Print" in the "Printer Features" of the "Sony DPP-FP70/FP90 Advanced Options" dialog box as "Printer" in the print dialog box, and select the print paper size in print... range. For example, select "Full page photo print" or a similar option. Printing from a PC Printing from the DPP-FP70/FP90. Select "DPPFP70" or "DPP-FP90" as the printer driver setting. Print quantity setting Depending on ...
On "Borderless Print" setting in the "Printer Features" When using an application other than the Picture Motion Browser, an image might be printed...even if you select "ON" for the "Borderless Print" in the "Printer Features" of the "Sony DPP-FP70/FP90 Advanced Options" dialog box as "Printer" in the print dialog box, and select the print paper size in print... range. For example, select "Full page photo print" or a similar option. Printing from a PC Printing from the DPP-FP70/FP90. Select "DPPFP70" or "DPP-FP90" as the printer driver setting. Print quantity setting Depending on ...
Instruction Manual
Page 77
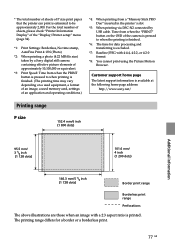
... *4: When printing from a "Memory Stick PRO Duo" inserted in the printer 's slot *5: When printing via DSC-N2 connected by a Sony digital still camera containing effective picture elements of approximately 10,100,000 or equivalent. *3: Print Speed: Time ...Printer Information Display" of the "Display/Printer setup" menu (page 34). *1: Print Settings: Borderless, No time stamp, AutoFine Print 4: ON (Photo) *2: When printing a photo (4.22 MB file size) taken by USB cable. Customer support home page The latest support information is available at the following home page address: http://www.sony...
... *4: When printing from a "Memory Stick PRO Duo" inserted in the printer 's slot *5: When printing via DSC-N2 connected by a Sony digital still camera containing effective picture elements of approximately 10,100,000 or equivalent. *3: Print Speed: Time ...Printer Information Display" of the "Display/Printer setup" menu (page 34). *1: Print Settings: Borderless, No time stamp, AutoFine Print 4: ON (Photo) *2: When printing a photo (4.22 MB file size) taken by USB cable. Customer support home page The latest support information is available at the following home page address: http://www.sony...
Instruction Manual
Page 78
... card Compact, light, removable storage media. A digital camera supporting Exif Print stores the data relevant to its optimum picture quality and printed. The printer uses thumbnails in each shot is automatically adjusted to the conditions of the DPOF preset images. Thumbnails Miniature images for ...digital photo printing. Glossary DCF (Design rule for Camera File system) This camera conforms with the DCF (Design rule ...
... card Compact, light, removable storage media. A digital camera supporting Exif Print stores the data relevant to its optimum picture quality and printed. The printer uses thumbnails in each shot is automatically adjusted to the conditions of the DPOF preset images. Thumbnails Miniature images for ...digital photo printing. Glossary DCF (Design rule for Camera File system) This camera conforms with the DCF (Design rule ...

Instruction Manual
Page 82
...Order 34 Date print 32 DCF (Design rule for Camera File system) 32 Deleting an image 28 Demonstration mode 34 Detailed image data display 8 Display/Printer setup 33 DPOF 8, 11 E Easy printing 11 Edit menu 12 Enlarging and reducing an image size 9, 13 Error messages 65 External device 38 F...-eye effect 15 Format 29 Front panel 6 H Handle 7 I Icon 34 ID photo 21 Image data display 8 Image list 9 Image preview 8 Index printing 11 Ink ribbon Notes on use 71 Input indications 8 Installing Picture Motion Browser 42 Printer driver 40 L Language 34 Layout print 19 LCD backlight 34 LCD screen 8 Listing ...
...Order 34 Date print 32 DCF (Design rule for Camera File system) 32 Deleting an image 28 Demonstration mode 34 Detailed image data display 8 Display/Printer setup 33 DPOF 8, 11 E Easy printing 11 Edit menu 12 Enlarging and reducing an image size 9, 13 Error messages 65 External device 38 F...-eye effect 15 Format 29 Front panel 6 H Handle 7 I Icon 34 ID photo 21 Image data display 8 Image list 9 Image preview 8 Index printing 11 Ink ribbon Notes on use 71 Input indications 8 Installing Picture Motion Browser 42 Printer driver 40 L Language 34 Layout print 19 LCD backlight 34 LCD screen 8 Listing ...


