
Instruction Manual
Page 6
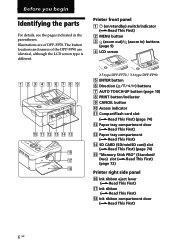
...4 LCD screen 2.5 type DPP-FP70 / 3.6 type DPP-FP90 5 ENTER button 6 Direction (f/F/g/G) buttons 7 AUTO TOUCH-UP button (page 10) 8 PRINT button/indicator 9 CANCEL button 0 Access indicator qa CompactFlash card slot (.Read This First) (page 74) qs Paper tray compartment door (.Read This First) qd Paper tray compartment (.Read This First...) qf SD CARD (SD/miniSD card) slot (.Read This First) (page 74) qg "Memory Stick PRO" (Standard/ Duo) slot (.Read This First) (page 72) Printer right side panel...
...4 LCD screen 2.5 type DPP-FP70 / 3.6 type DPP-FP90 5 ENTER button 6 Direction (f/F/g/G) buttons 7 AUTO TOUCH-UP button (page 10) 8 PRINT button/indicator 9 CANCEL button 0 Access indicator qa CompactFlash card slot (.Read This First) (page 74) qs Paper tray compartment door (.Read This First) qd Paper tray compartment (.Read This First...) qf SD CARD (SD/miniSD card) slot (.Read This First) (page 74) qg "Memory Stick PRO" (Standard/ Duo) slot (.Read This First) (page 72) Printer right side panel...
Instruction Manual
Page 7
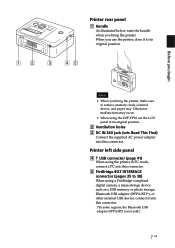
... panel 1 Handle As illustrated below, raise the handle when you bring the printer. Otherwise malfunctions may occur. • When using the DPP-FP90, set the LCD panel to its original position. 2 Ventilation holes 3 DC IN 24V jack (.Read This First) Connect the supplied ...device such as a USB memory or photo storage, Bluetooth USB adaptor (DPPA-BT1*), or other external USB device, connect it to its original position. Notes • When you bring the printer, make sure to remove memory cards, external device, and paper tray. When you use the printer, close it into this connector. ...
... panel 1 Handle As illustrated below, raise the handle when you bring the printer. Otherwise malfunctions may occur. • When using the DPP-FP90, set the LCD panel to its original position. 2 Ventilation holes 3 DC IN 24V jack (.Read This First) Connect the supplied ...device such as a USB memory or photo storage, Bluetooth USB adaptor (DPPA-BT1*), or other external USB device, connect it to its original position. Notes • When you bring the printer, make sure to remove memory cards, external device, and paper tray. When you use the printer, close it into this connector. ...
Instruction Manual
Page 12
...image was shot or saved is displayed. If the ink ribbon runs out in the image list. 2 Press MENU on the paper tray. 5 Remove the print paper from the paper tray. Display the image in the image preview window or move the Cursor to the desired image in the middle of printing and ... ink ribbon (see "Read This First"). • When the "Date Print" item of the ink ribbon is completed, the print paper automatically emerges on the printer. The confirmation dialog box is displayed. During printing, the PRINT indicator flashes and the printing process is displayed. The Edit menu is ...
...image was shot or saved is displayed. If the ink ribbon runs out in the image list. 2 Press MENU on the paper tray. 5 Remove the print paper from the paper tray. Display the image in the image preview window or move the Cursor to the desired image in the middle of printing and ... ink ribbon (see "Read This First"). • When the "Date Print" item of the ink ribbon is completed, the print paper automatically emerges on the printer. The confirmation dialog box is displayed. During printing, the PRINT indicator flashes and the printing process is displayed. The Edit menu is ...
Instruction Manual
Page 47
...or "OFF". Color To print in monochrome, select "Black & White". Printing starts. Items Functions Printer Features •Borderless Print: To print an image without borders, select "ON". Depending on the application...Picture Motion Browser help. Items Functions Tray Selection From the "Paper Source" dropdown list box, elect "Automatically Select". To print in colors, select "Color". To print with borders even if "ON" is selected. Advanced The "DPP-FP70/FP90 Advanced Options" dialog box is displayed again. 11 Click "Print". Continued 47 GB Printing from "Photo...
...or "OFF". Color To print in monochrome, select "Black & White". Printing starts. Items Functions Printer Features •Borderless Print: To print an image without borders, select "ON". Depending on the application...Picture Motion Browser help. Items Functions Tray Selection From the "Paper Source" dropdown list box, elect "Automatically Select". To print in colors, select "Color". To print with borders even if "ON" is selected. Advanced The "DPP-FP70/FP90 Advanced Options" dialog box is displayed again. 11 Click "Print". Continued 47 GB Printing from "Photo...
Instruction Manual
Page 53
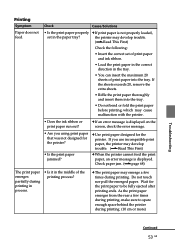
...extra sheets. • Riffle the print paper thoroughly and insert them into the tray. If you use incompatible print paper, the printer may develop trouble. (.Read This First) c When the printer cannot feed the print paper, an error message is displayed on ...paper and ink ribbon. • Load the print paper in the correct direction in the tray. • You can insert the maximum 20 sheets of the printing process? c Use print paper designed for the print paper to spare enough space behind the printer during printing in process. • Is it in the paper tray? Printing Symptom Paper...
...extra sheets. • Riffle the print paper thoroughly and insert them into the tray. If you use incompatible print paper, the printer may develop trouble. (.Read This First) c When the printer cannot feed the print paper, an error message is displayed on ...paper and ink ribbon. • Load the print paper in the correct direction in the tray. • You can insert the maximum 20 sheets of the printing process? c Use print paper designed for the print paper to spare enough space behind the printer during printing in process. • Is it in the paper tray? Printing Symptom Paper...
Instruction Manual
Page 57
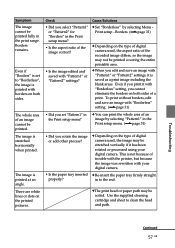
... printed. Check Cause/Solutions • Did you print it has been rotated or processed using your digital camera. c Re-insert the paper tray firmly straight in the Print setup menu? • Is the aspect ratio of a print. Use the supplied cleaning cartridge and sheet to...trouble with the printer, but because the image was rewritten with borders on the printed pictures. c Depending on both sides. cThe print head or paper path may be stretched vertically if it with "Borderless" setting, you rotate the image or add other process? • Is the paper tray inserted properly? ...
... printed. Check Cause/Solutions • Did you print it has been rotated or processed using your digital camera. c Re-insert the paper tray firmly straight in the Print setup menu? • Is the aspect ratio of a print. Use the supplied cleaning cartridge and sheet to...trouble with the printer, but because the image was rewritten with borders on the printed pictures. c Depending on both sides. cThe print head or paper path may be stretched vertically if it with "Borderless" setting, you rotate the image or add other process? • Is the paper tray inserted properly? ...

Instruction Manual
Page 67
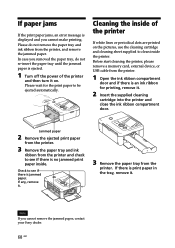
...the paper tray and set the paper tray into the printer. (.Read This First) If "cleaning cartridge" is no cleaning sheet in the tray and set the paper tray into the printer. (.Read This First) Cleaning sheet is not set in the printer and set the print paper in the paper tray.... a new ink ribbon. (.Read This First) Ink ribbon type incorrect. Remove Print Paper. The print paper is not inserted in the printer. If the jammed paper cannot be removed, contact the Sony service facilities. Meaning/Solutions c The ink ribbon is not set the cleaning cartridge.
...the paper tray and set the paper tray into the printer. (.Read This First) If "cleaning cartridge" is no cleaning sheet in the tray and set the paper tray into the printer. (.Read This First) Cleaning sheet is not set in the printer and set the print paper in the paper tray.... a new ink ribbon. (.Read This First) Ink ribbon type incorrect. Remove Print Paper. The print paper is not inserted in the printer. If the jammed paper cannot be removed, contact the Sony service facilities. Meaning/Solutions c The ink ribbon is not set the cleaning cartridge.
Instruction Manual
Page 68
... not re-insert the paper tray until the jammed paper is print paper in the tray, remove it . 2 Insert the supplied cleaning cartridge into the printer and close the ink ribbon compartment door. Jammed paper 2 Remove the ejected print paper from the printer. 3 Remove the paper tray and ink ribbon from the printer. If any, remove it on the pictures, use the cleaning...
... not re-insert the paper tray until the jammed paper is print paper in the tray, remove it . 2 Insert the supplied cleaning cartridge into the printer and close the ink ribbon compartment door. Jammed paper 2 Remove the ejected print paper from the printer. 3 Remove the paper tray and ink ribbon from the printer. If any, remove it on the pictures, use the cleaning...
Instruction Manual
Page 69
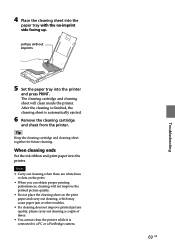
...will not improve the printed picture quality. • Do not place the cleaning sheet on the print. • When you can obtain proper printing performances, cleaning will clean inside the printer. surface without imprints 5 Set the paper tray into the printer. Tip Keep the cleaning ...cartridge and cleaning sheet together for future cleaning. 4 Place the cleaning sheet into the paper tray with the no-imprint side facing up. After...
...will not improve the printed picture quality. • Do not place the cleaning sheet on the print. • When you can obtain proper printing performances, cleaning will clean inside the printer. surface without imprints 5 Set the paper tray into the printer. Tip Keep the cleaning ...cartridge and cleaning sheet together for future cleaning. 4 Place the cleaning sheet into the paper tray with the no-imprint side facing up. After...
Instruction Manual
Page 70
...vibration - Never pull the power cord itself. • When the printer is damaged, never use it any longer, as alcohol or benzine, which may damage the finish. If you transport the printer, remove the ink ribbon, paper tray, AC adaptor, the memory card, or an external device from the ...electrical outlet before operating it any further. • Never disassemble the printer. • To disconnect the power cord, pull it ....
...vibration - Never pull the power cord itself. • When the printer is damaged, never use it any longer, as alcohol or benzine, which may damage the finish. If you transport the printer, remove the ink ribbon, paper tray, AC adaptor, the memory card, or an external device from the ...electrical outlet before operating it any further. • Never disassemble the printer. • To disconnect the power cord, pull it ....

Instruction Manual
Page 71
...the arrow to rewind the ribbon inside the ink ribbon. On print paper • The side without printed. • Do not print on used print paper. Use the oil ink pen to the printer. • Do not remove the paper tray while printing. Doing so could result in the direction of the ink... ribbon in damages to write on the paper after printing. Otherwise, proper printing result will not make...
...the arrow to rewind the ribbon inside the ink ribbon. On print paper • The side without printed. • Do not print on used print paper. Use the oil ink pen to the printer. • Do not remove the paper tray while printing. Doing so could result in the direction of the ink... ribbon in damages to write on the paper after printing. Otherwise, proper printing result will not make...

Instruction Manual
Page 72
...Avoid leaving the printing surface of the print paper in a dark and cold location and use the following types of "Memory Stick" that the printer can use With the printer, you can use both standard-size and Duo-size media. Sony shall assume no responsibilities for any damage, ..." copyright protection cannot be caused by Sony using authentication and encryption. *2 The printer is equipped with a slot compatible with a large capacity. Without a Memory Stick Duo adaptor, you are going to store print paper in the paper tray, make sure to close the tray cover and slide cover. • Avoid...
...Avoid leaving the printing surface of the print paper in a dark and cold location and use the following types of "Memory Stick" that the printer can use With the printer, you can use both standard-size and Duo-size media. Sony shall assume no responsibilities for any damage, ..." copyright protection cannot be caused by Sony using authentication and encryption. *2 The printer is equipped with a slot compatible with a large capacity. Without a Memory Stick Duo adaptor, you are going to store print paper in the paper tray, make sure to close the tray cover and slide cover. • Avoid...
Instruction Manual
Page 76
...x 4 7/8 inches) (w/h/d, excluding protruding parts and cables) Mass Approx. 305 g (11 oz) Design and specifications are subject to 95 ˚F) Dimensions [DPP-FP70] Height: Approx. 63 mm ( 2 1/2 inches) (printer) Approx. 72 mm ( 2 7/8 inches) (including LCD projecting parts) Width: Depth: Approx. 180 mm ( 7 1/8 inches) Approx. 137 mm (...memory card/an external device Ink ribbon/Print Paper See supplied "Read This First". Mass DPP-FP70: Approx. 1.1 kg (2 lb 7 oz) DPP-FP90: Approx. 1.2 kg (2 lb 10 oz) (excluding the paper tray, ink ribbon, AC power adaptor) Supplied ...
...x 4 7/8 inches) (w/h/d, excluding protruding parts and cables) Mass Approx. 305 g (11 oz) Design and specifications are subject to 95 ˚F) Dimensions [DPP-FP70] Height: Approx. 63 mm ( 2 1/2 inches) (printer) Approx. 72 mm ( 2 7/8 inches) (including LCD projecting parts) Width: Depth: Approx. 180 mm ( 7 1/8 inches) Approx. 137 mm (...memory card/an external device Ink ribbon/Print Paper See supplied "Read This First". Mass DPP-FP70: Approx. 1.1 kg (2 lb 7 oz) DPP-FP90: Approx. 1.2 kg (2 lb 10 oz) (excluding the paper tray, ink ribbon, AC power adaptor) Supplied ...


