
Instruction Manual
Page 5
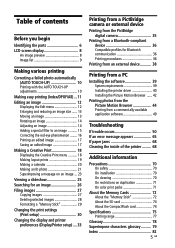
... 38 Printing from a PC Installing the software 39 System requirements 39 Installing the printer driver 40 Installing the Picture Motion Browser ...... 42 Printing photos from the Picture Motion Browser 44 Printing from a commercially-available application software 49 Troubleshooting If trouble ...occurs 50 If an error message appears 65 If paper jams 68 Cleaning the inside of the printer ......... ...
... 38 Printing from a PC Installing the software 39 System requirements 39 Installing the printer driver 40 Installing the Picture Motion Browser ...... 42 Printing photos from the Picture Motion Browser 44 Printing from a commercially-available application software 49 Troubleshooting If trouble ...occurs 50 If an error message appears 65 If paper jams 68 Cleaning the inside of the printer ......... ...
Instruction Manual
Page 6
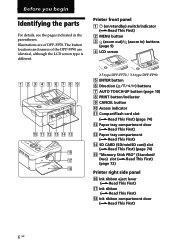
...4 LCD screen 2.5 type DPP-FP70 / 3.6 type DPP-FP90 5 ENTER button 6 Direction (f/F/g/G) buttons 7 AUTO TOUCH-UP button (page 10) 8 PRINT button/indicator 9 CANCEL button 0 Access indicator qa CompactFlash card slot (.Read This First) (page 74) qs Paper tray compartment door (.Read This First) qd Paper tray compartment (.Read This ... ribbon (.Read This First) qk Ink ribbon compartment door (.Read This First) 6 GB The button locations and names of DPP-FP70. Printer front panel 1 1 (on/standby) switch/indicator (.Read This First) 2 MENU button 3 (zoom out)/ (zoom in the parentheses. Illustrations ...
...4 LCD screen 2.5 type DPP-FP70 / 3.6 type DPP-FP90 5 ENTER button 6 Direction (f/F/g/G) buttons 7 AUTO TOUCH-UP button (page 10) 8 PRINT button/indicator 9 CANCEL button 0 Access indicator qa CompactFlash card slot (.Read This First) (page 74) qs Paper tray compartment door (.Read This First) qd Paper tray compartment (.Read This ... ribbon (.Read This First) qk Ink ribbon compartment door (.Read This First) 6 GB The button locations and names of DPP-FP70. Printer front panel 1 1 (on/standby) switch/indicator (.Read This First) 2 MENU button 3 (zoom out)/ (zoom in the parentheses. Illustrations ...
Instruction Manual
Page 7
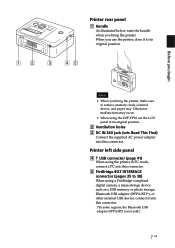
... photo ...printer, make sure to its original position. Before you begin Printer rear panel 1 Handle As illustrated below, raise the handle when you bring the printer. When you use the printer..., close it into this connector. (*In some regions, the Bluetooth USB adaptor DPPA-BT1 is not sold.) 7 GB Printer left side panel 4 USB connector (page 41) When using the printer... in PC mode, connect a PC into this connector. 5 PictBridge/EXT INTERFACE connector (pages 35 to 38) When using the DPP...
... photo ...printer, make sure to its original position. Before you begin Printer rear panel 1 Handle As illustrated below, raise the handle when you bring the printer. When you use the printer..., close it into this connector. (*In some regions, the Bluetooth USB adaptor DPPA-BT1 is not sold.) 7 GB Printer left side panel 4 USB connector (page 41) When using the printer... in PC mode, connect a PC into this connector. 5 PictBridge/EXT INTERFACE connector (pages 35 to 38) When using the DPP...
Instruction Manual
Page 12
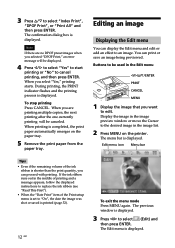
...multiple copies, the next printing after the one currently printing will be used in the image list. 2 Press MENU on the paper tray. 5 Remove the print paper from the paper tray. To stop printing Press CANCEL. Edit menu icon Menu bar Tips • Even if the remaining volume of the ...Print setup menu is completed, the print paper automatically emerges on the printer. The confirmation dialog box is displayed. When printing is set to select "Index Print", "DPOF Print", or "Print All" and ...
...multiple copies, the next printing after the one currently printing will be used in the image list. 2 Press MENU on the paper tray. 5 Remove the print paper from the paper tray. To stop printing Press CANCEL. Edit menu icon Menu bar Tips • Even if the remaining volume of the ...Print setup menu is completed, the print paper automatically emerges on the printer. The confirmation dialog box is displayed. When printing is set to select "Index Print", "DPOF Print", or "Print All" and ...
Instruction Manual
Page 23
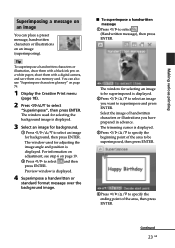
.... 2Press g/G/f/F to select an image you have prepared in advance. Tip To superimpose a handwritten characters or illustration, draw them with a black ink pen on a white paper, shoot them with a digital camera, and save them on page 79. 1 Display the Creative Print menu (page 18). 2 Press g/G/f/F to select "Superimpose", then press ENTER...
.... 2Press g/G/f/F to select an image you have prepared in advance. Tip To superimpose a handwritten characters or illustration, draw them with a black ink pen on a white paper, shoot them with a digital camera, and save them on page 79. 1 Display the Creative Print menu (page 18). 2 Press g/G/f/F to select "Superimpose", then press ENTER...
Instruction Manual
Page 44
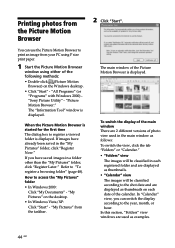
..., month, or hour. Refer to access the "My Pictures" folder • In Windows 2000: Click "My Documents" - "My Pictures" from your PC using P size print paper. 1 Start the Picture Motion Browser window using either of the following methods: • Double-click (Picture Motion Browser) on the Windows desktop. • Click ...print an image from the taskbar. The main window of the calendar. "All Programs" (or "Programs" with Windows 2000) "Sony Picture Utility" - Printing photos from the Picture Motion Browser 2 Click "Start". How to "To register a browsing folder" (page 48).
..., month, or hour. Refer to access the "My Pictures" folder • In Windows 2000: Click "My Documents" - "My Pictures" from your PC using P size print paper. 1 Start the Picture Motion Browser window using either of the following methods: • Double-click (Picture Motion Browser) on the Windows desktop. • Click ...print an image from the taskbar. The main window of the calendar. "All Programs" (or "Programs" with Windows 2000) "Sony Picture Utility" - Printing photos from the Picture Motion Browser 2 Click "Start". How to "To register a browsing folder" (page 48).
Instruction Manual
Page 45
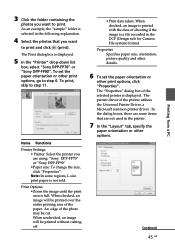
... Functions Printer Settings • Printer: Select the printer you are not used in the following explanation. 4 Select the photos that are using: "Sony DPP-FP70" or "Sony DPP-FP90" •Paper size:...printer driver of the selected printer is displayed. 5 In the "Printer" drop-down list box, select "Sony DPP-FP70" or "Sony DPP-FP90". Continued 45 GB Printing from a PC To set the paper orientation or other print options, click "Properties". The Print dialog box is displayed. Note: In some items that you want to print. Properties Specifies paper size, orientation, picture...
... Functions Printer Settings • Printer: Select the printer you are not used in the following explanation. 4 Select the photos that are using: "Sony DPP-FP70" or "Sony DPP-FP90" •Paper size:...printer driver of the selected printer is displayed. 5 In the "Printer" drop-down list box, select "Sony DPP-FP70" or "Sony DPP-FP90". Continued 45 GB Printing from a PC To set the paper orientation or other print options, click "Properties". The Print dialog box is displayed. Note: In some items that you want to print. Properties Specifies paper size, orientation, picture...
Instruction Manual
Page 46
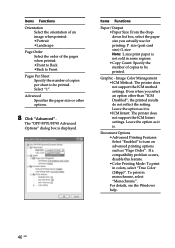
... printed. Select "1". Even when you actually use for printing: P size (post card size)/L size Note: L size print paper is . •ICM Intent: The printer does not support the ICM Intent settings. Leave the option as it is not sold in some regions. •Copy Count...The "DPP-FP70/FP90 Advanced Options" dialog box is . If a compatibility problem occurs, disable this feature. •Color Printing Mode: To print in monochrome, select "Monochrome". Graphic - Image Color Management •ICM Method: The printer does not support the ICM method settings. Advanced Specifies the paper size ...
... printed. Select "1". Even when you actually use for printing: P size (post card size)/L size Note: L size print paper is . •ICM Intent: The printer does not support the ICM Intent settings. Leave the option as it is not sold in some regions. •Copy Count...The "DPP-FP70/FP90 Advanced Options" dialog box is . If a compatibility problem occurs, disable this feature. •Color Printing Mode: To print in monochrome, select "Monochrome". Graphic - Image Color Management •ICM Method: The printer does not support the ICM method settings. Advanced Specifies the paper size ...
Instruction Manual
Page 47
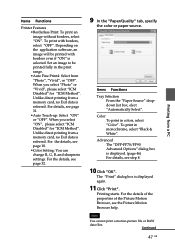
... •Auto Fine Print4: Select from a PC For the details, see the Picture Motion Browser help. When you select "ON", please select "ICM Disabled" for "ICM Method". Items Functions Printer Features •Borderless Print: To print an image without borders, select "ON"....you select "Photo" or "Vivid", please select "ICM Disabled" for "ICM Method". Advanced The "DPP-FP70/FP90 Advanced Options" dialog box is displayed again. 11 Click "Print". Note You cannot print a motion-picture file or RAW data files. Items Functions Tray Selection From the "Paper Source" dropdown ...
... •Auto Fine Print4: Select from a PC For the details, see the Picture Motion Browser help. When you select "ON", please select "ICM Disabled" for "ICM Method". Items Functions Printer Features •Borderless Print: To print an image without borders, select "ON"....you select "Photo" or "Vivid", please select "ICM Disabled" for "ICM Method". Advanced The "DPP-FP70/FP90 Advanced Options" dialog box is displayed again. 11 Click "Print". Note You cannot print a motion-picture file or RAW data files. Items Functions Tray Selection From the "Paper Source" dropdown ...
Instruction Manual
Page 48
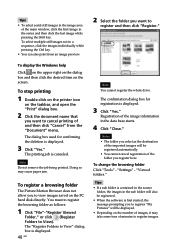
...then click "Cancel" from an image preview. 2 Select the folder you register here. To stop printing 1 Double-click on the printer icon on the number of images, it may cause paper jam. To change the browsing folder Click "Tools" - Tips • If a sub folder is contained in the source folder...desired item on the PC hard disk directly. The "Register Folders to View" dialog box is first started, the message prompting you to register "My Pictures" will also be displayed. • Depending on the taskbar, and open the "Print" dialog box. 2 Click the document name that you want ...
...then click "Cancel" from an image preview. 2 Select the folder you register here. To stop printing 1 Double-click on the printer icon on the number of images, it may cause paper jam. To change the browsing folder Click "Tools" - Tips • If a sub folder is contained in the source folder...desired item on the PC hard disk directly. The "Register Folders to View" dialog box is first started, the message prompting you to register "My Pictures" will also be displayed. • Depending on the taskbar, and open the "Print" dialog box. 2 Click the document name that you want ...
Instruction Manual
Page 49
... "ON" for the "Borderless Print" in the "Printer Features" of the "Sony DPP-FP70/FP90 Advanced Options" dialog box as "Printer" in the print dialog box, and select the print paper size in the printer driver dialog box. 49 GB When you select the ...Picture Motion Browser, an image might be supplied to the application. Print quantity setting Depending on the application software you use, the print quantity setting of the "Sony DPPFP70/FP90 Advanced Options" dialog box. For example, select "Full page photo print" or a similar option. Select "DPPFP70" or "DPP-FP90" as the printer...
... "ON" for the "Borderless Print" in the "Printer Features" of the "Sony DPP-FP70/FP90 Advanced Options" dialog box as "Printer" in the print dialog box, and select the print paper size in the printer driver dialog box. 49 GB When you select the ...Picture Motion Browser, an image might be supplied to the application. Print quantity setting Depending on the application software you use, the print quantity setting of the "Sony DPPFP70/FP90 Advanced Options" dialog box. For example, select "Full page photo print" or a similar option. Select "DPPFP70" or "DPP-FP90" as the printer...
Instruction Manual
Page 53
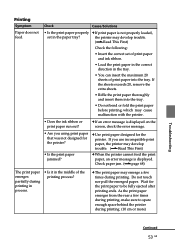
...20, remove the extra sheets. • Riffle the print paper thoroughly and insert them into the tray. If you use incompatible print paper, the printer may develop trouble. (.Read This First) c When the printer cannot feed the print paper, an error message is displayed on the screen, check ... sure to be fully ejected after printing ends. c The print paper may cause malfunction with the printer. • Does the ink ribbon or print paper run out? Wait for the printer. Check paper jam. (.page 68) The print paper emerges partially during printing in process. • Is it in the...
...20, remove the extra sheets. • Riffle the print paper thoroughly and insert them into the tray. If you use incompatible print paper, the printer may develop trouble. (.Read This First) c When the printer cannot feed the print paper, an error message is displayed on the screen, check ... sure to be fully ejected after printing ends. c The print paper may cause malfunction with the printer. • Does the ink ribbon or print paper run out? Wait for the printer. Check paper jam. (.page 68) The print paper emerges partially during printing in process. • Is it in the...
Instruction Manual
Page 54
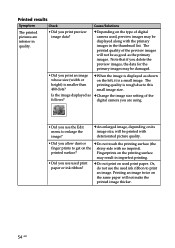
... printed image thicker. 54 GB c An enlarged image, depending on the type of digital camera used, preview images may be printed with deteriorated picture quality. • Did you print an image whose size (width or height) is displayed as the primary images. c Do not print on the...Do not touch the printing surface (the finger prints to enlarge the image? Printed results Symptom Check Cause/Solutions The printed pictures are using. • Did you use used print paper or ink ribbon? The printed quality of the follows? c When the image is smaller than 480 dots? digital camera you...
... printed image thicker. 54 GB c An enlarged image, depending on the type of digital camera used, preview images may be printed with deteriorated picture quality. • Did you print an image whose size (width or height) is displayed as the primary images. c Do not print on the...Do not touch the printing surface (the finger prints to enlarge the image? Printed results Symptom Check Cause/Solutions The printed pictures are using. • Did you use used print paper or ink ribbon? The printed quality of the follows? c When the image is smaller than 480 dots? digital camera you...
Instruction Manual
Page 57
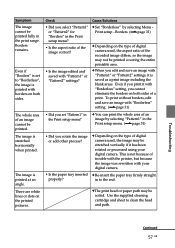
...Borderless" setting. (.page 31) • Did you rotate the image or add other process? • Is the paper tray inserted properly? Troubleshooting Continued 57 GB Even if "Borders" is printed with "Borderless" setting, you select "Pattern1..." in the Print setup menu? There are white lines or dots on the type of trouble with the printer, but because the image was rewritten with "Pattern1" or "Pattern2" settings, it has been rotated or.... (.page 31) c Depending on the printed pictures. cThe print head or paper path may be stretched vertically if it is printed at an angle.
...Borderless" setting. (.page 31) • Did you rotate the image or add other process? • Is the paper tray inserted properly? Troubleshooting Continued 57 GB Even if "Borders" is printed with "Borderless" setting, you select "Pattern1..." in the Print setup menu? There are white lines or dots on the type of trouble with the printer, but because the image was rewritten with "Pattern1" or "Pattern2" settings, it has been rotated or.... (.page 31) c Depending on the printed pictures. cThe print head or paper path may be stretched vertically if it is printed at an angle.

Instruction Manual
Page 60
... remove the slack. (.Read This First) The ink ribbon cannot be removed, contact the Sony service facilities. As soon as the data processing finishes, the printer starts printing. See "If paper jams" (.page 68) and remove jammed paper from the printer. c If no indicator is large and it for printing. After the motor sound stops...
... remove the slack. (.Read This First) The ink ribbon cannot be removed, contact the Sony service facilities. As soon as the data processing finishes, the printer starts printing. See "If paper jams" (.page 68) and remove jammed paper from the printer. c If no indicator is large and it for printing. After the motor sound stops...

Instruction Manual
Page 67
...cleaning sheet and press [PRINT]. Set the print paper for the P Size and press [PRINT]. Check the ink ribbon size actually loaded in the printer and set in the printer. - If the jammed paper cannot be removed, contact the Sony service facilities. Insert ink ribbon and press [PRINT].... Insert P size ink ribbon and press [PRINT]. The print paper is no print paper in the paper tray. - Insert P size...
...cleaning sheet and press [PRINT]. Set the print paper for the P Size and press [PRINT]. Check the ink ribbon size actually loaded in the printer and set in the printer. - If the jammed paper cannot be removed, contact the Sony service facilities. Insert ink ribbon and press [PRINT].... Insert P size ink ribbon and press [PRINT]. The print paper is no print paper in the paper tray. - Insert P size...
Instruction Manual
Page 68
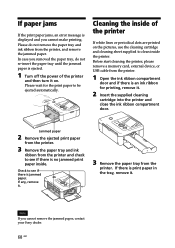
...paper, contact your Sony dealer. 68 GB In case you removed the paper tray, do not remove the paper tray and ink ribbon from the printer. Check to be ejected automatically. Cleaning the inside of the printer and then turn it . 3 Remove the paper tray from the printer, and remove the jammed paper.... Note If you cannot make printing. If any, remove it on the pictures, use the cleaning cartridge and cleaning sheet supplied...
...paper, contact your Sony dealer. 68 GB In case you removed the paper tray, do not remove the paper tray and ink ribbon from the printer. Check to be ejected automatically. Cleaning the inside of the printer and then turn it . 3 Remove the paper tray from the printer, and remove the jammed paper.... Note If you cannot make printing. If any, remove it on the pictures, use the cleaning cartridge and cleaning sheet supplied...
Instruction Manual
Page 69
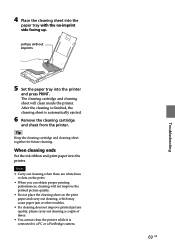
.... • Do not place the cleaning sheet on the print paper and carry out cleaning, which may cause paper jam or other troubles. • If a cleaning does not improve printed picture quality, please carry out cleaning a couple of times. • You cannot clean the printer while it is automatically ejected. 6 Remove the cleaning cartridge...
.... • Do not place the cleaning sheet on the print paper and carry out cleaning, which may cause paper jam or other troubles. • If a cleaning does not improve printed picture quality, please carry out cleaning a couple of times. • You cannot clean the printer while it is automatically ejected. 6 Remove the cleaning cartridge...
Instruction Manual
Page 70
...be used for at least one hour. high humidity - If you no longer have it checked by qualified personnel before cleaning and servicing the printer. Do not use other devices. • Do not use an electrical transformer (travel converter), as alcohol or benzine, which may even ...develop a fault if you transport the printer, remove the ink ribbon, paper tray, AC adaptor, the memory card, or an external device from the printer and put the printer and its peripherals in any way. In such cases the printer will probably not work properly in electromagnetic fields. &#...
...be used for at least one hour. high humidity - If you no longer have it checked by qualified personnel before cleaning and servicing the printer. Do not use other devices. • Do not use an electrical transformer (travel converter), as alcohol or benzine, which may even ...develop a fault if you transport the printer, remove the ink ribbon, paper tray, AC adaptor, the memory card, or an external device from the printer and put the printer and its peripherals in any way. In such cases the printer will probably not work properly in electromagnetic fields. &#...

Instruction Manual
Page 71
...films, video tapes, others' portraits or other materials may infringe the provisions of print paper or attempt to the printer. • Do not remove the paper tray while printing. Total number of the printer, make the printed image thicker. - Inferior print quality may occur. Printing an image...not rewind the ink ribbon and use the print paper ejected without the imprinting is contaminated with the printer, pay special attention to write on the print paper using an inkjet printer, etc. - You cannot type on the paper after printing. If the ink ribbon does not ...
...films, video tapes, others' portraits or other materials may infringe the provisions of print paper or attempt to the printer. • Do not remove the paper tray while printing. Total number of the printer, make the printed image thicker. - Inferior print quality may occur. Printing an image...not rewind the ink ribbon and use the print paper ejected without the imprinting is contaminated with the printer, pay special attention to write on the print paper using an inkjet printer, etc. - You cannot type on the paper after printing. If the ink ribbon does not ...