
Operating Instructions
Page 10
... display. (.page 26) x Exporting images You can export images in the album to the album are turning the pages of an album yourself. Just insert a memory card removed from various modes, including just images, a clock, or calendar view. You can select from a digital camera or other devices, such as a "Memory Stick", CompactFlash card, SD...
... display. (.page 26) x Exporting images You can export images in the album to the album are turning the pages of an album yourself. Just insert a memory card removed from various modes, including just images, a clock, or calendar view. You can select from a digital camera or other devices, such as a "Memory Stick", CompactFlash card, SD...
Operating Instructions
Page 13
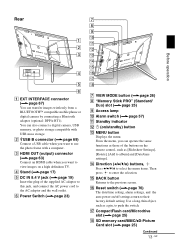
... Rear Before operation A EXT INTERFACE connector (.page 67) You can also connect a digital camera, USB memory, or photo storage compatible with a computer. B USB B connector (.page 69) Connect a USB .... C HDMI OUT (output) connector (.page 63) Connect an HDMI cable when you want to album] and [Date/time settings]. P Reset switch (.page 76) The date/time setting, alarm settings... TV. Use a long, thin object, such as [Slideshow Settings], [Rotate], [Add to use the photo frame with USB mass storage. N Direction (B/b/v/V) buttons, Press B/b/v/V to select the menu items. Then press to...
... Rear Before operation A EXT INTERFACE connector (.page 67) You can also connect a digital camera, USB memory, or photo storage compatible with a computer. B USB B connector (.page 69) Connect a USB .... C HDMI OUT (output) connector (.page 63) Connect an HDMI cable when you want to album] and [Date/time settings]. P Reset switch (.page 76) The date/time setting, alarm settings... TV. Use a long, thin object, such as [Slideshow Settings], [Rotate], [Add to use the photo frame with USB mass storage. N Direction (B/b/v/V) buttons, Press B/b/v/V to select the menu items. Then press to...

Operating Instructions
Page 15
Before operation Remote control A Auto Touch-up button (.page 45) B VIEW MODE button (.page 26) C SLIDE-SHOW ( ) button (.page 26) D INDEX ( ) button (.page 26) This button switches from the single view mode to the index image display. E SINGLE ( ) button (.page 26) F MENU button G BACK button H 1 (on/standby) button I CLOCK ( ) button (.page 26) J Zoom in ( )/Zoom out ( ) buttons (.page 47) K ALBUM ( ) button (.page 37) L Direction (B/b/v/V) buttons M (enter) button N ROTATE ( ) button (.page 47) 15 GB
Before operation Remote control A Auto Touch-up button (.page 45) B VIEW MODE button (.page 26) C SLIDE-SHOW ( ) button (.page 26) D INDEX ( ) button (.page 26) This button switches from the single view mode to the index image display. E SINGLE ( ) button (.page 26) F MENU button G BACK button H 1 (on/standby) button I CLOCK ( ) button (.page 26) J Zoom in ( )/Zoom out ( ) buttons (.page 47) K ALBUM ( ) button (.page 37) L Direction (B/b/v/V) buttons M (enter) button N ROTATE ( ) button (.page 47) 15 GB
Operating Instructions
Page 26
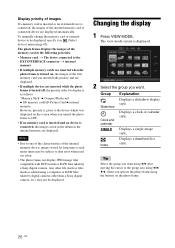
... style. Notes • Due to one of the characteristics of the internal memory device, images stored for display is connected, the images saved in the album in (Select device) menu (page 45). Changing the display 1 Press VIEW MODE. To manually change the memory card or external device to be subject to... or an external device is displayed. 2 Select the group you want using B/b after moving the cursor to the group area using B/b/ v/V, when you operate the photo frame using a computer or RAW files taken by a Sony digital camera.
... style. Notes • Due to one of the characteristics of the internal memory device, images stored for display is connected, the images saved in the album in (Select device) menu (page 45). Changing the display 1 Press VIEW MODE. To manually change the memory card or external device to be subject to... or an external device is displayed. 2 Select the group you want using B/b after moving the cursor to the group area using B/b/ v/V, when you operate the photo frame using a computer or RAW files taken by a Sony digital camera.
Operating Instructions
Page 37
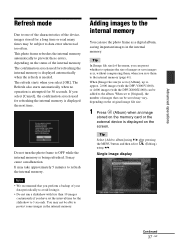
...to avoid losing it. • Do not run a slideshow with the DPF-X800/X1000) can be subject to the internal memory You can use the photo frame as is displayed the next time. Do not turn the photo frame to protect some images in the internal memory. When [Image file size..., images stored for a long time or read too often. The refresh starts when you save images as a digital album, saving important images in the internal memory. This photo frame refreshes the internal memory automatically to prevent these errors, depending on the screen. The confirmation screen used for 30 ...
...to avoid losing it. • Do not run a slideshow with the DPF-X800/X1000) can be subject to the internal memory You can use the photo frame as is displayed the next time. Do not turn the photo frame to protect some images in the internal memory. When [Image file size..., images stored for a long time or read too often. The refresh starts when you save images as a digital album, saving important images in the internal memory. This photo frame refreshes the internal memory automatically to prevent these errors, depending on the screen. The confirmation screen used for 30 ...

Operating Instructions
Page 38
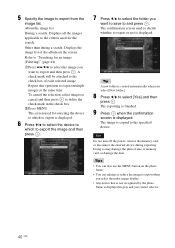
... select [Selected images], you can select the image you select [New folder]. 5 Press v/V to the criteria used for selecting a folder is displayed. Go to the album and then press . The image is displayed. Slideshow display Index image display 1Press B/b/v/V to select the image to add to step 3. If you select [Add... folder is created automatically when you want and press . A check mark will be selected on the screen. Go to step 4. 3 Specify the image to the album. Other than during a search: Displays all the images.
... select [Selected images], you can select the image you select [New folder]. 5 Press v/V to the criteria used for selecting a folder is displayed. Go to the album and then press . The image is displayed. Slideshow display Index image display 1Press B/b/v/V to select the image to add to step 3. If you select [Add... folder is created automatically when you want and press . A check mark will be selected on the screen. Go to step 4. 3 Specify the image to the album. Other than during a search: Displays all the images.

Operating Instructions
Page 39
... operations 4 Press v/V to the album. • Do not turn off the power, remove the memory card, or disconnect the external device while an image is exported to export from (Editing) and then press . • You can also use the MENU button on the photo frame. • You can change the... when read many times may damage the photo frame or memory card, or damage the data. If you perform a backup of all images], the image list is displayed. A check mark is displayed on the remote control and then press v/V to select [Add to album] from the image list. We recommend ...
... operations 4 Press v/V to the album. • Do not turn off the power, remove the memory card, or disconnect the external device while an image is exported to export from (Editing) and then press . • You can also use the MENU button on the photo frame. • You can change the... when read many times may damage the photo frame or memory card, or damage the data. If you perform a backup of all images], the image list is displayed. A check mark is displayed on the remote control and then press v/V to select [Add to album] from the image list. We recommend ...
Operating Instructions
Page 40
.... 7 Press v/V to select the folder you cannot select it. 40 GB Other than during exporting. Tip A new folder is displayed. Doing so may damage the photo frame or memory card, or damage the data. 5 Specify the image to select [Yes] and then press . Refer to "Searching for the search. The screen used... gray and you want to and press . To cancel the selection, select images to cancel and then press to the check box of the album on the photo frame. • You can enlarge or reduce the image to export when you select the index image display. • Any device that is not ...
.... 7 Press v/V to select the folder you cannot select it. 40 GB Other than during exporting. Tip A new folder is displayed. Doing so may damage the photo frame or memory card, or damage the data. 5 Specify the image to select [Yes] and then press . Refer to "Searching for the search. The screen used... gray and you want to and press . To cancel the selection, select images to cancel and then press to the check box of the album on the photo frame. • You can enlarge or reduce the image to export when you select the index image display. • Any device that is not ...
Operating Instructions
Page 61
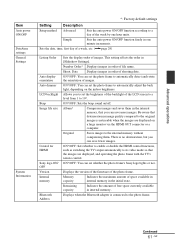
...backlight Beep Image file size Control for HDMI Sony logo ON/ OFF Version Internal memory Bluetooth Address Sets the display order of the week by one minute increments. Shoot. ON*/OFF: You can set the brightness of the backlight of the photo frame. Album* Compresses images and saves them . Number Order... the TV's input automatically to automatically detect and rotate the orientation of shooting date. ON*/OFF: You can set whether the photo frame's Sony logo lights or not. Remaining capacity Indicates the amount of free space currently available in [Slideshow Settings].
...backlight Beep Image file size Control for HDMI Sony logo ON/ OFF Version Internal memory Bluetooth Address Sets the display order of the week by one minute increments. Shoot. ON*/OFF: You can set the brightness of the backlight of the photo frame. Album* Compresses images and saves them . Number Order... the TV's input automatically to automatically detect and rotate the orientation of shooting date. ON*/OFF: You can set whether the photo frame's Sony logo lights or not. Remaining capacity Indicates the amount of free space currently available in [Slideshow Settings].
Operating Instructions
Page 64
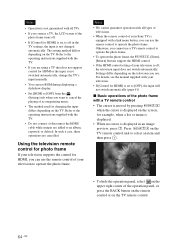
... is off, the television input does not switch automatically. Using the television remote control for photo frame If your television supports the control for HDMI, you use a TV remote control to an album, exported, or deleted. For details, see the manual supplied with your television. •...; If [Control for HDMI] is set to [OFF], the input will not switch automatically (page 61). Notes • Operation is not guaranteed with all types of televisions. • When the remote control of your Sony...
... is off, the television input does not switch automatically. Using the television remote control for photo frame If your television supports the control for HDMI, you use a TV remote control to an album, exported, or deleted. For details, see the manual supplied with your television. •...; If [Control for HDMI] is set to [OFF], the input will not switch automatically (page 61). Notes • Operation is not guaranteed with all types of televisions. • When the remote control of your Sony...

Operating Instructions
Page 65
... Zooming in the standby mode, the television is also turned on photo frame to perform linked operations. By connecting the photo frame and a "BRAVIA Sync"-compatible TV with the television. • After the photo frame is a name of a feature of Sony products that uses the HDMI control signals and enables you to control... out • Crop and save • Add to album/Export/Marking/Delete On control for HDMI When the [Control for HDMI] is set to [ON], you can switch the TV input automatically to the photo frame by turning on the photo frame, or by connecting the powered-on . • You...
... Zooming in the standby mode, the television is also turned on photo frame to perform linked operations. By connecting the photo frame and a "BRAVIA Sync"-compatible TV with the television. • After the photo frame is a name of a feature of Sony products that uses the HDMI control signals and enables you to control... out • Crop and save • Add to album/Export/Marking/Delete On control for HDMI When the [Control for HDMI] is set to [ON], you can switch the TV input automatically to the photo frame by turning on the photo frame, or by connecting the powered-on . • You...
