
Operating Instructions
Page 1
... an external device (with Bluetooth) Using an external device (with a computer) Error messages Troubleshooting Additional information © 2009 Sony Corporation Model No. Record the serial number in the space provided below. Digital Photo Frame DPF-D82/D92 Operating Instructions Before operating this unit, please read this product. Owner's Record The model and serial numbers are located...
... an external device (with Bluetooth) Using an external device (with a computer) Error messages Troubleshooting Additional information © 2009 Sony Corporation Model No. Record the serial number in the space provided below. Digital Photo Frame DPF-D82/D92 Operating Instructions Before operating this unit, please read this product. Owner's Record The model and serial numbers are located...

Operating Instructions
Page 2
... the limits for a Class B digital device, pursuant to the following two conditions: (1) This device may not cause harmful interference, and (2) this device must accept any changes or modifications not expressly approved in accordance with part 15 of the FCC Rules. Operation is...by one or more of Conformity Trade Name: SONY Model No.: DPF-D92 Responsible Party: Sony Electronics Inc. Telephone No.: 858-942-2230 This device complies with part 15 of Conformity Trade Name: SONY Model No.: DPF-D82 Responsible Party: Sony Electronics Inc. Operation is no guarantee that ...
... the limits for a Class B digital device, pursuant to the following two conditions: (1) This device may not cause harmful interference, and (2) this device must accept any changes or modifications not expressly approved in accordance with part 15 of the FCC Rules. Operation is...by one or more of Conformity Trade Name: SONY Model No.: DPF-D92 Responsible Party: Sony Electronics Inc. Telephone No.: 858-942-2230 This device complies with part 15 of Conformity Trade Name: SONY Model No.: DPF-D82 Responsible Party: Sony Electronics Inc. Operation is no guarantee that ...
Operating Instructions
Page 3
...safely. For more detailed information about recycling of waste batteries (applicable in separate service or guarantee documents. Disposal of this digital photo frame. In case of electrical and electronic equipment. Hand the battery over to the applicable collection point for the recycling of ... be replaced by inappropriate waste handling of the materials will help prevent potential negative consequences for EMC and product safety is Sony Corporation, 1-7-1 Konan Minato-ku Tokyo, 1080075 Japan. Instead it shall be treated as household waste. Notice If static ...
...safely. For more detailed information about recycling of waste batteries (applicable in separate service or guarantee documents. Disposal of this digital photo frame. In case of electrical and electronic equipment. Hand the battery over to the applicable collection point for the recycling of ... be replaced by inappropriate waste handling of the materials will help prevent potential negative consequences for EMC and product safety is Sony Corporation, 1-7-1 Konan Minato-ku Tokyo, 1080075 Japan. Instead it shall be treated as household waste. Notice If static ...

Operating Instructions
Page 4
... may be duplicated, use or malfunction of the digital photo frame or memory card. Furthermore, "™" and "®" are owned by Sony is not a malfunction. Sony Face Recognition technology developed by the Bluetooth SIG, Inc. Any unauthorized use . Notes on LCD screen • Do not press against the LCD screen. Backup recommendations To avoid potential risk of...
... may be duplicated, use or malfunction of the digital photo frame or memory card. Furthermore, "™" and "®" are owned by Sony is not a malfunction. Sony Face Recognition technology developed by the Bluetooth SIG, Inc. Any unauthorized use . Notes on LCD screen • Do not press against the LCD screen. Backup recommendations To avoid potential risk of...
Operating Instructions
Page 5
... illustrations and screen shots used in part, may also be modified or duplicated except for users Program © 2009 Sony Corporation Documentation © 2009 Sony Corporation All rights reserved. Any unauthorized duplication of the DPF-D92 unless noted otherwise. 5 GB Please note that unauthorized duplication or modification of portraits or copyrighted work could infringe...
... illustrations and screen shots used in part, may also be modified or duplicated except for users Program © 2009 Sony Corporation Documentation © 2009 Sony Corporation All rights reserved. Any unauthorized duplication of the DPF-D92 unless noted otherwise. 5 GB Please note that unauthorized duplication or modification of portraits or copyrighted work could infringe...

Operating Instructions
Page 6
...included items 11 Identifying the parts 11 Basic operations Preparing the remote control ........15 Setting the stand 16 To display the photo frame on the wall 17 Connecting to the AC power source 18 Turning the photo frame on ..........19 Setting the current time 20 Inserting a memory card 21 ... time to be alarmed ........44 Changing the settings 44 Setting procedure 44 Items to set 46 Operating an external device connected to the photo frame .......48 Using an external device (with Bluetooth) Connecting to a Bluetooth device 49 Using an external device (with a computer) Connecting ...
...included items 11 Identifying the parts 11 Basic operations Preparing the remote control ........15 Setting the stand 16 To display the photo frame on the wall 17 Connecting to the AC power source 18 Turning the photo frame on ..........19 Setting the current time 20 Inserting a memory card 21 ... time to be alarmed ........44 Changing the settings 44 Setting procedure 44 Items to set 46 Operating an external device connected to the photo frame .......48 Using an external device (with Bluetooth) Connecting to a Bluetooth device 49 Using an external device (with a computer) Connecting ...

Operating Instructions
Page 7
Connecting to a computer to exchange images 51 Disconnecting your computer ........52 Error messages If an error message appears .........53 Troubleshooting If trouble occurs 55 Additional information Precautions 60 Safety 60 Installation 60 Cleaning 60 Restrictions on duplication 61 About memory cards 61 "Memory Stick 61 SD memory card 62 xD-Picture Card 62 CompactFlash card 62 Notes on using a memory card .......63 Specifications 64 Index 66 7 GB
Connecting to a computer to exchange images 51 Disconnecting your computer ........52 Error messages If an error message appears .........53 Troubleshooting If trouble occurs 55 Additional information Precautions 60 Safety 60 Installation 60 Cleaning 60 Restrictions on duplication 61 About memory cards 61 "Memory Stick 61 SD memory card 62 xD-Picture Card 62 CompactFlash card 62 Notes on using a memory card .......63 Specifications 64 Index 66 7 GB
Operating Instructions
Page 8
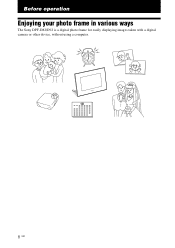
Before operation Enjoying your photo frame in various ways The Sony DPF-D82/D92 is a digital photo frame for easily displaying images taken with a digital camera or other device, without using a computer. 8 GB
Before operation Enjoying your photo frame in various ways The Sony DPF-D82/D92 is a digital photo frame for easily displaying images taken with a digital camera or other device, without using a computer. 8 GB

Operating Instructions
Page 9
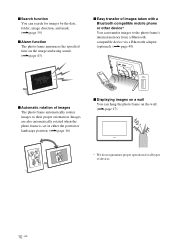
... modes, such as the slideshow display, Clock and calendar display, Single view mode, and Index image display. (.page 23) x Exporting images You can select from a digital camera or other devices, such as a "Memory Stick", CompactFlash card, SD memory card, xDPicture Card, and USB memory. Before operation Features x Support for various memory...
... modes, such as the slideshow display, Clock and calendar display, Single view mode, and Index image display. (.page 23) x Exporting images You can select from a digital camera or other devices, such as a "Memory Stick", CompactFlash card, SD memory card, xDPicture Card, and USB memory. Before operation Features x Support for various memory...
Operating Instructions
Page 10
...function You can transfer images to their proper orientation. Images are also automatically rotated when the photo frame is set in either the portrait or landscape position. (.page 16) x Displaying images on a wall You can hang the photo frame on the image and using sound. (.page 43) x Easy transfer of images taken with...mobile phone or other device* You can search for images by the date, folder, image direction, and mark. (.page 39) x Alarm function The photo frame announces the specified time on the wall. (.page 17) * We do not guarantee proper operations for all types of images The...
...function You can transfer images to their proper orientation. Images are also automatically rotated when the photo frame is set in either the portrait or landscape position. (.page 16) x Displaying images on a wall You can hang the photo frame on the image and using sound. (.page 43) x Easy transfer of images taken with...mobile phone or other device* You can search for images by the date, folder, image direction, and mark. (.page 39) x Alarm function The photo frame announces the specified time on the wall. (.page 17) * We do not guarantee proper operations for all types of images The...
Operating Instructions
Page 11
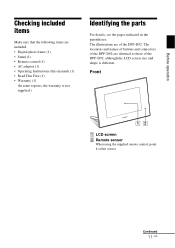
Before operation Checking included items Make sure that the following items are included. • Digital photo frame (1) • Stand (1) • Remote control (1) • AC adaptor (1) • Operating Instructions (this sensor. Front A LCD screen B Remote sensor When using the supplied remote control, point it at this manual) (1)..., the warranty is different. Continued 11 GB The locations and names of buttons and connectors of the DPF-D82 are of the DPF-D92, although the LCD screen size and shape is not supplied.) Identifying the parts For details, see the pages indicated in...
Before operation Checking included items Make sure that the following items are included. • Digital photo frame (1) • Stand (1) • Remote control (1) • AC adaptor (1) • Operating Instructions (this sensor. Front A LCD screen B Remote sensor When using the supplied remote control, point it at this manual) (1)..., the warranty is different. Continued 11 GB The locations and names of buttons and connectors of the DPF-D82 are of the DPF-D92, although the LCD screen size and shape is not supplied.) Identifying the parts For details, see the pages indicated in...
Operating Instructions
Page 12
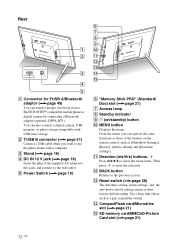
From the menu, you want to use the photo frame with USB mass storage. L BACK button Returns to enter the selection. E Power Switch (.page 19) F "Memory Stick PRO" (Standard/ Duo) slot (.page 21) G Access ...Displays the menu. Rear A Connector for USB A/Bluetooth adaptor (.page 49) You can also connect a digital camera, USB memory, or photo storage compatible with a computer. You can transfer images wirelessly from a BLUETOOTH™ compatible mobile phone or digital camera by connecting a Bluetooth adaptor (optional: DPPA-BT1). N CompactFlash card/Microdrive slot (.page 21) O...
From the menu, you want to use the photo frame with USB mass storage. L BACK button Returns to enter the selection. E Power Switch (.page 19) F "Memory Stick PRO" (Standard/ Duo) slot (.page 21) G Access ...Displays the menu. Rear A Connector for USB A/Bluetooth adaptor (.page 49) You can also connect a digital camera, USB memory, or photo storage compatible with a computer. You can transfer images wirelessly from a BLUETOOTH™ compatible mobile phone or digital camera by connecting a Bluetooth adaptor (optional: DPPA-BT1). N CompactFlash card/Microdrive slot (.page 21) O...

Operating Instructions
Page 13
Before operation P Buzzer Q VIEW MODE button (.page 23) R Alarm switch (.page 43) S Holes for hanging unit on the wall (.page 17) T Space for storing the stand Continued 13 GB
Before operation P Buzzer Q VIEW MODE button (.page 23) R Alarm switch (.page 43) S Holes for hanging unit on the wall (.page 17) T Space for storing the stand Continued 13 GB

Operating Instructions
Page 14
D SINGLE ( ) button (.page 23) E MENU button F BACK button G 1 (on/standby) button H CLOCK ( ) button (.page 23) I Zoom in ( )/Zoom out ( ) buttons (.page 40) J ALBUM ( ) button (.page 32) K Direction (B/b/v/V) buttons L (enter) button M ROTATE ( ) button (.page 40) 14 GB Remote control A VIEW MODE button (.page 23) B SLIDE-SHOW ( ) button (.page 23) C INDEX ( ) button (.page 23) This button switches from the single view mode to the index image display.
D SINGLE ( ) button (.page 23) E MENU button F BACK button G 1 (on/standby) button H CLOCK ( ) button (.page 23) I Zoom in ( )/Zoom out ( ) buttons (.page 40) J ALBUM ( ) button (.page 32) K Direction (B/b/v/V) buttons L (enter) button M ROTATE ( ) button (.page 40) 14 GB Remote control A VIEW MODE button (.page 23) B SLIDE-SHOW ( ) button (.page 23) C INDEX ( ) button (.page 23) This button switches from the single view mode to the index image display.

Operating Instructions
Page 15
...the battery (CR2025 lithium battery) with a Sony CR2025 lithium battery. Basic operations Using the remote control Point the top end of another battery may not function properly. While pressing in the figure. Remote sensor Note The photo frame may explode if mistreated. Use of the ...dispose of fire or explosion. In this case, replace the battery with a new one. 1 Pull out the battery holder. Continued 15 GB Operate the photo frame using the remote control. 3 Reinsert the battery holder into the remote control. Notes • When the lithium battery becomes weak,...
...the battery (CR2025 lithium battery) with a Sony CR2025 lithium battery. Basic operations Using the remote control Point the top end of another battery may not function properly. While pressing in the figure. Remote sensor Note The photo frame may explode if mistreated. Use of the ...dispose of fire or explosion. In this case, replace the battery with a new one. 1 Pull out the battery holder. Continued 15 GB Operate the photo frame using the remote control. 3 Reinsert the battery holder into the remote control. Notes • When the lithium battery becomes weak,...
Operating Instructions
Page 16
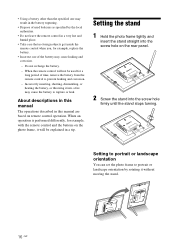
Do not recharge the battery. - Setting the stand 1 Hold the photo frame tightly and insert the stand straight into the screw hole on the photo frame, it will not be explained in this manual The operations described in a tip. About descriptions in this manual are based on remote ... a long period of the battery may cause the battery to prevent leaking and corrosion. - Setting to portrait or landscape orientation You can set the photo frame to portrait or landscape orientation by the local authorities. • Do not leave the remote control in a very hot and humid place. •...
Do not recharge the battery. - Setting the stand 1 Hold the photo frame tightly and insert the stand straight into the screw hole on the photo frame, it will not be explained in this manual The operations described in a tip. About descriptions in this manual are based on remote ... a long period of the battery may cause the battery to prevent leaking and corrosion. - Setting to portrait or landscape orientation You can set the photo frame to portrait or landscape orientation by the local authorities. • Do not leave the remote control in a very hot and humid place. •...

Operating Instructions
Page 17
... 2.5 to its proper orientation. The screws may fall over. • When the photo frame is placed in the portrait orientation, the Sony logo doesn't light up. • The photo frame does not detect and rotate the orientation of the wall. When the photo frame is placed in the portrait orientation, the image is also automatically rotated to...
... 2.5 to its proper orientation. The screws may fall over. • When the photo frame is placed in the portrait orientation, the Sony logo doesn't light up. • The photo frame does not detect and rotate the orientation of the wall. When the photo frame is placed in the portrait orientation, the image is also automatically rotated to...
Operating Instructions
Page 18
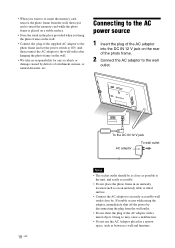
... • The socket outlet should be as close by disconnecting the plug from the wall, then eject and re-insert the memory card while the photo frame is placed on a stable surface. • Store the stand in a narrow space, such as on the wall. • We take no responsibility for any accidents... off the power by . Connecting to an easily accessible wall outlet close as possible to the unit, and easily accessible. • Do not place the photo frame in an unsteady location such as between a wall and furniture. And then connect the AC adaptor to the wall outlet after hanging the...
... • The socket outlet should be as close by disconnecting the plug from the wall, then eject and re-insert the memory card while the photo frame is placed on a stable surface. • Store the stand in a narrow space, such as on the wall. • We take no responsibility for any accidents... off the power by . Connecting to an easily accessible wall outlet close as possible to the unit, and easily accessible. • Do not place the photo frame in an unsteady location such as between a wall and furniture. And then connect the AC adaptor to the wall outlet after hanging the...
Operating Instructions
Page 19
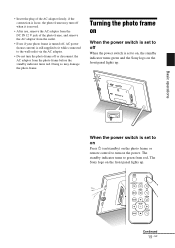
... adaptor firmly, if the connection is loose, the photo frame may damage the photo frame. Basic operations When the power switch is set to on, the standby indicator turns green and the Sony logo on the front panel lights up . Turning the photo frame on When the power switch is set to off...to on Press 1 (on/standby) on the photo frame or remote control to turn the photo frame off or disconnect the AC adaptor from the photo frame before the standby indicator turns red. The standby indicator turns to green from red. Continued 19 GB The Sony logo on the front panel lights up . &#...
... adaptor firmly, if the connection is loose, the photo frame may damage the photo frame. Basic operations When the power switch is set to on, the standby indicator turns green and the Sony logo on the front panel lights up . Turning the photo frame on When the power switch is set to off...to on Press 1 (on/standby) on the photo frame or remote control to turn the photo frame off or disconnect the AC adaptor from the photo frame before the standby indicator turns red. The standby indicator turns to green from red. Continued 19 GB The Sony logo on the front panel lights up . &#...
Operating Instructions
Page 20
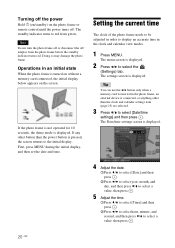
... menu screen is displayed. 2 Press B/b to display an accurate time in order to select the (Settings) tab. Note Do not turn the photo frame off or disconnect the AC adaptor from green. If any other than the power button is turned on without a memory card connected, the initial.... 1Press v/V to select [Time] and then press . 2Press B/b to select hour, minute, and second, and then press v/V to red from the photo frame before the standby indicator turns red. The Date/time settings screen is connected, or anything other button than the clock and calender settings item (page...
... menu screen is displayed. 2 Press B/b to display an accurate time in order to select the (Settings) tab. Note Do not turn the photo frame off or disconnect the AC adaptor from green. If any other than the power button is turned on without a memory card connected, the initial.... 1Press v/V to select [Time] and then press . 2Press B/b to select hour, minute, and second, and then press v/V to red from the photo frame before the standby indicator turns red. The Date/time settings screen is connected, or anything other button than the clock and calender settings item (page...