Operating Instructions
Page 6
...photo frame in various ways 8 Features 9 Checking included items 10 Identifying the parts 11 Basic operations Preparing the remote control ........14 Setting the stand 15 To display the photo frame on the wall 16 To exchange a panel (DPF-E72N only 17 Connecting to the AC power source 18 Turning the photo frame... images to the internal memory 32 Exporting an image 34 Deleting an image 36 Registering a mark (DPF-D72N only 37 Searching for an image (Filtering) (DPF-D72N only 39 Specifying the playback device .....40 Adjusting the image size and position 40 Enlarging/reducing an image...
...photo frame in various ways 8 Features 9 Checking included items 10 Identifying the parts 11 Basic operations Preparing the remote control ........14 Setting the stand 15 To display the photo frame on the wall 16 To exchange a panel (DPF-E72N only 17 Connecting to the AC power source 18 Turning the photo frame... images to the internal memory 32 Exporting an image 34 Deleting an image 36 Registering a mark (DPF-D72N only 37 Searching for an image (Filtering) (DPF-D72N only 39 Specifying the playback device .....40 Adjusting the image size and position 40 Enlarging/reducing an image...
Operating Instructions
Page 10
...(DPF-D72N only) You can hang the photo frame on a wall You can search for images by folder, and mark. (.page 39) x Automatic rotation of images The photo frame automatically rotates images to their proper orientation. Images are also automatically rotated when the photo frame ... (.page 15) Checking included items Make sure that the following items are included. • Digital photo frame (1) • Stand (1) • Remote control (1) • AC adaptor (1) • Exchangeable panel (2) (DPF-E72N only) • Operating Instructions (this manual) (1) • Read This First (1) •...
...(DPF-D72N only) You can hang the photo frame on a wall You can search for images by folder, and mark. (.page 39) x Automatic rotation of images The photo frame automatically rotates images to their proper orientation. Images are also automatically rotated when the photo frame ... (.page 15) Checking included items Make sure that the following items are included. • Digital photo frame (1) • Stand (1) • Remote control (1) • AC adaptor (1) • Exchangeable panel (2) (DPF-E72N only) • Operating Instructions (this manual) (1) • Read This First (1) •...
Operating Instructions
Page 11
.../E72N are identical to those of the DPF-D72N, except that the DPF-A72N/ E72N are of the supplied AC adaptor to use the photo frame with CompactFlash card/Microdrive slot. Continued 11 GB The illustrations are not equipped with a computer. Front Rear A LCD screen B Remote sensor When using the supplied remote control, point it at this jack...
.../E72N are identical to those of the DPF-D72N, except that the DPF-A72N/ E72N are of the supplied AC adaptor to use the photo frame with CompactFlash card/Microdrive slot. Continued 11 GB The illustrations are not equipped with a computer. Front Rear A LCD screen B Remote sensor When using the supplied remote control, point it at this jack...
Operating Instructions
Page 12
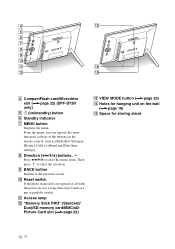
... the menu items. Then press to the previous screen. I BACK button Returns to enter the selection. J Reset switch If the photo frame does not operate at all with the power on the remote control, such as a pin to album] and [Date/time settings]. From the menu, you can operate the same functions as...) M VIEW MODE button (.page 23) N Holes for hanging unit on /standby) button F Standby indicator G MENU button Displays the menu. D CompactFlash card/Microdrive slot (.page 22) (DPF-D72N only) E 1 (on the wall (.page 16) O Space for storing stand 12 GB
... the menu items. Then press to the previous screen. I BACK button Returns to enter the selection. J Reset switch If the photo frame does not operate at all with the power on the remote control, such as a pin to album] and [Date/time settings]. From the menu, you can operate the same functions as...) M VIEW MODE button (.page 23) N Holes for hanging unit on /standby) button F Standby indicator G MENU button Displays the menu. D CompactFlash card/Microdrive slot (.page 22) (DPF-D72N only) E 1 (on the wall (.page 16) O Space for storing stand 12 GB

Operating Instructions
Page 13
Before operation Remote control A VIEW MODE button (.page 23) B SLIDE-SHOW ( ) button (.page 23) C INDEX ( ) button (.page 23) D SINGLE ( ) button (.page 23) E MENU button F BACK button G 1 (on/standby) button H CLOCK ( ) button (.page 23) I Zoom in ( )/Zoom out ( ) buttons (.page 40) J ALBUM ( ) button (.page 32) K Direction (B/b/v/V) buttons L (enter) button M ROTATE ( ) button (.page 41) 13 GB
Before operation Remote control A VIEW MODE button (.page 23) B SLIDE-SHOW ( ) button (.page 23) C INDEX ( ) button (.page 23) D SINGLE ( ) button (.page 23) E MENU button F BACK button G 1 (on/standby) button H CLOCK ( ) button (.page 23) I Zoom in ( )/Zoom out ( ) buttons (.page 40) J ALBUM ( ) button (.page 32) K Direction (B/b/v/V) buttons L (enter) button M ROTATE ( ) button (.page 41) 13 GB
Operating Instructions
Page 14
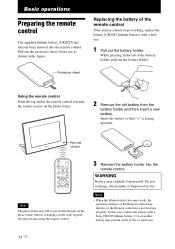
... stops working, replace the battery (CR2025 lithium battery) with a Sony CR2025 lithium battery. Protective sheet Replacing the battery of in fire. Remote sensor Note The photo frame may fall if you use as shown in the tab of the remote control towards the remote sensor on the photo frame when it is facing upwards. WARNING Battery may not...
... stops working, replace the battery (CR2025 lithium battery) with a Sony CR2025 lithium battery. Protective sheet Replacing the battery of in fire. Remote sensor Note The photo frame may fall if you use as shown in the tab of the remote control towards the remote sensor on the photo frame when it is facing upwards. WARNING Battery may not...
Operating Instructions
Page 15
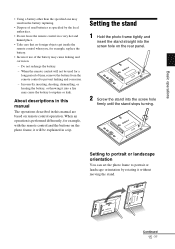
... • Take care that no foreign objects get inside the remote control when you, for example, with the remote control and the buttons on remote control operation. Setting to portrait or landscape orientation You can set the photo frame to prevent leaking and corrosion. - Continued 15 GB Do not...• Incorrect use of time, remove the battery from the remote control to portrait or landscape orientation by the local authorities. • Do not leave the remote control in a tip. Setting the stand 1 Hold the photo frame tightly and insert the stand straight into the screw hole on ...
... • Take care that no foreign objects get inside the remote control when you, for example, with the remote control and the buttons on remote control operation. Setting to portrait or landscape orientation You can set the photo frame to prevent leaking and corrosion. - Continued 15 GB Do not...• Incorrect use of time, remove the battery from the remote control to portrait or landscape orientation by the local authorities. • Do not leave the remote control in a tip. Setting the stand 1 Hold the photo frame tightly and insert the stand straight into the screw hole on ...

Operating Instructions
Page 18
... of the exchangeable panel to snap it into the DC IN 5 V jack on the rear of the photo frame. Remote sensor Connecting to the AC power source 1 Insert the plug of the AC adaptor into the photo frame. 18 GB To DC IN 5 V jack DC cable DC Plug To wall outlet AC adaptor main unit...; The socket outlet should be as close as possible to the unit, and easily accessible. • Do not place the photo frame on an exchangeable panel to the remote sensor of the photo frame. 2 Connect the AC adaptor to the wall outlet. If trouble occurs while using the adaptor, immediately shut off the power by...
... of the exchangeable panel to snap it into the DC IN 5 V jack on the rear of the photo frame. Remote sensor Connecting to the AC power source 1 Insert the plug of the AC adaptor into the photo frame. 18 GB To DC IN 5 V jack DC cable DC Plug To wall outlet AC adaptor main unit...; The socket outlet should be as close as possible to the unit, and easily accessible. • Do not place the photo frame on an exchangeable panel to the remote sensor of the photo frame. 2 Connect the AC adaptor to the wall outlet. If trouble occurs while using the adaptor, immediately shut off the power by...
Operating Instructions
Page 20
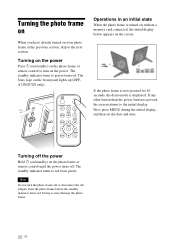
... The standby indicator turns to green from red. The Sony logo on the photo frame or remote control until the power turns off the power Hold 1 (on/standby) on the front panel lights up (DPFA72N/D72N only). If the photo frame is not operated for 10 seconds, the demo mode is pressed, the screen returns ...to the initial display. First, press MENU during the initial display, and then set the date and time. Note Do not turn on the photo frame or remote control to the...
... The standby indicator turns to green from red. The Sony logo on the photo frame or remote control until the power turns off the power Hold 1 (on/standby) on the front panel lights up (DPFA72N/D72N only). If the photo frame is not operated for 10 seconds, the demo mode is pressed, the screen returns ...to the initial display. First, press MENU during the initial display, and then set the date and time. Note Do not turn on the photo frame or remote control to the...
Operating Instructions
Page 34
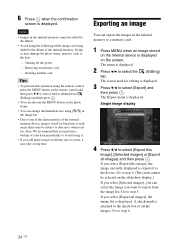
... internal memory cannot be added to the album. • Avoid doing the following while images are being added to avoid losing it may damage the photo frame, memory card, or the data: - A check mark is attached to the check box of your data periodically to the album of the internal memory...to export from (Editing) and then press . • You can also use the MENU button on the photo frame. • You can change the thumbnail size using the remote control, press the MENU button on the remote control and then press v/V to select [Add to the device. Go to select [Export] and then ...
... internal memory cannot be added to the album. • Avoid doing the following while images are being added to avoid losing it may damage the photo frame, memory card, or the data: - A check mark is attached to the check box of your data periodically to the album of the internal memory...to export from (Editing) and then press . • You can also use the MENU button on the photo frame. • You can change the thumbnail size using the remote control, press the MENU button on the remote control and then press v/V to select [Add to the device. Go to select [Export] and then ...

Operating Instructions
Page 40
... The screen used to select the method used for a JPEG file (extension: JPG). • Enlarging an image may reduce the quality depending on the photo frame. • The search is not possible to move an enlarged image up, down, left, and right. The images of the button enlarges the image ...times the original scale. You can enlarge or reduce an image in single view mode. 1 To enlarge an image, press (zoom in) on the photo frame. Notes • You cannot overwrite files except for selecting a device is displayed when you press B/b/v/V to enlarge an image using the buttons on the...
... The screen used to select the method used for a JPEG file (extension: JPG). • Enlarging an image may reduce the quality depending on the photo frame. • The search is not possible to move an enlarged image up, down, left, and right. The images of the button enlarges the image ...times the original scale. You can enlarge or reduce an image in single view mode. 1 To enlarge an image, press (zoom in) on the photo frame. Notes • You cannot overwrite files except for selecting a device is displayed when you press B/b/v/V to enlarge an image using the buttons on the...

Operating Instructions
Page 41
Rotating an image Press ROTATE ( ) on the remote control. Each press of the photo frame 1 Press MENU in single display mode. Operate from the menu of the button rotates the image 90 degrees counter-clockwise. Note An enlarged image cannot ...
Rotating an image Press ROTATE ( ) on the remote control. Each press of the photo frame 1 Press MENU in single display mode. Operate from the menu of the button rotates the image 90 degrees counter-clockwise. Note An enlarged image cannot ...

Operating Instructions
Page 54
...Solutions • Is the memory card write- c Use the device you operate the photo frame. - c An image cannot be recovered once it on the photo frame. (.page 14) c Remove any obstruction between the remote control and the remote sensor. Cause/Solutions c Replace the battery. (.page 14) c Insert a battery....protection and try deleting again. • Is the write-protect switch of the remote control towards the remote sensor on the photo frame. Cause/Solutions c Push the reset switch on the back of the photo frame using a long, thin object such as a pin, etc. (.page 12) ...
...Solutions • Is the memory card write- c Use the device you operate the photo frame. - c An image cannot be recovered once it on the photo frame. (.page 14) c Remove any obstruction between the remote control and the remote sensor. Cause/Solutions c Replace the battery. (.page 14) c Insert a battery....protection and try deleting again. • Is the write-protect switch of the remote control towards the remote sensor on the photo frame. Cause/Solutions c Push the reset switch on the back of the photo frame using a long, thin object such as a pin, etc. (.page 12) ...

Operating Instructions
Page 61
Index A AC adaptor 18 Accessories 10 Adding to the internal memory 32 Associated file 28 Auto power ON/OFF 42, 45 C Calendar 21 Changing the settings 43 Cleaning 55 Connecting AC ... 58 SD memory card 57 xD-Picture Card 57 P Placing in portrait or landscape orientation 15 Playback device 40 Precautions 55 R Remote control 14 Replacing the battery of the remote control 14 Reset 46 Rotating an image 41 S Searching for an image 39 Setting the stand 15 Single view mode 26 Slideshow...
Index A AC adaptor 18 Accessories 10 Adding to the internal memory 32 Associated file 28 Auto power ON/OFF 42, 45 C Calendar 21 Changing the settings 43 Cleaning 55 Connecting AC ... 58 SD memory card 57 xD-Picture Card 57 P Placing in portrait or landscape orientation 15 Playback device 40 Precautions 55 R Remote control 14 Replacing the battery of the remote control 14 Reset 46 Rotating an image 41 S Searching for an image 39 Setting the stand 15 Single view mode 26 Slideshow...

