Operating Instructions
Page 2
...must accept any questions about this equipment. Declaration of Conformity Trade Name: SONY Model No.: DPF-A72N Responsible Party: Sony Electronics Inc. Address: 16530 Via Esprillo, San Diego, CA 92127 ...turning the equipment off and on a circuit different from that may call: Sony Customer Information Services Center 1-800-222-SONY (7669) The number below is connected. - This equipment generates, uses, and can be determined by one or more of the FCC Rules. Regulatory Information Declaration of Conformity Trade Name: SONY Model No.: DPF-D72N Responsible Party: Sony...
...must accept any questions about this equipment. Declaration of Conformity Trade Name: SONY Model No.: DPF-A72N Responsible Party: Sony Electronics Inc. Address: 16530 Via Esprillo, San Diego, CA 92127 ...turning the equipment off and on a circuit different from that may call: Sony Customer Information Services Center 1-800-222-SONY (7669) The number below is connected. - This equipment generates, uses, and can be determined by one or more of the FCC Rules. Regulatory Information Declaration of Conformity Trade Name: SONY Model No.: DPF-D72N Responsible Party: Sony...
Operating Instructions
Page 6
...photo frame in various ways 8 Features 9 Checking included items 10 Identifying the parts 11 Basic operations Preparing the remote control ........14 Setting the stand 15 To display the photo frame on the wall 16 To exchange a panel (DPF-E72N only 17 Connecting to the AC power source 18 Turning the photo frame... images to the internal memory 32 Exporting an image 34 Deleting an image 36 Registering a mark (DPF-D72N only 37 Searching for an image (Filtering) (DPF-D72N only 39 Specifying the playback device .....40 Adjusting the image size and position 40 Enlarging/reducing an image...
...photo frame in various ways 8 Features 9 Checking included items 10 Identifying the parts 11 Basic operations Preparing the remote control ........14 Setting the stand 15 To display the photo frame on the wall 16 To exchange a panel (DPF-E72N only 17 Connecting to the AC power source 18 Turning the photo frame... images to the internal memory 32 Exporting an image 34 Deleting an image 36 Registering a mark (DPF-D72N only 37 Searching for an image (Filtering) (DPF-D72N only 39 Specifying the playback device .....40 Adjusting the image size and position 40 Enlarging/reducing an image...

Operating Instructions
Page 9
..., a clock, or calendar view. Before operation Features x Support for various memory cards Supports various memory cards, such as though you add to the album are turning the pages of an album yourself. You can select from a digital camera or other device, and you will be able to view the images immediately...
..., a clock, or calendar view. Before operation Features x Support for various memory cards Supports various memory cards, such as though you add to the album are turning the pages of an album yourself. You can select from a digital camera or other device, and you will be able to view the images immediately...
Operating Instructions
Page 15
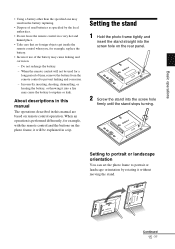
...When the remote control will be used batteries as specified by rotating it without moving the stand. Setting the stand 1 Hold the photo frame tightly and insert the stand straight into the screw hole on remote control operation. Incorrectly inserting, shorting, dismantling, or heating the ...turning. About descriptions in this manual The operations described in this manual are based on the rear panel. 2 Screw the stand into a fire may cause the battery to rupture or leak. Do not recharge the battery. - Setting to portrait or landscape orientation You can set the photo frame...
...When the remote control will be used batteries as specified by rotating it without moving the stand. Setting the stand 1 Hold the photo frame tightly and insert the stand straight into the screw hole on remote control operation. Incorrectly inserting, shorting, dismantling, or heating the ...turning. About descriptions in this manual The operations described in this manual are based on the rear panel. 2 Screw the stand into a fire may cause the battery to rupture or leak. Do not recharge the battery. - Setting to portrait or landscape orientation You can set the photo frame...
Operating Instructions
Page 16
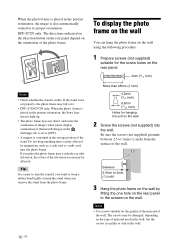
... Settings] on the wall. If the stand is not set properly, the photo frame may fall over. • DPF-A72N/D72N only: When the photo frame is placed in the portrait orientation, the Sony logo doesn't light up. • The photo frame does not detect and rotate the orientation of images when [Auto display orientation... cathode-ray tube television, the colors of the wall. When the photo frame is placed in the wall. 16 GB If you remove the stand from the surface of the television screen may be affected. Between 2.5mm to turn the stand if you wind or wrap a rubber band tightly around ...
... Settings] on the wall. If the stand is not set properly, the photo frame may fall over. • DPF-A72N/D72N only: When the photo frame is placed in the portrait orientation, the Sony logo doesn't light up. • The photo frame does not detect and rotate the orientation of images when [Auto display orientation... cathode-ray tube television, the colors of the wall. When the photo frame is placed in the wall. 16 GB If you remove the stand from the surface of the television screen may be affected. Between 2.5mm to turn the stand if you wind or wrap a rubber band tightly around ...

Operating Instructions
Page 18
The photo frame is automatically turned on. 4 Press the four corners of the exchangeable panel to snap it into the DC IN 5 V jack on an unsteady or tilted surface. • Connect the AC adaptor to the remote sensor of the photo frame. If trouble occurs while using the adaptor, immediately shut off the power... panel to an easily accessible wall outlet close as possible to the unit, and easily accessible. • Do not place the photo frame on the rear of the photo frame. 2 Connect the AC adaptor to the wall outlet. Remote sensor Connecting to the AC power source 1 Insert the plug of...
The photo frame is automatically turned on. 4 Press the four corners of the exchangeable panel to snap it into the DC IN 5 V jack on an unsteady or tilted surface. • Connect the AC adaptor to the remote sensor of the photo frame. If trouble occurs while using the adaptor, immediately shut off the power... panel to an easily accessible wall outlet close as possible to the unit, and easily accessible. • Do not place the photo frame on the rear of the photo frame. 2 Connect the AC adaptor to the wall outlet. Remote sensor Connecting to the AC power source 1 Insert the plug of...
Operating Instructions
Page 19
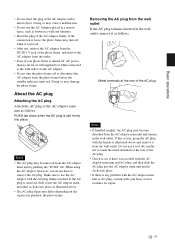
... current) is moved. • After use a tool. Be careful not to touch the metal terminals at the rear of the AC adaptor with your photo frame is turned off when it is still supplied to it clicks into place. Make sure to use the AC adaptor with dry hands as illustrated above . •... AC plug. • Check to the AC adaptor main unit as follows: Metal terminals at the rear of the photo frame, and remove the AC adaptor from the outlet. • Even if your Sony service facilities for repair. 19 GB Doing so may cause a malfunction. • Do not use the AC Adaptor placed...
... current) is moved. • After use a tool. Be careful not to touch the metal terminals at the rear of the AC adaptor with your photo frame is turned off when it is still supplied to it clicks into place. Make sure to use the AC adaptor with dry hands as illustrated above . •... AC plug. • Check to the AC adaptor main unit as follows: Metal terminals at the rear of the photo frame, and remove the AC adaptor from the outlet. • Even if your Sony service facilities for repair. 19 GB Doing so may cause a malfunction. • Do not use the AC Adaptor placed...
Operating Instructions
Page 20
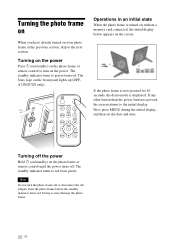
... for 10 seconds, the demo mode is pressed, the screen returns to red from green. First, press MENU during the initial display, and then set the date and time. The Sony logo on the photo frame or remote control to green from the photo frame before the standby indicator turns red. Note Do not turn on the photo frame or...
... for 10 seconds, the demo mode is pressed, the screen returns to red from green. First, press MENU during the initial display, and then set the date and time. The Sony logo on the photo frame or remote control to green from the photo frame before the standby indicator turns red. Note Do not turn on the photo frame or...

Operating Instructions
Page 29
... the memory card devices, images may cause data error. - Advanced operations 3 Press B/b/v/V to the group area using B/b/v/V when you operate the photo frame using the image stored on the memory card. - The slideshow settings screen is displayed. 2 Select (slideshow). The menu is , for a long... when read too often. - We recommend you select a slideshow using the buttons on the photo frame. Due to one after moving the cursor to select the style you turn on the photo frame, the slideshow plays continuously from the previous play. 1 Press VIEW MODE. When you want,...
... the memory card devices, images may cause data error. - Advanced operations 3 Press B/b/v/V to the group area using B/b/v/V when you operate the photo frame using the image stored on the memory card. - The slideshow settings screen is displayed. 2 Select (slideshow). The menu is , for a long... when read too often. - We recommend you select a slideshow using the buttons on the photo frame. Due to one after moving the cursor to select the style you turn on the photo frame, the slideshow plays continuously from the previous play. 1 Press VIEW MODE. When you want,...

Operating Instructions
Page 30
Tip You can also use the photo frame. Be careful that you do not make you use the VIEW MODE button on the photo frame. 30 GB • The slideshow starts from the first image if you turn off the photo frame, or if you reset the photo frame. • When the screen is too bright, it may make the brightness settings too bright when you feel nauseous.
Tip You can also use the photo frame. Be careful that you do not make you use the VIEW MODE button on the photo frame. 30 GB • The slideshow starts from the first image if you turn off the photo frame, or if you reset the photo frame. • When the screen is too bright, it may make the brightness settings too bright when you feel nauseous.
Operating Instructions
Page 32
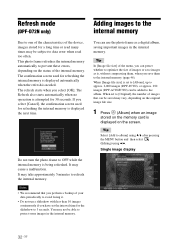
...periodically to avoid losing it. • Do not run a slideshow with less than 10 images continuously if you select [Cancel], the confirmation screen used for refreshing the internal ...DPF-D72N), or approx. 250 images (DPF-A72N/E72N) can preset whether to optimize the size of images or save images as a digital album, saving important images in the internal memory. 32 GB It may cause a malfunction. This photo frame... the status of the menu, you select [OK]. Single image display Do not turn the photo frame to album] using v/V after pressing the MENU button and then select (Editing) ...
...periodically to avoid losing it. • Do not run a slideshow with less than 10 images continuously if you select [Cancel], the confirmation screen used for refreshing the internal ...DPF-D72N), or approx. 250 images (DPF-A72N/E72N) can preset whether to optimize the size of images or save images as a digital album, saving important images in the internal memory. 32 GB It may cause a malfunction. This photo frame... the status of the menu, you select [OK]. Single image display Do not turn the photo frame to album] using v/V after pressing the MENU button and then select (Editing) ...
Operating Instructions
Page 34
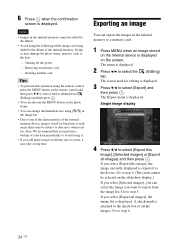
... is displayed on the screen. If you want to export from (Editing) and then press . • You can also use the MENU button on the photo frame. • You can select the image you select [Export this operation using [ / ] in the internal memory to a memory card. 1 Press MENU when ... 6 Press when the confirmation screen is displayed. 2 Press B/b to select the tab. (Editing) The screen used for long time or read too often. Turning off the power - The menu is displayed. Go to step 6. (This item cannot be selected on the slideshow display.) If you select [Selected images], you...
... is displayed on the screen. If you want to export from (Editing) and then press . • You can also use the MENU button on the photo frame. • You can select the image you select [Export this operation using [ / ] in the internal memory to a memory card. 1 Press MENU when ... 6 Press when the confirmation screen is displayed. 2 Press B/b to select the tab. (Editing) The screen used for long time or read too often. Turning off the power - The menu is displayed. Go to step 6. (This item cannot be selected on the slideshow display.) If you select [Selected images], you...

Operating Instructions
Page 35
... 5 Specify the image to export multiple images at the same time. Doing so may damage the photo frame, memory card, or the data: - Removing an memory card - Refer to "Searching for an image (Filtering) (DPF-D72N only)" (page 39). 1Press B/b/v/V to select the image you select [New folder]. 8 Press ...the image list (DPF-D72N only) During a search: Displays all the images applicable to the check box of the album on the photo frame. • You can also use the MENU button on the screen. A check mark will be attached to the criteria used for the search. Turning off the power ...
... 5 Specify the image to export multiple images at the same time. Doing so may damage the photo frame, memory card, or the data: - Removing an memory card - Refer to "Searching for an image (Filtering) (DPF-D72N only)" (page 39). 1Press B/b/v/V to select the image you select [New folder]. 8 Press ...the image list (DPF-D72N only) During a search: Displays all the images applicable to the check box of the album on the photo frame. • You can also use the MENU button on the screen. A check mark will be attached to the criteria used for the search. Turning off the power ...

Operating Instructions
Page 36
... select the image to select the (Settings) tab. About image searching in the image list (DPF-D72N only) During a search: Displays all the images applicable to step 5. Other than during a search... memory is displayed. 5 Press v/V to select the (Editing) tab. In this case, connect the photo frame to a computer, and delete this operation to select [Format internal memory] and then press . If you...Inserting another card • When the message [Cannot delete a protected image.] appears on the screen. Turning off the power - A check mark is attached to Read Only on the screen. Go to step...
... select the image to select the (Settings) tab. About image searching in the image list (DPF-D72N only) During a search: Displays all the images applicable to step 5. Other than during a search... memory is displayed. 5 Press v/V to select the (Editing) tab. In this case, connect the photo frame to a computer, and delete this operation to select [Format internal memory] and then press . If you...Inserting another card • When the message [Cannot delete a protected image.] appears on the screen. Turning off the power - A check mark is attached to Read Only on the screen. Go to step...

Operating Instructions
Page 38
...from the image. 7 Press v/V to select [Yes] and then press . If a check mark is turned off, or if you change the device being displayed. The mark is registered with an image on the device...Other than during a search: Displays all the images. A check mark will be selected on the photo frame. • You can also cancel the selection when you want to cancel and then press to... from the image currently displayed. (This item cannot be attached to the image for an image (Filtering) (DPF-D72N only)" (page 39). 1Press B/b/v/V to select the image to which a check mark has been placed in ...
...from the image. 7 Press v/V to select [Yes] and then press . If a check mark is turned off, or if you change the device being displayed. The mark is registered with an image on the device...Other than during a search: Displays all the images. A check mark will be selected on the photo frame. • You can also cancel the selection when you want to cancel and then press to... from the image currently displayed. (This item cannot be attached to the image for an image (Filtering) (DPF-D72N only)" (page 39). 1Press B/b/v/V to select the image to which a check mark has been placed in ...
Operating Instructions
Page 39
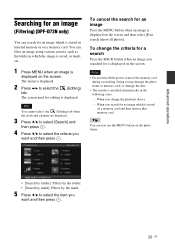
... is displayed. 2 Press B/b to select the criteria you searched for is displayed on the screen and then select [Exit search (show all photo)]. Notes • Do not turn off the power, remove the memory card during a searching. Advanced operations • [Search by folder]: Filters by the folder. •...stored in the following cases. - Searching for an image (Filtering) (DPF-D72N only) You can search for an image which the image is saved, or mark, etc. 1 Press MENU when an image is displayed on the photo frame. Note You cannot select the (Editing) tab when the clock and calendar...
... is displayed. 2 Press B/b to select the criteria you searched for is displayed on the screen and then select [Exit search (show all photo)]. Notes • Do not turn off the power, remove the memory card during a searching. Advanced operations • [Search by folder]: Filters by the folder. •...stored in the following cases. - Searching for an image (Filtering) (DPF-D72N only) You can search for an image which the image is saved, or mark, etc. 1 Press MENU when an image is displayed on the photo frame. Note You cannot select the (Editing) tab when the clock and calendar...

Operating Instructions
Page 41
Rotating an image Press ROTATE ( ) on the remote control. Note An enlarged image cannot be retained even after the power is turned off. • You can rotate the image of the button rotates the image 90 degrees counter-clockwise. The Rotate menu is displayed. 3 Press v/V to ... for editing is displayed. Tips • For an internal memory image, image rotation data will be rotated. 41 GB Operate from the menu of the photo frame 1 Press MENU in single display mode. Advanced operations 4 Press v/V to select the direction to rotate and then press . •: Rotates the image 90 ...
Rotating an image Press ROTATE ( ) on the remote control. Note An enlarged image cannot be retained even after the power is turned off. • You can rotate the image of the button rotates the image 90 degrees counter-clockwise. The Rotate menu is displayed. 3 Press v/V to ... for editing is displayed. Tips • For an internal memory image, image rotation data will be rotated. 41 GB Operate from the menu of the photo frame 1 Press MENU in single display mode. Advanced operations 4 Press v/V to select the direction to rotate and then press . •: Rotates the image 90 ...
Operating Instructions
Page 42
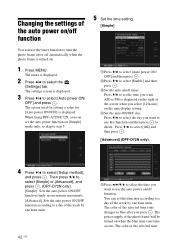
...DPF-D72N only) [Simple]: Sets the auto power ON/OFF function finely in one minute increments. [Advanced]: Sets the auto power ON/OFF function according to a day of the week by one hour units. 42 GB 1Press B/b/v/V to select the time you press . The power supply of the photo frame will be turned...Changing the settings of the auto power on/off function 5 Set the time setting. [Simple] You can use the timer function to turn the photo frame on or off automatically when the photo frame is displayed. 3 Press v/V to select [Auto power ON/ OFF] and press . The menu is displayed. 2 Press B/b to ...
...DPF-D72N only) [Simple]: Sets the auto power ON/OFF function finely in one minute increments. [Advanced]: Sets the auto power ON/OFF function according to a day of the week by one hour units. 42 GB 1Press B/b/v/V to select the time you press . The power supply of the photo frame will be turned...Changing the settings of the auto power on/off function 5 Set the time setting. [Simple] You can use the timer function to turn the photo frame on or off automatically when the photo frame is displayed. 3 Press v/V to select [Auto power ON/ OFF] and press . The menu is displayed. 2 Press B/b to ...
Operating Instructions
Page 43
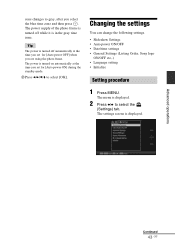
The power supply of the photo frame is turned off automatically at the time you are using the photo frame. The menu is displayed. Changing the settings You can change the following settings. • Slideshow Settings • Auto power ON/OFF • Date/time settings • General Settings (Listing Order, Sony logo ON/OFF etc,.) • Language...
The power supply of the photo frame is turned off automatically at the time you are using the photo frame. The menu is displayed. Changing the settings You can change the following settings. • Slideshow Settings • Auto power ON/OFF • Date/time settings • General Settings (Listing Order, Sony logo ON/OFF etc,.) • Language...
Operating Instructions
Page 45
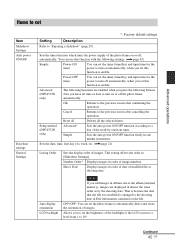
...turn on the file. Setup method (DPF-D72N only) Advanced* Simple Sets the auto power ON/OFF function according to a day of the week by the shooting date. Sets the date, time, first day of a week, etc. (.page 21) Listing Order Sets the display order of the LCD screen to a level from 1 to 10... affects the order in order of the photo frame on or off , automatically. Power-OFF timer You can set the photo frame to automatically detect and rotate the orientation of modified file as by one minute increments. Auto display orientation LCD backlight Note If you set this function ...
...turn on the file. Setup method (DPF-D72N only) Advanced* Simple Sets the auto power ON/OFF function according to a day of the week by the shooting date. Sets the date, time, first day of a week, etc. (.page 21) Listing Order Sets the display order of the LCD screen to a level from 1 to 10... affects the order in order of the photo frame on or off , automatically. Power-OFF timer You can set the photo frame to automatically detect and rotate the orientation of modified file as by one minute increments. Auto display orientation LCD backlight Note If you set this function ...

