Demo Mode Instructions
Page 3
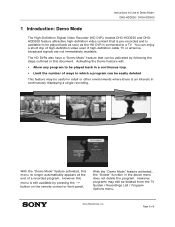
... a TV. With the "Demo Mode" feature activated, the "Delete" function in this menu no longer automatically appears at the end of a recorded program. Sony Electronics, Inc. With the "Demo Mode" feature activated, this document. You can enjoy a short clip of 8 Instructions for Use of Demo Mode: DHG-HDD250 / DHG-HDD500 1 Introduction: Demo Mode The High-Definition Digital Video Recorder (HD...
... a TV. With the "Demo Mode" feature activated, the "Delete" function in this menu no longer automatically appears at the end of a recorded program. Sony Electronics, Inc. With the "Demo Mode" feature activated, this document. You can enjoy a short clip of 8 Instructions for Use of Demo Mode: DHG-HDD250 / DHG-HDD500 1 Introduction: Demo Mode The High-Definition Digital Video Recorder (HD...
Demo Mode Instructions
Page 4
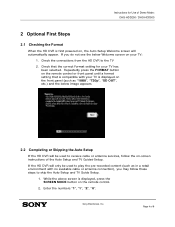
... setting that the correct Format setting for Use of Demo Mode: DHG-HDD250 / DHG-HDD500 2 Optional First Steps 2.1 Checking the Format When the HD DVR is first powered on, the Auto Setup Welcome screen will be used to the TV 2. Instructions for your TV: 1. Enter the numbers "1", "1", "2", "0". If you may ... HD DVR to receive cable or antenna services, follow these steps to skip the Auto Setup and TV Guide Setup. 1. Sony Electronics, Inc. If the HD DVR will only be used to play the pre-recorded content (such as "1080", "720p", "SD OUT", etc.) and the below Welcome screen on...
... setting that the correct Format setting for Use of Demo Mode: DHG-HDD250 / DHG-HDD500 2 Optional First Steps 2.1 Checking the Format When the HD DVR is first powered on, the Auto Setup Welcome screen will be used to the TV 2. Instructions for your TV: 1. Enter the numbers "1", "1", "2", "0". If you may ... HD DVR to receive cable or antenna services, follow these steps to skip the Auto Setup and TV Guide Setup. 1. Sony Electronics, Inc. If the HD DVR will only be used to play the pre-recorded content (such as "1080", "720p", "SD OUT", etc.) and the below Welcome screen on...
Demo Mode Instructions
Page 5
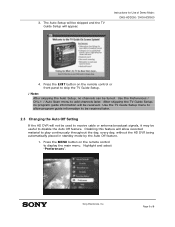
...and select "Preferences". The Auto Setup will be skipped and the TV Guide Setup will be received. Use the TV Guide Setup menu to allow recorded material to display the main menu. Disabling this feature will allow program guide information to be received later. 2.3 Changing the Auto Off Setting ..., without the HD DVR being automatically placed in standby mode by the Auto Off feature. 1. After skipping the TV Guide Setup, no channels can be useful to add channels later. Page 5 of Demo Mode: DHG-HDD250 / DHG-HDD500 4. 3. Instructions for Use of 8 Sony Electronics, Inc.
...and select "Preferences". The Auto Setup will be skipped and the TV Guide Setup will be received. Use the TV Guide Setup menu to allow recorded material to display the main menu. Disabling this feature will allow program guide information to be received later. 2.3 Changing the Auto Off Setting ..., without the HD DVR being automatically placed in standby mode by the Auto Off feature. 1. After skipping the TV Guide Setup, no channels can be useful to add channels later. Page 5 of Demo Mode: DHG-HDD250 / DHG-HDD500 4. 3. Instructions for Use of 8 Sony Electronics, Inc.
Demo Mode Instructions
Page 7
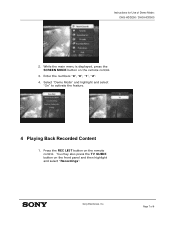
Select "Demo Mode" and highlight and select "On" to activate the feature. 4 Playing Back Recorded Content 1. Instructions for Use of 8 Press the REC LIST button on the front panel and then highlight and select "Recordings". You may also press the TV GUIDE button on the remote control. Sony Electronics, Inc. Page 7 of Demo Mode: DHG-HDD250 / DHG-HDD500 2. Enter the numbers "9", "0", "1", "2". 4. While the main menu is displayed, press the SCREEN MODE button on the remote control. 3.
Select "Demo Mode" and highlight and select "On" to activate the feature. 4 Playing Back Recorded Content 1. Instructions for Use of 8 Press the REC LIST button on the front panel and then highlight and select "Recordings". You may also press the TV GUIDE button on the remote control. Sony Electronics, Inc. Page 7 of Demo Mode: DHG-HDD250 / DHG-HDD500 2. Enter the numbers "9", "0", "1", "2". 4. While the main menu is displayed, press the SCREEN MODE button on the remote control. 3.
Operation Manual
Page 3
... encrypted subscription digital programming. NOTE This high-definition digital video recorder is intended for home and other intellectual property rights. This high-definition digital video recorder also includes ...digital cable services such as video-on the type of digital cable television programming in any way without written authorization from Gemstar-TV Guide International, Inc. Availability of programming and signal provided by Gemstar-TV Guide International, Inc. In Canada, TV Guide On Screen is a registered mark of HDMI Licensing LLC. HDMI, the HDMI logo and High-Definition...
... encrypted subscription digital programming. NOTE This high-definition digital video recorder is intended for home and other intellectual property rights. This high-definition digital video recorder also includes ...digital cable services such as video-on the type of digital cable television programming in any way without written authorization from Gemstar-TV Guide International, Inc. Availability of programming and signal provided by Gemstar-TV Guide International, Inc. In Canada, TV Guide On Screen is a registered mark of HDMI Licensing LLC. HDMI, the HDMI logo and High-Definition...
Operation Manual
Page 7
... Using the SCHEDULE Service..........68 Using the SETUP Service 69 Recording a Program from TV Guide On Screen System 70 References Learning About Available Video Services 73 Learning About Screen Modes...........76 TROUBLESHOOTING 79 Specifications 84 END-USER LICENSE AGREEMENT FOR SOFTWARE INCLUDED WITH YOUR SONY HIGH-DEFINITION DIGITAL VIDEO RECORDER 85 GNU GENERAL PUBLIC LICENSE 86 Index 93 LIMITED...
... Using the SCHEDULE Service..........68 Using the SETUP Service 69 Recording a Program from TV Guide On Screen System 70 References Learning About Available Video Services 73 Learning About Screen Modes...........76 TROUBLESHOOTING 79 Specifications 84 END-USER LICENSE AGREEMENT FOR SOFTWARE INCLUDED WITH YOUR SONY HIGH-DEFINITION DIGITAL VIDEO RECORDER 85 GNU GENERAL PUBLIC LICENSE 86 Index 93 LIMITED...
Operation Manual
Page 10
... being recorded. ❏ TV Guide On Screen™ System- HDMI supports enhanced, or highdefinition video, plus up to 5.1 channel digital audio. ❏ CableCARD™ device - You can also enjoy Chasing Playback; You can watch digital television programs and enjoy the improved audio/video quality offered by your cable TV service provider about CableCARD in HDTV for model DHG-HDD500). Watch TV...
... being recorded. ❏ TV Guide On Screen™ System- HDMI supports enhanced, or highdefinition video, plus up to 5.1 channel digital audio. ❏ CableCARD™ device - You can also enjoy Chasing Playback; You can watch digital television programs and enjoy the improved audio/video quality offered by your cable TV service provider about CableCARD in HDTV for model DHG-HDD500). Watch TV...
Operation Manual
Page 11
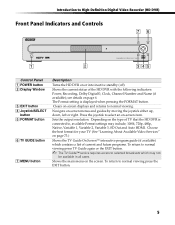
Press the joystick to High-Definition Digital Video Recorder (HD DVR) Front Panel Indicators and Controls 76 1 2 3 45 Control Panel 1 POWER button 2 Display Window 3 EXIT button 4 Joystick/SELECT button 5 FORMAT button 6 TV GUIDE button 7 MENU button Description Turns the HD DVR on or into inactive standby (off). Sets the output resolution. Choose the best format for your...
Press the joystick to High-Definition Digital Video Recorder (HD DVR) Front Panel Indicators and Controls 76 1 2 3 45 Control Panel 1 POWER button 2 Display Window 3 EXIT button 4 Joystick/SELECT button 5 FORMAT button 6 TV GUIDE button 7 MENU button Description Turns the HD DVR on or into inactive standby (off). Sets the output resolution. Choose the best format for your...
Operation Manual
Page 12
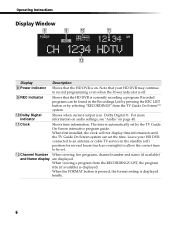
.... q; The time is automatically set by selecting "RECORDINGS" from the RECORDINGS LIST, the program title (if available) is on page 40. When viewing a program from the TV Guide On Screen™ system. Recorded programs can set . For more information on audio settings...recording a program. Dolby Digital indicator Shows when current output is off ) position for several hours (such as overnight) to allow the correct time to record programming even when the Power indicator is in the Recordings List by pressing the REC LIST button or by the TV Guide On Screen interactive program guide...
.... q; The time is automatically set by selecting "RECORDINGS" from the RECORDINGS LIST, the program title (if available) is on page 40. When viewing a program from the TV Guide On Screen™ system. Recorded programs can set . For more information on audio settings...recording a program. Dolby Digital indicator Shows when current output is off ) position for several hours (such as overnight) to allow the correct time to record programming even when the Power indicator is in the Recordings List by pressing the REC LIST button or by the TV Guide On Screen interactive program guide...
Operation Manual
Page 14
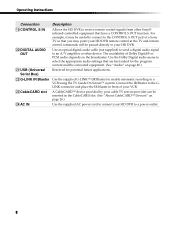
...may be useful to connect to the CONTROL S OUT jack of a Sony TV so that you may point your HD DVR remote control at the TV and remote control commands will be inserted in front of Dolby Digital® or PCM audio depends on the broadcaster. The availability of your ... other device. DIGITAL AUDIO OUT Use an optical digital audio cable (not supplied) to send a digital audio signal to a VCR using the TV Guide On Screen™ system. w; ws G-LINK IR Blaster Use the supplied G-LINK™ (IR Blaster) to enable automatic recording to an A/V amplifier or other Sony® infrared-...
...may be useful to connect to the CONTROL S OUT jack of a Sony TV so that you may point your HD DVR remote control at the TV and remote control commands will be inserted in front of Dolby Digital® or PCM audio depends on the broadcaster. The availability of your ... other device. DIGITAL AUDIO OUT Use an optical digital audio cable (not supplied) to send a digital audio signal to a VCR using the TV Guide On Screen™ system. w; ws G-LINK IR Blaster Use the supplied G-LINK™ (IR Blaster) to enable automatic recording to an A/V amplifier or other Sony® infrared-...

Operation Manual
Page 16
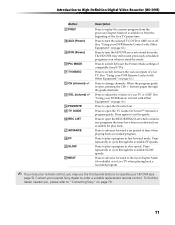
.... (dot) Use with the 0-9 and ENTER buttons to select subchannels for certain digital stations (for one second to Operate Other Equipment" describes which buttons are available for ...a set the output resolution to select an on -screen displays. qh REC (record) Press and hold to either 1080i, 720p, 480p, 480i, Native, Variable 1, Variable 2,...TV DVD POWER qk DVR AMP ql AUX DVR 2 w; 3 SCREEN FORMAT PIC TV/VIDEO wa MODE MODE CH P A ws G E 4 VOL ENTER wd 5 INFO FAVORITE 6 wf TV MENU GUIDE 7 wg 8 PUSH SELECT 9 EXIT q; While in the TV Guide...
.... (dot) Use with the 0-9 and ENTER buttons to select subchannels for certain digital stations (for one second to Operate Other Equipment" describes which buttons are available for ...a set the output resolution to select an on -screen displays. qh REC (record) Press and hold to either 1080i, 720p, 480p, 480i, Native, Variable 1, Variable 2,...TV DVD POWER qk DVR AMP ql AUX DVR 2 w; 3 SCREEN FORMAT PIC TV/VIDEO wa MODE MODE CH P A ws G E 4 VOL ENTER wd 5 INFO FAVORITE 6 wf TV MENU GUIDE 7 wg 8 PUSH SELECT 9 EXIT q; While in the TV Guide...
Operation Manual
Page 17
...with Other Equipment" on page 16.) Press to "Contacting Sony" on or off. (See "Using your remote control, you , please refer to open the TV Guide On Screen™ interactive program guide. Press repeatedly to High-Definition Digital Video Recorder (HD DVR) Button qj PREV qk AUX (Power) ...ql DVR (Power) w; Press to turn the selected TV, DVD or AMP on page 79. 11 Press...
...with Other Equipment" on page 16.) Press to "Contacting Sony" on or off. (See "Using your remote control, you , please refer to open the TV Guide On Screen™ interactive program guide. Press repeatedly to High-Definition Digital Video Recorder (HD DVR) Button qj PREV qk AUX (Power) ...ql DVR (Power) w; Press to turn the selected TV, DVD or AMP on page 79. 11 Press...
Operation Manual
Page 28
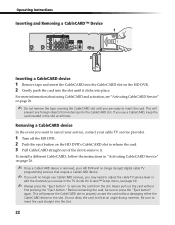
...slot. To install a different CableCARD, follow the instructions in "Activating CableCARD Service" on page 26. ✍ Once a CableCARD device is removed, your cable TV service provider. 1 Turn off the HD DVR. 2 Push the eject button on page 26. ✍ Do not remove the tape covering the CableCARD slot... decrypt digital cable TV programming services that require a CableCARD device. ✍ If you receive in the slot at an angle during insertion. Do not allow the card to remove it clicks into the slot. 22 This will no longer use a CableCARD, keep the card inserted in the TV Guide On ...
...slot. To install a different CableCARD, follow the instructions in "Activating CableCARD Service" on page 26. ✍ Once a CableCARD device is removed, your cable TV service provider. 1 Turn off the HD DVR. 2 Push the eject button on page 26. ✍ Do not remove the tape covering the CableCARD slot... decrypt digital cable TV programming services that require a CableCARD device. ✍ If you receive in the slot at an angle during insertion. Do not allow the card to remove it clicks into the slot. 22 This will no longer use a CableCARD, keep the card inserted in the TV Guide On ...
Operation Manual
Page 32
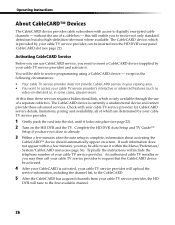
...TV Guide™ Setup if you need to receive not only standard definition but also high-definition television where available. Activating CableCARD Service Before you can use CableCARD service, you have not done so already. 3 Within a few minutes, you to insert a CableCARD device (supplied by your cable TV service provider, can be able to digitally... encrypted cable channels - You will include the telephone number of your cable TV service provider's interactive or advanced features (such as video-on-demand or, in...
...TV Guide™ Setup if you need to receive not only standard definition but also high-definition television where available. Activating CableCARD Service Before you can use CableCARD service, you have not done so already. 3 Within a few minutes, you to insert a CableCARD device (supplied by your cable TV service provider, can be able to digitally... encrypted cable channels - You will include the telephone number of your cable TV service provider's interactive or advanced features (such as video-on-demand or, in...
Operation Manual
Page 34
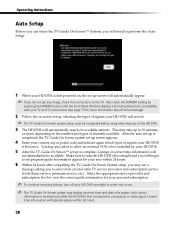
...After the auto set up screen will typically appear within 24 hours. 6 Within 24 hours after the HD DVR is received soon after completing the TV Guide On Screen System setup, you may take up to 30 minutes, or more information about Format settings). 2 Follow the on screen set up screen ...area and subscription. ✍ To continue receiving listings, turn the HD DVR off your HD DVR overnight or when not in use. ✍ The TV Guide On Screen system may also select to allow an external VCR to be controlled by pressing the FORMAT button until correct information is first connected...
...After the auto set up screen will typically appear within 24 hours. 6 Within 24 hours after the HD DVR is received soon after completing the TV Guide On Screen System setup, you may take up to 30 minutes, or more information about Format settings). 2 Follow the on screen set up screen ...area and subscription. ✍ To continue receiving listings, turn the HD DVR off your HD DVR overnight or when not in use. ✍ The TV Guide On Screen system may also select to allow an external VCR to be controlled by pressing the FORMAT button until correct information is first connected...
Operation Manual
Page 40
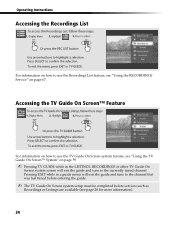
... the channel that was last tuned before entering the guide. ✍ The TV Guide On Screen system setup must be completed before services such as Recordings or Listings are available (see "Using the RECORDINGS Service" on page 59. ✍ Pressing TV GUIDE while in a guide menu will exit the guide and tune to the currently tuned channel. Pressing EXIT...
... the channel that was last tuned before entering the guide. ✍ The TV Guide On Screen system setup must be completed before services such as Recordings or Listings are available (see "Using the RECORDINGS Service" on page 59. ✍ Pressing TV GUIDE while in a guide menu will exit the guide and tune to the currently tuned channel. Pressing EXIT...

Operation Manual
Page 47
... or Cancel to which may also add or remove a channel from the CH+/-. List contains all of the TV Guide On Screen system. Select channels that the channels to display the options menu. List. 41 Change Password allows... channel and no other menus are displayed, press b to which you to make selection of the country in the program guide, use the Parental Lock function. ✍ For detailed information on the Parental Lock feature, see the Parental Lock section .... Select OK or Cancel to set . List. ✍ You may be listed in the TV Guide On Screen™ program...
... or Cancel to which may also add or remove a channel from the CH+/-. List contains all of the TV Guide On Screen system. Select channels that the channels to display the options menu. List. 41 Change Password allows... channel and no other menus are displayed, press b to which you to make selection of the country in the program guide, use the Parental Lock function. ✍ For detailed information on the Parental Lock feature, see the Parental Lock section .... Select OK or Cancel to set . List. ✍ You may be listed in the TV Guide On Screen™ program...
Operation Manual
Page 56
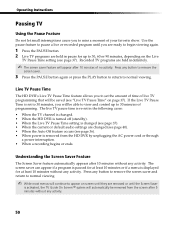
... page 36). • When power is activated, the TV Guide On Screen™ system will appear after 5 minutes without any activity. 50 Use the pause feature to pause a live TV programming that will continue to appear on page 37). Recorded TV programs are held indefinitely. ✍ The screen saver feature...power cord or through a power interruption. • When a recording begins or ends. Press any activity. Live TV Pause Time The HD DVR's Live TV Pause Time feature allows you to set in the following cases: • When the TV channel is changed (see page 40). • When the Auto...
... page 36). • When power is activated, the TV Guide On Screen™ system will appear after 5 minutes without any activity. 50 Use the pause feature to pause a live TV programming that will continue to appear on page 37). Recorded TV programs are held indefinitely. ✍ The screen saver feature...power cord or through a power interruption. • When a recording begins or ends. Press any activity. Live TV Pause Time The HD DVR's Live TV Pause Time feature allows you to set in the following cases: • When the TV channel is changed (see page 40). • When the Auto...
Operation Manual
Page 59
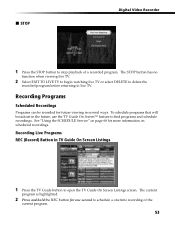
... future viewing in TV Guide On Screen Listings 1 Press the TV Guide button to open the TV Guide On Screen Listings screen. See "Using the SCHEDULE Service" on scheduled recordings. Recording Live Programs REC (Record) Button in several ways. To schedule programs that will broadcast in the future, use the TV Guide On Screen™ feature to live TV. x STOP Digital Video Recorder 1 Press the...
... future viewing in TV Guide On Screen Listings 1 Press the TV Guide button to open the TV Guide On Screen Listings screen. See "Using the SCHEDULE Service" on scheduled recordings. Recording Live Programs REC (Record) Button in several ways. To schedule programs that will broadcast in the future, use the TV Guide On Screen™ feature to live TV. x STOP Digital Video Recorder 1 Press the...
Operation Manual
Page 60
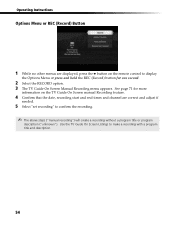
... a program title or program description ("unknown"). See page 71 for one second. 2 Select the RECORD option. 3 The TV Guide On Screen Manual Recording menu appears. Operating Instructions Options Menu or REC (Record) Button 1 While no other menus are displayed, press the b button on the remote control to ...display the Options Menu or press and hold the REC (Record) button for more information on the TV Guide On Screen manual Recording feature. 4 Confirm that the date, recording start and end times and channel are correct and adjust if needed. 5 Select "set...
... a program title or program description ("unknown"). See page 71 for one second. 2 Select the RECORD option. 3 The TV Guide On Screen Manual Recording menu appears. Operating Instructions Options Menu or REC (Record) Button 1 While no other menus are displayed, press the b button on the remote control to ...display the Options Menu or press and hold the REC (Record) button for more information on the TV Guide On Screen manual Recording feature. 4 Confirm that the date, recording start and end times and channel are correct and adjust if needed. 5 Select "set...


