Instructions Manual
Page 3
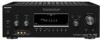
...Neural Surround" are for model STR-DG910. Check your model number by Neural Audio Corporation. "96/24" is a registered trademark of DTS, Inc. About This Manual • The instructions in this manual describe the controls on the remote. This receiver incorporates Dolby* Digital and ... panel. • The instructions in this product under license from Neural Audio Corporation. This receiver incorporates High-Definition Multimedia Interface (HDMITM) technology. Sony Corporation hereby grants the user a nonexclusive, non-transferable, limited license right to use the controls on...
...Neural Surround" are for model STR-DG910. Check your model number by Neural Audio Corporation. "96/24" is a registered trademark of DTS, Inc. About This Manual • The instructions in this manual describe the controls on the remote. This receiver incorporates Dolby* Digital and ... panel. • The instructions in this product under license from Neural Audio Corporation. This receiver incorporates High-Definition Multimedia Interface (HDMITM) technology. Sony Corporation hereby grants the user a nonexclusive, non-transferable, limited license right to use the controls on...
Instructions Manual
Page 4
... speakers 16 3a: Connecting the audio components.........17 3b: Connecting the video components ........20 4: Connecting the antennas 31 5: Preparing the receiver and the remote .....32 6: Selecting the speaker system 33 7: Calibrating the appropriate settings automatically (AUTO CALIBRATION 34 8: Adjusting the speaker levels and balance...Naming inputs 83 Changing the display 83 Using the Sleep Timer 84 Recording using the receiver 84 Using the Remote Programming the remote 85 Additional Information Glossary 90 Precautions 92 Troubleshooting 93 Specifications 97 Index 99 4US
... speakers 16 3a: Connecting the audio components.........17 3b: Connecting the video components ........20 4: Connecting the antennas 31 5: Preparing the receiver and the remote .....32 6: Selecting the speaker system 33 7: Calibrating the appropriate settings automatically (AUTO CALIBRATION 34 8: Adjusting the speaker levels and balance...Naming inputs 83 Changing the display 83 Using the Sleep Timer 84 Recording using the receiver 84 Using the Remote Programming the remote 85 Additional Information Glossary 90 Precautions 92 Troubleshooting 93 Specifications 97 Index 99 4US

Instructions Manual
Page 5
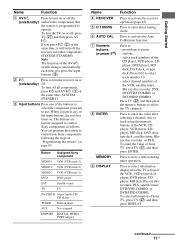
..., 83). continued 5US qa ?/1 SPEAKERS (OFF/A/B/A+B) TONE MODE TONE TUNING MODE TUNING AUTO CAL MIC PHONES VIDEO 3 IN/PORTABLE AV IN VIDEO L AUDIO R MULTI CHANNEL DECODING DISPLAY INPUT MODE INPUT SELECTOR MASTER VOLUME MEMORY/ CATEGORY ENTER MODE CATEGORY 2CH A.F.D. Turn... F Display The current status of the selected component or a list of parts Front panel 12 3 4 5 67 8 9 q; H Remote sensor Receives signals from remote commander. Function Press to adjust the level (page 46). Adjusts the tonal quality (bass/treble level) of the front speakers. to turn ...
..., 83). continued 5US qa ?/1 SPEAKERS (OFF/A/B/A+B) TONE MODE TONE TUNING MODE TUNING AUTO CAL MIC PHONES VIDEO 3 IN/PORTABLE AV IN VIDEO L AUDIO R MULTI CHANNEL DECODING DISPLAY INPUT MODE INPUT SELECTOR MASTER VOLUME MEMORY/ CATEGORY ENTER MODE CATEGORY 2CH A.F.D. Turn... F Display The current status of the selected component or a list of parts Front panel 12 3 4 5 67 8 9 q; H Remote sensor Receives signals from remote commander. Function Press to adjust the level (page 46). Adjusts the tonal quality (bass/treble level) of the front speakers. to turn ...

Instructions Manual
Page 10
... RM SET UP AV ?/1 ?/1 SYSTEM STANDBY VIDEO 1 VIDEO 2 VIDEO 3 DVD SAT TV SA-CD/CD TUNER AUX DMPORT RECEIVER 2CH A.F.D. For details, see "Programming the remote" (page 85). You can use the supplied remote to operate the receiver and to control the Sony audio/video components that the remote is assigned to control non-Sony audio/video components...
... RM SET UP AV ?/1 ?/1 SYSTEM STANDBY VIDEO 1 VIDEO 2 VIDEO 3 DVD SAT TV SA-CD/CD TUNER AUX DMPORT RECEIVER 2CH A.F.D. For details, see "Programming the remote" (page 85). You can use the supplied remote to operate the receiver and to control the Sony audio/video components that the remote is assigned to control non-Sony audio/video components...
Instructions Manual
Page 11
...to enter direct tuning mode. Press to activate the Auto Calibration function. You can program the remote to control non-Sony components following the steps in tuner AUX Not assigned DMPORT DIGITAL MEDIA PORT adapter Name D RECEIVER E D.TUNING F AUTO CAL G Numeric buttons (number 5a)) H ENTER MEMORY I DISPLAY ...TV on or off, press TV (wj) and then press AV ?/1. To turn on or off all components, press ?/1 and AV ?/1 (A) at the same time, it will turn the receiver on or (on /standby) audio/video components that the remote is programmed to operate. To turn off the (on /...
...to enter direct tuning mode. Press to activate the Auto Calibration function. You can program the remote to control non-Sony components following the steps in tuner AUX Not assigned DMPORT DIGITAL MEDIA PORT adapter Name D RECEIVER E D.TUNING F AUTO CAL G Numeric buttons (number 5a)) H ENTER MEMORY I DISPLAY ...TV on or off, press TV (wj) and then press AV ?/1. To turn on or off all components, press ?/1 and AV ?/1 (A) at the same time, it will turn the receiver on or (on /standby) audio/video components that the remote is programmed to operate. To turn off the (on /...
Instructions Manual
Page 14
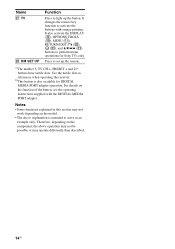
...TOOLS (J), MENU (K), RETURN/EXIT O (T), (U), and V/v/B/b (U) buttons to light up the remote. For details on the component, the above operation may not be possible or may not work depending on the model. • The above explanation is also available for Sony TVs only. Name wj TV wk RM SET UP Function Press... supplied with orange printing. a)The number 5, TV CH +, PRESET + and H buttons have tactile dots. Press to serve as references when operating the receiver. Use the tactile dots as an example only. b)This button is intended to set up the button. It changes the...
...TOOLS (J), MENU (K), RETURN/EXIT O (T), (U), and V/v/B/b (U) buttons to light up the remote. For details on the component, the above operation may not be possible or may not work depending on the model. • The above explanation is also available for Sony TVs only. Name wj TV wk RM SET UP Function Press... supplied with orange printing. a)The number 5, TV CH +, PRESET + and H buttons have tactile dots. Press to serve as references when operating the receiver. Use the tactile dots as an example only. b)This button is intended to set up the button. It changes the...
Instructions Manual
Page 22
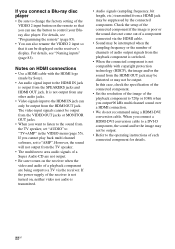
...of the connected component. • Set the resolution of the image of a playback component are not output. • Be sure to turn on the receiver when the video and audio of the playback component to 720p or 1080i when you connect a HDMI-DVI conversion cable to a DVI-D component, the sound...of channels of the VIDEO 2 input button on the remote so that it can be output from the TV speaker, set to the operating instructions of the receiver is not turned on the receiver's display. The video input signals cannot be suppressed by Sony). • An audio signal input to the HDMI IN...
...of the connected component. • Set the resolution of the image of a playback component are not output. • Be sure to turn on the receiver when the video and audio of the playback component to 720p or 1080i when you connect a HDMI-DVI conversion cable to a DVI-D component, the sound...of channels of the VIDEO 2 input button on the remote so that it can be output from the TV speaker, set to the operating instructions of the receiver is not turned on the receiver's display. The video input signals cannot be suppressed by Sony). • An audio signal input to the HDMI IN...
Instructions Manual
Page 26
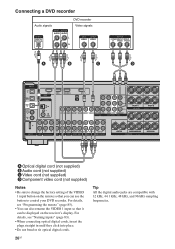
For details, see "Programming the remote" (page 85). • You can also rename the VIDEO 1 input so that you can be displayed on the receiver's display. Connecting a DVD recorder Audio signals DVD recorder Video signals A B C D DIGITAL (ASSIGNABLE) SAT IN VIDEO 2/ BD IN VIDEO 1 IN OPTICAL SA...not supplied) D Component video cord (not supplied) Notes • Be sure to change the factory setting of the VIDEO 1 input button on the remote so that it can use the button to control your DVD recorder. For details, see "Naming inputs" (page 83). • When connecting optical ...
For details, see "Programming the remote" (page 85). • You can also rename the VIDEO 1 input so that you can be displayed on the receiver's display. Connecting a DVD recorder Audio signals DVD recorder Video signals A B C D DIGITAL (ASSIGNABLE) SAT IN VIDEO 2/ BD IN VIDEO 1 IN OPTICAL SA...not supplied) D Component video cord (not supplied) Notes • Be sure to change the factory setting of the VIDEO 1 input button on the remote so that it can use the button to control your DVD recorder. For details, see "Naming inputs" (page 83). • When connecting optical ...
Instructions Manual
Page 32
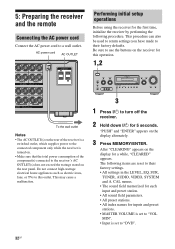
...AUTO CAL DIRECT 3 1 Press ?/1 to this operation. 1,2 ?/1 SPEAKERS (OFF/A/B/A+B) TONE MODE TONE TUNING MODE TUNING AUTO CAL MIC PHONES VIDEO 3 IN/PORTABLE AV IN VIDEO L AUDIO R MULTI CHANNEL DECODING DISPLAY INPUT MODE INPUT SELECTOR MASTER VOLUME MEMORY/ CATEGORY ENTER MODE CATEGORY 2CH A.F.D. Be sure to use the buttons...component(s) connected to their factory settings. • All settings in the LEVEL, EQ, SUR, TUNER, AUDIO, VIDEO, SYSTEM and A. 5: Preparing the receiver and the remote Connecting the AC power cord Connect the AC power cord to "DVD". 32US
...AUTO CAL DIRECT 3 1 Press ?/1 to this operation. 1,2 ?/1 SPEAKERS (OFF/A/B/A+B) TONE MODE TONE TUNING MODE TUNING AUTO CAL MIC PHONES VIDEO 3 IN/PORTABLE AV IN VIDEO L AUDIO R MULTI CHANNEL DECODING DISPLAY INPUT MODE INPUT SELECTOR MASTER VOLUME MEMORY/ CATEGORY ENTER MODE CATEGORY 2CH A.F.D. Be sure to use the buttons...component(s) connected to their factory settings. • All settings in the LEVEL, EQ, SUR, TUNER, AUDIO, VIDEO, SYSTEM and A. 5: Preparing the receiver and the remote Connecting the AC power cord Connect the AC power cord to "DVD". 32US
Instructions Manual
Page 33
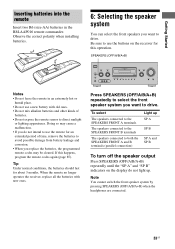
... Press SPEAKERS (OFF/A/B/A+B) repeatedly to select the front speaker system you replace the batteries, the programmed remote codes may be cleared. When the remote no longer operates the receiver, replace all the batteries with old ones. • Do not mix alkaline batteries and other kinds ... MUSIC AUTO CAL DIRECT Notes • Do not leave the remote in the RM-AAP016 remote commander. SPEAKERS (OFF/A/B/A+B) ?/1 SPEAKERS (OFF/A/B/A+B) TONE MODE TONE TUNING MODE TUNING AUTO CAL MIC PHONES VIDEO 3 IN/PORTABLE AV IN VIDEO L AUDIO R MULTI CHANNEL DECODING DISPLAY INPUT MODE ...
... Press SPEAKERS (OFF/A/B/A+B) repeatedly to select the front speaker system you replace the batteries, the programmed remote codes may be cleared. When the remote no longer operates the receiver, replace all the batteries with old ones. • Do not mix alkaline batteries and other kinds ... MUSIC AUTO CAL DIRECT Notes • Do not leave the remote in the RM-AAP016 remote commander. SPEAKERS (OFF/A/B/A+B) ?/1 SPEAKERS (OFF/A/B/A+B) TONE MODE TONE TUNING MODE TUNING AUTO CAL MIC PHONES VIDEO 3 IN/PORTABLE AV IN VIDEO L AUDIO R MULTI CHANNEL DECODING DISPLAY INPUT MODE ...
Instructions Manual
Page 65
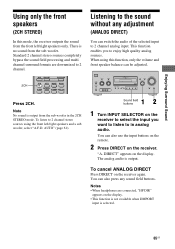
...to 2 channel analog input. Listening to the sound without any sound field buttons. You can also use the input buttons on the remote. 2 Press DIRECT on the receiver again. You can also press any adjustment (ANALOG DIRECT) You can switch the audio of the selected input to 2 channel stereo...and front speaker balance can be adjusted. ?/1 SPEAKERS (OFF/A/B/A+B) TONE MODE TONE TUNING MODE TUNING AUTO CAL MIC PHONES VIDEO 3 IN/PORTABLE AV IN VIDEO L AUDIO R MULTI CHANNEL DECODING DISPLAY INPUT MODE INPUT SELECTOR MASTER VOLUME MEMORY/ CATEGORY ENTER MODE CATEGORY 2CH A.F.D.
...to 2 channel analog input. Listening to the sound without any sound field buttons. You can also use the input buttons on the remote. 2 Press DIRECT on the receiver again. You can also press any adjustment (ANALOG DIRECT) You can switch the audio of the selected input to 2 channel stereo...and front speaker balance can be adjusted. ?/1 SPEAKERS (OFF/A/B/A+B) TONE MODE TONE TUNING MODE TUNING AUTO CAL MIC PHONES VIDEO 3 IN/PORTABLE AV IN VIDEO L AUDIO R MULTI CHANNEL DECODING DISPLAY INPUT MODE INPUT SELECTOR MASTER VOLUME MEMORY/ CATEGORY ENTER MODE CATEGORY 2CH A.F.D.
Instructions Manual
Page 78
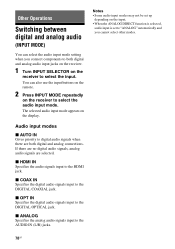
...to select the input. Audio input modes x AUTO IN Gives priority to select the audio input mode. The selected audio input mode appears on the receiver to digital audio signals when there are selected. x COAX IN Specifies the digital audio signals input to the AUDIO IN (L/R) jacks. x OPT IN...signals input to the HDMI jack. Other Operations Switching between digital and analog audio (INPUT MODE) You can also use the input buttons on the remote. 2 Press INPUT MODE repeatedly on the display. You can select the audio input mode setting when you cannot select other modes. 78US x ...
...to select the input. Audio input modes x AUTO IN Gives priority to select the audio input mode. The selected audio input mode appears on the receiver to digital audio signals when there are selected. x COAX IN Specifies the digital audio signals input to the AUDIO IN (L/R) jacks. x OPT IN...signals input to the HDMI jack. Other Operations Switching between digital and analog audio (INPUT MODE) You can also use the input buttons on the remote. 2 Press INPUT MODE repeatedly on the display. You can select the audio input mode setting when you cannot select other modes. 78US x ...
Instructions Manual
Page 82
... PORT adapter, you can enhance the sound. Listening to DMPORT input so that you can view the images on the TV screen. 1 Press RECEIVER. Initial setting: -NONE The assignable composite video input are VIDEO 1, VIDEO 2, VIDEO 3, DVD and SAT inputs. For example, select "-VIDEO...component through DMPORT connection You need to assign composite video input to a connected component through DIGITAL MEDIA PORT adapter will appear on remote button operation, see the operating instructions supplied with the DIGITAL MEDIA PORT adapter. For details on the TV screen. Press MUSIC ...
... PORT adapter, you can enhance the sound. Listening to DMPORT input so that you can view the images on the TV screen. 1 Press RECEIVER. Initial setting: -NONE The assignable composite video input are VIDEO 1, VIDEO 2, VIDEO 3, DVD and SAT inputs. For example, select "-VIDEO...component through DMPORT connection You need to assign composite video input to a connected component through DIGITAL MEDIA PORT adapter will appear on remote button operation, see the operating instructions supplied with the DIGITAL MEDIA PORT adapter. For details on the TV screen. Press MUSIC ...
Instructions Manual
Page 84
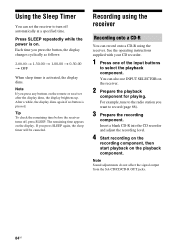
...activated, the display dims. Note If you want to select the playback component. Recording using the receiver Recording onto a CD-R You can also use INPUT SELECTOR on the remote or receiver after the display dims, the display brightens up. Press SLEEP repeatedly while the power is on ...the playback component. For example, tune to the radio station you press any buttons on the receiver. 2 Prepare the playback component for playing...
...activated, the display dims. Note If you want to select the playback component. Recording using the receiver Recording onto a CD-R You can also use INPUT SELECTOR on the remote or receiver after the display dims, the display brightens up. Press SLEEP repeatedly while the power is on ...the playback component. For example, tune to the radio station you press any buttons on the receiver. 2 Prepare the playback component for playing...
Instructions Manual
Page 85
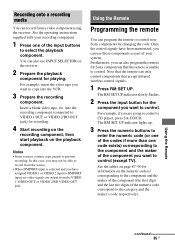
.... 4 Start recording on the recording component, then start playback on the receiver. 2 Prepare the playback component for the component you want to select the playback component. Recording onto a recording media You can also program the remote for Sony components that the remote is selected and you have been memorized, you can only control components... to enter the numeric code (or one of the codes if more than one of the component you are output from a video component using the receiver. You can program the remote to control (except TV).
.... 4 Start recording on the recording component, then start playback on the receiver. 2 Prepare the playback component for the component you want to select the playback component. Recording onto a recording media You can also program the remote for Sony components that the remote is selected and you have been memorized, you can only control components... to enter the numeric code (or one of the codes if more than one of the component you are output from a video component using the receiver. You can program the remote to control (except TV).
Instructions Manual
Page 86
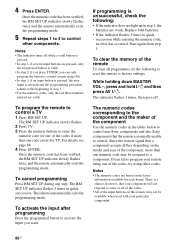
...all programmes, do the following : • If the indicator does not light up in the tables below to control non-Sony components and also Sony components that the remote is selected and the programming procedure returns to the beginning of step 3. • For the numeric codes, only the ... unable to control other codes. To cancel programming Press RM SET UP during any step. The remote automatically exits the programming mode. While holding down MASTER VOL -, press and hold ?/1 and then press AV ?/1. The RM SET UP indicator slowly flashes. 2 Press TV. 3 Press the numeric buttons to...
...all programmes, do the following : • If the indicator does not light up in the tables below to control non-Sony components and also Sony components that the remote is selected and the programming procedure returns to the beginning of step 3. • For the numeric codes, only the ... unable to control other codes. To cancel programming Press RM SET UP during any step. The remote automatically exits the programming mode. While holding down MASTER VOL -, press and hold ?/1 and then press AV ?/1. The RM SET UP indicator slowly flashes. 2 Press TV. 3 Press the numeric buttons to...
Instructions Manual
Page 87
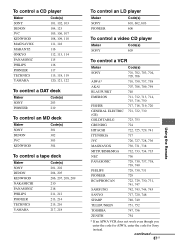
... 210 216 211, 212 213, 214 215, 216 217, 218 To control an LD player Maker SONY PIONEER Code(s) 601, 602, 603 606 To control a video CD player Maker SONY Code(s) 605 To control a VCR Maker SONY AIWA* AKAI BLAUPUNKT EMERSON FISHER GENERAL ELECTRIC (GE) GOLDSTAR/LG GRUNDIG HITACHI ITT/NOKIA JVC MAGNAVOX..., 749 751, 752 747, 756 754 * If an AIWA VCR does not work even though you enter the code for AIWA, enter the code for Sony instead. continued 87US Using the Remote
... 210 216 211, 212 213, 214 215, 216 217, 218 To control an LD player Maker SONY PIONEER Code(s) 601, 602, 603 606 To control a video CD player Maker SONY Code(s) 605 To control a VCR Maker SONY AIWA* AKAI BLAUPUNKT EMERSON FISHER GENERAL ELECTRIC (GE) GOLDSTAR/LG GRUNDIG HITACHI ITT/NOKIA JVC MAGNAVOX..., 749 751, 752 747, 756 754 * If an AIWA VCR does not work even though you enter the code for AIWA, enter the code for Sony instead. continued 87US Using the Remote
Instructions Manual
Page 89
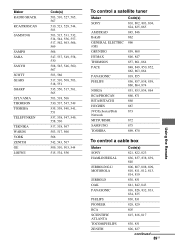
... 517, 566 566 542, 543, 567 509, 510, 503, 544 515, 534, 556 To control a satellite tuner Maker SONY AMSTRAD BskyB GENERAL ELECTRIC (GE) GRUNDIG HUMAX THOMSON PACE PANASONIC PHILIPS NOKIA RCA/PROSCAN BITA/HITACHI HUGHES JVC/Echostar/Dish Network MITSUBISHI ...864, 874 851, 853, 854, 864 866, 871 868 867 873 872 875 869, 870 To control a cable box Maker SONY HAMLIN/REGAL JERROLD/G.I./ MOTOROLA JERROLD OAK PANASONIC PHILIPS PIONEER RCA SCIENTIFIC ATLANTA TOCOM/PHILIPS ZENITH Code(s) 821, 822, 823 836, 837, ... 830, 831 828, 829 805 815, 816, 817 830, 831 826, 827 continued 89US Using the Remote
... 517, 566 566 542, 543, 567 509, 510, 503, 544 515, 534, 556 To control a satellite tuner Maker SONY AMSTRAD BskyB GENERAL ELECTRIC (GE) GRUNDIG HUMAX THOMSON PACE PANASONIC PHILIPS NOKIA RCA/PROSCAN BITA/HITACHI HUGHES JVC/Echostar/Dish Network MITSUBISHI ...864, 874 851, 853, 854, 864 866, 871 868 867 873 872 875 869, 870 To control a cable box Maker SONY HAMLIN/REGAL JERROLD/G.I./ MOTOROLA JERROLD OAK PANASONIC PHILIPS PIONEER RCA SCIENTIFIC ATLANTA TOCOM/PHILIPS ZENITH Code(s) 821, 822, 823 836, 837, ... 830, 831 828, 829 805 815, 816, 817 830, 831 826, 827 continued 89US Using the Remote
Instructions Manual
Page 96
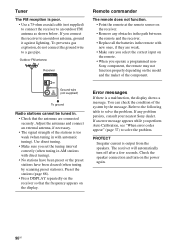
...supplied) to connect the receiver to a gas pipe... message appears while you connect the receiver to solve the problem. PROTECT Irregular current... on the receiver so that the antennas are connected securely. The receiver will automatically turn...Remote commander The remote does not function. • Point the remote at the remote ...in the path between the remote and the receiver. • Replace all ...Receiver ANTENNA AM Ground wire (not supplied) To ground Radio stations cannot be tuned in the remote... with new ones, if they are weak. • Make sure you select the correct input on the remote...
...supplied) to connect the receiver to a gas pipe... message appears while you connect the receiver to solve the problem. PROTECT Irregular current... on the receiver so that the antennas are connected securely. The receiver will automatically turn...Remote commander The remote does not function. • Point the remote at the remote ...in the path between the remote and the receiver. • Replace all ...Receiver ANTENNA AM Ground wire (not supplied) To ground Radio stations cannot be tuned in the remote... with new ones, if they are weak. • Make sure you select the correct input on the remote...
Instructions Manual
Page 98
....5 mm) including projecting parts and controls Mass (Approx.) 23 lb 6 oz (10.6 kg) Supplied accessories FM wire antenna (1) AM loop antenna (1) Remote commander RM-AAP016 (1) R6 (size-AA) batteries (2) Optimizer microphone ECM-AC2 (1) Design and specifications are subject to 9 kHz or 10 kHz. While ... (United States), 360 VA (Canada) Power consumption (during standby mode) 0.3 W (When "CONTROL" in any AM station, turn off the receiver. All preset stations will be erased when you change without notice. 98US FM tuner section Tuning range 87.5 - 108.0 MHz Antenna FM wire antenna...
....5 mm) including projecting parts and controls Mass (Approx.) 23 lb 6 oz (10.6 kg) Supplied accessories FM wire antenna (1) AM loop antenna (1) Remote commander RM-AAP016 (1) R6 (size-AA) batteries (2) Optimizer microphone ECM-AC2 (1) Design and specifications are subject to 9 kHz or 10 kHz. While ... (United States), 360 VA (Canada) Power consumption (during standby mode) 0.3 W (When "CONTROL" in any AM station, turn off the receiver. All preset stations will be erased when you change without notice. 98US FM tuner section Tuning range 87.5 - 108.0 MHz Antenna FM wire antenna...


