

Operating Instructions
Page 14
... an operation, you can hear a beep to CAMERA. Getting Started - z z z - e.g. Any differences in operation are for the seven models listed in this manual and operating your camcorder, check the model number by looking at the bottom of differences Model Recording system Playback system AUDIO/VIDEO jack S VIDEO jack DV jack USB jack "Memory Stick" slot LANC jack SteadyShot Remote sensor RFU jack MIC jack Hi8 Hi8/8 OUT OUT - - - - - - Using this manual The instructions in...
... an operation, you can hear a beep to CAMERA. Getting Started - z z z - e.g. Any differences in operation are for the seven models listed in this manual and operating your camcorder, check the model number by looking at the bottom of differences Model Recording system Playback system AUDIO/VIDEO jack S VIDEO jack DV jack USB jack "Memory Stick" slot LANC jack SteadyShot Remote sensor RFU jack MIC jack Hi8 Hi8/8 OUT OUT - - - - - - Using this manual The instructions in...
Operating Instructions
Page 51
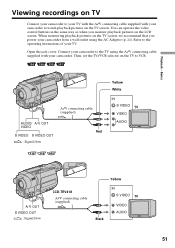
... Viewing recordings on the TV screen. A/V connecting cable (supplied) AUDIO/ A/ V OUT VIDEO Red S VIDEO S VIDEO OUT : Signal flow Yellow White IN S VIDEO TV VIDEO AUDIO A/ V OUT S VIDEO OUT : Signal flow CCD-TRV418 A/V connecting cable (supplied) Yellow IN S VIDEO TV Black VIDEO AUDIO 51 Open the jack cover. Connect your camcorder to watch playback pictures on TV Connect your camcorder to your TV with the A/V connecting cable supplied with your camcorder to the TV using the AC Adaptor (p. 24). Refer to VCR. You can operate the video control buttons...
... Viewing recordings on the TV screen. A/V connecting cable (supplied) AUDIO/ A/ V OUT VIDEO Red S VIDEO S VIDEO OUT : Signal flow Yellow White IN S VIDEO TV VIDEO AUDIO A/ V OUT S VIDEO OUT : Signal flow CCD-TRV418 A/V connecting cable (supplied) Yellow IN S VIDEO TV Black VIDEO AUDIO 51 Open the jack cover. Connect your camcorder to watch playback pictures on TV Connect your camcorder to your TV with the A/V connecting cable supplied with your camcorder to the TV using the AC Adaptor (p. 24). Refer to VCR. You can operate the video control buttons...

Operating Instructions
Page 60
...:9FULL Date or time indicator When you connect your camcorder to other equipment by an A/V connecting cable. In the wide mode You cannot operate the following functions: - Using the wide mode To cancel the wide mode In the standby mode, set the wide mode described below in the menu settings when the SteadyShot is compatible with the video ID (ID-1/ID-2) system. - BOUNCE (p. 61) Connection for a TV Pictures recorded in tape recording or tape recording standby...
...:9FULL Date or time indicator When you connect your camcorder to other equipment by an A/V connecting cable. In the wide mode You cannot operate the following functions: - Using the wide mode To cancel the wide mode In the standby mode, set the wide mode described below in the menu settings when the SteadyShot is compatible with the video ID (ID-1/ID-2) system. - BOUNCE (p. 61) Connection for a TV Pictures recorded in tape recording or tape recording standby...
Operating Instructions
Page 105
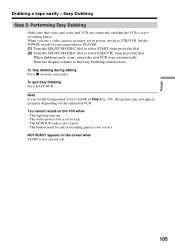
... stop automatically. Note If you use a video camera recorder, set the background color to FADE in Step 3 (p. 103), the picture may not appear properly depending on the VCR when: - The IR SETUP code is not correct. The button used to VTR/VCR. When you set its power switch to cancel recording pause is not correct. - Then the display returns to select EXECUTE, then press the dial. You cannot record on the connected VCR...
... stop automatically. Note If you use a video camera recorder, set the background color to FADE in Step 3 (p. 103), the picture may not appear properly depending on the VCR when: - The IR SETUP code is not correct. The button used to VTR/VCR. When you set its power switch to cancel recording pause is not correct. - Then the display returns to select EXECUTE, then press the dial. You cannot record on the connected VCR...
Operating Instructions
Page 107
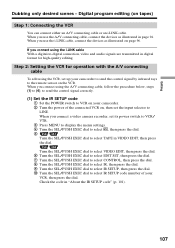
... digital format for high-quality editing. If you connect a video camera recorder, set the input selector to LINE. When you connect using the VCR, set up your VCR, then press the dial. When you use the A/V connecting cable, connect the devices as illustrated on the VCR. Check the code in VIDEO EDIT, then press the dial. Step 2: Setting the VCR for operation with the A/V connecting cable To edit using the i.LINK cable With a digital-to select IR SETUP code number of the connected VCR on tapes...
... digital format for high-quality editing. If you connect a video camera recorder, set the input selector to LINE. When you connect using the VCR, set up your VCR, then press the dial. When you use the A/V connecting cable, connect the devices as illustrated on the VCR. Check the code in VIDEO EDIT, then press the dial. Step 2: Setting the VCR for operation with the A/V connecting cable To edit using the i.LINK cable With a digital-to select IR SETUP code number of the connected VCR on tapes...
Operating Instructions
Page 115
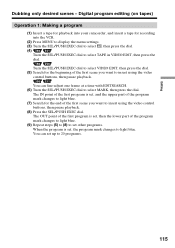
...-adjust one frame at a time with EDITSEARCH. (6) Turn the SEL/PUSH EXEC dial to insert using the video control buttons, then pause playback. (8) Press the SEL/PUSH EXEC dial. The OUT point of the first program is set , then the lower part of the first scene you want to 20 programs. 115 Digital program editing (on tapes) Operation 1: Making a program (1) Insert a tape for playback into your camcorder...
...-adjust one frame at a time with EDITSEARCH. (6) Turn the SEL/PUSH EXEC dial to insert using the video control buttons, then pause playback. (8) Press the SEL/PUSH EXEC dial. The OUT point of the first program is set , then the lower part of the first scene you want to 20 programs. 115 Digital program editing (on tapes) Operation 1: Making a program (1) Insert a tape for playback into your camcorder...
Operating Instructions
Page 151
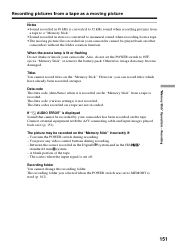
... any video control buttons during recording. - The data code (various settings) is cut off. The scenes when the input signal is not recorded. Recording Recording pictures from a tape to a "Memory Stick." •Sound recorded in stereo is lit or flashing Do not shake or knock your camcorder cannot be recorded on other camcorders without the folder creation function. A blank portion of the tape. - However, you selected when the POWER switch was set the POWER switch to MEMORY is used (p. 162...
... any video control buttons during recording. - The data code (various settings) is cut off. The scenes when the input signal is not recorded. Recording Recording pictures from a tape to a "Memory Stick." •Sound recorded in stereo is lit or flashing Do not shake or knock your camcorder cannot be recorded on other camcorders without the folder creation function. A blank portion of the tape. - However, you selected when the POWER switch was set the POWER switch to MEMORY is used (p. 162...
Operating Instructions
Page 156
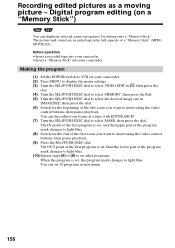
... the program mark changes to light blue. (10) Repeat steps (6) to (9) to set other programs. When the program is set 20 programs in maximum. 156 The picture and sound are recorded up to insert using the video control buttons, then pause playback. (9) Press the SEL/PUSH EXEC dial. Before operation •Insert a recorded tape into your camcorder. •Insert a "Memory Stick" into your camcorder. (2) Press MENU to display the menu settings. (3) Turn the SEL/PUSH...
... the program mark changes to light blue. (10) Repeat steps (6) to (9) to set other programs. When the program is set 20 programs in maximum. 156 The picture and sound are recorded up to insert using the video control buttons, then pause playback. (9) Press the SEL/PUSH EXEC dial. Before operation •Insert a recorded tape into your camcorder. •Insert a "Memory Stick" into your camcorder. (2) Press MENU to display the menu settings. (3) Turn the SEL/PUSH...
Operating Instructions
Page 185
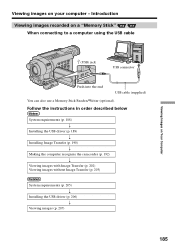
Viewing Images on Your Computer Viewing images on a "Memory Stick" When connecting to a computer using the USB cable (USB) jack USB connector Push into the end USB cable (supplied) You can also use a Memory Stick Reader/Writer (optional). Introduction Viewing images recorded on your computer - Follow the instructions in order described below System requirements (p. 188) r Installing the USB driver (p. 189) r Installing Image Transfer (p. 190) r Making the computer recognize the camcorder (p. 192) r Viewing images with Image Transfer (p. 202) Viewing images without Image Transfer (p....
Viewing Images on Your Computer Viewing images on a "Memory Stick" When connecting to a computer using the USB cable (USB) jack USB connector Push into the end USB cable (supplied) You can also use a Memory Stick Reader/Writer (optional). Introduction Viewing images recorded on your computer - Follow the instructions in order described below System requirements (p. 188) r Installing the USB driver (p. 189) r Installing Image Transfer (p. 190) r Making the computer recognize the camcorder (p. 192) r Viewing images with Image Transfer (p. 202) Viewing images without Image Transfer (p....
Operating Instructions
Page 193
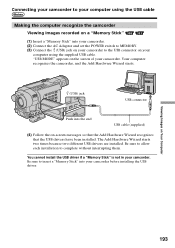
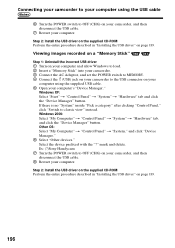
... USB drivers have been installed. Be sure to allow each installation to the USB connector on the screen of your camcorder. You cannot install the USB driver if a "Memory Stick" is not in your camcorder before installing the USB driver. Connecting your camcorder to your computer using the supplied USB cable. "USB MODE" appears on your computer using the USB cable Making the computer recognize the camcorder Viewing images recorded on a "Memory Stick" (1) Insert a "Memory Stick" into your camcorder. (2) Connect the AC Adaptor and set the POWER switch to MEMORY. (3) Connect...
... USB drivers have been installed. Be sure to allow each installation to the USB connector on the screen of your camcorder. You cannot install the USB driver if a "Memory Stick" is not in your camcorder before installing the USB driver. Connecting your camcorder to your computer using the supplied USB cable. "USB MODE" appears on your computer using the USB cable Making the computer recognize the camcorder Viewing images recorded on a "Memory Stick" (1) Insert a "Memory Stick" into your camcorder. (2) Connect the AC Adaptor and set the POWER switch to MEMORY. (3) Connect...
Operating Instructions
Page 194
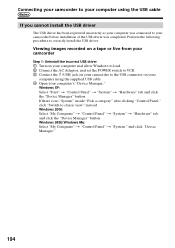
Viewing images recorded on a tape or live from your camcorder Step 1: Uninstall the incorrect USB driver 1 Turn on your computer and allow Windows to load. 2 Connect the AC Adaptor, and set the POWER switch to VCR. 3 Connect the (USB) jack on your camcorder to the USB connector on your computer using the USB cable If you cannot install the USB driver The USB driver has been registered incorrectly as your computer was connected to your computer's "Device Manager." Perform...
Viewing images recorded on a tape or live from your camcorder Step 1: Uninstall the incorrect USB driver 1 Turn on your computer and allow Windows to load. 2 Connect the AC Adaptor, and set the POWER switch to VCR. 3 Connect the (USB) jack on your camcorder to the USB connector on your computer using the USB cable If you cannot install the USB driver The USB driver has been registered incorrectly as your computer was connected to your computer's "Device Manager." Perform...
Operating Instructions
Page 196
... "Installing the USB driver" on page 189. mark and delete. Viewing images recorded on a "Memory Stick" Step 1: Uninstall the incorrect USB driver 1 Turn on your computer and allow Windows to load. 2 Insert a "Memory Stick" into your camcorder. 3 Connect the AC Adaptor, and set the POWER switch to MEMORY. 4 Connect the (USB) jack on your camcorder, and then disconnect the USB cable. 8 Restart your camcorder to classic view" instead. Other OS: Select "My Computer" t "Control Panel" t "System," and click "Device Manager...
... "Installing the USB driver" on page 189. mark and delete. Viewing images recorded on a "Memory Stick" Step 1: Uninstall the incorrect USB driver 1 Turn on your computer and allow Windows to load. 2 Insert a "Memory Stick" into your camcorder. 3 Connect the AC Adaptor, and set the POWER switch to MEMORY. 4 Connect the (USB) jack on your camcorder, and then disconnect the USB cable. 8 Restart your camcorder to classic view" instead. Other OS: Select "My Computer" t "Control Panel" t "System," and click "Device Manager...
Operating Instructions
Page 197
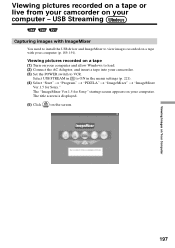
... screen is displayed. (5) Click on Your Computer 197 Viewing Images on the screen. USB Streaming Capturing images with ImageMixer You need to install the USB driver and ImageMixer to view images recorded on a tape with your computer. The "ImageMixer Ver.1.5 for Sony." Viewing pictures recorded on a tape or live from your camcorder on your camcorder. (3) Set the POWER switch to VCR. Viewing pictures recorded on a tape (1) Turn on your computer and allow Windows to ON in to load. (2) Connect the AC Adaptor, and insert a tape...
... screen is displayed. (5) Click on Your Computer 197 Viewing Images on the screen. USB Streaming Capturing images with ImageMixer You need to install the USB driver and ImageMixer to view images recorded on a tape with your computer. The "ImageMixer Ver.1.5 for Sony." Viewing pictures recorded on a tape or live from your camcorder on your camcorder. (3) Set the POWER switch to VCR. Viewing pictures recorded on a tape (1) Turn on your computer and allow Windows to ON in to load. (2) Connect the AC Adaptor, and insert a tape...
Operating Instructions
Page 203
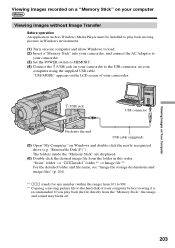
"USB MODE" appears on the LCD screen of your camcorder. (USB) jack USB connector Push into your camcorder, and connect the AC Adaptor to your camcorder. (3) Set the POWER switch to MEMORY. (4) Connect the (USB) jack on your camcorder to the hard disk of your computer using the supplied USB cable. "Removable Disk (F:)"). Viewing images recorded on a "Memory Stick" on your computer Viewing images without Image Transfer Before operation An application such as Windows Media Player must be installed to play back the file directly from 101 to 999. *2) Copying a moving pictures in...
"USB MODE" appears on the LCD screen of your camcorder. (USB) jack USB connector Push into your camcorder, and connect the AC Adaptor to your camcorder. (3) Set the POWER switch to MEMORY. (4) Connect the (USB) jack on your camcorder to the hard disk of your computer using the supplied USB cable. "Removable Disk (F:)"). Viewing images recorded on a "Memory Stick" on your computer Viewing images without Image Transfer Before operation An application such as Windows Media Player must be installed to play back the file directly from 101 to 999. *2) Copying a moving pictures in...
Operating Instructions
Page 205
... the same time, or when using the USB cable You must install a USB driver onto your computer in order to connect the camcorder to play back moving pictures. However, note that upgrade to Mac OS 9.0/9.1 should be installed to the computer's USB connector. QuickTime 3.0 or later must be used simultaneously. •Operations are not guaranteed for the following models: - Notes •Operations are not guaranteed for viewing images. The USB driver can be...
... the same time, or when using the USB cable You must install a USB driver onto your computer in order to connect the camcorder to play back moving pictures. However, note that upgrade to Mac OS 9.0/9.1 should be installed to the computer's USB connector. QuickTime 3.0 or later must be used simultaneously. •Operations are not guaranteed for the following models: - Notes •Operations are not guaranteed for viewing images. The USB driver can be...
Operating Instructions
Page 207
.... *2) Copying a moving pictures. (1) Turn on your computer before viewing it , and then select "Eject disk" from the folder in this order. Disconnect the USB cable and remove the "Memory Stick" or set the POWER switch to OFF (CHG). The folders inside the "Memory Stick" are displayed. (6) Double-click the desired image file from the "Special" menu at the top left of your camcorder to OFF (CHG). 207 Set the POWER switch of your computer using...
.... *2) Copying a moving pictures. (1) Turn on your computer before viewing it , and then select "Eject disk" from the folder in this order. Disconnect the USB cable and remove the "Memory Stick" or set the POWER switch to OFF (CHG). The folders inside the "Memory Stick" are displayed. (6) Double-click the desired image file from the "Special" menu at the top left of your camcorder to OFF (CHG). 207 Set the POWER switch of your computer using...
Operating Instructions
Page 224
...-diagnosis display function has worked. c Remove the cassette and leave your Sony dealer or local authorized Sony service facility. If "C:ss:ss" appears on the viewfinder screen is not adjusted. c Adjust to CAMERA. Troubleshooting - c Set it to OFF (p. 212). • The setting is set to focus manually (p. 71). • The video heads may be dirty. c Set the autofocus mode (p. 71). • Shooting conditions are not suitable for more than three minutes *1)/five minutes *2). c Install a charged battery...
...-diagnosis display function has worked. c Remove the cassette and leave your Sony dealer or local authorized Sony service facility. If "C:ss:ss" appears on the viewfinder screen is not adjusted. c Adjust to CAMERA. Troubleshooting - c Set it to OFF (p. 212). • The setting is set to focus manually (p. 71). • The video heads may be dirty. c Set the autofocus mode (p. 71). • Shooting conditions are not suitable for more than three minutes *1)/five minutes *2). c Install a charged battery...
Operating Instructions
Page 230
... trouble has occurred in the menu settings. The BATTERY INFO is not displayed. • The POWER switch is on. No function works though the power is not set to OFF (CHG). c Disconnect the power cord of other equipment (connected with the USB cable before installing the USB driver, so the driver was connected to your camcorder is connected to the outputs of the AC Adaptor or remove the battery, then reconnect it again, then operate your camcorder. c Eject the cassette...
... trouble has occurred in the menu settings. The BATTERY INFO is not displayed. • The POWER switch is on. No function works though the power is not set to OFF (CHG). c Disconnect the power cord of other equipment (connected with the USB cable before installing the USB driver, so the driver was connected to your camcorder is connected to the outputs of the AC Adaptor or remove the battery, then reconnect it again, then operate your camcorder. c Eject the cassette...
Operating Instructions
Page 238
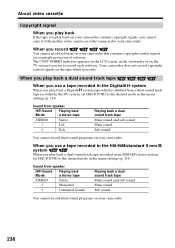
... control signals on the tape when it with another video camera recorder connected to the desired mode in the menu settings (p. 214). Sound from speaker HiFi Sound Mode Playing back a stereo tape STEREO Stereo 1 Lch 2 Rch Playing back a dual sound track tape Main sound and sub sound Main sound Sub sound You cannot record dual sound programs on your camcorder that contains copyright control signals for copyright protection of software. The COPY INHIBIT indicator appears on the LCD screen...
... control signals on the tape when it with another video camera recorder connected to the desired mode in the menu settings (p. 214). Sound from speaker HiFi Sound Mode Playing back a stereo tape STEREO Stereo 1 Lch 2 Rch Playing back a dual sound track tape Main sound and sub sound Main sound Sub sound You cannot record dual sound programs on your camcorder that contains copyright control signals for copyright protection of software. The COPY INHIBIT indicator appears on the LCD screen...

Operating Instructions
Page 267
... Adaptor 19 Adjusting viewfinder lens ...... 35 AFM HiFi Sound 238 AUDIO MIX 214 AUDIO MODE 219 AUTO SHTR 211 A/V connecting cable ........... 51, 94, 119, 138, 152, 208 BACK LIGHT 38 BATTERY INFO 20 Battery pack 18 BEEP 222 BOUNCE 61 Built-in light 79 C, D Camera chroma key 140 Charging battery 19 Charging built-in rechargeable battery 249 Cleaning cassette indicator 248 Clock set 26 Color Slow Shutter 40 Data code 47 Date search 90 DEMO 221 DIGITAL EFFECT 65...
... Adaptor 19 Adjusting viewfinder lens ...... 35 AFM HiFi Sound 238 AUDIO MIX 214 AUDIO MODE 219 AUTO SHTR 211 A/V connecting cable ........... 51, 94, 119, 138, 152, 208 BACK LIGHT 38 BATTERY INFO 20 Battery pack 18 BEEP 222 BOUNCE 61 Built-in light 79 C, D Camera chroma key 140 Charging battery 19 Charging built-in rechargeable battery 249 Cleaning cassette indicator 248 Clock set 26 Color Slow Shutter 40 Data code 47 Date search 90 DEMO 221 DIGITAL EFFECT 65...


