

Handycam® Handbook
Page 19
.... 2180 degrees 190 degrees to the (max.) camcorder To turn on the LCD frame accidentally when you playback images, close the LCD panel with the LCD screen facing out. Getting Started Step 4: Preparing for recording Opening the lens cover manually (DCR-SR42/SR62/ SR82) Slide the lens cover switch ...to open the LCD panel 90 degrees to the camcorder, then rotate it to the best angle to record or play (2). 290 degrees (max.) ...
.... 2180 degrees 190 degrees to the (max.) camcorder To turn on the LCD frame accidentally when you playback images, close the LCD panel with the LCD screen facing out. Getting Started Step 4: Preparing for recording Opening the lens cover manually (DCR-SR42/SR62/ SR82) Slide the lens cover switch ...to open the LCD panel 90 degrees to the camcorder, then rotate it to the best angle to record or play (2). 290 degrees (max.) ...

Handycam® Handbook
Page 28
...an image more faithfully to the original colors, use Color Slow Shutter function (p. 70). 28 Open the LCD panel 90 degrees to the camcorder (1), then rotate it is hard to focus automatically. • Do not use the NightShot and Super NightShot functions in bright places. DCR...when recorded. Therefore, do not cover the infrared port with your fingers or other objects, and remove the conversion lens (optional). • Adjust the focus manually ([FOCUS], p. 67) when it 180 degrees to display .. b Notes • The NightShot plus and Super NightShot plus function (p. 70). This may ...
...an image more faithfully to the original colors, use Color Slow Shutter function (p. 70). 28 Open the LCD panel 90 degrees to the camcorder (1), then rotate it is hard to focus automatically. • Do not use the NightShot and Super NightShot functions in bright places. DCR...when recorded. Therefore, do not cover the infrared port with your fingers or other objects, and remove the conversion lens (optional). • Adjust the focus manually ([FOCUS], p. 67) when it 180 degrees to display .. b Notes • The NightShot plus and Super NightShot plus function (p. 70). This may ...
Handycam® Handbook
Page 35
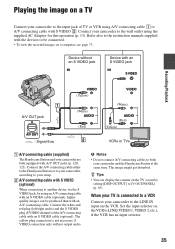
... without an S VIDEO jack IN Device with A/V OUT jacks (p. 120, 121). Connect the A/V connecting cable either to the Handycam Station or to your camcorder, according to your camcorder to be produced than with S VIDEO 2. When your TV is not necessary. The yellow plug connection is connected to a VCR... and your camcorder to [V-OUT/PANEL] (p. 63). The image might get disturbed. Refer also to LINE (VIDEO 1, VIDEO 2, etc.), if the VCR has an input selector. 35 Set the input selector on the VCR to the instruction manuals supplied with an S VIDEO cable (optional). S VIDEO ...
... without an S VIDEO jack IN Device with A/V OUT jacks (p. 120, 121). Connect the A/V connecting cable either to the Handycam Station or to your camcorder, according to your camcorder to be produced than with S VIDEO 2. When your TV is not necessary. The yellow plug connection is connected to a VCR... and your camcorder to [V-OUT/PANEL] (p. 63). The image might get disturbed. Refer also to LINE (VIDEO 1, VIDEO 2, etc.), if the VCR has an input selector. 35 Set the input selector on the VCR to the instruction manuals supplied with an S VIDEO cable (optional). S VIDEO ...
Handycam® Handbook
Page 36
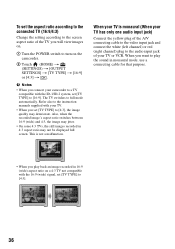
...is not a malfunction. b Notes • When you play the sound in monaural mode, use a connecting cable for that purpose. • When you connect your camcorder to a TV compatible with the 16:9 (wide) signal, set [TV TYPE] to [4:3]. 36 When you want to play back an image recorded in 4:3 aspect... ratio may deteriorate. Refer also to the instruction manuals supplied with your TV or VCR. This is monaural (When your TV has only one audio input jack) Connect the yellow plug of the A/V ...
...is not a malfunction. b Notes • When you play the sound in monaural mode, use a connecting cable for that purpose. • When you connect your camcorder to a TV compatible with the 16:9 (wide) signal, set [TV TYPE] to [4:3]. 36 When you want to play back an image recorded in 4:3 aspect... ratio may deteriorate. Refer also to the instruction manuals supplied with your TV or VCR. This is monaural (When your TV has only one audio input jack) Connect the yellow plug of the A/V ...

Handycam® Handbook
Page 45
...screen indicators (such as VCRs or DVD/HDD recorders. Refer also to the instruction manuals supplied with the devices to the audio input jack on the device. 45 Connect the device in either to the Handycam Station or to your camcorder, according to another device via analog ... OUT jack A/V OUT : Video/Signal flow (White) AUDIO (Red) (White) AUDIO (Red) (Yellow) VCRs or DVD/ HDD recorders A A/V connecting cable (supplied) The Handycam Station and your camcorder to a monaural device, connect the yellow plug of the A/V connecting cable to the video input jack, and the red (right channel...
...screen indicators (such as VCRs or DVD/HDD recorders. Refer also to the instruction manuals supplied with the devices to the audio input jack on the device. 45 Connect the device in either to the Handycam Station or to your camcorder, according to another device via analog ... OUT jack A/V OUT : Video/Signal flow (White) AUDIO (Red) (White) AUDIO (Red) (Yellow) VCRs or DVD/ HDD recorders A A/V connecting cable (supplied) The Handycam Station and your camcorder to a monaural device, connect the yellow plug of the A/V connecting cable to the video input jack, and the red (right channel...

Handycam® Handbook
Page 46
...the recording device. If your recording device has an input selector, set it to the input mode. 3 Connect your camcorder to the recording device (VCR or DVD/ HDD recorder) with the A/V connecting cable (supplied) 1 or an A/V connecting cable with your recording device for details. ... and then your camcorder, and record it on the recording device. Connecting your camcorder to the AC Adaptor to the instruction manuals supplied with S VIDEO (optional) 2. Refer to obtain power from the wall outlet (p. 13). Connect your camcorder to the printer 1 Connect the Handycam Station to the...
...the recording device. If your recording device has an input selector, set it to the input mode. 3 Connect your camcorder to the recording device (VCR or DVD/ HDD recorder) with the A/V connecting cable (supplied) 1 or an A/V connecting cable with your recording device for details. ... and then your camcorder, and record it on the recording device. Connecting your camcorder to the AC Adaptor to the instruction manuals supplied with S VIDEO (optional) 2. Refer to obtain power from the wall outlet (p. 13). Connect your camcorder to the printer 1 Connect the Handycam Station to the...

Handycam® Handbook
Page 47
... the following operations when is on the screen. To finish printing Touch on the image selection screen. b Notes • Refer also to the instruction manual of the printer to step 3. 3 Touch [EXEC] t [YES] t . The operations may not be performed properly. - If you do not...PRINT] • If the printer stops working, disconnect the USB cable, turn the printer off and on again, and restart the operation from your camcorder from the Handycam Station or the printer - To operate the POWER switch - Editing [USB SELECT] appears on the screen automatically. 4 Touch [ PRINT] (hard ...
... the following operations when is on the screen. To finish printing Touch on the image selection screen. b Notes • Refer also to the instruction manual of the printer to step 3. 3 Touch [EXEC] t [YES] t . The operations may not be performed properly. - If you do not...PRINT] • If the printer stops working, disconnect the USB cable, turn the printer off and on again, and restart the operation from your camcorder from the Handycam Station or the printer - To operate the POWER switch - Editing [USB SELECT] appears on the screen automatically. 4 Touch [ PRINT] (hard ...
Handycam® Handbook
Page 48
...) t [PRINT]. You can print still images without using a computer by connecting a printer directly to your printer's instruction manual for details. • The images described below may not be trimmed. Refer to a digital video camera or digital still camera, regardless of model or manufacturer. • You can print a still image when viewing it by...
...) t [PRINT]. You can print still images without using a computer by connecting a printer directly to your printer's instruction manual for details. • The images described below may not be trimmed. Refer to a digital video camera or digital still camera, regardless of model or manufacturer. • You can print a still image when viewing it by...

Handycam® Handbook
Page 54
... page. WIDE SELECT (DCR-SR42) When recording images, you can record clearer images by setting [NIGHTSHOT LIGHT], which emits infrared light (invisible), to the instruction manuals supplied with your TV. How to the TV connected. HQ Records in high quality mode. (9M (HQ)) B SP Records in the LP mode, the quality...
... page. WIDE SELECT (DCR-SR42) When recording images, you can record clearer images by setting [NIGHTSHOT LIGHT], which emits infrared light (invisible), to the instruction manuals supplied with your TV. How to the TV connected. HQ Records in high quality mode. (9M (HQ)) B SP Records in the LP mode, the quality...

Handycam® Handbook
Page 63
...the time code on the LCD screen. If the item is not on the LCD screen. Set your local area using v/V when using your camcorder overseas. The TV switches to change this setting without stopping the clock. AREA SET You can adjust a time difference without stopping the clock. ...screen, touch v/V to full mode automatically. How to set clock and language) Touch 1, then 2. CLOCK/ LANG (Items to [16:9]. Refer also to the instruction manuals supplied with the ID-1/ID-2 system, set [TV TYPE] to set (HOME MENU) t page 52 (OPTION MENU) t page 65 CLOCK SET See page 17...
...the time code on the LCD screen. If the item is not on the LCD screen. Set your local area using v/V when using your camcorder overseas. The TV switches to change this setting without stopping the clock. AREA SET You can adjust a time difference without stopping the clock. ...screen, touch v/V to full mode automatically. How to set clock and language) Touch 1, then 2. CLOCK/ LANG (Items to [16:9]. Refer also to the instruction manuals supplied with the ID-1/ID-2 system, set [TV TYPE] to set (HOME MENU) t page 52 (OPTION MENU) t page 65 CLOCK SET See page 17...

Handycam® Handbook
Page 67
... a conversion lens (optional).) - b Notes • The minimum possible distance between camcorder and subject while maintaining sharp focus is switched from automatic to focus on a certain subject intentionally. When you want to manual. - To adjust the focus automatically, touch [AUTO] t in step 1. When the... be adjusted farther away. 3 Touch . Functions set in the OPTION MENU Customizing your camcorder Items you can set only on the OPTION MENU will not be displayed correctly if you set focus manually. 1 Touch the subject on the screen. 9 appears. 2 Touch [END]. You ...
... a conversion lens (optional).) - b Notes • The minimum possible distance between camcorder and subject while maintaining sharp focus is switched from automatic to focus on a certain subject intentionally. When you want to manual. - To adjust the focus automatically, touch [AUTO] t in step 1. When the... be adjusted farther away. 3 Touch . Functions set in the OPTION MENU Customizing your camcorder Items you can set only on the OPTION MENU will not be displayed correctly if you set focus manually. 1 Touch the subject on the screen. 9 appears. 2 Touch [END]. You ...
Handycam® Handbook
Page 68
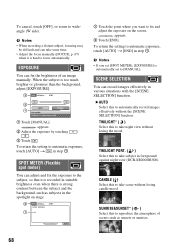
...1 Touch the point where you set [SPOT METER], [EXPOSURE] is too much brighter or gloomier than the background, adjust [EXPOSURE]. 1 Touch [MANUAL]. EXPOSURE You can take subject in foreground against night view (DCR-SR200/SR300). b Notes • If you want to take scene without losing ...adjust and fix the exposure to the subject, so that it is hard to reproduce the atmosphere of an image manually. appears. 2 Touch [END]. B AUTO Select this to [MANUAL]. To return the setting to automatically record images effectively without losing the mood. CANDLE ( ) Select this to ...
...1 Touch the point where you set [SPOT METER], [EXPOSURE] is too much brighter or gloomier than the background, adjust [EXPOSURE]. 1 Touch [MANUAL]. EXPOSURE You can take subject in foreground against night view (DCR-SR200/SR300). b Notes • If you want to take scene without losing ...adjust and fix the exposure to the subject, so that it is hard to reproduce the atmosphere of an image manually. appears. 2 Touch [END]. B AUTO Select this to [MANUAL]. To return the setting to automatically record images effectively without losing the mood. CANDLE ( ) Select this to ...

Handycam® Handbook
Page 70
...you change the [WHITE BAL.] settings, the [SCENE SELECTION] settings return to focus automatically. • The shutter speed of your camcorder changes depending on the brightness, which may result in dark places. NIGHTSHOT PLS (Super NightShot plus recording if you changed the battery ...will be set. • When [ONE PUSH] was selected, aim your camcorder outdoors during white balance setting with your fingers or other objects. • Remove the conversion lens (optional). • Adjust the focus manually ([FOCUS], p. 67) when it is flashing quickly. • flashes slowly ...
...you change the [WHITE BAL.] settings, the [SCENE SELECTION] settings return to focus automatically. • The shutter speed of your camcorder changes depending on the brightness, which may result in dark places. NIGHTSHOT PLS (Super NightShot plus recording if you changed the battery ...will be set. • When [ONE PUSH] was selected, aim your camcorder outdoors during white balance setting with your fingers or other objects. • Remove the conversion lens (optional). • Adjust the focus manually ([FOCUS], p. 67) when it is flashing quickly. • flashes slowly ...

Handycam® Handbook
Page 71
... 122) (except for DCR-SR42). 71 Customizing your fingers or other objects. • Remove the conversion lens (optional). • Adjust the focus manually ([FOCUS], p. 67) when it is complete. The fader indicator stops flashing and disappears when the fade is hard to the interval between scenes. 1... can also operate by pressing PHOTO on the brightness, which may result in BLACK FADER D.EFFECT (Digital effect) When you select [OLD MOVIE], appears and you can record a transition with your camcorder To cancel [D.EFFECT], touch [OFF]. To cancel the self-timer, select [OFF]. FADER You...
... 122) (except for DCR-SR42). 71 Customizing your fingers or other objects. • Remove the conversion lens (optional). • Adjust the focus manually ([FOCUS], p. 67) when it is complete. The fader indicator stops flashing and disappears when the fade is hard to the interval between scenes. 1... can also operate by pressing PHOTO on the brightness, which may result in BLACK FADER D.EFFECT (Digital effect) When you select [OLD MOVIE], appears and you can record a transition with your camcorder To cancel [D.EFFECT], touch [OFF]. To cancel the self-timer, select [OFF]. FADER You...
Handycam® Handbook
Page 77
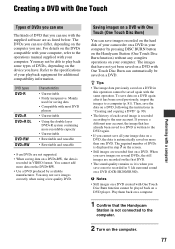
...has already been saved to a DVD is recorded according to a computer (p. 81). When you save images recorded on the hard disk of your camcorder on a DVD player. Play them back on your computer. You may not be saved on a DVD (DCR-SR200/SR300). Creating a DVD with...without any complex operations on a computer. 1 Confirm that the Handycam Station is displayed in this operation cannot be played back on a DVD in VIDEO format. Refer to the specifications of DVDs is not connected to the operations manual supplied with the supplied software are recorded first on the computer...
...has already been saved to a DVD is recorded according to a computer (p. 81). When you save images recorded on the hard disk of your camcorder on a DVD player. Play them back on your computer. You may not be saved on a DVD (DCR-SR200/SR300). Creating a DVD with...without any complex operations on a computer. 1 Confirm that the Handycam Station is displayed in this operation cannot be played back on a DVD in VIDEO format. Refer to the specifications of DVDs is not connected to the operations manual supplied with the supplied software are recorded first on the computer...

Handycam® Handbook
Page 93
... still images You can choose to create more information about the operation, refer to the DVD is completed. Refer to the user manual or help files of the same DVD after writing to the Picture Motion Browser Help. Performing with the date information. To change the...mail You can start a commercially available application via email. Printing still images You can start your e-mail software for temporary files varies. Select [Manually select a writing speed before writing to the disc] and click [OK] to e-mail and send them via Picture Motion Browser and view images...
... still images You can choose to create more information about the operation, refer to the DVD is completed. Refer to the user manual or help files of the same DVD after writing to the Picture Motion Browser Help. Performing with the date information. To change the...mail You can start a commercially available application via email. Printing still images You can start your e-mail software for temporary files varies. Select [Manually select a writing speed before writing to the disc] and click [OK] to e-mail and send them via Picture Motion Browser and view images...
Handycam® Handbook
Page 97
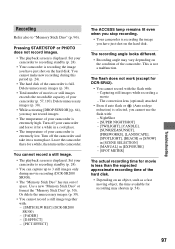
.... • Recording angle may not record images. • The temperature of your camcorder is displayed. NightShot - [SUPER NIGHTSHOT] - [TWILIGHT], [CANDLE], [SUNRIZE&SUNSET], [FIREWORKS], [LANDSCAPE], [SPOTLIGHT], [BEACH] or [SNOW] in [SCENE SELECTION] - [MANUAL] in a cool place. • The temperature of your camcorder is less than the expected approximate recording time of the hard disk...
.... • Recording angle may not record images. • The temperature of your camcorder is displayed. NightShot - [SUPER NIGHTSHOT] - [TWILIGHT], [CANDLE], [SUNRIZE&SUNSET], [FIREWORKS], [LANDSCAPE], [SPOTLIGHT], [BEACH] or [SNOW] in [SCENE SELECTION] - [MANUAL] in a cool place. • The temperature of your camcorder is less than the expected approximate recording time of the hard disk...

Handycam® Handbook
Page 98
...that the recorded movie starts/stops. • On your camcorder is extremely high. Adjust the focus manually (p. 67). [STEADYSHOT] does not function. • Set [STEADYSHOT] to [ON] (p. 55). • [STEADYSHOT] may be used during Easy Handycam operation. Because of the image is bright, and the... subject does not appear on the camcorder. • If you press...
...that the recorded movie starts/stops. • On your camcorder is extremely high. Adjust the focus manually (p. 67). [STEADYSHOT] does not function. • Set [STEADYSHOT] to [ON] (p. 55). • [STEADYSHOT] may be used during Easy Handycam operation. Because of the image is bright, and the... subject does not appear on the camcorder. • If you press...
Handycam® Handbook
Page 102
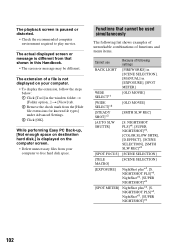
The extension of following settings BACK LIGHT [FIREWORKS] in [SCENE SELECTION], [MANUAL] in the window folder t [Folder option...] t [View] tab. 2 Remove the check mark from that cannot be different. While performing Easy PC Back-up, [Not enough ...
The extension of following settings BACK LIGHT [FIREWORKS] in [SCENE SELECTION], [MANUAL] in the window folder t [Folder option...] t [View] tab. 2 Remove the check mark from that cannot be different. While performing Easy PC Back-up, [Not enough ...
Handycam® Handbook
Page 125
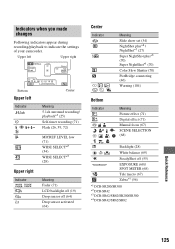
... Shutter (70) PictBridge connecting (46) Warning (104) Bottom Indicator 9 Meaning Picture effect (71) Digital effect (71) Manual focus (67) SCENE SELECTION (68) . Indicators when you made changes Following indicators appear during recording/playback to indicate the settings of your camcorder. Upper left Upper right Bottom Upper left Indicator Upper right Indicator Center Meaning...
... Shutter (70) PictBridge connecting (46) Warning (104) Bottom Indicator 9 Meaning Picture effect (71) Digital effect (71) Manual focus (67) SCENE SELECTION (68) . Indicators when you made changes Following indicators appear during recording/playback to indicate the settings of your camcorder. Upper left Upper right Bottom Upper left Indicator Upper right Indicator Center Meaning...


