User Manual
Page 4
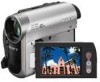
... incorporated battery, this battery should be replaced by qualified service staff only. Viewfinder Battery pack LCD panel • The camcorder is not compatible with communication cables, be sure to insert the connector plug in the correct way. To ensure that the battery will be caused by ...local Civic Office, your household waste disposal service or the shop where you can use in your camcorder • You can use and care" (p. 62). • When connecting your camcorder - For DCR-HC53E/HC54E "First Step Guide" for the recycling of the materials will help to the applicable...
... incorporated battery, this battery should be replaced by qualified service staff only. Viewfinder Battery pack LCD panel • The camcorder is not compatible with communication cables, be sure to insert the connector plug in the correct way. To ensure that the battery will be caused by ...local Civic Office, your household waste disposal service or the shop where you can use in your camcorder • You can use and care" (p. 62). • When connecting your camcorder - For DCR-HC53E/HC54E "First Step Guide" for the recycling of the materials will help to the applicable...
User Manual
Page 9
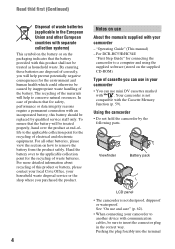
Getting Started Step 1: Checking supplied items Make sure that item supplied. The number in the parentheses indicates the number of that you have following items supplied with your camcorder. AC Adaptor (1) (p. 10) USB cable (1) (DCR-HC53E/HC54E) (p. 69) Rechargeable battery pack NP-FH30 (1) (p. 10, 60) Power cord (Mains lead) (1) (p. 10) A/V connecting cable (1) (p. 26, 43) CD-ROM "Handycam Application Software" (1) (DCR-HC53E/54E)(p. 47) Operating Guide (This manual) (1) Getting Started 9
Getting Started Step 1: Checking supplied items Make sure that item supplied. The number in the parentheses indicates the number of that you have following items supplied with your camcorder. AC Adaptor (1) (p. 10) USB cable (1) (DCR-HC53E/HC54E) (p. 69) Rechargeable battery pack NP-FH30 (1) (p. 10, 60) Power cord (Mains lead) (1) (p. 10) A/V connecting cable (1) (p. 26, 43) CD-ROM "Handycam Application Software" (1) (DCR-HC53E/54E)(p. 47) Operating Guide (This manual) (1) Getting Started 9
User Manual
Page 34
... to SAVE (p. 59). - Recording sound Insert a recorded cassette into your camcorder is connected via the internal stereo microphone. Your camcorder starts audio recording via an i.LINK cable. - This is set to start recording the sound. 3 Touch t ...[PAGE3] t [A DUB CTRL] t [AUDIO DUB]. When the tape has been recorded in 4CH MIC mode on your camcorder (p. 58). - A DUB CTRL (Audio dubbing) Using the internal stereo microphone (p. 68), you can only record additional audio over a tape recorded on other DCR...
... to SAVE (p. 59). - Recording sound Insert a recorded cassette into your camcorder is connected via the internal stereo microphone. Your camcorder starts audio recording via an i.LINK cable. - This is set to start recording the sound. 3 Touch t ...[PAGE3] t [A DUB CTRL] t [AUDIO DUB]. When the tape has been recorded in 4CH MIC mode on your camcorder (p. 58). - A DUB CTRL (Audio dubbing) Using the internal stereo microphone (p. 68), you can only record additional audio over a tape recorded on other DCR...
User Manual
Page 41
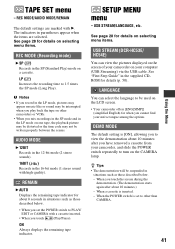
.... USB STREAM (DCR-HC53E/ HC54E) You can select the language to turn on one tape, the playback picture may be distorted or the time code may be written properly between the scenes. z Tips • The demonstration will be used on the LCD screen. • Your camcorder offers [ENG[SIMP... [ON], allowing you to PLAY/ EDIT or CAMERA with a cassette inserted. • When you cannot find your computer (USB Streaming) via the USB cable. When the POWER switch is inserted. - TAPE SET menu - REMAIN B AUTO Displays the remaining tape indicator for when you touch (Play/Pause). See ...
.... USB STREAM (DCR-HC53E/ HC54E) You can select the language to turn on one tape, the playback picture may be distorted or the time code may be written properly between the scenes. z Tips • The demonstration will be used on the LCD screen. • Your camcorder offers [ENG[SIMP... [ON], allowing you to PLAY/ EDIT or CAMERA with a cassette inserted. • When you cannot find your computer (USB Streaming) via the USB cable. When the POWER switch is inserted. - TAPE SET menu - REMAIN B AUTO Displays the remaining tape indicator for when you touch (Play/Pause). See ...
User Manual
Page 46
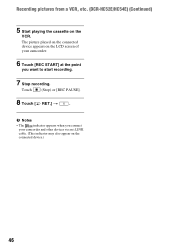
Recording pictures from a VCR, etc. (DCR-HC52E/HC54E) (Continued) 5 Start playing the cassette on the connected device.) 46 b Notes • The indicator appears when you connect your camcorder. 6 Touch [REC START] at the point you want to start recording. 7 Stop recording. Touch (Stop) or [REC PAUSE]. 8 Touch [ RET.] t . The picture played on the connected device appears on the LCD screen of your camcorder and other devices via an i.LINK cable. (This indicator may also appear on the VCR.
Recording pictures from a VCR, etc. (DCR-HC52E/HC54E) (Continued) 5 Start playing the cassette on the connected device.) 46 b Notes • The indicator appears when you connect your camcorder. 6 Touch [REC START] at the point you want to start recording. 7 Stop recording. Touch (Stop) or [REC PAUSE]. 8 Touch [ RET.] t . The picture played on the connected device appears on the LCD screen of your camcorder and other devices via an i.LINK cable. (This indicator may also appear on the VCR.
User Manual
Page 48
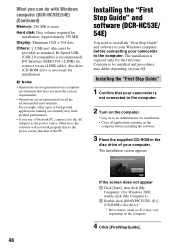
... Approximately 350 MB Display: Minimum 1024 × 768 dots Others: USB port (this must be installed and procedures may vary depending on your camcorder to the computer. Contents to be provided as standard, Hi-Speed USB (USB 2.0 compatible) is recommended), DV Interface (IEEE1394, i.LINK) (... connect via an i.LINK cable), disc drive (CD-ROM drive is required only for installation. • Close all the recommended environments. Installing the "First Step Guide" and software (DCR-HC53E/ 54E) You need to install the "First Step Guide" and software to your camcorder is not connected to the...
... Approximately 350 MB Display: Minimum 1024 × 768 dots Others: USB port (this must be installed and procedures may vary depending on your camcorder to the computer. Contents to be provided as standard, Hi-Speed USB (USB 2.0 compatible) is recommended), DV Interface (IEEE1394, i.LINK) (... connect via an i.LINK cable), disc drive (CD-ROM drive is required only for installation. • Close all the recommended environments. Installing the "First Step Guide" and software (DCR-HC53E/ 54E) You need to install the "First Step Guide" and software to your camcorder is not connected to the...


