User Manual
Page 7
... or DVD/HDD recorders 43 Recording pictures from a VCR, etc. (DCR-HC52E/HC54E 45 Using a Computer What you can do with Windows computer (DCR-HC53E/54E) ......47 Installing the "First Step Guide" and software (DCR-HC53E/54E) .......48 Viewing "First Step Guide" (DCRHC53E/54E 50 ... setting 14 Step 4: Making setting adjustments before recording 15 Step 5: Inserting a Cassette ......... 16 Recording/Playback Easy Recording/Playback (Easy Handycam 17 Recording 19 Zooming 20 Recording in dark places (NightShot plus 20 Adjusting the exposure for backlit subjects 21 Recording in mirror mode ...
... or DVD/HDD recorders 43 Recording pictures from a VCR, etc. (DCR-HC52E/HC54E 45 Using a Computer What you can do with Windows computer (DCR-HC53E/54E) ......47 Installing the "First Step Guide" and software (DCR-HC53E/54E) .......48 Viewing "First Step Guide" (DCRHC53E/54E 50 ... setting 14 Step 4: Making setting adjustments before recording 15 Step 5: Inserting a Cassette ......... 16 Recording/Playback Easy Recording/Playback (Easy Handycam 17 Recording 19 Zooming 20 Recording in dark places (NightShot plus 20 Adjusting the exposure for backlit subjects 21 Recording in mirror mode ...
User Manual
Page 9
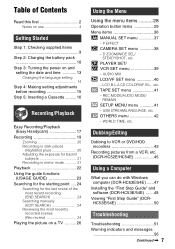
The number in the parentheses indicates the number of that you have following items supplied with your camcorder. Getting Started Step 1: Checking supplied items Make sure that item supplied. AC Adaptor (1) (p. 10) USB cable (1) (DCR-HC53E/HC54E) (p. 69) Rechargeable battery pack NP-FH30 (1) (p. 10, 60) Power cord (Mains lead) (1) (p. 10) A/V connecting cable (1) (p. 26, 43) CD-ROM "Handycam Application Software" (1) (DCR-HC53E/54E)(p. 47) Operating Guide (This manual) (1) Getting Started 9
The number in the parentheses indicates the number of that you have following items supplied with your camcorder. Getting Started Step 1: Checking supplied items Make sure that item supplied. AC Adaptor (1) (p. 10) USB cable (1) (DCR-HC53E/HC54E) (p. 69) Rechargeable battery pack NP-FH30 (1) (p. 10, 60) Power cord (Mains lead) (1) (p. 10) A/V connecting cable (1) (p. 26, 43) CD-ROM "Handycam Application Software" (1) (DCR-HC53E/54E)(p. 47) Operating Guide (This manual) (1) Getting Started 9
User Manual
Page 13
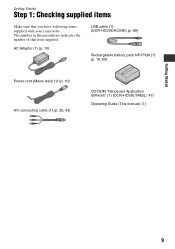
...] screen appears every time you can set any operation attempted for [DATA CODE] (During Easy Handycam operation, you turn off the power Slide the POWER switch to turn on the touch panel do not use your camcorder for about 3 months, the built-in the direction of purchase, the power is set with... Touch the button on the respective lamp. CAMERA: To record on and setting the date and time Set the date and time when using this camcorder for the hour and minute. 5 Make sure the date and time settings are automatically recorded on the tape, and can set with , then set the...
...] screen appears every time you can set any operation attempted for [DATA CODE] (During Easy Handycam operation, you turn off the power Slide the POWER switch to turn on the touch panel do not use your camcorder for about 3 months, the built-in the direction of purchase, the power is set with... Touch the button on the respective lamp. CAMERA: To record on and setting the date and time Set the date and time when using this camcorder for the hour and minute. 5 Make sure the date and time settings are automatically recorded on the tape, and can set with , then set the...
User Manual
Page 17
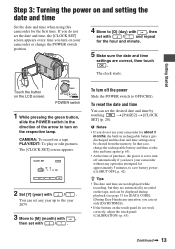
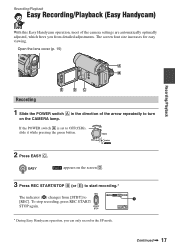
...POWER switch A in the SP mode. If the POWER switch A is set to [REC]. Continued , 17 Recording/Playback Easy Recording/Playback (Easy Handycam) With this Easy Handycam operation, most of the arrow repeatedly to turn on the screen D. 3 Press REC START/STOP B (or E) to start recording.* The indicator (A)... appears on the CAMERA lamp. To stop recording, press REC START/ STOP again. 60min REC 0:00:00 A GUIDE FN * During Easy Handycam operation, you can only record in the direction of the camera settings are automatically optimally adjusted, which frees you from [STBY] to OFF(CHG...
...POWER switch A in the SP mode. If the POWER switch A is set to [REC]. Continued , 17 Recording/Playback Easy Recording/Playback (Easy Handycam) With this Easy Handycam operation, most of the arrow repeatedly to turn on the screen D. 3 Press REC START/STOP B (or E) to start recording.* The indicator (A)... appears on the CAMERA lamp. To stop recording, press REC START/ STOP again. 60min REC 0:00:00 A GUIDE FN * During Easy Handycam operation, you can only record in the direction of the camera settings are automatically optimally adjusted, which frees you from [STBY] to OFF(CHG...

User Manual
Page 18
... button. x Unavailable button during Easy Handycam During Easy Handycam operation, the . (back light) button (p. 21) is unavailable. [Invalid during Easy Handycam operation Touch to display adjustable menu settings. Easy Recording/Playback (Easy Handycam) (Continued) Playback Slide the POWER switch A in Easy Handycam mode. 18 A D B C ... B Stop C Play/Pause toggles as follows. Touch , then touch to the images. x Adjustable menu settings during Easy Handycam operation.] appears if an attempted operation is set to turn on the PLAY/EDIT lamp. See page 28 for details on the...
... button. x Unavailable button during Easy Handycam During Easy Handycam operation, the . (back light) button (p. 21) is unavailable. [Invalid during Easy Handycam operation Touch to display adjustable menu settings. Easy Recording/Playback (Easy Handycam) (Continued) Playback Slide the POWER switch A in Easy Handycam mode. 18 A D B C ... B Stop C Play/Pause toggles as follows. Touch , then touch to the images. x Adjustable menu settings during Easy Handycam operation.] appears if an attempted operation is set to turn on the PLAY/EDIT lamp. See page 28 for details on the...

User Manual
Page 23
Your camcorder has 2 guide functions as shown below. e.g., to record night views Touch [SHOOT GUIDE] t [SELCT SCENE] t [PAGE r]/[PAGE R] to recording. Unavailable settings during Easy Handycam During Easy Handycam operation, some items are unavailable. Follow the instruction to your purpose. See page 72 for details. 1 Touch ...[To keep the mood of each indicator that appears on the LCD screen. Adjust the settings according to cancel Easy Handycam operation and then select the setting. The desired setting screen appears. If an attempted setting is not displayed in step...
Your camcorder has 2 guide functions as shown below. e.g., to record night views Touch [SHOOT GUIDE] t [SELCT SCENE] t [PAGE r]/[PAGE R] to recording. Unavailable settings during Easy Handycam During Easy Handycam operation, some items are unavailable. Follow the instruction to your purpose. See page 72 for details. 1 Touch ...[To keep the mood of each indicator that appears on the LCD screen. Adjust the settings according to cancel Easy Handycam operation and then select the setting. The desired setting screen appears. If an attempted setting is not displayed in step...
User Manual
Page 28
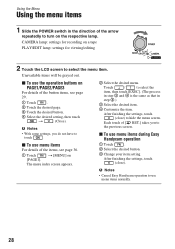
b Notes • With some settings, you to use menu items during Easy Handycam operation 1 Touch . 2 Select the desired button. 3 Change your item setting. After finishing the settings, touch (close ) to touch . x To use menu items For details of ... 3 and 4 is the same as that in the direction of [ RET.] takes you do not have to hide the menu screen. b Notes • Cancel Easy Handycam operation to the previous screen. CAMERA lamp: settings for viewing/editing 2 Touch the LCD screen to select the menu item. Using the Menu Using the...
b Notes • With some settings, you to use menu items during Easy Handycam operation 1 Touch . 2 Select the desired button. 3 Change your item setting. After finishing the settings, touch (close ) to touch . x To use menu items For details of ... 3 and 4 is the same as that in the direction of [ RET.] takes you do not have to hide the menu screen. b Notes • Cancel Easy Handycam operation to the previous screen. CAMERA lamp: settings for viewing/editing 2 Touch the LCD screen to select the menu item. Using the Menu Using the...

User Manual
Page 29
b Notes • The minimum possible distance between camcorder and subject while maintaining sharp focus is automatically set to [MANUAL]. To adjust the focus automatically, touch [AUTO] or set [SPOT FOCUS], [FOCUS] is about 1 ... the focus, then towards W (wide angle) to adjust the zoom for recording. The indicators in the frame. 9 appears. 2 Touch [END]. The available functions during Easy Handycam operation are marked with "*". b Notes • If you want to focus on a certain subject intentionally. 1 Touch [MANUAL]. 9 appears. 2 Touch (focusing on close range, move the...
b Notes • The minimum possible distance between camcorder and subject while maintaining sharp focus is automatically set to [MANUAL]. To adjust the focus automatically, touch [AUTO] or set [SPOT FOCUS], [FOCUS] is about 1 ... the focus, then towards W (wide angle) to adjust the zoom for recording. The indicators in the frame. 9 appears. 2 Touch [END]. The available functions during Easy Handycam operation are marked with "*". b Notes • If you want to focus on a certain subject intentionally. 1 Touch [MANUAL]. 9 appears. 2 Touch (focusing on close range, move the...

User Manual
Page 33
... (LCD bright) You can use the video operation buttons ( / / / ) on every PAGE. [PAGE1] MENU See page 36. The recorded picture will appear. • During Easy Handycam operation, you can play back in the same area. END SCH (END SEARCH) See page 24. DISP GUIDE (Display Guide)* See page 72. [PAGE2] DATA...
... (LCD bright) You can use the video operation buttons ( / / / ) on every PAGE. [PAGE1] MENU See page 36. The recorded picture will appear. • During Easy Handycam operation, you can play back in the same area. END SCH (END SEARCH) See page 24. DISP GUIDE (Display Guide)* See page 72. [PAGE2] DATA...
User Manual
Page 36
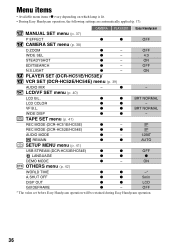
... Menu items • Available menu items (z) vary depending on which lamp is lit. • During Easy Handycam operation, the following settings are automatically applied (p. 17). TAPE SET menu (p. 41) REC MODE (DCR-HC51E/HC53E) z - CAMERA PLAY/EDIT Easy Handycam MANUAL SET menu (p. 37) P EFFECT z z OFF CAMERA SET menu (p. 38) D ZOOM z - SP REC MODE...
... Menu items • Available menu items (z) vary depending on which lamp is lit. • During Easy Handycam operation, the following settings are automatically applied (p. 17). TAPE SET menu (p. 41) REC MODE (DCR-HC51E/HC53E) z - CAMERA PLAY/EDIT Easy Handycam MANUAL SET menu (p. 37) P EFFECT z z OFF CAMERA SET menu (p. 38) D ZOOM z - SP REC MODE...
User Manual
Page 51
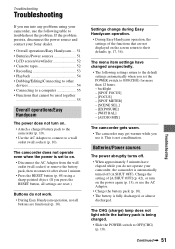
...) or remove the battery pack, then reconnect it . If the problem persists, disconnect the power source and contact your Sony dealer. • Overall operations/Easy Handycam ..... 51 • Batteries/Power sources 51 • LCD screen/viewfinder 52 • Cassette tapes 52 • Recording... you press the RESET button, all settings are reset.) Buttons do not operate your camcorder, use it after about 1 minute. • Press the RESET button (p. 69) using your camcorder, the camcorder is automatically turned off . • When approximately 5 minutes have changed unexpectedly. &#...
...) or remove the battery pack, then reconnect it . If the problem persists, disconnect the power source and contact your Sony dealer. • Overall operations/Easy Handycam ..... 51 • Batteries/Power sources 51 • LCD screen/viewfinder 52 • Cassette tapes 52 • Recording... you press the RESET button, all settings are reset.) Buttons do not operate your camcorder, use it after about 1 minute. • Press the RESET button (p. 69) using your camcorder, the camcorder is automatically turned off . • When approximately 5 minutes have changed unexpectedly. &#...

User Manual
Page 53
... and LP mode on a tape from the last recorded scene to REC or insert a new cassette (p. 59). • The tape is noisier during Easy Handycam operation (p. 18). This is not a malfunction. Adjust the focus manually (p. 29). [STEADYSHOT] does not function. • Set [STEADYSHOT] to moisture condensation... or title display does not appear while using the AC Adaptor, rewind/fast forward speed increases (compared with Cassette Memory. • This camcorder does not support Cassette Memory, so the indicator does not appear. The cassette is stuck to the drum due to [ON] (p. 38...
... and LP mode on a tape from the last recorded scene to REC or insert a new cassette (p. 59). • The tape is noisier during Easy Handycam operation (p. 18). This is not a malfunction. Adjust the focus manually (p. 29). [STEADYSHOT] does not function. • Set [STEADYSHOT] to moisture condensation... or title display does not appear while using the AC Adaptor, rewind/fast forward speed increases (compared with Cassette Memory. • This camcorder does not support Cassette Memory, so the indicator does not appear. The cassette is stuck to the drum due to [ON] (p. 38...

User Manual
Page 67
... the United States and/or other countries. All other specifications. Additional Information 67 On trademarks • "Handycam" and are registered trademarks of Sony Corporation. • "InfoLITHIUM" is a trademark of Sony Corporation. • i.LINK and are trademarks of Sony Corporation. • is a trademark. • Microsoft, Windows, Windows Media, Windows Vista, and DirectX are registered trademarks...
... the United States and/or other countries. All other specifications. Additional Information 67 On trademarks • "Handycam" and are registered trademarks of Sony Corporation. • "InfoLITHIUM" is a trademark of Sony Corporation. • i.LINK and are trademarks of Sony Corporation. • is a trademark. • Microsoft, Windows, Windows Media, Windows Vista, and DirectX are registered trademarks...
User Manual
Page 74
... DATE/TIME 13, 33, 72 DEMO MODE 41 74 DISP GUIDE (Display guide 72 DISP OUT (Display output 42 Display indicators 71 Dubbing 43 E Easy Handycam 17, 28 EDITSEARCH 24, 38 END SCH (END SEARCH 24, 53 EXPOSURE 31 F FADER 31 First Step Guide 47, 50 Flexible spot meter 30 FOCUS...
... DATE/TIME 13, 33, 72 DEMO MODE 41 74 DISP GUIDE (Display guide 72 DISP OUT (Display output 42 Display indicators 71 Dubbing 43 E Easy Handycam 17, 28 EDITSEARCH 24, 38 END SCH (END SEARCH 24, 53 EXPOSURE 31 F FADER 31 First Step Guide 47, 50 Flexible spot meter 30 FOCUS...


