Operating Guide
Page 8
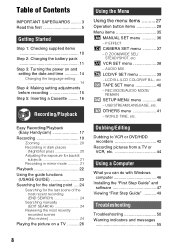
... and time 14 Changing the language setting 14 Step 4: Making setting adjustments before recording 15 Step 5: Inserting a Cassette ......... 16 Recording/Playback Easy Recording/Playback (Easy Handycam 17 Recording 19 Zooming 20 Recording in dark places (NightShot plus 20 Adjusting the exposure for backlit subjects 21 Recording in mirror mode 21 Playback...
... and time 14 Changing the language setting 14 Step 4: Making setting adjustments before recording 15 Step 5: Inserting a Cassette ......... 16 Recording/Playback Easy Recording/Playback (Easy Handycam 17 Recording 19 Zooming 20 Recording in dark places (NightShot plus 20 Adjusting the exposure for backlit subjects 21 Recording in mirror mode 21 Playback...
Operating Guide
Page 10
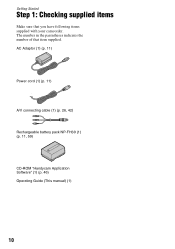
AC Adaptor (1) (p. 11) Power cord (1) (p. 11) A/V connecting cable (1) (p. 26, 42) Rechargeable battery pack NP-FH30 (1) (p. 11, 59) CD-ROM "Handycam Application Software" (1) (p. 46) Operating Guide (This manual) (1) 10 The number in the parentheses indicates the number of that you have following items supplied with your camcorder. Getting Started Step 1: Checking supplied items Make sure that item supplied.
AC Adaptor (1) (p. 11) Power cord (1) (p. 11) A/V connecting cable (1) (p. 26, 42) Rechargeable battery pack NP-FH30 (1) (p. 11, 59) CD-ROM "Handycam Application Software" (1) (p. 46) Operating Guide (This manual) (1) 10 The number in the parentheses indicates the number of that you have following items supplied with your camcorder. Getting Started Step 1: Checking supplied items Make sure that item supplied.
Operating Guide
Page 14
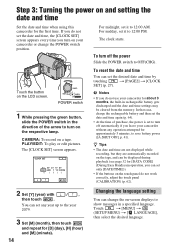
... -screen displays to 12:00 AM. Step 3: Turning the power on and setting the date and time Set the date and time when using this camcorder for [D] (day), [H] (hour) and [M] (minute). 14 Changing the language setting You can change the POWER switch position. z Tips • The date and ... while recording, but they are automatically recorded on the tape, and can be displayed during playback (see page 32 for [DATA CODE] (During Easy Handycam operation, you turn off the power Slide the POWER switch to save battery power ([A.SHUT OFF], p. 41). PLAY/EDIT: To play or edit pictures...
... -screen displays to 12:00 AM. Step 3: Turning the power on and setting the date and time Set the date and time when using this camcorder for [D] (day), [H] (hour) and [M] (minute). 14 Changing the language setting You can change the POWER switch position. z Tips • The date and ... while recording, but they are automatically recorded on the tape, and can be displayed during playback (see page 32 for [DATA CODE] (During Easy Handycam operation, you turn off the power Slide the POWER switch to save battery power ([A.SHUT OFF], p. 41). PLAY/EDIT: To play or edit pictures...
Operating Guide
Page 17
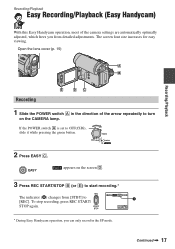
... Slide the POWER switch A in the SP mode. To stop recording, press REC START/ STOP again. 60min REC 0:00:00 A GUIDE FN * During Easy Handycam operation, you from [STBY] to turn on the screen D. 3 Press REC START/STOP B (or E) to start recording.* The indicator (A) changes from detailed ...POWER switch A is set to OFF(CHG), slide it while pressing the green button. Recording/Playback Easy Recording/Playback (Easy Handycam) With this Easy Handycam operation, most of the camera settings are automatically optimally adjusted, which frees you can only record in the direction of the arrow...
... Slide the POWER switch A in the SP mode. To stop recording, press REC START/ STOP again. 60min REC 0:00:00 A GUIDE FN * During Easy Handycam operation, you from [STBY] to turn on the screen D. 3 Press REC START/STOP B (or E) to start recording.* The indicator (A) changes from detailed ...POWER switch A is set to OFF(CHG), slide it while pressing the green button. Recording/Playback Easy Recording/Playback (Easy Handycam) With this Easy Handycam operation, most of the camera settings are automatically optimally adjusted, which frees you can only record in the direction of the arrow...
Operating Guide
Page 18
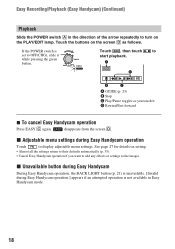
... B Stop C Play/Pause toggles as follows. disappears from the screen D. x Unavailable button during Easy Handycam During Easy Handycam operation, the BACK LIGHT button (p. 21) is unavailable. [Invalid during Easy Handycam operation Touch to display adjustable menu settings. See page 27 for details on the screen D as you ...the buttons on setting. • Almost all the settings return to their defaults automatically (p. 35). • Cancel Easy Handycam operation if you touch it while pressing the green button. If the POWER switch is not available in the direction of...
... B Stop C Play/Pause toggles as follows. disappears from the screen D. x Unavailable button during Easy Handycam During Easy Handycam operation, the BACK LIGHT button (p. 21) is unavailable. [Invalid during Easy Handycam operation Touch to display adjustable menu settings. See page 27 for details on the screen D as you ...the buttons on setting. • Almost all the settings return to their defaults automatically (p. 35). • Cancel Easy Handycam operation if you touch it while pressing the green button. If the POWER switch is not available in the direction of...

Operating Guide
Page 23
... recording. See page 71 for details. 1 Touch [GUIDE]. 2 Select the desired item. Adjust the settings according to cancel Easy Handycam operation and then select the setting. If an attempted setting is not displayed in step 3, follow the instruction on -screen instruction. ...GUIDE) You can easily select the desired setting screens by using the guide functions (USAGE GUIDE). Your camcorder has 2 guide functions as shown below. Unavailable settings during Easy Handycam During Easy Handycam operation, some items are unavailable. e.g., to record night views Touch [SHOOT GUIDE] t [SELCT ...
... recording. See page 71 for details. 1 Touch [GUIDE]. 2 Select the desired item. Adjust the settings according to cancel Easy Handycam operation and then select the setting. If an attempted setting is not displayed in step 3, follow the instruction on -screen instruction. ...GUIDE) You can easily select the desired setting screens by using the guide functions (USAGE GUIDE). Your camcorder has 2 guide functions as shown below. Unavailable settings during Easy Handycam During Easy Handycam operation, some items are unavailable. e.g., to record night views Touch [SHOOT GUIDE] t [SELCT ...
Operating Guide
Page 27
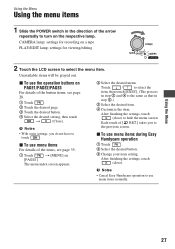
... details of the arrow repeatedly to the previous screen. CAMERA lamp: settings for viewing/editing 2 Touch the LCD screen to use menu items during Easy Handycam operation 1 Touch . 2 Select the desired button. 3 Change your item setting. Touch / to select the item, then touch [EXEC]. (The ...items, see page 35. 1 Touch t [MENU] on a tape PLAY/EDIT lamp: settings for recording on [PAGE1]. b Notes • Cancel Easy Handycam operation to select the menu item. Using the Menu 27 Each touch of the items, see page 28. 1 Touch . 2 Touch the desired page. 3...
... details of the arrow repeatedly to the previous screen. CAMERA lamp: settings for viewing/editing 2 Touch the LCD screen to use menu items during Easy Handycam operation 1 Touch . 2 Select the desired button. 3 Change your item setting. Touch / to select the item, then touch [EXEC]. (The ...items, see page 35. 1 Touch t [MENU] on a tape PLAY/EDIT lamp: settings for recording on [PAGE1]. b Notes • Cancel Easy Handycam operation to select the menu item. Using the Menu 27 Each touch of the items, see page 28. 1 Touch . 2 Touch the desired page. 3...
Operating Guide
Page 28
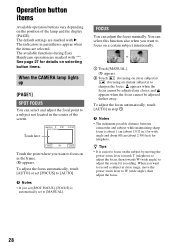
..., touch [AUTO] in .) for wide angle and about 80 cm (about 13/32 in step 1. The available functions during Easy Handycam operation are selected. b Notes • The minimum possible distance between camcorder and subject while maintaining sharp focus is about 1 cm (about 2 5/8 feet) for telephoto. appears when the focus cannot be adjusted...
..., touch [AUTO] in .) for wide angle and about 80 cm (about 13/32 in step 1. The available functions during Easy Handycam operation are selected. b Notes • The minimum possible distance between camcorder and subject while maintaining sharp focus is about 1 cm (about 2 5/8 feet) for telephoto. appears when the focus cannot be adjusted...

Operating Guide
Page 32
... (LCD bright) You can use the video operation buttons ( / / / ) on every PAGE. [PAGE1] MENU See page 35. The recorded picture will appear. • During Easy Handycam operation, you record a picture without setting the clock and [--:--:--] will not be affected by this operation. Adjust the brightness with / . END SCH (END SEARCH) See...
... (LCD bright) You can use the video operation buttons ( / / / ) on every PAGE. [PAGE1] MENU See page 35. The recorded picture will appear. • During Easy Handycam operation, you record a picture without setting the clock and [--:--:--] will not be affected by this operation. Adjust the brightness with / . END SCH (END SEARCH) See...
Operating Guide
Page 35
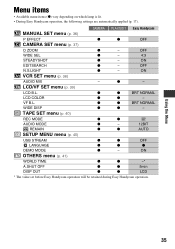
... OFF N.S.LIGHT z - Menu items • Available menu items (z) vary depending on which lamp is lit. • During Easy Handycam operation, the following settings are automatically applied (p. 17). ON EDITSEARCH z - ON VCR SET menu (p. 38) AUDIO MIX - z... z BRT NORMAL LCD COLOR z z - Using the Menu 35 OFF WIDE SEL z - 4:3 STEADYSHOT z - LCD/VF SET menu (p. 39) LCD B.L. CAMERA PLAY/EDIT Easy Handycam MANUAL SET menu (p. 36) P EFFECT z z OFF CAMERA SET menu (p. 37) D ZOOM z - z z BRT NORMAL WIDE DISP z z - VF B.L. TAPE SET menu (p. ...
... OFF N.S.LIGHT z - Menu items • Available menu items (z) vary depending on which lamp is lit. • During Easy Handycam operation, the following settings are automatically applied (p. 17). ON EDITSEARCH z - ON VCR SET menu (p. 38) AUDIO MIX - z... z BRT NORMAL LCD COLOR z z - Using the Menu 35 OFF WIDE SEL z - 4:3 STEADYSHOT z - LCD/VF SET menu (p. 39) LCD B.L. CAMERA PLAY/EDIT Easy Handycam MANUAL SET menu (p. 36) P EFFECT z z OFF CAMERA SET menu (p. 37) D ZOOM z - z z BRT NORMAL WIDE DISP z z - VF B.L. TAPE SET menu (p. ...
Operating Guide
Page 50
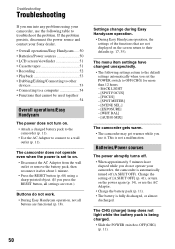
... using a sharp-pointed object. (If you press the RESET button, all settings are reset.) Buttons do not operate your camcorder, use the following settings return to the default settings automatically when you set to on . • Attach a charged battery pack to the... lamp does not light while the battery pack is not a malfunction. If the problem persists, disconnect the power source and contact your Sony dealer. • Overall operations/Easy Handycam ..... 50 • Batteries/Power sources 50 • LCD screen/viewfinder 51 • Cassette tapes 51 • Recording 52 •...
... using a sharp-pointed object. (If you press the RESET button, all settings are reset.) Buttons do not operate your camcorder, use the following settings return to the default settings automatically when you set to on . • Attach a charged battery pack to the... lamp does not light while the battery pack is not a malfunction. If the problem persists, disconnect the power source and contact your Sony dealer. • Overall operations/Easy Handycam ..... 50 • Batteries/Power sources 50 • LCD screen/viewfinder 51 • Cassette tapes 51 • Recording 52 •...
Operating Guide
Page 52
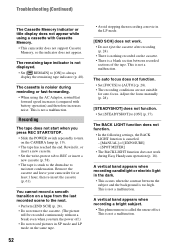
The cassette is noisier during Easy Handycam operation (p. 18). This is called the smear effect. A vertical band appears when recording a bright subject. • This phenomenon is not a malfunction. Remove the cassette and leave your camcorder for auto focus. A vertical band appears when recording candlelight or... title display does not appear while using the AC Adaptor, rewind/fast forward speed increases (compared with Cassette Memory. • This camcorder does not support Cassette Memory, so the indicator does not appear. Rewind it, or insert a new cassette. • Set the...
The cassette is noisier during Easy Handycam operation (p. 18). This is called the smear effect. A vertical band appears when recording a bright subject. • This phenomenon is not a malfunction. Remove the cassette and leave your camcorder for auto focus. A vertical band appears when recording candlelight or... title display does not appear while using the AC Adaptor, rewind/fast forward speed increases (compared with Cassette Memory. • This camcorder does not support Cassette Memory, so the indicator does not appear. Rewind it, or insert a new cassette. • Set the...
Operating Guide
Page 66
On trademarks • "Handycam" and are registered trademarks of Sony Corporation. • "InfoLITHIUM" is a trademark of Sony Corporation. • i.LINK and are trademarks of Sony Corporation. • is a trademark or registered trademark of Intel Corporation. • Adobe and Adobe Reader are either registered trademarks or trademarks of U.S. Furthermore, ™ and "&#...
On trademarks • "Handycam" and are registered trademarks of Sony Corporation. • "InfoLITHIUM" is a trademark of Sony Corporation. • i.LINK and are trademarks of Sony Corporation. • is a trademark or registered trademark of Intel Corporation. • Adobe and Adobe Reader are either registered trademarks or trademarks of U.S. Furthermore, ™ and "&#...
Operating Guide
Page 72
... DATE/TIME 14, 32, 71 DEMO MODE 40 72 DISP GUIDE (Display guide 71 DISP OUT (Display output 41 Display indicators 70 Dubbing 42 E Easy Handycam 17, 27 EDITSEARCH 24, 37 END SCH (END SEARCH 24, 52 EXPOSURE 30 F FADER 30 First Step Guide 46, 49 Flexible spot meter 29 FOCUS...
... DATE/TIME 14, 32, 71 DEMO MODE 40 72 DISP GUIDE (Display guide 71 DISP OUT (Display output 41 Display indicators 70 Dubbing 42 E Easy Handycam 17, 27 EDITSEARCH 24, 37 END SCH (END SEARCH 24, 52 EXPOSURE 30 F FADER 30 First Step Guide 46, 49 Flexible spot meter 29 FOCUS...


