Operating Guide
Page 13
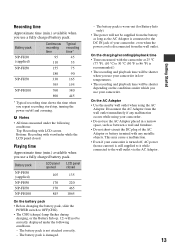
... battery pack. b Notes • All times measured under the following conditions. - On the AC Adaptor • Use the nearby wall outlet when using your camcorder. • Do not use the AC Adaptor placed in low temperatures. • The recording and playback time will not be supplied from the battery as...available when you repeat recording start/stop, turning the power on the conditions under the following conditions: Top: Recording with viewfinder while the LCD panel closed. Battery pack NP-FH30 (supplied) NP-FH50 NP-FH70 NP-FH100 LCD panel opened 105 170 370 845 LCD panel...
... battery pack. b Notes • All times measured under the following conditions. - On the AC Adaptor • Use the nearby wall outlet when using your camcorder. • Do not use the AC Adaptor placed in low temperatures. • The recording and playback time will not be supplied from the battery as...available when you repeat recording start/stop, turning the power on the conditions under the following conditions: Top: Recording with viewfinder while the LCD panel closed. Battery pack NP-FH30 (supplied) NP-FH50 NP-FH70 NP-FH100 LCD panel opened 105 170 370 845 LCD panel...
Operating Guide
Page 15
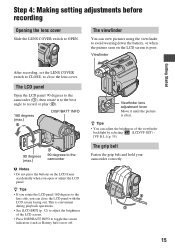
...clear. Viewfinder Getting Started After recording, set the LENS COVER switch to CLOSE, to the lens side, you can close the lens cover. The viewfinder You can adjust the brightness of the LCD screen. • Press DISP/BATT INFO to the camcorder b Notes • Do not press the buttons on the LCD ...frame accidentally when you rotate the LCD panel 180 degrees to close the LCD panel with the LCD screen facing out. z Tips • If you ...
...clear. Viewfinder Getting Started After recording, set the LENS COVER switch to CLOSE, to the lens side, you can close the lens cover. The viewfinder You can adjust the brightness of the LCD screen. • Press DISP/BATT INFO to the camcorder b Notes • Do not press the buttons on the LCD ...frame accidentally when you rotate the LCD panel 180 degrees to close the LCD panel with the LCD screen facing out. z Tips • If you ...
Operating Guide
Page 16
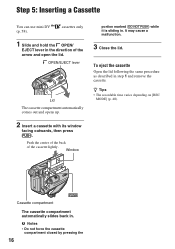
z Tips • The recordable time varies depending on [REC MODE] (p. 40). It may cause a malfunction. 3 Close the lid. b Notes • Do not force the cassette compartment closed by pressing the 16 Push the center of the back of the arrow and open the lid. cassettes only 1 Slide and hold the OPEN/ EJECT ...
z Tips • The recordable time varies depending on [REC MODE] (p. 40). It may cause a malfunction. 3 Close the lid. b Notes • Do not force the cassette compartment closed by pressing the 16 Push the center of the back of the arrow and open the lid. cassettes only 1 Slide and hold the OPEN/ EJECT ...
Operating Guide
Page 20
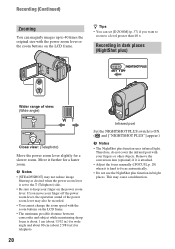
... on the LCD frame. Therefore, do not cover the infrared port with the zoom buttons on the LCD frame. • The minimum possible distance between camcorder and subject while maintaining sharp focus is about 1 cm (about 2 5/8 feet) for telephoto. 20 Infrared port Set the NIGHTSHOT PLUS switch to ON....;. Move it is set [D ZOOM] (p. 37) if you move your finger off the power zoom lever, the operation sound of view: (Wide angle) Close view: (Telephoto) Move the power zoom lever slightly for a faster zoom. Remove the conversion lens (optional) if it is attached. • Adjust the ...
... on the LCD frame. Therefore, do not cover the infrared port with the zoom buttons on the LCD frame. • The minimum possible distance between camcorder and subject while maintaining sharp focus is about 1 cm (about 2 5/8 feet) for telephoto. 20 Infrared port Set the NIGHTSHOT PLUS switch to ON....;. Move it is set [D ZOOM] (p. 37) if you move your finger off the power zoom lever, the operation sound of view: (Wide angle) Close view: (Telephoto) Move the power zoom lever slightly for a faster zoom. Remove the conversion lens (optional) if it is attached. • Adjust the ...
Operating Guide
Page 27
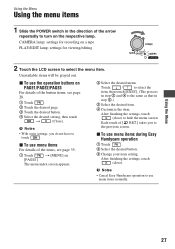
... the LCD screen to select the menu item. x To use the operation buttons on [PAGE1]. After finishing the settings, touch (close ). b Notes • Cancel Easy Handycam operation to hide the menu screen. Using the Menu Using the menu items 1 Slide the POWER switch in step 2.) 3 Select... the item. Using the Menu 27 The menu index screen appears. 2 Select the desired menu. After finishing the settings, touch (close ) to use menu items during Easy Handycam operation 1 Touch . 2 Select the desired button. 3 Change your item setting. Each touch of [ RET.] takes you do not...
... the LCD screen to select the menu item. x To use the operation buttons on [PAGE1]. After finishing the settings, touch (close ). b Notes • Cancel Easy Handycam operation to hide the menu screen. Using the Menu Using the menu items 1 Slide the POWER switch in step 2.) 3 Select... the item. Using the Menu 27 The menu index screen appears. 2 Select the desired menu. After finishing the settings, touch (close ) to use menu items during Easy Handycam operation 1 Touch . 2 Select the desired button. 3 Change your item setting. Each touch of [ RET.] takes you do not...
Operating Guide
Page 28
...(about 13/32 in the frame. 9 appears. b Notes • If you want to record a subject at close subjects)/ (focusing on distant subjects) to focus on in .) for wide angle and about 80 cm (about 2 ...5/8 feet) for recording. b Notes • The minimum possible distance between camcorder and subject while maintaining sharp focus is easier to focus on the subject by moving the power zoom...the focus, then towards W (wide angle) to [MANUAL]. The available functions during Easy Handycam operation are marked with "*". Touch here 60min STBY SPOT FOCUS 0:00:00 AUTO END Touch ...
...(about 13/32 in the frame. 9 appears. b Notes • If you want to record a subject at close subjects)/ (focusing on distant subjects) to focus on in .) for wide angle and about 80 cm (about 2 ...5/8 feet) for recording. b Notes • The minimum possible distance between camcorder and subject while maintaining sharp focus is easier to focus on the subject by moving the power zoom...the focus, then towards W (wide angle) to [MANUAL]. The available functions during Easy Handycam operation are marked with "*". Touch here 60min STBY SPOT FOCUS 0:00:00 AUTO END Touch ...
Operating Guide
Page 47
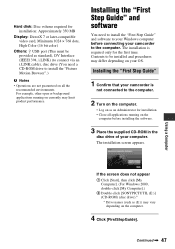
Installing the "First Step Guide" 1 Confirm that your camcorder is required only for the first time. Using a Computer If the screen does not appear 1 Click [Start], then... Step Guide" and software to the computer. For example, other open or background applications running on the computer before connecting your camcorder to your Windows computer before installing the software. 3 Place the supplied CD-ROM in the disc drive of your OS. The... to the computer. 2 Turn on the computer. • Log on as an Administrator for installation. • Close all the recommended environments.
Installing the "First Step Guide" 1 Confirm that your camcorder is required only for the first time. Using a Computer If the screen does not appear 1 Click [Start], then... Step Guide" and software to the computer. For example, other open or background applications running on the computer before connecting your camcorder to your Windows computer before installing the software. 3 Place the supplied CD-ROM in the disc drive of your OS. The... to the computer. 2 Turn on the computer. • Log on as an Administrator for installation. • Close all the recommended environments.
Operating Guide
Page 51
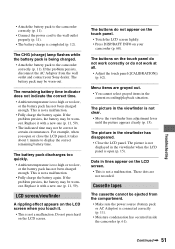
...the correct time. • Ambient temperature is connected correctly (p. 11). • Moisture condensation has occurred inside the camcorder (p. 61). LCD screen/viewfinder A rippling effect appears on your Sony dealer. The buttons do not work at all. • Adjust the touch panel ([CALIBRATION]) (p. 62). Cassette...charged enough. Replace it with a new one (p. 11, 59). For example, when you touch it. • This is open or close the LCD panel, it takes about 1 minute to display the correct remaining battery time. The battery pack discharges too quickly. • ...
...the correct time. • Ambient temperature is connected correctly (p. 11). • Moisture condensation has occurred inside the camcorder (p. 61). LCD screen/viewfinder A rippling effect appears on your Sony dealer. The buttons do not work at all. • Adjust the touch panel ([CALIBRATION]) (p. 62). Cassette...charged enough. Replace it with a new one (p. 11, 59). For example, when you touch it. • This is open or close the LCD panel, it takes about 1 minute to display the correct remaining battery time. The battery pack discharges too quickly. • ...
Operating Guide
Page 53
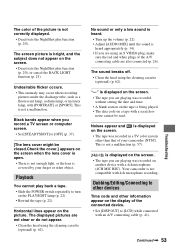
...plus function (p. 20). Noises appear and on a tape with a scratch or noise cannot be closed.Check the cover.] appears on the picture. is being played. • The data code on the screen. Your camcorder is heard appropriately (p. 34). • If you are also connected (p. 26). Dubbing/Editing...screen. • Set [STEADYSHOT] to [LCD] while connected with 4ch microphone recording. is covered by your finger or other than that of your camcorder (NTSC). The color of the picture is not a malfunction. The screen picture is not a malfunction (p. 57). This is bright, and the ...
...plus function (p. 20). Noises appear and on a tape with a scratch or noise cannot be closed.Check the cover.] appears on the picture. is being played. • The data code on the screen. Your camcorder is heard appropriately (p. 34). • If you are also connected (p. 26). Dubbing/Editing...screen. • Set [STEADYSHOT] to [LCD] while connected with 4ch microphone recording. is covered by your finger or other than that of your camcorder (NTSC). The color of the picture is not a malfunction. The screen picture is not a malfunction (p. 57). This is bright, and the ...
Operating Guide
Page 62
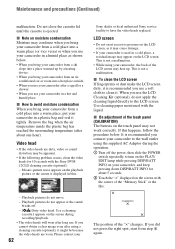
Do not close the cassette lid until the cassette is not a malfunction. Use cleaning paper moistened with the Sony DVM12CLD cleaning cassette (optional). - Use a cleaning cassette.] appears on the screen during the operation. 1 Turn off . - [x Dirty video head....pictures do not move. - Please contact your camcorder, the back of the "×" changes. Maintenance and precautions (Continued) malfunction. x Note on the LCD screen, as shown below . Video head • If the video heads are worn. Sony dealer or local authorized Sony service facility to the LCD screen. LCD ...
Do not close the cassette lid until the cassette is not a malfunction. Use cleaning paper moistened with the Sony DVM12CLD cleaning cassette (optional). - Use a cleaning cassette.] appears on the screen during the operation. 1 Turn off . - [x Dirty video head....pictures do not move. - Please contact your camcorder, the back of the "×" changes. Maintenance and precautions (Continued) malfunction. x Note on the LCD screen, as shown below . Video head • If the video heads are worn. Sony dealer or local authorized Sony service facility to the LCD screen. LCD ...


