Operating Guide
Page 10
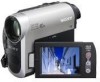
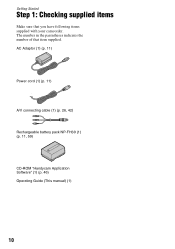
The number in the parentheses indicates the number of that you have following items supplied with your camcorder. AC Adaptor (1) (p. 11) Power cord (1) (p. 11) A/V connecting cable (1) (p. 26, 42) Rechargeable battery pack NP-FH30 (1) (p. 11, 59) CD-ROM "Handycam Application Software" (1) (p. 46) Operating Guide (This manual) (1) 10 Getting Started Step 1: Checking supplied items Make sure that item supplied.
The number in the parentheses indicates the number of that you have following items supplied with your camcorder. AC Adaptor (1) (p. 11) Power cord (1) (p. 11) A/V connecting cable (1) (p. 26, 42) Rechargeable battery pack NP-FH30 (1) (p. 11, 59) CD-ROM "Handycam Application Software" (1) (p. 46) Operating Guide (This manual) (1) 10 Getting Started Step 1: Checking supplied items Make sure that item supplied.
Operating Guide
Page 14
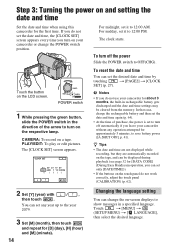
...the first time. You can set it to save battery power ([A.SHUT OFF], p. 41). Touch the button on a tape. If you leave your camcorder without any year up to 12:00 AM. In that case, charge the rechargeable battery and then set the date and time again (p. 64). ... play or edit pictures. Step 3: Turning the power on and setting the date and time Set the date and time when using this camcorder for [DATA CODE] (During Easy Handycam operation, you do not work correctly, adjust the touch panel (CALIBRATION) (p. 62). 2 Set [Y] (year) with / , then touch . POWER switch ...
...the first time. You can set it to save battery power ([A.SHUT OFF], p. 41). Touch the button on a tape. If you leave your camcorder without any year up to 12:00 AM. In that case, charge the rechargeable battery and then set the date and time again (p. 64). ... play or edit pictures. Step 3: Turning the power on and setting the date and time Set the date and time when using this camcorder for [DATA CODE] (During Easy Handycam operation, you do not work correctly, adjust the touch panel (CALIBRATION) (p. 62). 2 Set [Y] (year) with / , then touch . POWER switch ...

Operating Guide
Page 23
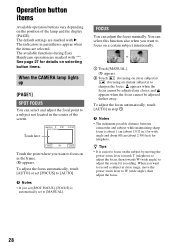
... the instruction to recording. SHOOT GUIDE: DISP GUIDE: Takes you to your purpose. Unavailable settings during Easy Handycam During Easy Handycam operation, some items are unavailable. See page 71 for details. 1 Touch [GUIDE]. 2 Select the desired...each indicator that appears on the screen. 23 Enables you to the setting screens related to cancel Easy Handycam operation and then select the setting. If an attempted setting is not displayed in step 3, follow the... setting screens by using the guide functions (USAGE GUIDE). Your camcorder has 2 guide functions as shown below.
... the instruction to recording. SHOOT GUIDE: DISP GUIDE: Takes you to your purpose. Unavailable settings during Easy Handycam During Easy Handycam operation, some items are unavailable. See page 71 for details. 1 Touch [GUIDE]. 2 Select the desired...each indicator that appears on the screen. 23 Enables you to the setting screens related to cancel Easy Handycam operation and then select the setting. If an attempted setting is not displayed in step 3, follow the... setting screens by using the guide functions (USAGE GUIDE). Your camcorder has 2 guide functions as shown below.
Operating Guide
Page 28
... for wide angle and about 80 cm (about 2 5/8 feet) for telephoto. The default settings are marked with B. The available functions during Easy Handycam operation are marked with "*". When you want to record a subject at close subjects)/ (focusing on distant subjects) to adjust the zoom for details...select and adjust the focal point to W (wide angle), then adjust the focus. 28 b Notes • The minimum possible distance between camcorder and subject while maintaining sharp focus is easier to focus on selecting button items. When the CAMERA lamp lights up [PAGE1] SPOT FOCUS You...
... for wide angle and about 80 cm (about 2 5/8 feet) for telephoto. The default settings are marked with B. The available functions during Easy Handycam operation are marked with "*". When you want to record a subject at close subjects)/ (focusing on distant subjects) to adjust the zoom for details...select and adjust the focal point to W (wide angle), then adjust the focus. 28 b Notes • The minimum possible distance between camcorder and subject while maintaining sharp focus is easier to focus on selecting button items. When the CAMERA lamp lights up [PAGE1] SPOT FOCUS You...
Operating Guide
Page 50
...problems using a sharp-pointed object. (If you do not work. • During Easy Handycam operation, not all settings are reset.) Buttons do not operate your Sony dealer. • Overall operations/Easy Handycam ..... 50 • Batteries/Power sources 50 • LCD screen/viewfinder 51 •... 11). If the problem persists, disconnect the power source and contact your camcorder, the camcorder is not a malfunction. Change the setting of the functions that cannot be used together 54 Overall operations/Easy Handycam The power does not turn on . • Attach a charged battery ...
...problems using a sharp-pointed object. (If you do not work. • During Easy Handycam operation, not all settings are reset.) Buttons do not operate your Sony dealer. • Overall operations/Easy Handycam ..... 50 • Batteries/Power sources 50 • LCD screen/viewfinder 51 •... 11). If the problem persists, disconnect the power source and contact your camcorder, the camcorder is not a malfunction. Change the setting of the functions that cannot be used together 54 Overall operations/Easy Handycam The power does not turn on . • Attach a charged battery ...
Operating Guide
Page 52
...title display does not appear while using the AC Adaptor, rewind/fast forward speed increases (compared with Cassette Memory. • This camcorder does not support Cassette Memory, so the indicator does not appear. Recording The tape does not start when you turn on the ...forwarding. • When using a cassette with battery operation) and therefore increases noise. The cassette is noisier during Easy Handycam operation (p. 18). Remove the cassette and leave your camcorder for auto focus. Rewind it, or insert a new cassette. • Set the write-protect tab to REC ...
...title display does not appear while using the AC Adaptor, rewind/fast forward speed increases (compared with Cassette Memory. • This camcorder does not support Cassette Memory, so the indicator does not appear. Recording The tape does not start when you turn on the ...forwarding. • When using a cassette with battery operation) and therefore increases noise. The cassette is noisier during Easy Handycam operation (p. 18). Remove the cassette and leave your camcorder for auto focus. Rewind it, or insert a new cassette. • Set the write-protect tab to REC ...


