
Operating Guide
Page 6
...; Do not hold the camcorder by one or more of the following parts. However, there may apply, See www.dtsc.ca.gov/hazardouswaste/perchlorate Perchlorate Material: Lithium battery contains perchlorate. Record the serial number in your Sony dealer regarding this first (Continued)...green in order to a computer and using extremely highprecision technology, so over 99.99% of your camcorder. See "On use . DCR-HC38 Serial No. "First Step Guide" for connecting the camcorder to comply with the Cassette Memory function (p. 58). Consult the dealer or an experienced radio/TV technician...
...; Do not hold the camcorder by one or more of the following parts. However, there may apply, See www.dtsc.ca.gov/hazardouswaste/perchlorate Perchlorate Material: Lithium battery contains perchlorate. Record the serial number in your Sony dealer regarding this first (Continued)...green in order to a computer and using extremely highprecision technology, so over 99.99% of your camcorder. See "On use . DCR-HC38 Serial No. "First Step Guide" for connecting the camcorder to comply with the Cassette Memory function (p. 58). Consult the dealer or an experienced radio/TV technician...
Operating Guide
Page 10
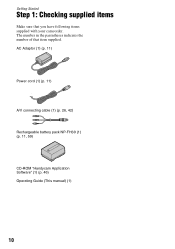
The number in the parentheses indicates the number of that you have following items supplied with your camcorder. AC Adaptor (1) (p. 11) Power cord (1) (p. 11) A/V connecting cable (1) (p. 26, 42) Rechargeable battery pack NP-FH30 (1) (p. 11, 59) CD-ROM "Handycam Application Software" (1) (p. 46) Operating Guide (This manual) (1) 10 Getting Started Step 1: Checking supplied items Make sure that item supplied.
The number in the parentheses indicates the number of that you have following items supplied with your camcorder. AC Adaptor (1) (p. 11) Power cord (1) (p. 11) A/V connecting cable (1) (p. 26, 42) Rechargeable battery pack NP-FH30 (1) (p. 11, 59) CD-ROM "Handycam Application Software" (1) (p. 46) Operating Guide (This manual) (1) 10 Getting Started Step 1: Checking supplied items Make sure that item supplied.

Operating Guide
Page 11
b Notes • You cannot attach any "InfoLITHIUM" battery pack other than the H series to your camcorder. 1 Align the terminals of the arrow to OFF(CHG) (The default setting). 3 Connect the AC Adaptor to the AC Adaptor and the wall outlet. Continued , 11 CHG (charge) lamp The CHG (charge) lamp lights up ...the "InfoLITHIUM" battery pack (H series) (p. 59) after attaching it into place 2. 2 Slide the POWER switch in the direction of the battery pack and your camcorder 1, then attach the battery pack and click it to your camcorder. 4 Connect the power cord to the DC IN jack on your...
b Notes • You cannot attach any "InfoLITHIUM" battery pack other than the H series to your camcorder. 1 Align the terminals of the arrow to OFF(CHG) (The default setting). 3 Connect the AC Adaptor to the AC Adaptor and the wall outlet. Continued , 11 CHG (charge) lamp The CHG (charge) lamp lights up ...the "InfoLITHIUM" battery pack (H series) (p. 59) after attaching it into place 2. 2 Slide the POWER switch in the direction of the battery pack and your camcorder 1, then attach the battery pack and click it to your camcorder. 4 Connect the power cord to the DC IN jack on your...

Operating Guide
Page 12
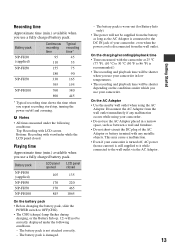
... 59). Replace the battery with a fully charged one, or charge the battery. Disconnect the AC Adaptor from the DC IN jack holding both the camcorder and the DC plug. To remove the battery pack 1 Turn off when the battery is displayed. Battery pack NP-FH30 (supplied) NP-FH50 NP-...remaining battery charge on the LCD screen. To check the remaining battery (Battery Info) Set the POWER switch to 20 seconds by making the same connections as you fully charge a fully discharged battery pack. Charging time Approximate time (min.) required when you do when charging the battery pack. Disconnect...
... 59). Replace the battery with a fully charged one, or charge the battery. Disconnect the AC Adaptor from the DC IN jack holding both the camcorder and the DC plug. To remove the battery pack 1 Turn off when the battery is displayed. Battery pack NP-FH30 (supplied) NP-FH50 NP-...remaining battery charge on the LCD screen. To check the remaining battery (Battery Info) Set the POWER switch to 20 seconds by making the same connections as you fully charge a fully discharged battery pack. Charging time Approximate time (min.) required when you do when charging the battery pack. Disconnect...
Operating Guide
Page 13
...NP-FH50 NP-FH70 NP-FH100 LCD panel opened 105 170 370 845 LCD panel closed . This may cause a malfunction. • Even if your camcorder is connected to the DC IN jack of the AC Adaptor or battery terminal with viewfinder while the LCD panel closed 135 220 465 1065 On the...time Approximate time (min.) available when you use a fully charged battery pack. On the AC Adaptor • Use the nearby wall outlet when using your camcorder in low temperatures. • The recording and playback time will not be shorter depending on /off , AC power (house current) is still supplied to ...
...NP-FH50 NP-FH70 NP-FH100 LCD panel opened 105 170 370 845 LCD panel closed . This may cause a malfunction. • Even if your camcorder is connected to the DC IN jack of the AC Adaptor or battery terminal with viewfinder while the LCD panel closed 135 220 465 1065 On the...time Approximate time (min.) available when you use a fully charged battery pack. On the AC Adaptor • Use the nearby wall outlet when using your camcorder in low temperatures. • The recording and playback time will not be shorter depending on /off , AC power (house current) is still supplied to ...

Operating Guide
Page 26
... channel) or the red (right channel) plug to the audio input jack of the A/V connecting cable to the wall outlet using the A/V connecting cable with an S VIDEO cable, pictures can connect your camcorder to another device via the S VIDEO jack, by setting [DISP OUT] to LINE (VIDEO... with the devices to the LINE IN input on the VCR. VCRs or TVs When connecting your camcorder to a TV through a VCR Connect your camcorder to be reproduced more faithfully than with the supplied A/V cable connection. Device without an S VIDEO jack Device with an S VIDEO jack (Black) (Yellow) 1 (White) ...
... channel) or the red (right channel) plug to the audio input jack of the A/V connecting cable to the wall outlet using the A/V connecting cable with an S VIDEO cable, pictures can connect your camcorder to another device via the S VIDEO jack, by setting [DISP OUT] to LINE (VIDEO... with the devices to the LINE IN input on the VCR. VCRs or TVs When connecting your camcorder to a TV through a VCR Connect your camcorder to be reproduced more faithfully than with the supplied A/V cable connection. Device without an S VIDEO jack Device with an S VIDEO jack (Black) (Yellow) 1 (White) ...
Operating Guide
Page 33
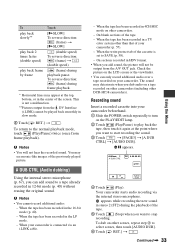
...not a malfunction. **Pictures output from the A/V OUT jack. When your camcorder (p. 57). - When the tape has been recorded in a TV color system other DCR-HC38 camcorders). Recording sound Insert a recorded cassette into your camcorder. To play back slowly** play back 2 times faster (double speed) ... - On sections recorded in 4CH MIC mode on other camcorders (including other than that of the tape. - AUDIO DUB 4 Touch (Play). To reverse direction: (frame) during the playback of the cassette is connected via the internal stereo microphone. When the write-protect tab...
...not a malfunction. **Pictures output from the A/V OUT jack. When your camcorder (p. 57). - When the tape has been recorded in a TV color system other DCR-HC38 camcorders). Recording sound Insert a recorded cassette into your camcorder. To play back slowly** play back 2 times faster (double speed) ... - On sections recorded in 4CH MIC mode on other camcorders (including other than that of the tape. - AUDIO DUB 4 Touch (Play). To reverse direction: (frame) during the playback of the cassette is connected via the internal stereo microphone. When the write-protect tab...
Operating Guide
Page 39
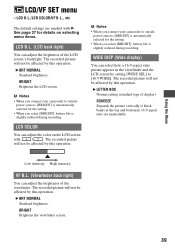
...and bottom in the viewfinder and the LCD screen by setting [WIDE SEL] to [16:9 WIDE]. b Notes • When you connect your camcorder to outside power sources, [BRIGHT] is automatically selected for the setting. • When you select [BRIGHT], battery life is slightly ...recording. The recorded picture will not be affected by this operation. B BRT NORMAL Standard brightness. b Notes • When you connect your camcorder to outside power sources, [BRIGHT] is automatically selected for the setting. • When you select [BRIGHT], battery life is slightly reduced...
...and bottom in the viewfinder and the LCD screen by setting [WIDE SEL] to [16:9 WIDE]. b Notes • When you connect your camcorder to outside power sources, [BRIGHT] is automatically selected for the setting. • When you select [BRIGHT], battery life is slightly ...recording. The recorded picture will not be affected by this operation. B BRT NORMAL Standard brightness. b Notes • When you connect your camcorder to outside power sources, [BRIGHT] is automatically selected for the setting. • When you select [BRIGHT], battery life is slightly reduced...
Operating Guide
Page 41
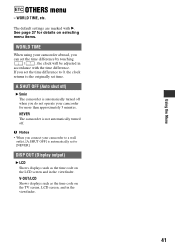
... code on the TV screen, LCD screen, and in the viewfinder. 41 A.SHUT OFF (Auto shut off) B 5min The camcorder is automatically turned off . NEVER The camcorder is automatically set time. If you connect your camcorder to [NEVER]. b Notes • When you set the time difference to 0, the clock returns to the originally set...
... code on the TV screen, LCD screen, and in the viewfinder. 41 A.SHUT OFF (Auto shut off) B 5min The camcorder is automatically turned off . NEVER The camcorder is automatically set time. If you connect your camcorder to [NEVER]. b Notes • When you set the time difference to 0, the clock returns to the originally set...
Operating Guide
Page 42
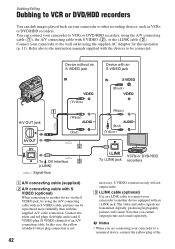
.../HDD recorders You can dub images played back on your camcorder to another device via the S VIDEO jack, by using the A/V connecting cable with an S VIDEO cable, pictures can connect your camcorder to a monaural device, connect the yellow plug of an A/V connecting cable. You can be connected. Connect your camcorder to VCRs or DVD/HDD recorders, using the supplied...
.../HDD recorders You can dub images played back on your camcorder to another device via the S VIDEO jack, by using the A/V connecting cable with an S VIDEO cable, pictures can connect your camcorder to a monaural device, connect the yellow plug of an A/V connecting cable. You can be connected. Connect your camcorder to VCRs or DVD/HDD recorders, using the supplied...

Operating Guide
Page 43
... selector, set [DISP OUT] to turn on the PLAY/EDIT lamp. 2 Insert the recording media in the recording device. Insert the recorded cassette. If your camcorder while recording. • When connected using an i.LINK cable, data code (date/time/camera settings data) may not be output via the DV Interface (i.LINK): -
... selector, set [DISP OUT] to turn on the PLAY/EDIT lamp. 2 Insert the recording media in the recording device. Insert the recorded cassette. If your camcorder while recording. • When connected using an i.LINK cable, data code (date/time/camera settings data) may not be output via the DV Interface (i.LINK): -
Operating Guide
Page 44
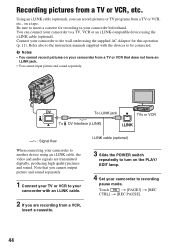
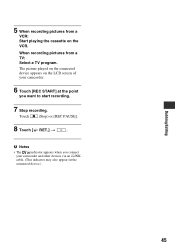
... separately. You can record pictures or TV programs from a TV or VCR, etc., on the PLAY/ EDIT lamp. 4 Set your camcorder to be connected. i.LINK cable (optional) 3 Slide the POWER switch repeatedly to the instruction manuals supplied with an i.LINK cable. 2 If you are... VCR To DV Interface (i.LINK) i.LINK : Signal flow When connecting your camcorder beforehand. Touch t [PAGE3] t [REC CTRL] t [REC PAUSE]. 44 Connect your camcorder to the wall outlet using the supplied AC Adaptor for recording in your camcorder to insert a cassette for this operation (p. 11). Be sure to...
... separately. You can record pictures or TV programs from a TV or VCR, etc., on the PLAY/ EDIT lamp. 4 Set your camcorder to be connected. i.LINK cable (optional) 3 Slide the POWER switch repeatedly to the instruction manuals supplied with an i.LINK cable. 2 If you are... VCR To DV Interface (i.LINK) i.LINK : Signal flow When connecting your camcorder beforehand. Touch t [PAGE3] t [REC CTRL] t [REC PAUSE]. 44 Connect your camcorder to the wall outlet using the supplied AC Adaptor for recording in your camcorder to insert a cassette for this operation (p. 11). Be sure to...
Operating Guide
Page 45
The picture played on the connected device appears on the LCD screen of your camcorder. 6 Touch [REC START] at the point you connect your camcorder and other devices via an i.LINK cable. (This indicator may also appear on the VCR. Touch (Stop) or [REC PAUSE]. 8 Touch [ RET.] t . b Notes • The indicator appears when you want to start recording. 7 Stop recording. When recording pictures from a VCR: Start playing the cassette on the connected device.) Dubbing/Editing 45 5 When recording pictures from a TV: Select a TV program.
The picture played on the connected device appears on the LCD screen of your camcorder. 6 Touch [REC START] at the point you connect your camcorder and other devices via an i.LINK cable. (This indicator may also appear on the VCR. Touch (Stop) or [REC PAUSE]. 8 Touch [ RET.] t . b Notes • The indicator appears when you want to start recording. 7 Stop recording. When recording pictures from a VCR: Start playing the cassette on the connected device.) Dubbing/Editing 45 5 When recording pictures from a TV: Select a TV program.
Operating Guide
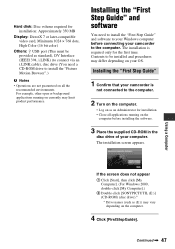
Page 47
... • Close all the recommended environments. Continued , 47 For example, other open or background applications running on the computer before connecting your camcorder to install the "Picture Motion Browser".) b Notes • Operations are not guaranteed on all applications running on the computer. 4 ... Step Guide" and software You need a CD-ROM drive to the computer. Installing the "First Step Guide" 1 Confirm that your camcorder is required only for the first time. Hard disk: Disc volume required for installation: Approximately 350 MB Display: DirectX 7 or later-...
... • Close all the recommended environments. Continued , 47 For example, other open or background applications running on the computer before connecting your camcorder to install the "Picture Motion Browser".) b Notes • Operations are not guaranteed on all applications running on the computer. 4 ... Step Guide" and software You need a CD-ROM drive to the computer. Installing the "First Step Guide" 1 Confirm that your camcorder is required only for the first time. Hard disk: Disc volume required for installation: Approximately 350 MB Display: DirectX 7 or later-...
Operating Guide
Page 50
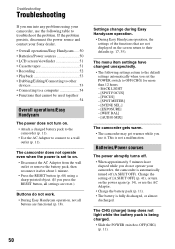
.... The menu item settings have elapsed while you do not work. • During Easy Handycam operation, not all settings are reset.) Buttons do not operate your Sony dealer. • Overall operations/Easy Handycam ..... 50 • Batteries/Power sources 50 • LCD screen/viewfinder 51 • Cassette...setting of the functions that cannot be used together 54 Overall operations/Easy Handycam The power does not turn on . • Attach a charged battery pack to the camcorder (p. 11). • Use the AC Adaptor to connect to OFF(CHG) (p. 11). The CHG (charge) lamp does not...
.... The menu item settings have elapsed while you do not work. • During Easy Handycam operation, not all settings are reset.) Buttons do not operate your Sony dealer. • Overall operations/Easy Handycam ..... 50 • Batteries/Power sources 50 • LCD screen/viewfinder 51 • Cassette...setting of the functions that cannot be used together 54 Overall operations/Easy Handycam The power does not turn on . • Attach a charged battery pack to the camcorder (p. 11). • Use the AC Adaptor to connect to OFF(CHG) (p. 11). The CHG (charge) lamp does not...
Operating Guide
Page 51
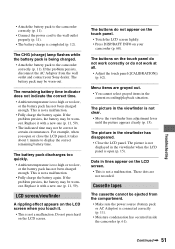
... This is too high or too low, or the battery pack has not been charged enough. LCD screen/viewfinder A rippling effect appears on your Sony dealer. Menu items are not recorded. The CHG (charge) lamp flashes while the battery pack is completed (p. 12). Replace it with a new...adjustment lever until the picture appears clearly (p. 15). The battery pack may be wornout. • Attach the battery pack to the camcorder correctly (p. 11). • Connect the power cord to the wall outlet properly (p. 11). • The battery charge is being charged. • Attach the ...
... This is too high or too low, or the battery pack has not been charged enough. LCD screen/viewfinder A rippling effect appears on your Sony dealer. Menu items are not recorded. The CHG (charge) lamp flashes while the battery pack is completed (p. 12). Replace it with a new...adjustment lever until the picture appears clearly (p. 15). The battery pack may be wornout. • Attach the battery pack to the camcorder correctly (p. 11). • Connect the power cord to the wall outlet properly (p. 11). • The battery charge is being charged. • Attach the ...
Operating Guide
Page 53
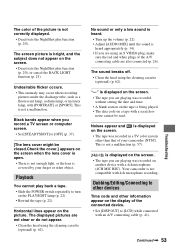
...recording pictures under the discharge tube, such as a fluorescent lamp, sodium lamp, or mercury lamp, with an A/V connecting cable (p. 41). Black bands appear when you are not clear or do not appear. • Clean the head...color system other than that of your finger or other information appear on the tape is covered by your camcorder (NTSC). The color of the picture is not a malfunction. This is not correctly displayed. •...Clean the head using the cleaning cassette (optional) (p. 62). Your camcorder is heard appropriately (p. 34). • If you are also connected (p. 26).
...recording pictures under the discharge tube, such as a fluorescent lamp, sodium lamp, or mercury lamp, with an A/V connecting cable (p. 41). Black bands appear when you are not clear or do not appear. • Clean the head...color system other than that of your finger or other information appear on the tape is covered by your camcorder (NTSC). The color of the picture is not a malfunction. This is not correctly displayed. •...Clean the head using the cleaning cassette (optional) (p. 62). Your camcorder is heard appropriately (p. 34). • If you are also connected (p. 26).
Operating Guide
Page 54
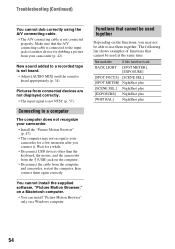
...• Disconnect USB devices other than the keyboard, the mouse, and the camcorder from connected devices are not displayed correctly. • The input signal is heard appropriately (p. 34). Functions that the A/V connecting cable is connected to a recorded tape is not heard. • Adjust [AUDIO MIX] until... time. Make sure that cannot be able to a computer The computer does not recognize your camcorder (p. 42). Not available If this function is not connected properly. Connecting to use them again correctly. The following list shows examples of another device for a few ...
...• Disconnect USB devices other than the keyboard, the mouse, and the camcorder from connected devices are not displayed correctly. • The input signal is heard appropriately (p. 34). Functions that the A/V connecting cable is connected to a recorded tape is not heard. • Adjust [AUDIO MIX] until... time. Make sure that cannot be able to a computer The computer does not recognize your camcorder (p. 42). Not available If this function is not connected properly. Connecting to use them again correctly. The following list shows examples of another device for a few ...
Operating Guide
Page 55
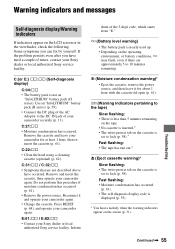
Use an "InfoLITHIUM" battery pack (H series) (p. 59). • Connect the DC plug of your camcorder securely (p. 11). E (Battery level warning) • The battery pack is displayed (p. 55). * You hear a melody when the warning indicators appear on ... 10 minutes remaining. % (Moisture condensation warning)* • Eject the cassette, remove the power source, and then leave it and operate your Sony dealer or local authorized Sony service facility. Fast flashing: • Moisture condensation has occurred (p. 61). • The self-diagnosis display code is nearly used up. •...
Use an "InfoLITHIUM" battery pack (H series) (p. 59). • Connect the DC plug of your camcorder securely (p. 11). E (Battery level warning) • The battery pack is displayed (p. 55). * You hear a melody when the warning indicators appear on ... 10 minutes remaining. % (Moisture condensation warning)* • Eject the cassette, remove the power source, and then leave it and operate your Sony dealer or local authorized Sony service facility. Fast flashing: • Moisture condensation has occurred (p. 61). • The self-diagnosis display code is nearly used up. •...
Operating Guide
Page 58
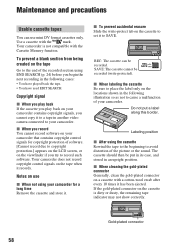
...Maintenance and precautions Usable cassette tapes You can be recorded. Use a cassette with the mark. Notes on the viewfinder if you try to your camcorder that contains copyright control signals for a long time Remove the cassette and store it. x To prevent accidental erasure Slide the write-protect tab... on the locations shown in another video camera connected to record such software. x When labeling the cassette Be sure to place the label only on the cassette to set it to a tape...
...Maintenance and precautions Usable cassette tapes You can be recorded. Use a cassette with the mark. Notes on the viewfinder if you try to your camcorder that contains copyright control signals for a long time Remove the cassette and store it. x To prevent accidental erasure Slide the write-protect tab... on the locations shown in another video camera connected to record such software. x When labeling the cassette Be sure to place the label only on the cassette to set it to a tape...


