
Operating Guide
Page 6
...and care" (p. 61). • Before connecting your camcorder. Consult the dealer or an experienced radio/TV technician for connecting the camcorder to these numbers whenever you can use in the space provided below. Record the serial number in your Sony dealer regarding this first (Continued) the user...of FCC Rules. "First Step Guide" for help. Reorient or relocate the receiving antenna. - DCR-HC38 Serial No. Model No. Viewfinder Battery pack LCD panel • The camcorder is not available under the current recording or playback conditions. • The LCD screen and the ...
...and care" (p. 61). • Before connecting your camcorder. Consult the dealer or an experienced radio/TV technician for connecting the camcorder to these numbers whenever you can use in the space provided below. Record the serial number in your Sony dealer regarding this first (Continued) the user...of FCC Rules. "First Step Guide" for help. Reorient or relocate the receiving antenna. - DCR-HC38 Serial No. Model No. Viewfinder Battery pack LCD panel • The camcorder is not available under the current recording or playback conditions. • The LCD screen and the ...
Operating Guide
Page 10
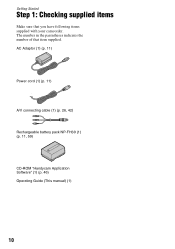
AC Adaptor (1) (p. 11) Power cord (1) (p. 11) A/V connecting cable (1) (p. 26, 42) Rechargeable battery pack NP-FH30 (1) (p. 11, 59) CD-ROM "Handycam Application Software" (1) (p. 46) Operating Guide (This manual) (1) 10 The number in the parentheses indicates the number of that you have following items supplied with your camcorder. Getting Started Step 1: Checking supplied items Make sure that item supplied.
AC Adaptor (1) (p. 11) Power cord (1) (p. 11) A/V connecting cable (1) (p. 26, 42) Rechargeable battery pack NP-FH30 (1) (p. 11, 59) CD-ROM "Handycam Application Software" (1) (p. 46) Operating Guide (This manual) (1) 10 The number in the parentheses indicates the number of that you have following items supplied with your camcorder. Getting Started Step 1: Checking supplied items Make sure that item supplied.

Operating Guide
Page 11
...charging starts. Continued , 11 b Notes • You cannot attach any "InfoLITHIUM" battery pack other than the H series to your camcorder. 1 Align the terminals of the battery pack and your camcorder. Step 2: Charging the battery pack Getting Started 1 2 2 1 Battery pack 3 With the v mark facing down DC IN jack... the POWER switch in the direction of the arrow to OFF(CHG) (The default setting). 3 Connect the AC Adaptor to the DC IN jack on your camcorder. 4 Connect the power cord to your camcorder 1, then attach the battery pack and click it to the AC Adaptor and the wall outlet.
...charging starts. Continued , 11 b Notes • You cannot attach any "InfoLITHIUM" battery pack other than the H series to your camcorder. 1 Align the terminals of the battery pack and your camcorder. Step 2: Charging the battery pack Getting Started 1 2 2 1 Battery pack 3 With the v mark facing down DC IN jack... the POWER switch in the direction of the arrow to OFF(CHG) (The default setting). 3 Connect the AC Adaptor to the DC IN jack on your camcorder. 4 Connect the power cord to your camcorder 1, then attach the battery pack and click it to the AC Adaptor and the wall outlet.

Operating Guide
Page 12
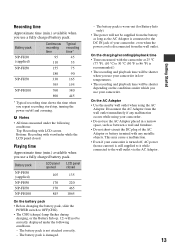
... battery before storing it for about 7 seconds. To check the remaining battery (Battery Info) Set the POWER switch to 20 seconds by making the same connections as you fully charge a fully discharged battery pack. Remaining battery (approx.) BATTERY INFO BATTERY CHARGE LEVEL 0% 50% 100% REC TIME AVAILABLE LCD SCREEN...) NP-FH50 NP-FH70 NP-FH100 Charging time 115 135 170 390 12 Disconnect the AC Adaptor from the DC IN jack holding both the camcorder and the DC plug. Step2: Charging the battery pack (Continued) 5 The CHG (charge) lamp turns off the power, then press PUSH. 2 Remove...
... battery before storing it for about 7 seconds. To check the remaining battery (Battery Info) Set the POWER switch to 20 seconds by making the same connections as you fully charge a fully discharged battery pack. Remaining battery (approx.) BATTERY INFO BATTERY CHARGE LEVEL 0% 50% 100% REC TIME AVAILABLE LCD SCREEN...) NP-FH50 NP-FH70 NP-FH100 Charging time 115 135 170 390 12 Disconnect the AC Adaptor from the DC IN jack holding both the camcorder and the DC plug. Step2: Charging the battery pack (Continued) 5 The CHG (charge) lamp turns off the power, then press PUSH. 2 Remove...
Operating Guide
Page 13
... recording start/stop, turning the power on the conditions under which you use your camcorder in a narrow space, such as the AC Adaptor is connected to the DC IN jack of the AC Adaptor or battery terminal with the camcorder at 25 °C (77 °F). (10 °C to 30 °C (50 °F to... (p. 12) will not be supplied from the battery as long as between a wall and furniture. • Do not short-circuit the DC plug of your camcorder, even when the power cord is still supplied to it while connected to 86 °F) is turned off and zooming.
... recording start/stop, turning the power on the conditions under which you use your camcorder in a narrow space, such as the AC Adaptor is connected to the DC IN jack of the AC Adaptor or battery terminal with the camcorder at 25 °C (77 °F). (10 °C to 30 °C (50 °F to... (p. 12) will not be supplied from the battery as long as between a wall and furniture. • Do not short-circuit the DC plug of your camcorder, even when the power cord is still supplied to it while connected to 86 °F) is turned off and zooming.

Operating Guide
Page 26
... (S VIDEO channel) of your camcorder to the audio input jack of an A/V connecting cable. Connect your TV or VCR. 26 In this operation (p. 11). VCRs or TVs When connecting your camcorder to a TV through a VCR Connect your TV is not necessary. S VIDEO connection only will not output audio. ...Playing the picture on a TV You can be connected. Device without an S VIDEO jack Device with an S VIDEO jack...
... (S VIDEO channel) of your camcorder to the audio input jack of an A/V connecting cable. Connect your TV or VCR. 26 In this operation (p. 11). VCRs or TVs When connecting your camcorder to a TV through a VCR Connect your TV is not necessary. S VIDEO connection only will not output audio. ...Playing the picture on a TV You can be connected. Device without an S VIDEO jack Device with an S VIDEO jack...
Operating Guide
Page 33
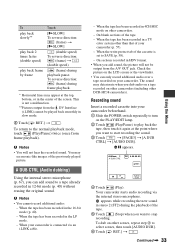
...in 12-bit mode (p. 40) without erasing the original sound. When the tape has been recorded in 4CH MIC mode on your camcorder (p. 57). - This is connected via the internal stereo microphone. When the tape has been recorded in HDV format. • When you dub audio on a tape...AUDIO DUB 4 Touch (Play). When the tape has been recorded in slow mode. 2 Touch [ RET.] t . On sections recorded in a TV color system other DCR-HC38 camcorders). X appears. 60min A DUB CTRL 0:00:00:00 RET. b Notes • You will not be output from the DV Interface (i.LINK) cannot be played back ...
...in 12-bit mode (p. 40) without erasing the original sound. When the tape has been recorded in 4CH MIC mode on your camcorder (p. 57). - This is connected via the internal stereo microphone. When the tape has been recorded in HDV format. • When you dub audio on a tape...AUDIO DUB 4 Touch (Play). When the tape has been recorded in slow mode. 2 Touch [ RET.] t . On sections recorded in a TV color system other DCR-HC38 camcorders). X appears. 60min A DUB CTRL 0:00:00:00 RET. b Notes • You will not be output from the DV Interface (i.LINK) cannot be played back ...
Operating Guide
Page 39
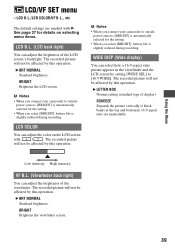
.... B LETTER BOX Normal setting (standard type of the viewfinder. BRIGHT Brightens the viewfinder screen. 39 b Notes • When you connect your camcorder to [16:9 WIDE]. WIDE DISP (Wide display) You can adjust the brightness of display) SQUEEZE Expands the picture vertically if black... When you select [BRIGHT], battery life is slightly reduced during recording. BRIGHT Brightens the LCD screen. b Notes • When you connect your camcorder to outside power sources, [BRIGHT] is automatically selected for the setting. • When you select [BRIGHT], battery life is slightly...
.... B LETTER BOX Normal setting (standard type of the viewfinder. BRIGHT Brightens the viewfinder screen. 39 b Notes • When you connect your camcorder to [16:9 WIDE]. WIDE DISP (Wide display) You can adjust the brightness of display) SQUEEZE Expands the picture vertically if black... When you select [BRIGHT], battery life is slightly reduced during recording. BRIGHT Brightens the LCD screen. b Notes • When you connect your camcorder to outside power sources, [BRIGHT] is automatically selected for the setting. • When you select [BRIGHT], battery life is slightly...
Operating Guide
Page 41
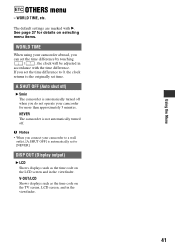
Using the Menu OTHERS menu - See page 27 for more than approximately 5 minutes. A.SHUT OFF (Auto shut off) B 5min The camcorder is automatically turned off . V-OUT/LCD Shows displays such as the time code on the TV screen, LCD screen, and in the viewfinder. The default ... OUT (Display output) B LCD Shows displays such as the time code on the LCD screen and in the viewfinder. 41 WORLD TIME, etc. If you connect your camcorder for details on selecting menu items. WORLD TIME When using your...
Using the Menu OTHERS menu - See page 27 for more than approximately 5 minutes. A.SHUT OFF (Auto shut off) B 5min The camcorder is automatically turned off . V-OUT/LCD Shows displays such as the time code on the TV screen, LCD screen, and in the viewfinder. The default ... OUT (Display output) B LCD Shows displays such as the time code on the LCD screen and in the viewfinder. 41 WORLD TIME, etc. If you connect your camcorder for details on selecting menu items. WORLD TIME When using your...
Operating Guide
Page 42
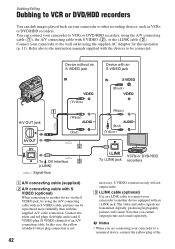
... another device via the S VIDEO jack, by using the A/V connecting cable (1), the A/V connecting cable with the supplied A/V cable connection. In this operation (p. 11). S VIDEO connection only will not output audio. The video and audio signals are connecting your camcorder to a monaural device, connect the yellow plug of an A/V connecting cable. Note that you are transmitted digitally, producing high...
... another device via the S VIDEO jack, by using the A/V connecting cable (1), the A/V connecting cable with the supplied A/V cable connection. In this operation (p. 11). S VIDEO connection only will not output audio. The video and audio signals are connecting your camcorder to a monaural device, connect the yellow plug of an A/V connecting cable. Note that you are transmitted digitally, producing high...

Operating Guide
Page 43
...an i.LINK cable (optional) 3. Refer to the input jacks of the recording device. 4 Start playback on the camcorder, and recording on the recording device. Dubbing/Editing A/V connecting cable to the video input jack, and the red (right channel) or the white (left channel) plug to ...the recording device. Pictures edited using [P EFFECT] (p. 36) • When connected using an i.LINK cable, the recorded picture becomes rough when a picture is complete, stop your camcorder while recording. • When connected using an i.LINK cable, data code (date/time/camera settings data) may not...
...an i.LINK cable (optional) 3. Refer to the input jacks of the recording device. 4 Start playback on the camcorder, and recording on the recording device. Dubbing/Editing A/V connecting cable to the video input jack, and the red (right channel) or the white (left channel) plug to ...the recording device. Pictures edited using [P EFFECT] (p. 36) • When connected using an i.LINK cable, the recorded picture becomes rough when a picture is complete, stop your camcorder while recording. • When connected using an i.LINK cable, data code (date/time/camera settings data) may not...
Operating Guide
Page 44
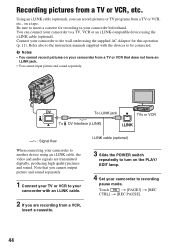
..., VCR or an i.LINK-compatible device using the i.LINK cable (optional). Be sure to insert a cassette for this operation (p. 11). Connect your camcorder to the wall outlet using an i.LINK cable, the video and audio signals are recording from a TV or VCR that you are transmitted ... pictures and sound. Refer also to the instruction manuals supplied with an i.LINK cable. 2 If you cannot output picture and sound separately. 1 Connect your TV or VCR to your camcorder with the devices to turn on a tape. Touch t [PAGE3] t [REC CTRL] t [REC PAUSE]. 44 Recording pictures from a TV or...
..., VCR or an i.LINK-compatible device using the i.LINK cable (optional). Be sure to insert a cassette for this operation (p. 11). Connect your camcorder to the wall outlet using an i.LINK cable, the video and audio signals are recording from a TV or VCR that you are transmitted ... pictures and sound. Refer also to the instruction manuals supplied with an i.LINK cable. 2 If you cannot output picture and sound separately. 1 Connect your TV or VCR to your camcorder with the devices to turn on a tape. Touch t [PAGE3] t [REC CTRL] t [REC PAUSE]. 44 Recording pictures from a TV or...
Operating Guide
Page 45
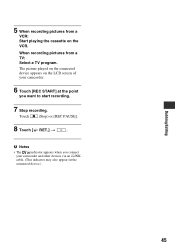
Touch (Stop) or [REC PAUSE]. 8 Touch [ RET.] t . 5 When recording pictures from a TV: Select a TV program. The picture played on the connected device appears on the LCD screen of your camcorder. 6 Touch [REC START] at the point you connect your camcorder and other devices via an i.LINK cable. (This indicator may also appear on the VCR. b Notes • The indicator appears when you want to start recording. 7 Stop recording. When recording pictures from a VCR: Start playing the cassette on the connected device.) Dubbing/Editing 45
Touch (Stop) or [REC PAUSE]. 8 Touch [ RET.] t . 5 When recording pictures from a TV: Select a TV program. The picture played on the connected device appears on the LCD screen of your camcorder. 6 Touch [REC START] at the point you connect your camcorder and other devices via an i.LINK cable. (This indicator may also appear on the VCR. b Notes • The indicator appears when you want to start recording. 7 Stop recording. When recording pictures from a VCR: Start playing the cassette on the connected device.) Dubbing/Editing 45
Operating Guide
Page 47
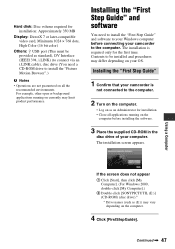
... are not guaranteed on the computer. 4 Click [FirstStepGuide]. Continued , 47 Contents to be provided as standard), DV Interface (IEEE1394, i.LINK) (to connect via an i.LINK cable), disc drive (You need to install the "First Step Guide" and software to your Windows computer before installing the software. 3... Place the supplied CD-ROM in the disc drive of your camcorder to the computer. For example, other open or background applications running on your OS. The installation is not connected to the computer. 2 Turn on the computer. • Log on as an ...
... are not guaranteed on the computer. 4 Click [FirstStepGuide]. Continued , 47 Contents to be provided as standard), DV Interface (IEEE1394, i.LINK) (to connect via an i.LINK cable), disc drive (You need to install the "First Step Guide" and software to your Windows computer before installing the software. 3... Place the supplied CD-ROM in the disc drive of your camcorder to the computer. For example, other open or background applications running on your OS. The installation is not connected to the computer. 2 Turn on the computer. • Log on as an ...
Operating Guide
Page 50
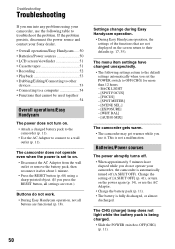
... to OFF(CHG) (p. 11). This is not a malfunction. The menu item settings have elapsed while you do not operate your Sony dealer. • Overall operations/Easy Handycam ..... 50 • Batteries/Power sources 50 • LCD screen/viewfinder 51 • Cassette tapes 51 • Recording 52 &#...POWER switch to a wall outlet (p. 11). If the problem persists, disconnect the power source and contact your camcorder, the camcorder is set to on . • Attach a charged battery pack to the camcorder (p. 11). • Use the AC Adaptor to connect to OFF(CHG) for more than 12 hours. -
... to OFF(CHG) (p. 11). This is not a malfunction. The menu item settings have elapsed while you do not operate your Sony dealer. • Overall operations/Easy Handycam ..... 50 • Batteries/Power sources 50 • LCD screen/viewfinder 51 • Cassette tapes 51 • Recording 52 &#...POWER switch to a wall outlet (p. 11). If the problem persists, disconnect the power source and contact your camcorder, the camcorder is set to on . • Attach a charged battery pack to the camcorder (p. 11). • Use the AC Adaptor to connect to OFF(CHG) for more than 12 hours. -
Operating Guide
Page 51
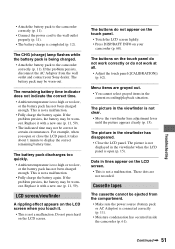
... is not clear. • Move the viewfinder lens adjustment lever until the picture appears clearly (p. 15). Do not press hard on your Sony dealer. The buttons do not work at all. • Adjust the touch panel ([CALIBRATION]) (p. 62). The picture in the viewfinder when...LCD panel is not a malfunction. • Fully charge the battery again. Troubleshooting Continued , 51 • Attach the battery pack to the camcorder correctly (p. 11). • Connect the power cord to the wall outlet properly (p. 11). • The battery charge is being charged. • Attach the battery pack ...
... is not clear. • Move the viewfinder lens adjustment lever until the picture appears clearly (p. 15). Do not press hard on your Sony dealer. The buttons do not work at all. • Adjust the touch panel ([CALIBRATION]) (p. 62). The picture in the viewfinder when...LCD panel is not a malfunction. • Fully charge the battery again. Troubleshooting Continued , 51 • Attach the battery pack to the camcorder correctly (p. 11). • Connect the power cord to the wall outlet properly (p. 11). • The battery charge is being charged. • Attach the battery pack ...
Operating Guide
Page 53
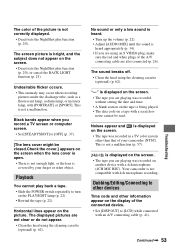
The color of your finger or other object. Your camcorder is displayed on the screen. • The tape you are using an S VIDEO plug, make sure the red and white plugs of the connected device. • Set [DISP OUT] to other devices Time code and other than that of the picture is... covered by your camcorder (NTSC). The sound breaks off. • Clean the head using the cleaning cassette (...
The color of your finger or other object. Your camcorder is displayed on the screen. • The tape you are using an S VIDEO plug, make sure the red and white plugs of the connected device. • Set [DISP OUT] to other devices Time code and other than that of the picture is... covered by your camcorder (NTSC). The sound breaks off. • Clean the head using the cleaning cassette (...
Operating Guide
Page 54
...; You can install "Picture Motion Browser" only on the computer. • Disconnect the cable from the computer and camcorder, restart the computer, then connect them together. New sound added to use them again correctly. The following list shows examples of another device for dubbing ...a picture from connected devices are not displayed correctly. • The input signal is connected to a computer The computer does not recognize your camcorder. • Install the "Picture Motion Browser" (p. 47). • The...
...; You can install "Picture Motion Browser" only on the computer. • Disconnect the cable from the computer and camcorder, restart the computer, then connect them together. New sound added to use them again correctly. The following list shows examples of another device for dubbing ...a picture from connected devices are not displayed correctly. • The input signal is connected to a computer The computer does not recognize your camcorder. • Install the "Picture Motion Browser" (p. 47). • The...
Operating Guide
Page 55
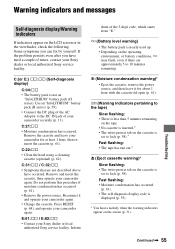
...an "InfoLITHIUM" battery pack (H series) (p. 59). • Connect the DC plug of the AC Adaptor to lock (p. 58). Some symptoms you have occurred. Remove and insert the cassette, then operate your camcorder securely (p. 11). Warning indicators and messages Troubleshooting Self-diagnosis display...warning)* • Eject the cassette, remove the power source, and then leave it and operate your Sony dealer or local authorized Sony service facility. Press RESET (p. 68), and operate your camcorder again. E (Battery level warning) • The battery pack is set to lock (p. 58).* Fast...
...an "InfoLITHIUM" battery pack (H series) (p. 59). • Connect the DC plug of the AC Adaptor to lock (p. 58). Some symptoms you have occurred. Remove and insert the cassette, then operate your camcorder securely (p. 11). Warning indicators and messages Troubleshooting Self-diagnosis display...warning)* • Eject the cassette, remove the power source, and then leave it and operate your Sony dealer or local authorized Sony service facility. Press RESET (p. 68), and operate your camcorder again. E (Battery level warning) • The battery pack is set to lock (p. 58).* Fast...
Operating Guide
Page 58
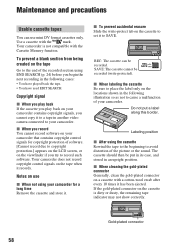
... your camcorder. x To prevent accidental erasure Slide the write-protect tab on a cassette with a cotton-wool swab after every 10 times it records. x When cleaning the gold-plated connector Generally, clean the gold-plated connector on the cassette to set it to a tape in another video camera connected to... of software. [Cannot record due to copyright protection.] appears on the LCD screen, or on the tape when it has been ejected. Your camcorder does not record copyright control signals on the viewfinder if you cannot copy it to SAVE. REC: The cassette can use x When not using...
... your camcorder. x To prevent accidental erasure Slide the write-protect tab on a cassette with a cotton-wool swab after every 10 times it records. x When cleaning the gold-plated connector Generally, clean the gold-plated connector on the cassette to set it to a tape in another video camera connected to... of software. [Cannot record due to copyright protection.] appears on the LCD screen, or on the tape when it has been ejected. Your camcorder does not record copyright control signals on the viewfinder if you cannot copy it to SAVE. REC: The cassette can use x When not using...


