Operating Guide
Page 6
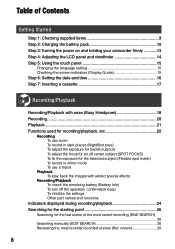
... Contents Getting Started Step 1: Checking supplied items 9 Step 2: Charging the battery pack 10 Step 3: Turning the power on and holding your camcorder firmly ...........13 Step 4: Adjusting the LCD panel and viewfinder 14 Step 5: Using the touch panel 15 Changing the language... (Display Guide 15 Step 6: Setting the date and time 16 Step 7: Inserting a cassette 17 Recording/Playback Recording/Playback with ease (Easy Handycam 18 Recording 20 Playback 21 Functions used for recording/playback, etc 22 Recording To use zoom To record in dark places (NightShot plus) To...
... Contents Getting Started Step 1: Checking supplied items 9 Step 2: Charging the battery pack 10 Step 3: Turning the power on and holding your camcorder firmly ...........13 Step 4: Adjusting the LCD panel and viewfinder 14 Step 5: Using the touch panel 15 Changing the language... (Display Guide 15 Step 6: Setting the date and time 16 Step 7: Inserting a cassette 17 Recording/Playback Recording/Playback with ease (Easy Handycam 18 Recording 20 Playback 21 Functions used for recording/playback, etc 22 Recording To use zoom To record in dark places (NightShot plus) To...
Operating Guide
Page 18
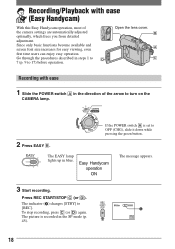
The indicator () changes [STBY] to 17) before operation. B A C Recording with ease (Easy Handycam) With this Easy Handycam operation, most of the arrow to OFF (CHG), slide it down while pressing the green button. 2 Press EASY . Open the lens cover. Press ...REC 0:00:00 A FN 18 If the POWER switch is recorded in blue. The picture is set to turn on the CAMERA lamp. Easy Handycam operation ON The message appears. 3 Start recording. Recording/Playback with ease 1 Slide the POWER switch in the direction of the camera settings are ...
The indicator () changes [STBY] to 17) before operation. B A C Recording with ease (Easy Handycam) With this Easy Handycam operation, most of the arrow to OFF (CHG), slide it down while pressing the green button. 2 Press EASY . Open the lens cover. Press ...REC 0:00:00 A FN 18 If the POWER switch is recorded in blue. The picture is set to turn on the CAMERA lamp. Easy Handycam operation ON The message appears. 3 Start recording. Recording/Playback with ease 1 Slide the POWER switch in the direction of the camera settings are ...
Operating Guide
Page 19
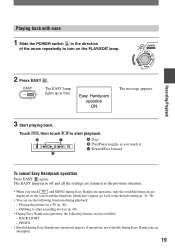
.... Dubbing to other recording devices (p. 49) • During Easy Handycam operation, the following functions during Easy Handycam are attempted. 19 Playing the picture on the PLAY/EDIT lamp. PHOTO • [Invalid during Easy Handycam operation] appears if operations not available during playback: - Playing back .... The EASY lamp turns off and all the settings are returned to the previous situation. • When you touch and MENU during Easy Handycam operation, only the available functions are not available: - Touch , then touch A C B to the default setting (p. 32, 38). ...
.... Dubbing to other recording devices (p. 49) • During Easy Handycam operation, the following functions during Easy Handycam are attempted. 19 Playing the picture on the PLAY/EDIT lamp. PHOTO • [Invalid during Easy Handycam operation] appears if operations not available during playback: - Playing back .... The EASY lamp turns off and all the settings are returned to the previous situation. • When you touch and MENU during Easy Handycam operation, only the available functions are not available: - Touch , then touch A C B to the default setting (p. 32, 38). ...
Operating Guide
Page 28
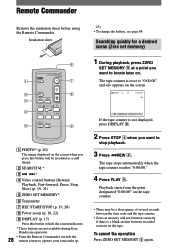
... screen when you press this button to hide the screen indicators. * These buttons are not available during Easy Handycam operation. • Point the Remote Commander towards the 28 remote sensor to operate your camcorder (p. 1 During playback, press ZERO SET MEMORY at a point you want to "0:00:00" and appears on . The...
... screen when you press this button to hide the screen indicators. * These buttons are not available during Easy Handycam operation. • Point the Remote Commander towards the 28 remote sensor to operate your camcorder (p. 1 During playback, press ZERO SET MEMORY at a point you want to "0:00:00" and appears on . The...
Operating Guide
Page 32
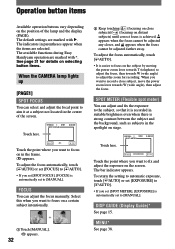
The indicators in parentheses appear when the items are marked with . The available functions during Easy Handycam operation are selected. When you want to the subject, so that it at a subject not located in the spotlight on the position of the screen. ...
The indicators in parentheses appear when the items are marked with . The available functions during Easy Handycam operation are selected. When you want to the subject, so that it at a subject not located in the spotlight on the position of the screen. ...
Operating Guide
Page 34
... about 10 seconds for better color balance adjustment. • Redo the [ONE PUSH] procedure if you change the [PROGRAM AE] settings, or bring your camcorder outdoors from inside the house, or vice versa. • Set [WHT BAL] to [ AUTO] or [ONE PUSH] under daylight fluorescent light....of paper, to fill the screen under the same lighting conditions as a piece of the LCD screen. To cancel the count down during Easy Handycam operation. Adjust the brightness with the Remote Commander (p. 28). DISP GUIDE (Display Guide)* See page 15. ONE PUSH ( ) The white balance ...
... about 10 seconds for better color balance adjustment. • Redo the [ONE PUSH] procedure if you change the [PROGRAM AE] settings, or bring your camcorder outdoors from inside the house, or vice versa. • Set [WHT BAL] to [ AUTO] or [ONE PUSH] under daylight fluorescent light....of paper, to fill the screen under the same lighting conditions as a piece of the LCD screen. To cancel the count down during Easy Handycam operation. Adjust the brightness with the Remote Commander (p. 28). DISP GUIDE (Display Guide)* See page 15. ONE PUSH ( ) The white balance ...
Operating Guide
Page 39
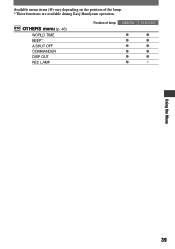
Available menu items () vary depending on the position of lamp: CAMERA PLAY/EDIT × Using the Menu 39 OTHERS menu (p. 46) WORLD TIME BEEP* A.SHUT OFF COMMANDER DISP OUT REC LAMP Position of the lamp. * These functions are available during Easy Handycam operation.
Available menu items () vary depending on the position of lamp: CAMERA PLAY/EDIT × Using the Menu 39 OTHERS menu (p. 46) WORLD TIME BEEP* A.SHUT OFF COMMANDER DISP OUT REC LAMP Position of the lamp. * These functions are available during Easy Handycam operation.
Operating Guide
Page 63
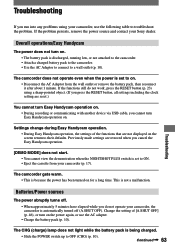
..., press the RESET button (p. 23) using your Sony dealer. If the problem persists, remove the power source and contact your camcorder, use the AC adapter. • Charge the battery pack (p. 10). Change the setting of the functions that are reset.) You cannot turn Easy Handycam operation on the power again, or use the...
..., press the RESET button (p. 23) using your Sony dealer. If the problem persists, remove the power source and contact your camcorder, use the AC adapter. • Charge the battery pack (p. 10). Change the setting of the functions that are reset.) You cannot turn Easy Handycam operation on the power again, or use the...
Operating Guide
Page 67
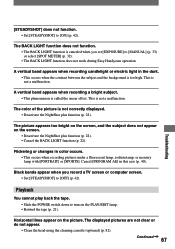
... screen or computer screen. • Set [STEADYSHOT] to [MANUAL] (p. 33) or select [SPOT METER] (p. 32). • The BACK LIGHT function does not work during Easy Handycam operation. Playback You cannot play back the tape. • Slide the POWER switch down to [ON] (p. 42). The BACK LIGHT function does not function. •...
... screen or computer screen. • Set [STEADYSHOT] to [MANUAL] (p. 33) or select [SPOT METER] (p. 32). • The BACK LIGHT function does not work during Easy Handycam operation. Playback You cannot play back the tape. • Slide the POWER switch down to [ON] (p. 42). The BACK LIGHT function does not function. •...
Operating Guide
Page 71
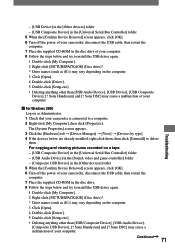
...] [View] [Devices by type]. 4 If the devices below are already installed, right-click them, then click [Uninstall] to delete them. Sony Handycam] and [? Troubleshooting - [USB Device] in the [Other devices] folder - [USB Composite Device] in the [Universal Serial Bus Controller] folder 5 When the [Con...firm Device Removal] screen appears, click [OK]. 6 Turn off the power of your camcorder, disconnect the USB cable, then restart the computer. 7 Place the supplied CD-ROM in the disc drive of your computer. 8 Follow the ...
...] [View] [Devices by type]. 4 If the devices below are already installed, right-click them, then click [Uninstall] to delete them. Sony Handycam] and [? Troubleshooting - [USB Device] in the [Other devices] folder - [USB Composite Device] in the [Universal Serial Bus Controller] folder 5 When the [Con...firm Device Removal] screen appears, click [OK]. 6 Turn off the power of your camcorder, disconnect the USB cable, then restart the computer. 7 Place the supplied CD-ROM in the disc drive of your computer. 8 Follow the ...
Operating Guide
Page 72
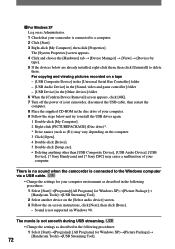
Sony Handycam] and [? Sony DSC] may vary depending on the computer. 3 Click [Open]. 4 Double-click [Driver].... of your computer. 9 Follow the steps below are already installed, right-click them . There is no sound when the camcorder is connected to a computer. 2 Click [Start]. 3 Right-click [My Computer], then click [Properties]. For copying and... folder 6 When the [Confirm Device Removal] screen appears, click [OK]. 7 Turn off the power of your camcorder, disconnect the USB cable, then restart the computer. 8 Place the supplied CD-ROM in the following procedures: 1 Select [...
Sony Handycam] and [? Sony DSC] may vary depending on the computer. 3 Click [Open]. 4 Double-click [Driver].... of your computer. 9 Follow the steps below are already installed, right-click them . There is no sound when the camcorder is connected to a computer. 2 Click [Start]. 3 Right-click [My Computer], then click [Properties]. For copying and... folder 6 When the [Confirm Device Removal] screen appears, click [OK]. 7 Turn off the power of your camcorder, disconnect the USB cable, then restart the computer. 8 Place the supplied CD-ROM in the following procedures: 1 Select [...
Operating Guide
Page 75
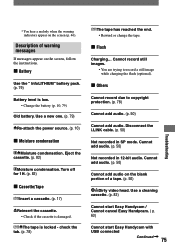
... audio on the blank portion of warning messages If messages appear on the screen (p. 46). Use a cleaning cassette. (p. 82) Cannot start Easy Handycam / Cannot cancel Easy Handycam. ( p. 63) Cannot start Easy Handycam with USB connected Continued 75 Troubleshooting Turn off for 1H. (p. 82) Cassette/Tape Insert a cassette. (p. 17) Reinsert...
... audio on the blank portion of warning messages If messages appear on the screen (p. 46). Use a cleaning cassette. (p. 82) Cannot start Easy Handycam / Cannot cancel Easy Handycam. ( p. 63) Cannot start Easy Handycam with USB connected Continued 75 Troubleshooting Turn off for 1H. (p. 82) Cassette/Tape Insert a cassette. (p. 17) Reinsert...
Operating Guide
Page 76
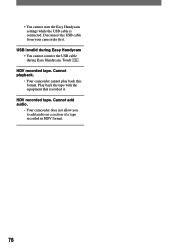
Cannot add audio. • Your camcorder does not allow you to add audio on a section of a tape recorded in HDV format. 76 Play back the tape with the equipment that recorded it. HDV recorded tape. Disconnect the USB cable from your camcorder first. HDV recorded tape. Touch . USB invalid during Easy Handycam • You cannot connect the USB cable during Easy Handycam. Cannot playback. • Your camcorder cannot play back this format. • You cannot start the Easy Handycam settings while the USB cable is connected.
Cannot add audio. • Your camcorder does not allow you to add audio on a section of a tape recorded in HDV format. 76 Play back the tape with the equipment that recorded it. HDV recorded tape. Disconnect the USB cable from your camcorder first. HDV recorded tape. Touch . USB invalid during Easy Handycam • You cannot connect the USB cable during Easy Handycam. Cannot playback. • Your camcorder cannot play back this format. • You cannot start the Easy Handycam settings while the USB cable is connected.
Operating Guide
Page 87
... 15 DISP OUT (Display output 47 Double speed Playback ........ 35 Dubbing 49 DV Interface 48, 52, 60 D ZOOM (Digital zoom) ..... 42 E EASY button 18 Easy Handycam 18 EDITSEARCH 26, 42 END SCH (END SEARCH 26 EXPOSURE 33, 69 F FADER 33 First Step Guide 53, 59 Fixing the exposure 22 FLASH LVL... 32, 66 Frame-by-frame playback.... 35 Full charge 10 G Getting started 9, 55, 59 H Hand pad 84 Help 54 Hifi SOUND 43 Holding the camcorder......... 13 I Icon ......
... 15 DISP OUT (Display output 47 Double speed Playback ........ 35 Dubbing 49 DV Interface 48, 52, 60 D ZOOM (Digital zoom) ..... 42 E EASY button 18 Easy Handycam 18 EDITSEARCH 26, 42 END SCH (END SEARCH 26 EXPOSURE 33, 69 F FADER 33 First Step Guide 53, 59 Fixing the exposure 22 FLASH LVL... 32, 66 Frame-by-frame playback.... 35 Full charge 10 G Getting started 9, 55, 59 H Hand pad 84 Help 54 Hifi SOUND 43 Holding the camcorder......... 13 I Icon ......


