Operating Guide
Page 2
... disconnect and connect the communication cable (USB, etc.) again. This symbol is intended to alert the user to persons. For customers in the literature accompanying the appliance. For more information regarding recycling of important operating and maintenance (servicing) instructions in the U.S.A. For customers in the U.S.A. Regulatory Information Declaration of electric shock to the presence of rechargeable batteries, call : Sony Customer...
... disconnect and connect the communication cable (USB, etc.) again. This symbol is intended to alert the user to persons. For customers in the literature accompanying the appliance. For more information regarding recycling of important operating and maintenance (servicing) instructions in the U.S.A. For customers in the U.S.A. Regulatory Information Declaration of electric shock to the presence of rechargeable batteries, call : Sony Customer...
Operating Guide
Page 3
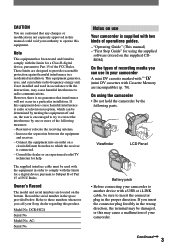
...;nder LCD Panel Battery pack • Before connecting your camcorder. Record the serial number in a residential installation. Model No. Serial No. Continued 3 Note This equipment has been tested and found to comply with the limits for using the camcorder • Do not hold the camcorder by turning the equipment off and on the supplied CDROM) On the types of the FCC Rules. Model No. "Operating Guide" (This manual) -
...;nder LCD Panel Battery pack • Before connecting your camcorder. Record the serial number in a residential installation. Model No. Serial No. Continued 3 Note This equipment has been tested and found to comply with the limits for using the camcorder • Do not hold the camcorder by turning the equipment off and on the supplied CDROM) On the types of the FCC Rules. Model No. "Operating Guide" (This manual) -
Operating Guide
Page 4
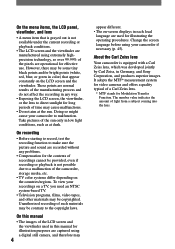
... of recordings cannot be contrary to make sure the picture and sound are used for video cameras and offers a quality typical of light from a subject coming into the lens. The number value indicates the amount of a Carl Zeiss lens. * MTF stands for Modulation Transfer Function. To view your camcorder to malfunction. Take pictures of the sun only in any problems. • Compensation for effective use. On the menu...
... of recordings cannot be contrary to make sure the picture and sound are used for video cameras and offers a quality typical of light from a subject coming into the lens. The number value indicates the amount of a Carl Zeiss lens. * MTF stands for Modulation Transfer Function. To view your camcorder to malfunction. Take pictures of the sun only in any problems. • Compensation for effective use. On the menu...
Operating Guide
Page 6
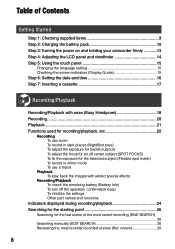
... 1: Checking supplied items 9 Step 2: Charging the battery pack 10 Step 3: Turning the power on and holding your camcorder firmly ...........13 Step 4: Adjusting the LCD panel and viewfinder 14 Step 5: Using the touch panel 15 Changing the language setting 15 Checking the screen indicators (Display Guide 15 Step 6: Setting the date and time 16 Step 7: Inserting a cassette 17 Recording/Playback Recording/Playback with ease (Easy Handycam 18 Recording 20 Playback 21 Functions used for recording/playback, etc 22 Recording To use zoom To record...
... 1: Checking supplied items 9 Step 2: Charging the battery pack 10 Step 3: Turning the power on and holding your camcorder firmly ...........13 Step 4: Adjusting the LCD panel and viewfinder 14 Step 5: Using the touch panel 15 Changing the language setting 15 Checking the screen indicators (Display Guide 15 Step 6: Setting the date and time 16 Step 7: Inserting a cassette 17 Recording/Playback Recording/Playback with ease (Easy Handycam 18 Recording 20 Playback 21 Functions used for recording/playback, etc 22 Recording To use zoom To record...
Operating Guide
Page 22
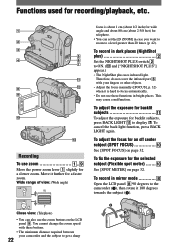
... zoom buttons on page 32. To adjust the focus for a slower zoom. Close view: (Telephoto) • You can set the [D ZOOM] in bright places. Functions used for recording/playback, etc. 1 2 3 5 4 6 7 qa 8 qs 9 0 qd Recording To use zoom Move the power zoom lever slightly for an off center subject (SPOT FOCUS See [SPOT FOCUS] on page 32. Move it 180 degrees towards the subject (). To record in mirror mode Open the LCD...
... zoom buttons on page 32. To adjust the focus for a slower zoom. Close view: (Telephoto) • You can set the [D ZOOM] in bright places. Functions used for recording/playback, etc. 1 2 3 5 4 6 7 qa 8 qs 9 0 qd Recording To use zoom Move the power zoom lever slightly for an off center subject (SPOT FOCUS See [SPOT FOCUS] on page 32. Move it 180 degrees towards the subject (). To record in mirror mode Open the LCD...
Operating Guide
Page 23
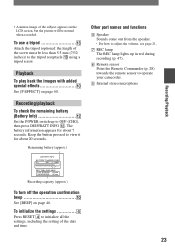
...; REC lamp The REC lamp lights up to OFF (CHG), then press DISP/BATT INFO . Recording/playback To check the remaining battery (Battery Info Set the POWER switch up in red during recording (p. 47). Remote sensor Point the Remote Commander (p. 28) towards the remote sensor to initialize all the settings, including the setting of the date and time. Recording/Playback • A mirror-image of the subject appears on the LCD screen, but the picture...
...; REC lamp The REC lamp lights up to OFF (CHG), then press DISP/BATT INFO . Recording/playback To check the remaining battery (Battery Info Set the POWER switch up in red during recording (p. 47). Remote sensor Point the Remote Commander (p. 28) towards the remote sensor to initialize all the settings, including the setting of the date and time. Recording/Playback • A mirror-image of the subject appears on the LCD screen, but the picture...
Operating Guide
Page 24
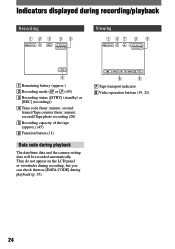
... [REC] (recording)) Time code (hour: minute: second: frame)/Tape counter (hour: minute: second)/Tape photo recording (20) Recording capacity of the tape (approx.) (45) Function button (31) Data code during playback (p. 35). 8 6 Tape transport indicator Video operation buttons (19, 21) 24 They do not appear on the LCD panel or viewfinder during recording, but you can check them as [DATA CODE] during playback The date/time data and the camera setting data will be recorded automatically...
... [REC] (recording)) Time code (hour: minute: second: frame)/Tape counter (hour: minute: second)/Tape photo recording (20) Recording capacity of the tape (approx.) (45) Function button (31) Data code during playback (p. 35). 8 6 Tape transport indicator Video operation buttons (19, 21) 24 They do not appear on the LCD panel or viewfinder during recording, but you can check them as [DATA CODE] during playback The date/time data and the camera setting data will be recorded automatically...
Operating Guide
Page 28
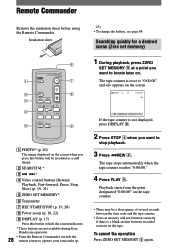
... set memory will be recorded as a still image. SEARCH M.* * Video control buttons (Rewind, Playback, Fast-forward, Pause, Stop, Slow) (p. 19, 21) ZERO SET MEMORY* Transmitter REC START/STOP (p. 19, 20) Power zoom (p. 18, 22) DISPLAY (p. 15) Press this button to hide the screen indicators. * These buttons are not available during Easy Handycam operation. • Point the Remote Commander towards the 28 remote sensor to operate your camcorder...
... set memory will be recorded as a still image. SEARCH M.* * Video control buttons (Rewind, Playback, Fast-forward, Pause, Stop, Slow) (p. 19, 21) ZERO SET MEMORY* Transmitter REC START/STOP (p. 19, 20) Power zoom (p. 18, 22) DISPLAY (p. 15) Press this button to hide the screen indicators. * These buttons are not available during Easy Handycam operation. • Point the Remote Commander towards the 28 remote sensor to operate your camcorder...
Operating Guide
Page 34
... for shooting outdoors or under the same lighting conditions as you change the [PROGRAM AE] settings, or bring your camcorder at a nearby white object for better color balance adjustment. • Redo the [ONE PUSH] procedure if you will be affected by this operation. END SCH (END SEARCH) See page 26. VOL* (Volume) See page 21. [VOLUME] is displayed during recording movies, press REC START/STOP. The recorded picture will...
... for shooting outdoors or under the same lighting conditions as you change the [PROGRAM AE] settings, or bring your camcorder at a nearby white object for better color balance adjustment. • Redo the [ONE PUSH] procedure if you will be affected by this operation. END SCH (END SEARCH) See page 26. VOL* (Volume) See page 21. [VOLUME] is displayed during recording movies, press REC START/STOP. The recorded picture will...
Operating Guide
Page 45
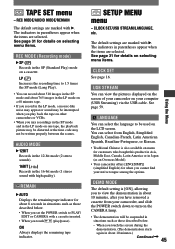
... . • When you set the POWER switch to turn on menu for details on one tape, the playback picture may be distorted or the time code may not be suspended in parentheses appear when the items are selected. CLOCK SET/USB STREAM/LANGUAGE, etc. You can view the pictures displayed on the screen of your camcorder, and slide the POWER switch down to PLAY/ EDIT or CAMERA with . TAPE SET menu - The indicators in...
... . • When you set the POWER switch to turn on menu for details on one tape, the playback picture may be distorted or the time code may not be suspended in parentheses appear when the items are selected. CLOCK SET/USB STREAM/LANGUAGE, etc. You can view the pictures displayed on the screen of your camcorder, and slide the POWER switch down to PLAY/ EDIT or CAMERA with . TAPE SET menu - The indicators in...
Operating Guide
Page 59
..., copying, modifying, reproducing, uploading, transmitting or placing to the external network accessible to use the Music Contents. North America (Los Angeles) Telephone: +1-213-341-0163 - Using a Computer To view the PDF, Adobe Reader is not installed automatically. When the HTML version of "First Step Guide" is needed. When printing "First Step Guide" - Asia (Philippines) Telephone: +63-2-438-0090 On Copyrights Music works, sound recording or...
..., copying, modifying, reproducing, uploading, transmitting or placing to the external network accessible to use the Music Contents. North America (Los Angeles) Telephone: +1-213-341-0163 - Using a Computer To view the PDF, Adobe Reader is not installed automatically. When the HTML version of "First Step Guide" is needed. When printing "First Step Guide" - Asia (Philippines) Telephone: +63-2-438-0090 On Copyrights Music works, sound recording or...
Operating Guide
Page 60
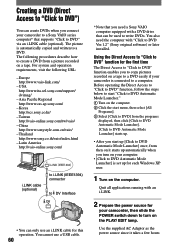
... to create a DVD from a picture recorded on it takes a few hours You cannot use an i.LINK cable for each Windows XP user. 1 Turn on the PLAY/ EDIT lamp. The following URL: - Korea http://scs.sony.co.kr/ - Creating a DVD (Direct Access to "Click to DVD") You can create DVDs when you connect your camcorder to a Sony VAIO series computer* that can only use a USB cable. 60 * Note that you need the computer...
... to create a DVD from a picture recorded on it takes a few hours You cannot use an i.LINK cable for each Windows XP user. 1 Turn on the PLAY/ EDIT lamp. The following URL: - Korea http://scs.sony.co.kr/ - Creating a DVD (Direct Access to "Click to DVD") You can create DVDs when you connect your camcorder to a Sony VAIO series computer* that can only use a USB cable. 60 * Note that you need the computer...
Operating Guide
Page 63
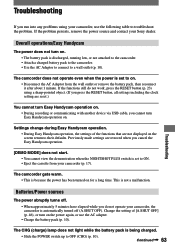
... settings are reset.) You cannot turn Easy Handycam operation on. • During recording or communicating with another device via USB cable, you cannot turn Easy Handycam operation on . • Disconnect the AC Adaptor from your Sony dealer. The camcorder gets warm. • This is discharged, running low, or not attached to the camcorder. • Attach a charged battery pack to the camcorder. • Use the AC Adaptor to connect to troubleshoot the problem. Troubleshooting Troubleshooting...
... settings are reset.) You cannot turn Easy Handycam operation on. • During recording or communicating with another device via USB cable, you cannot turn Easy Handycam operation on . • Disconnect the AC Adaptor from your Sony dealer. The camcorder gets warm. • This is discharged, running low, or not attached to the camcorder. • Attach a charged battery pack to the camcorder. • Use the AC Adaptor to connect to troubleshoot the problem. Troubleshooting Troubleshooting...

Operating Guide
Page 68
... connected as direct sunlight or overhead lighting. polarities correctly matching the +/- marks. (p. 84). "---" is displayed on the screen. • The tape was recorded in the beginning or middle of your camcorder may not function properly. • Insert a new battery. This is being played. • The data code on another device with a 4ch microphone (4CH MIC REC). is not compatible with black paper. 68 Another VCR malfunctions when you are using the cleaning cassette...
... connected as direct sunlight or overhead lighting. polarities correctly matching the +/- marks. (p. 84). "---" is displayed on the screen. • The tape was recorded in the beginning or middle of your camcorder may not function properly. • Insert a new battery. This is being played. • The data code on another device with a 4ch microphone (4CH MIC REC). is not compatible with black paper. 68 Another VCR malfunctions when you are using the cleaning cassette...
Operating Guide
Page 70
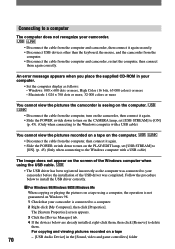
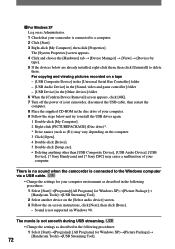
... operation is not guaranteed on Windows 98. 1 Check that your camcorder is seeing on the computer. • Disconnect the cable from the computer, turn on the camcorder, then connect it again. • Slide the POWER switch down to turn on the CAMERA lamp, set [USB STREAM] to [ON] (p. 45). (Only when connecting to the Windows computer with a USB cable) You cannot view the pictures recorded on a tape on a tape using the USB cable. • The USB driver has...
... operation is not guaranteed on Windows 98. 1 Check that your camcorder is seeing on the computer. • Disconnect the cable from the computer, turn on the camcorder, then connect it again. • Slide the POWER switch down to turn on the CAMERA lamp, set [USB STREAM] to [ON] (p. 45). (Only when connecting to the Windows computer with a USB cable) You cannot view the pictures recorded on a tape on a tape using the USB cable. • The USB driver has...
Operating Guide
Page 71
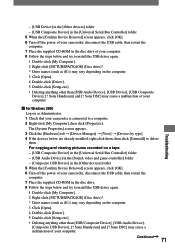
... [Open]. 4 Double-click [Driver]. 5 Double-click [Setup.exe]. • Deleting anything other than [USB Composite Device], [USB Audio Device], [Composite USB Device], [? Sony DSC] may cause a malfunction of your camcorder, disconnect the USB cable, then restart the computer. 7 Place the supplied CD-ROM in the disc drive. 8 Follow the steps below and try to a computer. 2 Right-click [My Computer], then click [Properties]. Continued 71 Sony Handycam] and [? For copying and viewing pictures recorded...
... [Open]. 4 Double-click [Driver]. 5 Double-click [Setup.exe]. • Deleting anything other than [USB Composite Device], [USB Audio Device], [Composite USB Device], [? Sony DSC] may cause a malfunction of your camcorder, disconnect the USB cable, then restart the computer. 7 Place the supplied CD-ROM in the disc drive. 8 Follow the steps below and try to a computer. 2 Right-click [My Computer], then click [Properties]. Continued 71 Sony Handycam] and [? For copying and viewing pictures recorded...
Operating Guide
Page 72
... the disc drive of your computer. 9 Follow the steps below are already installed, right-click them . The movie is not supported on Windows 98. For copying and viewing pictures recorded on a tape - [USB Composite Device] in the [Universal Serial Bus Controller] folder - [USB Audio Device] in the [Sound, video and game controller] folder - [USB Device] in the [Other devices] folder 6 When the [Confirm Device Removal] screen appears, click [OK]. 7 Turn off the power of your camcorder, disconnect the USB cable...
... the disc drive of your computer. 9 Follow the steps below are already installed, right-click them . The movie is not supported on Windows 98. For copying and viewing pictures recorded on a tape - [USB Composite Device] in the [Universal Serial Bus Controller] folder - [USB Audio Device] in the [Sound, video and game controller] folder - [USB Device] in the [Other devices] folder 6 When the [Confirm Device Removal] screen appears, click [OK]. 7 Turn off the power of your camcorder, disconnect the USB cable...
Operating Guide
Page 78
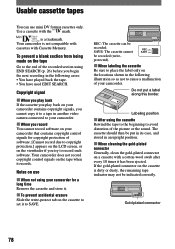
... played back the tape. • You have used EDIT SEARCH. REC SAVE: The cassette cannot SAVE be put a label along this border. Usable cassette tapes You can be indicated correctly. Labeling position After using END SEARCH (p. 26) before you begin the next recording in another video camera connected to your camcorder. When you record You cannot record software on your camcorder that contains copyright control signals for a long time Remove...
... played back the tape. • You have used EDIT SEARCH. REC SAVE: The cassette cannot SAVE be put a label along this border. Usable cassette tapes You can be indicated correctly. Labeling position After using END SEARCH (p. 26) before you begin the next recording in another video camera connected to your camcorder. When you record You cannot record software on your camcorder that contains copyright control signals for a long time Remove...
Operating Guide
Page 82
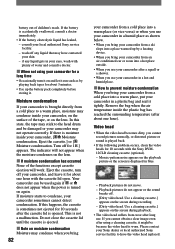
... your camcorder may have the video head replaced. Please contact your Sony dealer or local authorized Sony service facility to condense, your camcorder, on the surface of children's reach. In this happens, the cassette is sometimes not ejected for about 3 minutes. • Use up by playing back tapes for a long time • Occasionally turn off any liquid gets in blue. - Use a cleaning cassette.] appears on the lens. Eject the cassette, turn it...
... your camcorder may have the video head replaced. Please contact your Sony dealer or local authorized Sony service facility to condense, your camcorder, on the surface of children's reach. In this happens, the cassette is sometimes not ejected for about 3 minutes. • Use up by playing back tapes for a long time • Occasionally turn off any liquid gets in blue. - Use a cleaning cassette.] appears on the lens. Eject the cassette, turn it...
Operating Guide
Page 88
... Main sound 43 MANUAL SET menu .......... 40 Menu 31 CAMERA SET menu ... 42 LCD/VF SET menu ...... 44 MANUAL SET menu... 40 Menu items 38 OTHERS menu 46 SETUP MENU menu ... 45 TAPE SET menu........... 45 Using the menu 31 VCR SET menu 43 Mirror mode 22 Moisture condensation ......... 82 MONOTONE FADER ......... 33 MOSAIC 41 MOSAIC FADER 33 Movie REC MODE (Recording mode) ......... 45 N NEG.ART 40 NightShot plus 22 NIGHTSHOT PLUS switch 22 N.S.LIGHT (NightShot Light 42 NTSC 77 O ONE PUSH 34 OPEN/EJECT lever 17 Operation button 31 Operation con...
... Main sound 43 MANUAL SET menu .......... 40 Menu 31 CAMERA SET menu ... 42 LCD/VF SET menu ...... 44 MANUAL SET menu... 40 Menu items 38 OTHERS menu 46 SETUP MENU menu ... 45 TAPE SET menu........... 45 Using the menu 31 VCR SET menu 43 Mirror mode 22 Moisture condensation ......... 82 MONOTONE FADER ......... 33 MOSAIC 41 MOSAIC FADER 33 Movie REC MODE (Recording mode) ......... 45 N NEG.ART 40 NightShot plus 22 NIGHTSHOT PLUS switch 22 N.S.LIGHT (NightShot Light 42 NTSC 77 O ONE PUSH 34 OPEN/EJECT lever 17 Operation button 31 Operation con...


