
Operating Guide
Page 27
...LCD screen is convenient during playback operations. Step 4: Making adjustments before recording Getting Started Opening the lens cover Slide the LENS COVER switch to your camcorder properly. 27 After recording, set the LENS COVER switch to CLOSE to avoid wearing down the battery, or when the image seen on the ...LCD frame accidentally when you press DISP. Adjusting the viewfinder You can close the lens cover. z Tips • If you open or adjust the LCD panel. ...
...LCD screen is convenient during playback operations. Step 4: Making adjustments before recording Getting Started Opening the lens cover Slide the LENS COVER switch to your camcorder properly. 27 After recording, set the LENS COVER switch to CLOSE to avoid wearing down the battery, or when the image seen on the ...LCD frame accidentally when you press DISP. Adjusting the viewfinder You can close the lens cover. z Tips • If you open or adjust the LCD panel. ...

Operating Guide
Page 40
... a level greater than 60×. 40 Dolby Digital 5.1 Creator, 5.1ch surround sound Glossary (p. 135) b Notes • 5.1ch sound is converted to keep your camcorder. z Tips • You can select the recording sound, [5.1ch SURROUND] or [2ch STEREO] ([AUDIO MODE], p. 81). Enjoy realistic sound when playing the movies... up by the built-in microphone is converted to 60 times the original size with the zoom buttons on the LCD frame. • The minimum possible distance between camcorder and subject while maintaining sharp focus is about 1 cm (about 13/32 in.) for wide angle and about 150 ...
... a level greater than 60×. 40 Dolby Digital 5.1 Creator, 5.1ch surround sound Glossary (p. 135) b Notes • 5.1ch sound is converted to keep your camcorder. z Tips • You can select the recording sound, [5.1ch SURROUND] or [2ch STEREO] ([AUDIO MODE], p. 81). Enjoy realistic sound when playing the movies... up by the built-in microphone is converted to 60 times the original size with the zoom buttons on the LCD frame. • The minimum possible distance between camcorder and subject while maintaining sharp focus is about 1 cm (about 13/32 in.) for wide angle and about 150 ...
Operating Guide
Page 45
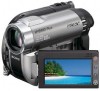
... VISUAL INDEX screen appears. Using PB zoom You can magnify still images from [ FACE] (p. 82). The recording dates of images are displayed on the LCD frame. Select beforehand media which contains the movie you want to play back (p. 28). b Notes • You cannot use the Date Index with the power zoom... screen or the Face Index screen, you can be detected depending on recording conditions. The images recorded on the selected date are displayed on your camcorder.
... VISUAL INDEX screen appears. Using PB zoom You can magnify still images from [ FACE] (p. 82). The recording dates of images are displayed on the LCD frame. Select beforehand media which contains the movie you want to play back (p. 28). b Notes • You cannot use the Date Index with the power zoom... screen or the Face Index screen, you can be detected depending on recording conditions. The images recorded on the selected date are displayed on your camcorder.
Operating Guide
Page 46
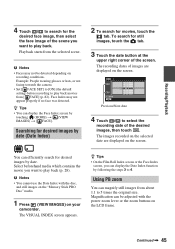
...] to magnify. 2 Magnify the still image with W (Wide angle)/T (Telephoto). As the default setting is [ON], is framed. 3 Touch the screen at the point you want to [OFF], your camcorder repeats a slide show by touching (OPTION) t tab t [SLIDE SHOW SET]. The screen is displayed on the LCD screen ...and your camcorder plays the still images in the center of still images (Slide show) b Notes • You cannot ...
...] to magnify. 2 Magnify the still image with W (Wide angle)/T (Telephoto). As the default setting is [ON], is framed. 3 Touch the screen at the point you want to [OFF], your camcorder repeats a slide show by touching (OPTION) t tab t [SLIDE SHOW SET]. The screen is displayed on the LCD screen ...and your camcorder plays the still images in the center of still images (Slide show) b Notes • You cannot ...
Operating Guide
Page 82
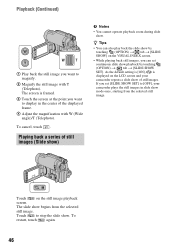
... indicator. S FACE SET The camcorder detects faces automatically during movie recording. b Notes • The number of faces detected in a movie is set to (Movie). - The default setting is [ON]. AUTO Displays the remaining recording time of the guide frame makes a balanced composition. The default... setting is [ON]. Face icons and their meanings : This icon appears when the setting is [ON]. The default setting is [ON]. : This icon flashes when your camcorder recognizes the remaining media capacity when...
... indicator. S FACE SET The camcorder detects faces automatically during movie recording. b Notes • The number of faces detected in a movie is set to (Movie). - The default setting is [ON]. AUTO Displays the remaining recording time of the guide frame makes a balanced composition. The default... setting is [ON]. Face icons and their meanings : This icon appears when the setting is [ON]. The default setting is [ON]. : This icon flashes when your camcorder recognizes the remaining media capacity when...
Operating Guide
Page 93
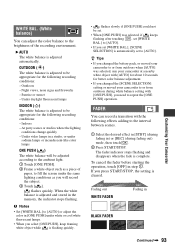
...studios where the lighting conditions change quickly - OUTDOOR ( ) The white balance is adjusted to the ambient light. 1 Touch [ONE PUSH]. 2 Frame a white object such as you will be adjusted according to be set [WHITE BAL.] to [AUTO]. • If you need to be appropriate... the recording environment. Indoors - To cancel the fader before starting the operation, touch [OFF] in BLACK FADER Continued , 93 Customizing Your Camcorder Under daylight fluorescent lamps INDOOR (n) The white balance is adjusted to repeat the [ONE PUSH] operation. Under video lamps in the memory,...
...studios where the lighting conditions change quickly - OUTDOOR ( ) The white balance is adjusted to the ambient light. 1 Touch [ONE PUSH]. 2 Frame a white object such as you will be adjusted according to be set [WHITE BAL.] to [AUTO]. • If you need to be appropriate... the recording environment. Indoors - To cancel the fader before starting the operation, touch [OFF] in BLACK FADER Continued , 93 Customizing Your Camcorder Under daylight fluorescent lamps INDOOR (n) The white balance is adjusted to repeat the [ONE PUSH] operation. Under video lamps in the memory,...
Operating Guide
Page 95
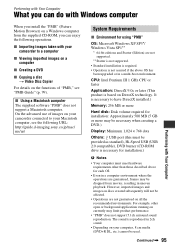
... b Notes • Your computer must be affected. • Operations are guaranteed, frames may limit product performance. • "PMB" does not support 5.1ch surround sound reproduction... from movies, resulting in uneven playback. x Importing images taken with your camcorder to a computer x Viewing imported images on a computer x Creating a DVD x Copying a disc t Video Disc Copier For details on the functions.... Performing with Your Computer What you can enjoy the following URL: http://guide.d-imaging.sony.co.jp/mac/ ms/us/ System Requirements x Environment for using "PMB" OS:...
... b Notes • Your computer must be affected. • Operations are guaranteed, frames may limit product performance. • "PMB" does not support 5.1ch surround sound reproduction... from movies, resulting in uneven playback. x Importing images taken with your camcorder to a computer x Viewing imported images on a computer x Creating a DVD x Copying a disc t Video Disc Copier For details on the functions.... Performing with Your Computer What you can enjoy the following URL: http://guide.d-imaging.sony.co.jp/mac/ ms/us/ System Requirements x Environment for using "PMB" OS:...
Operating Guide
Page 100
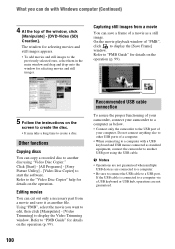
... USB mouse connected as below. • Connect only the camcorder to the USB port of the window, click [Manipulate] - [DVD-Video (SD) Creation]. Click [Start] - [All Programs] - [Sony Picture Utility] - [Video Disc Copier] to display the [Save Frame] window. Using "PMB", select the movie you can cut... Guide" for details on the operation (p. 99). 5 Follow the instructions on the operation (p. 99). On the movie playback window of your camcorder, connect your computer. Refer to another disc using the USB cable. Do not connect anything else to other USB ports of a computer. &#...
... USB mouse connected as below. • Connect only the camcorder to the USB port of the window, click [Manipulate] - [DVD-Video (SD) Creation]. Click [Start] - [All Programs] - [Sony Picture Utility] - [Video Disc Copier] to display the [Save Frame] window. Using "PMB", select the movie you can cut... Guide" for details on the operation (p. 99). 5 Follow the instructions on the operation (p. 99). On the movie playback window of your camcorder, connect your computer. Refer to another disc using the USB cable. Do not connect anything else to other USB ports of a computer. &#...


