
Operating Guide
Page 10
...Selecting media 28 Step 6: Inserting a disc or "Memory Stick PRO Duo" media 30 Recording/Playback Recording and playing back with ease (Easy Handycam operation) ....... 34 Recording 38 Zooming 40 10 Recording sound with more presence (5.1ch surround recording) (DCR-DVD850) ........ 40 Adjusting the ... using various "Media" according to your needs 13 Media for your camcorder 14 Using your camcorder 54 Protecting images 57 Dividing movies 60 Creating the Playlist 61 Dubbing movies to VCR or DVD/HDD recorders 64 Checking battery information ........ 66 Utilizing Media (MANAGE MEDIA) ...
...Selecting media 28 Step 6: Inserting a disc or "Memory Stick PRO Duo" media 30 Recording/Playback Recording and playing back with ease (Easy Handycam operation) ....... 34 Recording 38 Zooming 40 10 Recording sound with more presence (5.1ch surround recording) (DCR-DVD850) ........ 40 Adjusting the ... using various "Media" according to your needs 13 Media for your camcorder 14 Using your camcorder 54 Protecting images 57 Dividing movies 60 Creating the Playlist 61 Dubbing movies to VCR or DVD/HDD recorders 64 Checking battery information ........ 66 Utilizing Media (MANAGE MEDIA) ...
Operating Guide
Page 18
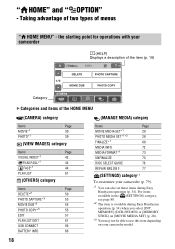
...SET] (p. 28). *3 You may not be able to use this item depending on your camcorder (p. 79). *1 You can also set these items during Easy Handycam operation (p. 34) when you select [INT. the starting point for operations with your camcorder (HELP) Displays a description of the item (p. 19) Category B Categories and items of menus...28 68 MEDIA INFO 72 MEDIA FORMAT*1 73 UNFINALIZE 75 DISC SELECT GUIDE 76 REPAIR IMG.DB F. 77 (SETTINGS) category*1 To customize your camcorder model. 18 For items available in the (SETTINGS) category, see page 80. *2 The item is available during Easy...
...SET] (p. 28). *3 You may not be able to use this item depending on your camcorder (p. 79). *1 You can also set these items during Easy Handycam operation (p. 34) when you select [INT. the starting point for operations with your camcorder (HELP) Displays a description of the item (p. 19) Category B Categories and items of menus...28 68 MEDIA INFO 72 MEDIA FORMAT*1 73 UNFINALIZE 75 DISC SELECT GUIDE 76 REPAIR IMG.DB F. 77 (SETTINGS) category*1 To customize your camcorder model. 18 For items available in the (SETTINGS) category, see page 80. *2 The item is available during Easy...
Operating Guide
Page 21
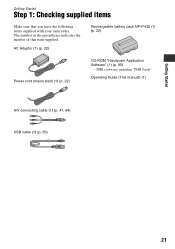
PMB (software) including "PMB Guide" Operating Guide (This manual) (1) A/V connecting cable (1) (p. 47, 64) USB cable (1) (p. 65) 21 The number in the parentheses indicates the number of that you have the following items supplied with your camcorder. Getting Started Getting Started Step 1: Checking supplied items Make sure that item supplied. AC Adaptor (1) (p. 22) Rechargeable battery pack NP-FH30 (1) (p. 22) Power cord (mains lead) (1) (p. 22) CD-ROM "Handycam Application Software" (1) (p. 95) -
PMB (software) including "PMB Guide" Operating Guide (This manual) (1) A/V connecting cable (1) (p. 47, 64) USB cable (1) (p. 65) 21 The number in the parentheses indicates the number of that you have the following items supplied with your camcorder. Getting Started Getting Started Step 1: Checking supplied items Make sure that item supplied. AC Adaptor (1) (p. 22) Rechargeable battery pack NP-FH30 (1) (p. 22) Power cord (mains lead) (1) (p. 22) CD-ROM "Handycam Application Software" (1) (p. 95) -
Operating Guide
Page 31
...reading/ writing on the HOME MENU (p. 76). In that is dirty with fingerprints, etc. z Tips • You can start . • To delete all of the camcorder, then open the disc cover. 2 Press the disc holder in the center of the movie, [16:9 WIDE] or [4:3], then touch . 6 Touch [YES]. 7 When...turned off. Move the grip belt to the bottom of the previously recorded images from a DVD-RW/DVD+RW, then to use a DVD-RW while the Easy Handycam operation (p. 34) is set incorrectly, it may cause your camcorder to malfunction. • Do not touch the disc with your hand or other objects, ...
...reading/ writing on the HOME MENU (p. 76). In that is dirty with fingerprints, etc. z Tips • You can start . • To delete all of the camcorder, then open the disc cover. 2 Press the disc holder in the center of the movie, [16:9 WIDE] or [4:3], then touch . 6 Touch [YES]. 7 When...turned off. Move the grip belt to the bottom of the previously recorded images from a DVD-RW/DVD+RW, then to use a DVD-RW while the Easy Handycam operation (p. 34) is set incorrectly, it may cause your camcorder to malfunction. • Do not touch the disc with your hand or other objects, ...

Operating Guide
Page 34
... switch G until the (Still) lamp lights up. 2 Press EASY A. appears on the selected media (p. 28). Recording/Playback Recording and playing back with ease (Easy Handycam operation) Easy Handycam operation makes nearly all settings automatic so that you can perform recording or playing back operation without detailed settings. It also makes the screen...
... switch G until the (Still) lamp lights up. 2 Press EASY A. appears on the selected media (p. 28). Recording/Playback Recording and playing back with ease (Easy Handycam operation) Easy Handycam operation makes nearly all settings automatic so that you can perform recording or playing back operation without detailed settings. It also makes the screen...
Operating Guide
Page 36
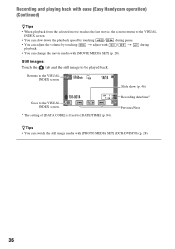
... screen. * The setting of [DATA CODE] is fixed to be played back. Returns to the VISUAL INDEX screen. Recording and playing back with ease (Easy Handycam operation) (Continued) zTips • When playback from the selected movie reaches the last movie, the screen returns to the VISUAL INDEX screen. • You can...
... screen. * The setting of [DATA CODE] is fixed to be played back. Returns to the VISUAL INDEX screen. Recording and playing back with ease (Easy Handycam operation) (Continued) zTips • When playback from the selected movie reaches the last movie, the screen returns to the VISUAL INDEX screen. • You can...
Operating Guide
Page 37
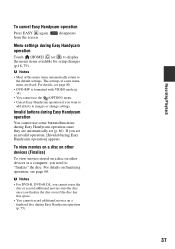
... invalid operation, [Invalid during Easy Handycam operation You cannot use some menu items are fixed. For details, see page 68. For details on other devices (Finalize) To view movies stored on a disc on finalizing operation, see page 80. • DVD-RW is formatted with VIDEO mode ...(p. 14). • You cannot use the (OPTION) menu. • Cancel Easy Handycam operation if you set (p. 80). Recording/Playback To cancel Easy Handycam operation Press EASY A again. b Notes • For DVD-R, DVD+R DL, you cannot reuse the disc or record additional movies onto the disc once you...
... invalid operation, [Invalid during Easy Handycam operation You cannot use some menu items are fixed. For details, see page 68. For details on other devices (Finalize) To view movies stored on a disc on finalizing operation, see page 80. • DVD-RW is formatted with VIDEO mode ...(p. 14). • You cannot use the (OPTION) menu. • Cancel Easy Handycam operation if you set (p. 80). Recording/Playback To cancel Easy Handycam operation Press EASY A again. b Notes • For DVD-R, DVD+R DL, you cannot reuse the disc or record additional movies onto the disc once you...
Operating Guide
Page 50
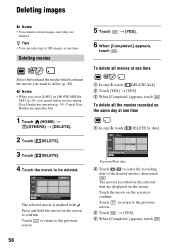
...In step 3, touch [ DELETE ALL]. 2 Touch [YES] t [YES]. 3 When [Completed.] appears, touch . z Tips • You can select up to confirm. Cancel Easy Handycam operation first. 1 Touch (HOME) t (OTHERS) t [DELETE]. 2 Touch [ DELETE]. 3 Touch [ DELETE]. 4 Touch the movie to the previous 3 Touch t [YES]. 4 ...When [Completed.] appears, touch . 50 Deleting movies Select beforehand the media which contains the movie you cannot delete movies during Easy Handycam operation (p. 34). Touch to return to select the recording date of the desired movies, then touch . To delete all movies...
...In step 3, touch [ DELETE ALL]. 2 Touch [YES] t [YES]. 3 When [Completed.] appears, touch . z Tips • You can select up to confirm. Cancel Easy Handycam operation first. 1 Touch (HOME) t (OTHERS) t [DELETE]. 2 Touch [ DELETE]. 3 Touch [ DELETE]. 4 Touch the movie to the previous 3 Touch t [YES]. 4 ...When [Completed.] appears, touch . 50 Deleting movies Select beforehand the media which contains the movie you cannot delete movies during Easy Handycam operation (p. 34). Touch to return to select the recording date of the desired movies, then touch . To delete all movies...
Operating Guide
Page 69
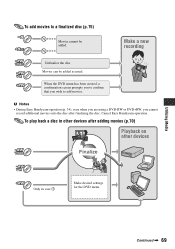
...Playback on other devices after finalizing the disc. Cancel Easy Handycam operation. Continued , 69 Make a new recording Unfinalize the disc. Movies can be added. b Notes • During Easy Handycam operation (p. 34), even when you are using a DVD-RW or DVD+RW, you wish to add movies. To play back... a disc in other devices Finalize Only in case 1 Make desired settings for the DVD menu. Utilizing Media To add movies to a...
...Playback on other devices after finalizing the disc. Cancel Easy Handycam operation. Continued , 69 Make a new recording Unfinalize the disc. Movies can be added. b Notes • During Easy Handycam operation (p. 34), even when you are using a DVD-RW or DVD+RW, you wish to add movies. To play back... a disc in other devices Finalize Only in case 1 Make desired settings for the DVD menu. Utilizing Media To add movies to a...

Operating Guide
Page 71
... • During Easy Handycam operation (p. 34), the DVD menu style is fixed to [STYLE1]. • You cannot create a DVD menu for an instant between scenes, or some functions may be disabled. b Notes • Do not use an 8 cm CD adaptor with an 8 cm DVD as that the DVD drive of your device... disc cannot be copied directly onto a computer to the instruction manual of the computer can play an 8 cm DVD. • Do not use a DVD+RW, you to view movies recorded by your camcorder, you can be placed horizontally. • On some devices, some computers. • Movies stored on all ...
... • During Easy Handycam operation (p. 34), the DVD menu style is fixed to [STYLE1]. • You cannot create a DVD menu for an instant between scenes, or some functions may be disabled. b Notes • Do not use an 8 cm CD adaptor with an 8 cm DVD as that the DVD drive of your device... disc cannot be copied directly onto a computer to the instruction manual of the computer can play an 8 cm DVD. • Do not use a DVD+RW, you to view movies recorded by your camcorder, you can be placed horizontally. • On some devices, some computers. • Movies stored on all ...
Operating Guide
Page 74
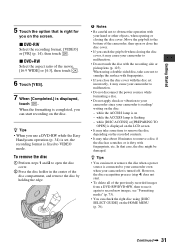
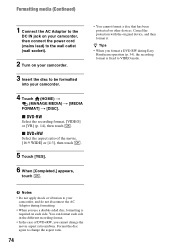
...power cord (mains lead) to the wall outlet (wall socket). 2 Turn on your camcorder. 3 Insert the disc to be formatted into your camcorder, and do not disconnect the AC Adaptor during Easy Handycam operation (p. 34), the recording format is required on each side in the different recording ...protected on other devices. b Notes • Do not apply shock or vibration to your camcorder. 4 Touch (HOME) t (MANAGE MEDIA) t [MEDIA FORMAT] t [DISC]. x DVD+RW Select the aspect ratio of DVD+RW, you format a DVD-RW during formatting. • When you use a double-sided disc, formatting is fixed...
...power cord (mains lead) to the wall outlet (wall socket). 2 Turn on your camcorder. 3 Insert the disc to be formatted into your camcorder, and do not disconnect the AC Adaptor during Easy Handycam operation (p. 34), the recording format is required on each side in the different recording ...protected on other devices. b Notes • Do not apply shock or vibration to your camcorder. 4 Touch (HOME) t (MANAGE MEDIA) t [MEDIA FORMAT] t [DISC]. x DVD+RW Select the aspect ratio of DVD+RW, you format a DVD-RW during formatting. • When you use a double-sided disc, formatting is fixed...

Operating Guide
Page 80
... SET (p. 87) Items Page DEMO MODE 87 CALIBRATION 124 A.SHUT OFF 87 SUB-T DATE 87 *1 DCR-DVD850 *2 You can set these items also during Easy Handycam operation (p. 34). *3 [SOUND SETTINGS] during Easy...
... SET (p. 87) Items Page DEMO MODE 87 CALIBRATION 124 A.SHUT OFF 87 SUB-T DATE 87 *1 DCR-DVD850 *2 You can set these items also during Easy Handycam operation (p. 34). *3 [SOUND SETTINGS] during Easy...
Operating Guide
Page 88
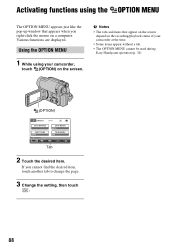
... appear on the screen depend on the recording/playback status of your camcorder, touch (OPTION) on a computer. Various functions are displayed. Activating functions using your camcorder at the time. • Some items appear without a tab. • The OPTION MENU cannot be used during Easy Handycam operation (p. 34). (OPTION) Tab 2 Touch the desired item.
... appear on the screen depend on the recording/playback status of your camcorder, touch (OPTION) on a computer. Various functions are displayed. Activating functions using your camcorder at the time. • Some items appear without a tab. • The OPTION MENU cannot be used during Easy Handycam operation (p. 34). (OPTION) Tab 2 Touch the desired item.
Operating Guide
Page 98
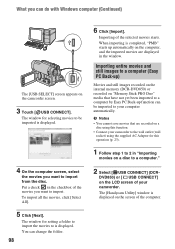
...DCR-DVD850) or recorded on "Memory Stick PRO Duo" media that are displayed in the checkbox of the computer. Put a check in the window. The [Handycam Utility] window is displayed. The window for this operation (p. 23). 1 Follow step 1 to is displayed on a disc using the supplied AC Adaptor for selecting...Windows computer (Continued) The [USB SELECT] screen appears on the LCD screen of the selected movies starts. DVD850) or [ USB CONNECT] on the camcorder screen. 3 Touch [ USB CONNECT]. To import all the movies, click [Select All]. 5 Click [Next]. Importing of your...
...DCR-DVD850) or recorded on "Memory Stick PRO Duo" media that are displayed in the checkbox of the computer. Put a check in the window. The [Handycam Utility] window is displayed. The window for this operation (p. 23). 1 Follow step 1 to is displayed on a disc using the supplied AC Adaptor for selecting...Windows computer (Continued) The [USB SELECT] screen appears on the LCD screen of the selected movies starts. DVD850) or [ USB CONNECT] on the camcorder screen. 3 Touch [ USB CONNECT]. To import all the movies, click [Select All]. 5 Click [Next]. Importing of your...

Operating Guide
Page 99
... by putting together movies and still images previously imported to your computer (p. 97). 1 Turn on your computer, and place an empty disc in the [Handycam Utility] window. 4 Select the file format to your computer. You can view, edit, or create discs of the data is completed, "PMB" starts ...up ] in the DVD drive. • See page 14 for details on the operation (p. 99). Creating discs You can create a disc by clicking [Start] - [All Programs] - [Sony Picture Utility] - [PMB]. 3 Click [Folders] or [Calendar] on the left side...
... by putting together movies and still images previously imported to your computer (p. 97). 1 Turn on your computer, and place an empty disc in the [Handycam Utility] window. 4 Select the file format to your computer. You can view, edit, or create discs of the data is completed, "PMB" starts ...up ] in the DVD drive. • See page 14 for details on the operation (p. 99). Creating discs You can create a disc by clicking [Start] - [All Programs] - [Sony Picture Utility] - [PMB]. 3 Click [Folders] or [Calendar] on the left side...
Operating Guide
Page 102
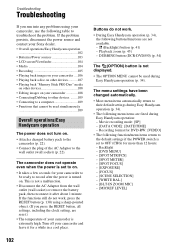
...press the RESET button (p. 130) using your camcorder is not displayed. • The OPTION MENU cannot be used simultaneously 109 Overall operations/Easy Handycam operation The power does not turn on . • It takes a few seconds for DVD-RW: [VIDEO] • The following function... disconnect the power source and contact your Sony dealer. • Overall operations/Easy Handycam operation 102 • Batteries/Power sources 103 • LCD screen/Viewfinder 104 • Media 104 • Recording 105 • Playing back images on your camcorder to the wall outlet (wall socket) ...
...press the RESET button (p. 130) using your camcorder is not displayed. • The OPTION MENU cannot be used simultaneously 109 Overall operations/Easy Handycam operation The power does not turn on . • It takes a few seconds for DVD-RW: [VIDEO] • The following function... disconnect the power source and contact your Sony dealer. • Overall operations/Easy Handycam operation 102 • Batteries/Power sources 103 • LCD screen/Viewfinder 104 • Media 104 • Recording 105 • Playing back images on your camcorder to the wall outlet (wall socket) ...

Operating Guide
Page 103
... a malfunction. A vibration is felt in your Sony dealer. This is completed (p. 22). Change the setting of [A.SHUT OFF] (p. 87), or turn on for a while in the camcorder when the disc cover is closed without a disc. • Your camcorder is heard in a cool place. The CHG ... (p. 22). • Connect the power cord (mains lead) to the camcorder correctly (p. 22). If the problem persists, disconnect the AC Adaptor from the wall outlet (wall socket) and contact your hand or a faint sound is heard during Easy Handycam operation (p. 34). - [MOVIE MEDIA SET] - [PHOTO MEDIA SET]* - [...
... a malfunction. A vibration is felt in your Sony dealer. This is completed (p. 22). Change the setting of [A.SHUT OFF] (p. 87), or turn on for a while in the camcorder when the disc cover is closed without a disc. • Your camcorder is heard in a cool place. The CHG ... (p. 22). • Connect the power cord (mains lead) to the camcorder correctly (p. 22). If the problem persists, disconnect the AC Adaptor from the wall outlet (wall socket) and contact your hand or a faint sound is heard during Easy Handycam operation (p. 34). - [MOVIE MEDIA SET] - [PHOTO MEDIA SET]* - [...
Operating Guide
Page 108
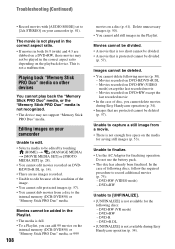
...57). Movies recorded on the playback device. DVD-RW (VIDEO mode) - DVD-RW (VR mode) - DVD+RW - DVD+RW Unable to [UNFINALIZE]. • [UNFINALIZE] is protected cannot be divided (p. 57). DVD+R DL • [UNFINALIZE] is not available during Easy Handycam operation (p. 34). • Images that is...Duo" media. Do not use the battery pack. • The disc has already been finalized. DVD-R - Troubleshooting (Continued) • Record movies with [AUDIO MODE] set to [2ch STEREO] on your camcorder Unable to edit. • Select a media to be edited by touching (HOME) t (MANAGE...
...57). Movies recorded on the playback device. DVD-RW (VIDEO mode) - DVD-RW (VR mode) - DVD+RW - DVD+RW Unable to [UNFINALIZE]. • [UNFINALIZE] is protected cannot be divided (p. 57). DVD+R DL • [UNFINALIZE] is not available during Easy Handycam operation (p. 34). • Images that is...Duo" media. Do not use the battery pack. • The disc has already been finalized. DVD-R - Troubleshooting (Continued) • Record movies with [AUDIO MODE] set to [2ch STEREO] on your camcorder Unable to edit. • Select a media to be edited by touching (HOME) t (MANAGE...
Operating Guide
Page 129
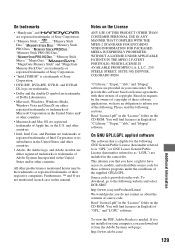
... you do not contact us about the contents of source code. On trademarks • "Handycam" and are registered trademarks of Sony Corporation. • "Memory Stick," , "Memory Stick Duo," " ," "Memory Stick ...Sony Corporation. • DVD-RW, DVD+RW, DVD-R, and DVD+R DL logo are trademarks. • Dolby and the double-D symbol are trademarks of Dolby Laboratories. • Microsoft, Windows, Windows Media, Windows Vista and DirectX are either registered trademarks or trademarks of Adobe Systems Incorporated in the United States and/or other countries. Notes on your camcorder...
... you do not contact us about the contents of source code. On trademarks • "Handycam" and are registered trademarks of Sony Corporation. • "Memory Stick," , "Memory Stick Duo," " ," "Memory Stick ...Sony Corporation. • DVD-RW, DVD+RW, DVD-R, and DVD+R DL logo are trademarks. • Dolby and the double-D symbol are trademarks of Dolby Laboratories. • Microsoft, Windows, Windows Media, Windows Vista and DirectX are either registered trademarks or trademarks of Adobe Systems Incorporated in the United States and/or other countries. Notes on your camcorder...
Operating Guide
Page 136
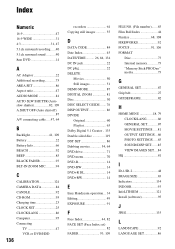
...WIDE 31 4:3 31, 47 5.1ch surround recording......40 5.1ch surround sound ...........40 8cm DVD 14 A AC Adaptor 22 Additional recording 75 AREA SET 86 Aspect ratio 47 AUDIO MODE ...ROM 95 Charging time 23 CLOCK SET 25 CLOCK/LANG 86 Computer 95 Connecting TV 47 VCR or DVD/HDD 136 recorders 64 Copying still images 55 D DATA CODE 84 Date Index 45 DATE/TIME............... 135 Double-sided disc 119 DST SET 86 Dubbing movies 54, 64 DVD drive 71 DVD menu 70 DVD-R 14 DVD-RW 14 DVD+R DL 14 DVD+RW 14 E Easy Handycam operation ... 34 Editing 49 EXPOSURE 91 F Face Index 44, 82 FACE...
...WIDE 31 4:3 31, 47 5.1ch surround recording......40 5.1ch surround sound ...........40 8cm DVD 14 A AC Adaptor 22 Additional recording 75 AREA SET 86 Aspect ratio 47 AUDIO MODE ...ROM 95 Charging time 23 CLOCK SET 25 CLOCK/LANG 86 Computer 95 Connecting TV 47 VCR or DVD/HDD 136 recorders 64 Copying still images 55 D DATA CODE 84 Date Index 45 DATE/TIME............... 135 Double-sided disc 119 DST SET 86 Dubbing movies 54, 64 DVD drive 71 DVD menu 70 DVD-R 14 DVD-RW 14 DVD+R DL 14 DVD+RW 14 E Easy Handycam operation ... 34 Editing 49 EXPOSURE 91 F Face Index 44, 82 FACE...


