
Operating Guide
Page 2
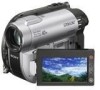
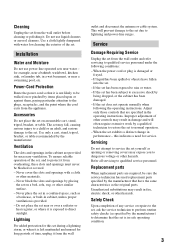
...Entry Never push objects of important operating and maintenance (servicing) instructions in the operating instructions and adhere to rain or moisture. Use Power Sources This set through openings as they may cause hazards. 2 WARNING To reduce fire or shock hazard, do not expose the ...plug by the manufacturer, as they may touch dangerous voltage points or short out parts that may be equipped with a polarized ac power cord plug (a plug having one way. IMPORTANT SAFEGUARDS For your protection, please read these safety instructions completely before operating the appliance, and...
...Entry Never push objects of important operating and maintenance (servicing) instructions in the operating instructions and adhere to rain or moisture. Use Power Sources This set through openings as they may cause hazards. 2 WARNING To reduce fire or shock hazard, do not expose the ...plug by the manufacturer, as they may touch dangerous voltage points or short out parts that may be equipped with a polarized ac power cord plug (a plug having one way. IMPORTANT SAFEGUARDS For your protection, please read these safety instructions completely before operating the appliance, and...
Operating Guide
Page 3
... ventilation is provided. - Never block the slots and openings by being dropped, or the cabinet has been damaged. - When the power cord or plug is left unattended and unused for necessary ventilation. Adjust only those controls that the set is in damage and will prevent ...servicing to qualified service personnel under the following the operating instructions. Do not use power-line operated sets near or over a radiator or heat register, or where it . Power-Cord Protection Route the power cord so that have fallen into the set does not operate normally when following conditions: ...
... ventilation is provided. - Never block the slots and openings by being dropped, or the cabinet has been damaged. - When the power cord or plug is left unattended and unused for necessary ventilation. Adjust only those controls that the set is in damage and will prevent ...servicing to qualified service personnel under the following the operating instructions. Do not use power-line operated sets near or over a radiator or heat register, or where it . Power-Cord Protection Route the power cord so that have fallen into the set does not operate normally when following conditions: ...
Operating Guide
Page 20
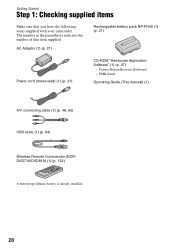
AC Adaptor (1) (p. 21) Rechargeable battery pack NP-FH40 (1) (p. 21) Power cord (mains lead) (1) (p. 21) CD-ROM "Handycam Application Software" (1) (p. 97) - Picture Motion Browser (Software) - PMB Guide Operating Guide (This manual) (1) A/V connecting cable (1) (p. 48, 62) USB cable (1) (p. 64) Wireless Remote Commander (DCRDVD710/DVD810) (1) ... lithium battery is already installed. 20 The number in the parentheses indicates the number of that you have the following items supplied with your camcorder. Getting Started Step 1: Checking supplied items Make sure that item supplied.
AC Adaptor (1) (p. 21) Rechargeable battery pack NP-FH40 (1) (p. 21) Power cord (mains lead) (1) (p. 21) CD-ROM "Handycam Application Software" (1) (p. 97) - Picture Motion Browser (Software) - PMB Guide Operating Guide (This manual) (1) A/V connecting cable (1) (p. 48, 62) USB cable (1) (p. 64) Wireless Remote Commander (DCRDVD710/DVD810) (1) ... lithium battery is already installed. 20 The number in the parentheses indicates the number of that you have the following items supplied with your camcorder. Getting Started Step 1: Checking supplied items Make sure that item supplied.
Operating Guide
Page 21
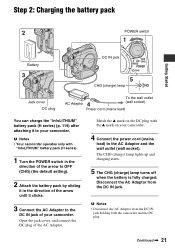
Disconnect the AC Adaptor from the DC IN jack holding both the camcorder and the DC plug. Match the v mark on your camcorder. 4 Connect the power cord (mains lead) to the AC Adaptor and the wall outlet (wall socket). Continued , 21 The CHG (charge) lamp lights up and charging starts. 5 The CHG... cover DC plug AC Adaptor To the wall outlet (wall socket) Power cord (mains lead) You can charge the "InfoLITHIUM" battery pack (H series) (p. 119) after attaching it clicks. 3 Connect the AC Adaptor to the DC IN jack of your camcorder. Open the jack cover, and connect the DC plug of the ...
Disconnect the AC Adaptor from the DC IN jack holding both the camcorder and the DC plug. Match the v mark on your camcorder. 4 Connect the power cord (mains lead) to the AC Adaptor and the wall outlet (wall socket). Continued , 21 The CHG (charge) lamp lights up and charging starts. 5 The CHG... cover DC plug AC Adaptor To the wall outlet (wall socket) Power cord (mains lead) You can charge the "InfoLITHIUM" battery pack (H series) (p. 119) after attaching it clicks. 3 Connect the AC Adaptor to the DC IN jack of your camcorder. Open the jack cover, and connect the DC plug of the ...

Operating Guide
Page 24
... not be supplied from the battery as long as between a wall and furniture. • Do not short-circuit the DC plug of your camcorder, even when the power cord (mains lead) is disconnected from the wall outlet (wall socket). • When attaching an optional video light, it while connected to it is on... DCR-DVD610 Battery pack NP-FH40 (supplied) NP-FH50 NP-FH70 NP-FH100 LCD panel opened* 120 LCD panel closed 135 140 155 300 330 680 745 DCR-DVD710/DVD810 Battery pack NP-FH40 (supplied) NP-FH50 NP-FH70 NP-FH100 LCD panel opened* 115 LCD panel closed 135 135 155...
... not be supplied from the battery as long as between a wall and furniture. • Do not short-circuit the DC plug of your camcorder, even when the power cord (mains lead) is disconnected from the wall outlet (wall socket). • When attaching an optional video light, it while connected to it is on... DCR-DVD610 Battery pack NP-FH40 (supplied) NP-FH50 NP-FH70 NP-FH100 LCD panel opened* 120 LCD panel closed 135 140 155 300 330 680 745 DCR-DVD710/DVD810 Battery pack NP-FH40 (supplied) NP-FH50 NP-FH70 NP-FH100 LCD panel opened* 115 LCD panel closed 135 135 155...
Operating Guide
Page 72
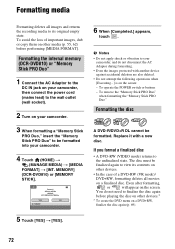
...) or "Memory Stick PRO Duo" 1 Connect the AC Adaptor to the DC IN jack on your camcorder, then connect the power cord (mains lead) to the wall outlet (wall socket). 2 Turn on your camcorder. 3 When formatting a "Memory Stick PRO Duo," insert the "Memory Stick PRO Duo" to the ...unfinalized state. To operate the POWER switch or buttons - MEMORY] (DCR-DVD810) or [MEMORY STICK]. 6 When [Completed.] appears, touch...
...) or "Memory Stick PRO Duo" 1 Connect the AC Adaptor to the DC IN jack on your camcorder, then connect the power cord (mains lead) to the wall outlet (wall socket). 2 Turn on your camcorder. 3 When formatting a "Memory Stick PRO Duo," insert the "Memory Stick PRO Duo" to the ...unfinalized state. To operate the POWER switch or buttons - MEMORY] (DCR-DVD810) or [MEMORY STICK]. 6 When [Completed.] appears, touch...
Operating Guide
Page 73
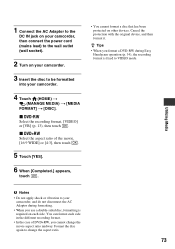
... VIDEO mode. Cancel the protection with the original device, and then format it. Utilizing Media b Notes • Do not apply shock or vibration to your camcorder. 4 Touch (HOME) t (MANAGE MEDIA) t [MEDIA FORMAT] t [DISC]. Format the disc again to change the movie aspect ratio midway. z Tips ...to the DC IN jack on your camcorder, then connect the power cord (mains lead) to the wall outlet (wall socket). 2 Turn on your camcorder. 3 Insert the disc to be formatted into your camcorder, and do not disconnect the AC Adaptor during Easy Handycam operation (p. 34), the recording format ...
... VIDEO mode. Cancel the protection with the original device, and then format it. Utilizing Media b Notes • Do not apply shock or vibration to your camcorder. 4 Touch (HOME) t (MANAGE MEDIA) t [MEDIA FORMAT] t [DISC]. Format the disc again to change the movie aspect ratio midway. z Tips ...to the DC IN jack on your camcorder, then connect the power cord (mains lead) to the wall outlet (wall socket). 2 Turn on your camcorder. 3 Insert the disc to be formatted into your camcorder, and do not disconnect the AC Adaptor during Easy Handycam operation (p. 34), the recording format ...
Operating Guide
Page 74
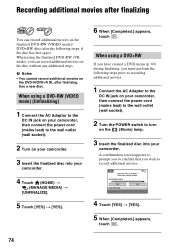
...movies. 1 Connect the AC Adaptor to the DC IN jack on your camcorder, then connect the power cord (mains lead) to the wall outlet (wall socket). 2 Turn the POWER switch to turn on the (Movie) lamp. 3 Insert the finalized disc into your camcorder. A confirmation screen appears to prompt you to confirm that you must ...the disc without any additional steps. When using a DVD-RW (VIDEO mode) (Unfinalizing) 1 Connect the AC Adaptor to the DC IN jack on your camcorder, then connect the power cord (mains lead) to the wall outlet (wall socket). 2 Turn on the DVD-R/DVD+R DL after finalizing.
...movies. 1 Connect the AC Adaptor to the DC IN jack on your camcorder, then connect the power cord (mains lead) to the wall outlet (wall socket). 2 Turn the POWER switch to turn on the (Movie) lamp. 3 Insert the finalized disc into your camcorder. A confirmation screen appears to prompt you to confirm that you must ...the disc without any additional steps. When using a DVD-RW (VIDEO mode) (Unfinalizing) 1 Connect the AC Adaptor to the DC IN jack on your camcorder, then connect the power cord (mains lead) to the wall outlet (wall socket). 2 Turn on the DVD-R/DVD+R DL after finalizing.
Operating Guide
Page 77
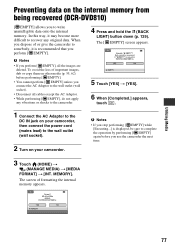
b Notes • If you dispose of or give the camcorder to the wall outlet (wall socket). 2 Turn on your camcorder, then connect the power cord (mains lead) to somebody, it may become more difficult to write unintelligible data onto the internal memory. b Notes • If you stop performing [ EMPTY] while [...
b Notes • If you dispose of or give the camcorder to the wall outlet (wall socket). 2 Turn on your camcorder, then connect the power cord (mains lead) to somebody, it may become more difficult to write unintelligible data onto the internal memory. b Notes • If you stop performing [ EMPTY] while [...
Operating Guide
Page 103
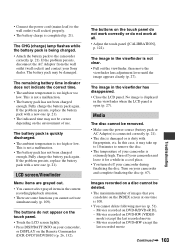
... turned off your camcorder during finalizing the disc. Movies recorded on the touch panel do not work correctly or do not appear on the touch panel. • Touch the LCD screen lightly. • Press DISP/BATT INFO on a disc cannot be damaged. • Connect the power cord (mains lead) to... current recording/playback situation. • There are some functions you can delete on your Sony dealer. The buttons on DVD+RW except the last recorded movie Continued , 103 Troubleshooting Turn off your camcorder and leave it may be deleted. • The maximum number of use. Turn on...
... turned off your camcorder during finalizing the disc. Movies recorded on the touch panel do not work correctly or do not appear on the touch panel. • Touch the LCD screen lightly. • Press DISP/BATT INFO on a disc cannot be damaged. • Connect the power cord (mains lead) to... current recording/playback situation. • There are some functions you can delete on your Sony dealer. The buttons on DVD+RW except the last recorded movie Continued , 103 Troubleshooting Turn off your camcorder and leave it may be deleted. • The maximum number of use. Turn on...

Operating Guide
Page 121
...a warm place, moisture may condense inside your camcorder from a ski slope into a place warmed up inside. • When disconnecting the power cord (mains lead), pull it by the plug and not the cord. • Do not damage the power cord (mains lead) such as under direct sunlight, ... condensation Moisture may cause a malfunction to record properly. - About handling of your local authorized Sony service facility. - Anywhere extremely hot, cold, or humid. The camcorder may malfunction. The camcorder may be repaired. • If any solid object or liquid gets inside of water and ...
...a warm place, moisture may condense inside your camcorder from a ski slope into a place warmed up inside. • When disconnecting the power cord (mains lead), pull it by the plug and not the cord. • Do not damage the power cord (mains lead) such as under direct sunlight, ... condensation Moisture may cause a malfunction to record properly. - About handling of your local authorized Sony service facility. - Anywhere extremely hot, cold, or humid. The camcorder may malfunction. The camcorder may be repaired. • If any solid object or liquid gets inside of water and ...
Operating Guide
Page 127
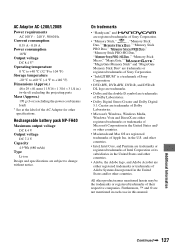
... the projecting parts Mass (Approx.) 170 g (6 oz) excluding the power cord (mains lead) * See at the label of Apple Inc. in this manual. On trademarks • "Handycam" and are registered trademarks of Sony Corporation. • "Memory Stick," , "Memory Stick Duo," " ...Power consumption 18 W Output voltage DC 8.4 V* Operating temperature 0 °C to +40 °C (32 °F to 104 °F) Storage temperature -20 °C to +60 °C (-4 °F to change without notice. Rechargeable battery pack NP-FH40 Maximum output voltage DC 8.4 V Output voltage DC 7.2 V Capacity 4.9 Wh (680...
... the projecting parts Mass (Approx.) 170 g (6 oz) excluding the power cord (mains lead) * See at the label of Apple Inc. in this manual. On trademarks • "Handycam" and are registered trademarks of Sony Corporation. • "Memory Stick," , "Memory Stick Duo," " ...Power consumption 18 W Output voltage DC 8.4 V* Operating temperature 0 °C to +40 °C (32 °F to 104 °F) Storage temperature -20 °C to +60 °C (-4 °F to change without notice. Rechargeable battery pack NP-FH40 Maximum output voltage DC 8.4 V Output voltage DC 7.2 V Capacity 4.9 Wh (680...

Operating Guide
Page 137
... effect 96, 109 Playback 35, 43 Playback zoom 46 Playing time 23 Playlist Creating 59 Divide 61 Erase 60 Move 61 Playback 60 PORTRAIT 94 Power cord (mains lead) ...... 21 Precautions 117 Preparation 21 Print 64 Protect 113 Q QUICK ON 41 QUICK ON STBY 89 R REC MODE (Recording mode 80 Recording 34...
... effect 96, 109 Playback 35, 43 Playback zoom 46 Playing time 23 Playlist Creating 59 Divide 61 Erase 60 Move 61 Playback 60 PORTRAIT 94 Power cord (mains lead) ...... 21 Precautions 117 Preparation 21 Print 64 Protect 113 Q QUICK ON 41 QUICK ON STBY 89 R REC MODE (Recording mode 80 Recording 34...


