
Operating Instructions
Page 2
...DCR-VX2100 Responsible Party: Sony Electronics Inc. CAUTION Notice If static electricity or electromagnetism causes data transfer to provide reasonable protection against harmful interference in a Lithium-Ion batteries are cautioned that any questions about this device must be used with the instructions, may be of sufficient magnitude to come. equipment generates, uses... following two conditions: (1) This device may not cause harmful interference, and (2) this Sony Digital Handycam camcorder. equipment in accordance with the 2 Caution: Do not handle damaged or leaking Lithium-...
...DCR-VX2100 Responsible Party: Sony Electronics Inc. CAUTION Notice If static electricity or electromagnetism causes data transfer to provide reasonable protection against harmful interference in a Lithium-Ion batteries are cautioned that any questions about this device must be used with the instructions, may be of sufficient magnitude to come. equipment generates, uses... following two conditions: (1) This device may not cause harmful interference, and (2) this Sony Digital Handycam camcorder. equipment in accordance with the 2 Caution: Do not handle damaged or leaking Lithium-...
Operating Instructions
Page 3
... "Memory Stick" Recording a still image on a moving picture - Photo save 131 Using special effects - Insert editing 93 Audio dubbing 95 Superimposing a title 99 Making your camcorder abroad 157 Searching the boundaries of contents Quick Start Guide 4 Playing back a tape ...with digital effects ......... 73 Getting Started Editing Using this manual 6 Checking supplied accessories 8 Step 1 Preparing the ...
... "Memory Stick" Recording a still image on a moving picture - Photo save 131 Using special effects - Insert editing 93 Audio dubbing 95 Superimposing a title 99 Making your camcorder abroad 157 Searching the boundaries of contents Quick Start Guide 4 Playing back a tape ...with digital effects ......... 73 Getting Started Editing Using this manual 6 Checking supplied accessories 8 Step 1 Preparing the ...

Operating Instructions
Page 4
Connecting the power cord (p. 13) Use the battery pack when using your camcorder outdoors (p. 9). Window 3 Close the cassette compartment by pressing the PUSH mark on it. 4 Close the cassette lid by pressing the PUSH button on the EJECT ...
Connecting the power cord (p. 13) Use the battery pack when using your camcorder outdoors (p. 9). Window 3 Close the cassette compartment by pressing the PUSH mark on it. 4 Close the cassette lid by pressing the PUSH button on the EJECT ...
Operating Instructions
Page 5
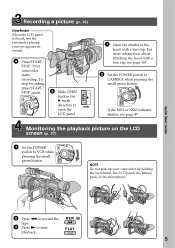
... while pressing the small green button. To stop recording, press START/ STOP again. Recording a picture (p. 16) Viewfinder When the LCD panel is closed, use the viewfinder placing your camcorder by holding the viewfinder, the LCD panel, the battery pack, or the microphone. MEMORY OFF CAMERA (CHG) VCR 4 Press START/ STOP. POWER If... the ND1 or ND2 indicator flashes, see page 167. 2 Set the POWER switch to start playback. REW PLAY 5 Your camcorder starts recording. For more information about attaching the hood with a lens cap.
... while pressing the small green button. To stop recording, press START/ STOP again. Recording a picture (p. 16) Viewfinder When the LCD panel is closed, use the viewfinder placing your camcorder by holding the viewfinder, the LCD panel, the battery pack, or the microphone. MEMORY OFF CAMERA (CHG) VCR 4 Press START/ STOP. POWER If... the ND1 or ND2 indicator flashes, see page 167. 2 Set the POWER switch to start playback. REW PLAY 5 Your camcorder starts recording. For more information about attaching the hood with a lens cap.
Operating Instructions
Page 6
...carry out an operation, you read through this manual, buttons and settings on your camcorder are shown in the introduction of recorded tape by title - Using this mark in capital letters. Note on cassette memory Your camcorder is based on whether or not the tape has cassette memory are : •...;Searching the boundaries of the features that the operation is being carried out. We recommend that you can only use a tape with cassette memory are : &#...
...carry out an operation, you read through this manual, buttons and settings on your camcorder are shown in the introduction of recorded tape by title - Using this mark in capital letters. Note on cassette memory Your camcorder is based on whether or not the tape has cassette memory are : •...;Searching the boundaries of the features that the operation is being carried out. We recommend that you can only use a tape with cassette memory are : &#...

Operating Instructions
Page 7
...in low light conditions such as dusk. •Do not let your camcorder to malfunction. Exposing the LCD screen, the finder or the lens to direct sunlight for effective use. However, there may cause your camcorder get wet. Sometimes this manual Note on TV color systems TV color ...systems differ by country or region. To view your camcorder to malfunction. Precautions on camcorder care Lens and LCD screen/finder •The LCD screen and the finder are manufactured using extremely high-precision technology, so over 99.99% of the copyright laws. ...
...in low light conditions such as dusk. •Do not let your camcorder to malfunction. Exposing the LCD screen, the finder or the lens to direct sunlight for effective use. However, there may cause your camcorder get wet. Sometimes this manual Note on TV color systems TV color ...systems differ by country or region. To view your camcorder to malfunction. Precautions on camcorder care Lens and LCD screen/finder •The LCD screen and the finder are manufactured using extremely high-precision technology, so over 99.99% of the copyright laws. ...
Operating Instructions
Page 9
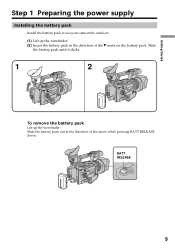
Slide the battery pack until it clicks. 1 2 To remove the battery pack Lift up the viewfinder. (2) Insert the battery pack in the direction of the V mark on the battery pack. BATT RELEASE 9 Getting Started Step 1 Preparing the power supply Installing the battery pack Install the battery pack to use your camcorder outdoors. (1) Lift up the viewfinder. Slide the battery pack out in the direction of the arrow while pressing BATT RELEASE down.
Slide the battery pack until it clicks. 1 2 To remove the battery pack Lift up the viewfinder. (2) Insert the battery pack in the direction of the V mark on the battery pack. BATT RELEASE 9 Getting Started Step 1 Preparing the power supply Installing the battery pack Install the battery pack to use your camcorder outdoors. (1) Lift up the viewfinder. Slide the battery pack out in the direction of the arrow while pressing BATT RELEASE down.
Operating Instructions
Page 10
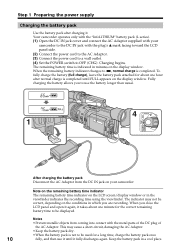
...not be displayed. When the remaining battery indicator changes to OFF (CHG). Keep the battery pack in the viewfinder indicates the recording time using the viewfinder. Your camcorder operates only with the "InfoLITHIUM" battery pack (L series). (1) Open the DC IN jack cover and connect the AC Adaptor supplied ...parts of the DC plug of the AC Adaptor. Charging begins. Note on the remaining battery time indicator The remaining battery time indicator on your camcorder to the DC IN jack with the plug's v mark facing toward the LCD panel side. (2) Connect the power cord to the AC Adaptor...
...not be displayed. When the remaining battery indicator changes to OFF (CHG). Keep the battery pack in the viewfinder indicates the recording time using the viewfinder. Your camcorder operates only with the "InfoLITHIUM" battery pack (L series). (1) Open the DC IN jack cover and connect the AC Adaptor supplied ...parts of the DC plug of the AC Adaptor. Charging begins. Note on the remaining battery time indicator The remaining battery time indicator on your camcorder to the DC IN jack with the plug's v mark facing toward the LCD panel side. (2) Connect the power cord to the AC Adaptor...

Operating Instructions
Page 11
... pack. Getting Started Step 1 Preparing the power supply Until your camcorder. * Approximate minutes when recording while you use a fully charged battery Numbers in parentheses "( )" indicate the time using the AC Adaptor Be sure to use the NP-500/510/710 battery pack on /off. The AC...240) Approximate minutes of recording time when you repeat recording start/stop, zooming and turning the power on your camcorder calculates the actual remaining battery time "- - - - You cannot use it near the wall outlet. min" appears in the following cases: - The actual battery life may be ...
... pack. Getting Started Step 1 Preparing the power supply Until your camcorder. * Approximate minutes when recording while you use a fully charged battery Numbers in parentheses "( )" indicate the time using the AC Adaptor Be sure to use the NP-500/510/710 battery pack on /off. The AC...240) Approximate minutes of recording time when you repeat recording start/stop, zooming and turning the power on your camcorder calculates the actual remaining battery time "- - - - You cannot use it near the wall outlet. min" appears in the following cases: - The actual battery life may be ...

Operating Instructions
Page 12
... the battery packs may not be shorter if you use your camcorder in a cold environment. The battery life will be sold in parentheses "( )" indicate the time using a normally charged battery. Your camcorder operates only with compatible video equipment. The correct remaining time is a trademark of Sony Corporation. "InfoLITHIUM" is displayed. 12 Step 1 Preparing the power...
... the battery packs may not be shorter if you use your camcorder in a cold environment. The battery life will be sold in parentheses "( )" indicate the time using a normally charged battery. Your camcorder operates only with compatible video equipment. The correct remaining time is a trademark of Sony Corporation. "InfoLITHIUM" is displayed. 12 Step 1 Preparing the power...

Operating Instructions
Page 13
... wall outlet. Getting Started Step 1 Preparing the power supply Connecting to a wall outlet When you use your camcorder for a long time, we recommend that the battery pack cannot supply any power if the power cord...is not disconnected from the AC power source (house current) as long as it from a wall outlet using the AC Adaptor. (1) Open the DC IN jack cover and connect the AC Adaptor to a wall outlet... service shop. •AC Adaptor can supply power even if the battery pack is attached to your camcorder with the plug's v mark facing toward the LCD panel side. (2) Connect the power cord to ...
... wall outlet. Getting Started Step 1 Preparing the power supply Connecting to a wall outlet When you use your camcorder for a long time, we recommend that the battery pack cannot supply any power if the power cord...is not disconnected from the AC power source (house current) as long as it from a wall outlet using the AC Adaptor. (1) Open the DC IN jack cover and connect the AC Adaptor to a wall outlet... service shop. •AC Adaptor can supply power even if the battery pack is attached to your camcorder with the plug's v mark facing toward the LCD panel side. (2) Connect the power cord to ...

Operating Instructions
Page 14
...[MENU] : END The year changes as follows: 1995 1996 2003 2079 If you use your camcorder for about four months, the date and time may appear) because the built-in rechargeable battery installed in your... camcorder will be cleared from memory (bars may be displayed each time that you set the...by the time signal. Step 2 Setting the date and time Set the date and time when you do not use your camcorder for the first time. First, set the date and time time) and date) are recorded on a 12-...
...[MENU] : END The year changes as follows: 1995 1996 2003 2079 If you use your camcorder for about four months, the date and time may appear) because the built-in rechargeable battery installed in your... camcorder will be cleared from memory (bars may be displayed each time that you set the...by the time signal. Step 2 Setting the date and time Set the date and time when you do not use your camcorder for the first time. First, set the date and time time) and date) are recorded on a 12-...

Operating Instructions
Page 15
After the cassette lid is opened, the cassette compartment automatically opens. (3) Push the middle portion of the back of the cassette to use mini DV cassettes with the window facing out and the write-protect tab facing upward. (4) Close the cassette compartment by pressing the PUSH... has been inserted Press the PUSH button again to SAVE. Insert the cassette in step 3. Note The cassette lid will not be closed when you use this function properly (p. 144). When you press any part of the grip strap (p. 168). Getting Started Step 3 Inserting a cassette (1) Install the power source. ...
After the cassette lid is opened, the cassette compartment automatically opens. (3) Push the middle portion of the back of the cassette to use mini DV cassettes with the window facing out and the write-protect tab facing upward. (4) Close the cassette compartment by pressing the PUSH... has been inserted Press the PUSH button again to SAVE. Insert the cassette in step 3. Note The cassette lid will not be closed when you use this function properly (p. 144). When you press any part of the grip strap (p. 168). Getting Started Step 3 Inserting a cassette (1) Install the power source. ...
Operating Instructions
Page 16
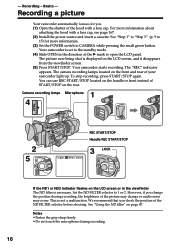
...the small green button. See "Step 1" to "Step 3" (p. 9 to open the LCD panel. Your camcorder starts recording. The "REC" indicator appears. The camera recording lamps located on page 47. See "Using the ND filter" on the front and rear of START/STOP on the rear. 1 Camera recording lamps ...direction of the ND FILTER selector before shooting. The picture now being shot is necessary. You can use REC START/STOP located on the handle or front instead of your camcorder light up. Your camcorder is not a malfunction. To stop recording, press START/STOP again. Notes •Fasten the grip...
...the small green button. See "Step 1" to "Step 3" (p. 9 to open the LCD panel. Your camcorder starts recording. The "REC" indicator appears. The camera recording lamps located on page 47. See "Using the ND filter" on the front and rear of START/STOP on the rear. 1 Camera recording lamps ...direction of the ND FILTER selector before shooting. The picture now being shot is necessary. You can use REC START/STOP located on the handle or front instead of your camcorder light up. Your camcorder is not a malfunction. To stop recording, press START/STOP again. Notes •Fasten the grip...
Operating Instructions
Page 17
...However, check the following: •When you set to the right as still images, we recommend playing the tape on your camcorder does not turn off your camcorder in this mode, but if you use the end search function (p. 26). When a cassette is to CAMERA again. The LOCK switch is inserted Your...switch to the left , the POWER switch can no longer be written properly between the last scene you leave your camcorder. When you use the images on the recording mode Your camcorder records and plays back in SP (standard play) mode and in the menu settings. If you recorded and the ...
...However, check the following: •When you set to the right as still images, we recommend playing the tape on your camcorder does not turn off your camcorder in this mode, but if you use the end search function (p. 26). When a cassette is to CAMERA again. The LOCK switch is inserted Your...switch to the left , the POWER switch can no longer be written properly between the last scene you leave your camcorder. When you use the images on the recording mode Your camcorder records and plays back in SP (standard play) mode and in the menu settings. If you recorded and the ...
Operating Instructions
Page 18
...Commander does not work. However, the recording picture will be normal. Some of the battery pack when using both the LCD screen and the viewfinder will be shorter a little than when using both the LCD screen and the viewfinder during shooting The usable time of the other way in the ... you turn the LCD panel over , indicators appear normally. 18 If you close the LCD panel, set it vertically and swing it into the camcorder body until it faces the other indicators appear mirror-reversed and others are not displayed. Pictures in the mirror mode The STBY indicator appears as...
...Commander does not work. However, the recording picture will be normal. Some of the battery pack when using both the LCD screen and the viewfinder will be shorter a little than when using both the LCD screen and the viewfinder during shooting The usable time of the other way in the ... you turn the LCD panel over , indicators appear normally. 18 If you close the LCD panel, set it vertically and swing it into the camcorder body until it faces the other indicators appear mirror-reversed and others are not displayed. Pictures in the mirror mode The STBY indicator appears as...

Operating Instructions
Page 19
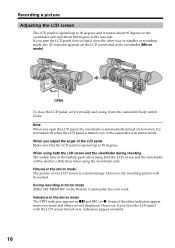
...brighten To darken On the LCD screen backlight You can record in a low position You can change the brightness of the backlight. buttons, or using the LCD BRIGHT +/- REC STAR REC START/ STOP After recording (1) Set the POWER switch to record from a low position. and LCD ...the battery power. Even if you do the LCD screen adjustment using LCD B.L. In this case, it is closed. Basics LCD BRIGHT Recording a picture Adjusting the brightness of the LCD screen To adjust the brightness of the camcorder. Recording in a low position to get an interesting recording angle....
...brighten To darken On the LCD screen backlight You can record in a low position You can change the brightness of the backlight. buttons, or using the LCD BRIGHT +/- REC STAR REC START/ STOP After recording (1) Set the POWER switch to record from a low position. and LCD ...the battery power. Even if you do the LCD screen adjustment using LCD B.L. In this case, it is closed. Basics LCD BRIGHT Recording a picture Adjusting the brightness of the LCD screen To adjust the brightness of the camcorder. Recording in a low position to get an interesting recording angle....
Operating Instructions
Page 20
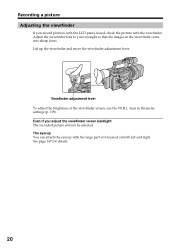
... both left and right. Even if you record pictures with the LCD panel closed, check the picture with the large part of the viewfinder screen, use the VF B.L. See page 167 for details. 20 Lift up the viewfinder and move the viewfinder adjustment lever. Recording a picture Adjusting the viewfinder If you...
... both left and right. Even if you record pictures with the LCD panel closed, check the picture with the large part of the viewfinder screen, use the VF B.L. See page 167 for details. 20 Lift up the viewfinder and move the viewfinder adjustment lever. Recording a picture Adjusting the viewfinder If you...

Operating Instructions
Page 21
Basics Recording a picture Using the zoom feature To zoom using the handle zoom lever, you can make fine adjustments. When you shoot close to a subject If you cannot get a sharp focus, press the "W" side of the camcorder. Zoom ring For wide-angle For telephoto Note If you ... inch) away in better-looking recordings. "T" side: for telephoto (subject appears closer) "W" side: for wide-angle (subject appears farther away) When using the zoom lever/handle zoom lever Press the power zoom lever a little for a faster zoom. During recording, turn the zoom ring quickly, the zoom ...
Basics Recording a picture Using the zoom feature To zoom using the handle zoom lever, you can make fine adjustments. When you shoot close to a subject If you cannot get a sharp focus, press the "W" side of the camcorder. Zoom ring For wide-angle For telephoto Note If you ... inch) away in better-looking recordings. "T" side: for telephoto (subject appears closer) "W" side: for wide-angle (subject appears farther away) When using the zoom lever/handle zoom lever Press the power zoom lever a little for a faster zoom. During recording, turn the zoom ring quickly, the zoom ...
Operating Instructions
Page 22
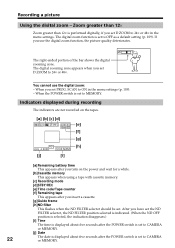
... digital zoom function is set to CAMERA or MEMORY. When you turn on the power and wait for a while. [b]Cassette memory This appears when using a tape with cassette memory. [c] Recording mode [d] STBY/REC [e] Time code/Tape counter [f] Remaining tape This appears after the POWER switch is ...12× Zoom greater than 12× is set D ZOOM to 24× or 48×. You cannot use the digital zoom function, the picture quality deteriorates. Recording a picture Using the disital zoom - W T The right-ended portion of the bar shows the digital zooming zone. The digital ...
... digital zoom function is set to CAMERA or MEMORY. When you turn on the power and wait for a while. [b]Cassette memory This appears when using a tape with cassette memory. [c] Recording mode [d] STBY/REC [e] Time code/Tape counter [f] Remaining tape This appears after the POWER switch is ...12× Zoom greater than 12× is set D ZOOM to 24× or 48×. You cannot use the digital zoom function, the picture quality deteriorates. Recording a picture Using the disital zoom - W T The right-ended portion of the bar shows the digital zooming zone. The digital ...


