
Operating Instructions
Page 2
...only. You will soon be producing home video that you have any interference received, including interference that may not cause harmful interference, and (2) this device must accept any questions about this Sony Digital Handycam camcorder. For customers in the U.S.A. Regulatory Information... DCR-TRV730, DCRTRV828, DCR-TRV830 Responsible Party: Sony Electronics lnc. Caution: Do not handle damaged or leaking lithium ion battery. If you can capture life's precious moments with superior picture and sound quality. For the customers in the U.S.A. Welcome! Your Digital ...
...only. You will soon be producing home video that you have any interference received, including interference that may not cause harmful interference, and (2) this device must accept any questions about this Sony Digital Handycam camcorder. For customers in the U.S.A. Regulatory Information... DCR-TRV730, DCRTRV828, DCR-TRV830 Responsible Party: Sony Electronics lnc. Caution: Do not handle damaged or leaking lithium ion battery. If you can capture life's precious moments with superior picture and sound quality. For the customers in the U.S.A. Welcome! Your Digital ...

Operating Instructions
Page 5
...- END SEARCH/ EDITSEARCH/Rec Review 26 Playback - MPEG movie recording ....... 104 Recording moving pictures from a tape as a still image 102 Recording moving picture - Photo save 115 Viewing a still image - Digital effect 40 Using the PROGRAM AE function 43 Adjusting the exposure ... Playing back a tape with analog video unit and your computer - SLIDE SHOW 131 Preventing accidental erasure - Insert Editing 76 Customizing Your Camcorder Changing the menu settings 78 "Memory Stick" operations Using "Memory Stick"-introduction .......... 88 Recording still images on an image -...
...- END SEARCH/ EDITSEARCH/Rec Review 26 Playback - MPEG movie recording ....... 104 Recording moving pictures from a tape as a still image 102 Recording moving picture - Photo save 115 Viewing a still image - Digital effect 40 Using the PROGRAM AE function 43 Adjusting the exposure ... Playing back a tape with analog video unit and your computer - SLIDE SHOW 131 Preventing accidental erasure - Insert Editing 76 Customizing Your Camcorder Changing the menu settings 78 "Memory Stick" operations Using "Memory Stick"-introduction .......... 88 Recording still images on an image -...
Operating Instructions
Page 8
... model used for example, "DCR-TRV830 only." Using this manual The instructions in this manual are shown in the Hi8 /standard 8 system. Also, your camcorder plays back tapes recorded in the illustrations. e.g. To view your digital camcorder, you can use the functions in "Advanced Playback Operations" on page 52 to CAMERA. Unauthorized recording of such materials may be...
... model used for example, "DCR-TRV830 only." Using this manual The instructions in this manual are shown in the Hi8 /standard 8 system. Also, your camcorder plays back tapes recorded in the illustrations. e.g. To view your digital camcorder, you can use the functions in "Advanced Playback Operations" on page 52 to CAMERA. Unauthorized recording of such materials may be...

Operating Instructions
Page 24
To enable NightShot Light, set to ON in normal recording, the picture may cause your camcorder to malfunction. •When you can not use the Super NightShot function. Digital effect - NightShot Light NightShot Light rays are infrared and so are invisible. The maximum shooting distance using the ... to 16 times brighter than those recorded in the NightShot mode. (1) Slide NIGHTSHOT to ON in the menu settings (p. 78). Exposure - This may be clearer with the autofocus mode when using the Super NightShot function, you keep NIGHTSHOT set N.S.LIGHT to ON in CAMERA mode.
To enable NightShot Light, set to ON in normal recording, the picture may cause your camcorder to malfunction. •When you can not use the Super NightShot function. Digital effect - NightShot Light NightShot Light rays are infrared and so are invisible. The maximum shooting distance using the ... to 16 times brighter than those recorded in the NightShot mode. (1) Slide NIGHTSHOT to ON in the menu settings (p. 78). Exposure - This may be clearer with the autofocus mode when using the Super NightShot function, you keep NIGHTSHOT set N.S.LIGHT to ON in CAMERA mode.
Operating Instructions
Page 33
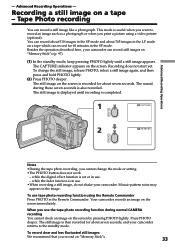
... recording function using a video printer (optional). Recording a still image on the screen immediately. You can record about 510 images in the SP mode and about seven seconds, and your camcorder can record still images on the screen by pressing PHOTO lightly. while the digital effect function is in use . •When recording a still image, do not shake your camcorder. Recording...
... recording function using a video printer (optional). Recording a still image on the screen immediately. You can record about 510 images in the SP mode and about seven seconds, and your camcorder can record still images on the screen by pressing PHOTO lightly. while the digital effect function is in use . •When recording a still image, do not shake your camcorder. Recording...

Operating Instructions
Page 38
...PROGRAM AE (Overlap, wipe, or dot function only) - Notes •The overlap, wipe and dot functions work only for tapes recorded in the Digital8 system. •You cannot use the fader function while using the following functions while using the fader function. Tape photo... indicator stops flashing. Depending on the tape. Low lux mode of all. (2) Press START/STOP. Super NightShot - Digital effect - As the image is carried out, your camcorder automatically returns to the normal mode. 1 FADER FADER To cancel the fader function Before pressing START/STOP, press FADER until...
...PROGRAM AE (Overlap, wipe, or dot function only) - Notes •The overlap, wipe and dot functions work only for tapes recorded in the Digital8 system. •You cannot use the fader function while using the following functions while using the fader function. Tape photo... indicator stops flashing. Depending on the tape. Low lux mode of all. (2) Press START/STOP. Super NightShot - Digital effect - As the image is carried out, your camcorder automatically returns to the normal mode. 1 FADER FADER To cancel the fader function Before pressing START/STOP, press FADER until...

Operating Instructions
Page 40
...image STILL Still image LUMI. Your camcorder automatically sets the wide mode to ON, picture effect to recorded image using the various digital functions. FLASH (FLASH MOTION) You can add an old movie type atmosphere to images. OLD MOVIE You can record still images successively at constant intervals.... SLOW SHTR (SLOW SHUTTER) You can record the image so that ...
...image STILL Still image LUMI. Your camcorder automatically sets the wide mode to ON, picture effect to recorded image using the various digital functions. FLASH (FLASH MOTION) You can add an old movie type atmosphere to images. OLD MOVIE You can record still images successively at constant intervals.... SLOW SHTR (SLOW SHUTTER) You can record the image so that ...

Operating Instructions
Page 44
... mode - Notes •In the spotlight, sports lesson and beach & ski modes, you are recording under a discharge tube such as a fluorescent lamp, sodium lamp or mercury lamp Flickering or changes in...color may occur in the following functions do not work in the PROGRAM AE mode: - Digital effect - Dot •While setting the NIGHTSHOT to ON, the PROGRAM AE function does ...landscape modes, your camcorder is set to focus only on distant subjects. •The following modes. Wipe - Overlap - Using the PROGRAM AE function (1) Press MENU to display menu settings in CAMERA or MEMORY mode...
... mode - Notes •In the spotlight, sports lesson and beach & ski modes, you are recording under a discharge tube such as a fluorescent lamp, sodium lamp or mercury lamp Flickering or changes in...color may occur in the following functions do not work in the PROGRAM AE mode: - Digital effect - Dot •While setting the NIGHTSHOT to ON, the PROGRAM AE function does ...landscape modes, your camcorder is set to focus only on distant subjects. •The following modes. Wipe - Overlap - Using the PROGRAM AE function (1) Press MENU to display menu settings in CAMERA or MEMORY mode...

Operating Instructions
Page 53
.... (4) Turn SEL/PUSH EXEC dial to adjust the effect. Pictures processed by the digital effect function Pictures processed by the digital effect function are not output through the DV IN/OUT jack. To record images that you have processed using your camcorder as a still image. (5) Turn the SEL/PUSH EXEC dial to select the...
.... (4) Turn SEL/PUSH EXEC dial to adjust the effect. Pictures processed by the digital effect function Pictures processed by the digital effect function are not output through the DV IN/OUT jack. To record images that you have processed using your camcorder as a still image. (5) Turn the SEL/PUSH EXEC dial to select the...

Operating Instructions
Page 60
... the operating instructions of the A/V connecting cable. DV DV IN/OUT 60 With digital-to DV IN/OUT of both your camcorder and the VCR. Dubbing a tape If your camcorder. (5) Start recording on the VCR. Connect an S video cable (optional) to the S video jacks of the DV products. With this connection, you have finished dubbing a tape...
... the operating instructions of the A/V connecting cable. DV DV IN/OUT 60 With digital-to DV IN/OUT of both your camcorder and the VCR. Dubbing a tape If your camcorder. (5) Start recording on the VCR. Connect an S video cable (optional) to the S video jacks of the DV products. With this connection, you have finished dubbing a tape...

Operating Instructions
Page 62
...dub using an i.LINK cable (DV connecting cable) With a digital-to IR in page 59. Step 3 Adjusting the synchronicity of your camcorder . •When editing digital video, the operation signals cannot be able to 20 programs. Unwanted ...digital connection, video and audio signals are transmitted in page 60. Notes •The Digital program editing works only for editing onto a tape without operating the VCR. Dubbing only desired scenes - You can skip steps 2 and 3. When you connect with LANC . Digital program editing You can duplicate selected scenes (programs) for tapes recorded...
...dub using an i.LINK cable (DV connecting cable) With a digital-to IR in page 59. Step 3 Adjusting the synchronicity of your camcorder . •When editing digital video, the operation signals cannot be able to 20 programs. Unwanted ...digital connection, video and audio signals are transmitted in page 60. Notes •The Digital program editing works only for editing onto a tape without operating the VCR. Dubbing only desired scenes - You can skip steps 2 and 3. When you connect with LANC . Digital program editing You can duplicate selected scenes (programs) for tapes recorded...

Operating Instructions
Page 63
Digital program editing Step 2: Setting the VCR to operate with the A/V connecting cable To edit using an A/V connecting cable, ... the IR SETUP code 1 Set the POWER switch to select the IR SETUP code number of the connected VCR on the VCR. When you connect a video camera recorder, set the input selector to LINE. I N " " CUT-OUT " I R SETUP P AUS EMODE I R TEST RETURN [ MENU ] : END 6-9 OTHERS ED I R ADJ...to select IR SETUP, then press the dial. 9 Turn the SEL/PUSH EXEC dial to VCR on your camcorder. 2 Turn the power of your VCR, then press the dial. Dubbing only desired scenes -
Digital program editing Step 2: Setting the VCR to operate with the A/V connecting cable To edit using an A/V connecting cable, ... the IR SETUP code 1 Set the POWER switch to select the IR SETUP code number of the connected VCR on the VCR. When you connect a video camera recorder, set the input selector to LINE. I N " " CUT-OUT " I R SETUP P AUS EMODE I R TEST RETURN [ MENU ] : END 6-9 OTHERS ED I R ADJ...to select IR SETUP, then press the dial. 9 Turn the SEL/PUSH EXEC dial to VCR on your camcorder. 2 Turn the power of your VCR, then press the dial. Dubbing only desired scenes -

Operating Instructions
Page 64
... code number 3. Wards) 89 Aiwa 80 Audio Dynamic 21, 35 Bell & Howell (M. Be sure to set the correct code depending on IR SETUP code Digital program editing is not possible if the VCR does not support IR SETUP codes. 64 Default setting is stored in the memory of your VCR...*, 94*, 24* Sanyo 36, 37 Scott 40, 41, 32, 37, 28, 22, 23, 24 Sharp 89, 88 Shintom 73 Signature 2000 (M. Brand IR SETUP code Sony 1, 2, 3, 4, 5, 6 Admiral (M. Dubbing only desired scenes - Wards) 80, 89 Sylvania 83, 78, 77, 80 Symphonic 80 Tashiro 47 Tatung 21, 33, 35 Teac 21, 33,...
... code number 3. Wards) 89 Aiwa 80 Audio Dynamic 21, 35 Bell & Howell (M. Be sure to set the correct code depending on IR SETUP code Digital program editing is not possible if the VCR does not support IR SETUP codes. 64 Default setting is stored in the memory of your VCR...*, 94*, 24* Sanyo 36, 37 Scott 40, 41, 32, 37, 28, 22, 23, 24 Sharp 89, 88 Shintom 73 Signature 2000 (M. Brand IR SETUP code Sony 1, 2, 3, 4, 5, 6 Admiral (M. Dubbing only desired scenes - Wards) 80, 89 Sylvania 83, 78, 77, 80 Symphonic 80 Tashiro 47 Tatung 21, 33, 35 Teac 21, 33,...

Operating Instructions
Page 65
... devices about 30 cm (11 7/8 in.) apart, and remove any obstacles between the devices. Select PAUSE if the button to cancel recording pause on your camcorder and the VCR to cancel recording pause is X. - I N " " CUT-OUT " I R SETUP P AUS EMODE P AUS E I R TEST REC RETURN PB [ MENU ] : END OTHERS ED I R TEST RETURN [ ...PUSH EXEC dial to select PAUSEMODE, then press the dial. 2 Turn the SEL/PUSH EXEC dial to select the mode to cancel recording pause is z. - To cancel recording pause: - Digital program editing (2) Setting the modes to cancel recording pause on the following page) 65
... devices about 30 cm (11 7/8 in.) apart, and remove any obstacles between the devices. Select PAUSE if the button to cancel recording pause on your camcorder and the VCR to cancel recording pause is X. - I N " " CUT-OUT " I R SETUP P AUS EMODE P AUS E I R TEST REC RETURN PB [ MENU ] : END OTHERS ED I R TEST RETURN [ ...PUSH EXEC dial to select PAUSEMODE, then press the dial. 2 Turn the SEL/PUSH EXEC dial to select the mode to cancel recording pause is z. - To cancel recording pause: - Digital program editing (2) Setting the modes to cancel recording pause on the following page) 65

Operating Instructions
Page 66
... EXECUTE, then press the dial. If the VCR starts recording, the setting is correct. Digital program editing (4) Confirming VCR operation 1 Insert a recordable tape into the VCR, then set the IR SETUP or the PAUSEMODE again. •Place your camcorder at least 30 cm (11 7/8 in "About the IR... SETUP code", set to recording pause. 2 Turn the SEL/PUSH EXEC...
... EXECUTE, then press the dial. If the VCR starts recording, the setting is correct. Digital program editing (4) Confirming VCR operation 1 Insert a recordable tape into the VCR, then set the IR SETUP or the PAUSEMODE again. •Place your camcorder at least 30 cm (11 7/8 in "About the IR... SETUP code", set to recording pause. 2 Turn the SEL/PUSH EXEC...

Operating Instructions
Page 67
... the dial. (6) Turn the SEL/PUSH EXEC dial to select CONTROL, then press the dial. (7) Turn the SEL/PUSH EXEC dial to VCR on your camcorder . (2) Turn the power of the connected VCR on the following page) 67 I N " " CUT-OUT " I R SETUP P AUS EMODE I T...OTHERS ED I T SET CONTROL I R TEST RETURN [ MENU ] : END IR i . Editing Dubbing only desired scenes - Digital program editing Step 2: Setting the VCR to operate with the i.LINK cable (DV connecting cable) When you connect a digital video camera recorder, set the input selector to DV input. I N " " CUT-OUT " I R SETUP P AUS EMODE I R ADJ...
... the dial. (6) Turn the SEL/PUSH EXEC dial to select CONTROL, then press the dial. (7) Turn the SEL/PUSH EXEC dial to VCR on your camcorder . (2) Turn the power of the connected VCR on the following page) 67 I N " " CUT-OUT " I R SETUP P AUS EMODE I T...OTHERS ED I T SET CONTROL I R TEST RETURN [ MENU ] : END IR i . Editing Dubbing only desired scenes - Digital program editing Step 2: Setting the VCR to operate with the i.LINK cable (DV connecting cable) When you connect a digital video camera recorder, set the input selector to DV input. I N " " CUT-OUT " I R SETUP P AUS EMODE I R ADJ...

Operating Instructions
Page 68
... the SEL/PUSH EXEC dial to select the average numerical value of OUT, then press the dial. Digital program editing Step 3: Adjusting the synchronicity of the VCR You can adjust the synchronicity of your camcorder. (1) Set the POWER swtich to select the average numerical value of IN, then press the dial. The... the SEL/PUSH EXEC dial to select ADJ TEST, then press the dial. (4) Turn the SEL/PUSH EXEC dial to calculate the numerical values for recording is set . (9) Turn the SEL/PUSH EXEC dial to select "CUT-OUT", then press the dial. (10) Turn the SEL/PUSH EXEC dial to VCR...
... the SEL/PUSH EXEC dial to select the average numerical value of OUT, then press the dial. Digital program editing Step 3: Adjusting the synchronicity of the VCR You can adjust the synchronicity of your camcorder. (1) Set the POWER swtich to select the average numerical value of IN, then press the dial. The... the SEL/PUSH EXEC dial to select ADJ TEST, then press the dial. (4) Turn the SEL/PUSH EXEC dial to calculate the numerical values for recording is set . (9) Turn the SEL/PUSH EXEC dial to select "CUT-OUT", then press the dial. (10) Turn the SEL/PUSH EXEC dial to VCR...

Operating Instructions
Page 70
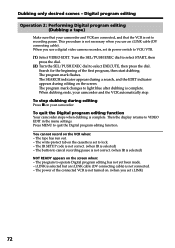
... to light blue. The OUT point of the first program is set , and the top part of the program mark changes to insert using the video operation buttons, then pause playback. (8) Press the SEL/PUSH EXEC dial. When the program is set a maximum of the first scene you want to... desired scenes - You can set , then the bottom part of the first scene you want to 8. Digital program editing Operation 1: Making the program (1) Insert the tape for playback into your camcorder, and insert a tape for recording into the VCR. (2) Press MENU to display the menu. (3) Turn the SEL/PUSH EXEC dial to...
... to light blue. The OUT point of the first program is set , and the top part of the program mark changes to insert using the video operation buttons, then pause playback. (8) Press the SEL/PUSH EXEC dial. When the program is set a maximum of the first scene you want to... desired scenes - You can set , then the bottom part of the first scene you want to 8. Digital program editing Operation 1: Making the program (1) Insert the tape for playback into your camcorder, and insert a tape for recording into the VCR. (2) Press MENU to display the menu. (3) Turn the SEL/PUSH EXEC dial to...
Operating Instructions
Page 72
... an i.LINK cable (DV connecting cable). Dubbing only desired scenes - Search for the beginning of the connected VCR is not necessary when you use a digital video camera recorder, set to VCR/VTR. (1) Select VIDEO EDIT. When dubbing ends, your camcorder. i.LINK is selected but an i.LINK cable (DV connecting cable) is selected) - When you set to...
... an i.LINK cable (DV connecting cable). Dubbing only desired scenes - Search for the beginning of the connected VCR is not necessary when you use a digital video camera recorder, set to VCR/VTR. (1) Select VIDEO EDIT. When dubbing ends, your camcorder. i.LINK is selected but an i.LINK cable (DV connecting cable) is selected) - When you set to...

Operating Instructions
Page 73
... convert analog video signals into digital video signals via your camcorder. Signal convert function You can exchange video signals. •Depending on the analog video unit, the image may not be able to the instruction manual of the analog video signals, the computer may contain noise or incorrect colors. •You cannot record or capture the video output via...
... convert analog video signals into digital video signals via your camcorder. Signal convert function You can exchange video signals. •Depending on the analog video unit, the image may not be able to the instruction manual of the analog video signals, the computer may contain noise or incorrect colors. •You cannot record or capture the video output via...


