Operating Instructions
Page 2
...accept any changes or modifications not expressly approved in the U.S.A. Never expose the battery pack to operate this Sony Digital Handycam camcorder. You can return your unwanted lithium ion batteries to your authority to temperatures above 140°F (60...SONY (Canada only). Address: 1 Sony Drive, Park Ridge, NJ, 07656 USA Telephone No.: 201-930-6972 This device complies with Part 15 of Conformity Trade Name: SONY Model No.: DCR-TRV6, DCR-TRV11 Responsible Party:Sony Electronics Inc. LITHIUM ION BATTERY. Congratulations on your Digital Handycam, you call : Sony...
...accept any changes or modifications not expressly approved in the U.S.A. Never expose the battery pack to operate this Sony Digital Handycam camcorder. You can return your unwanted lithium ion batteries to your authority to temperatures above 140°F (60...SONY (Canada only). Address: 1 Sony Drive, Park Ridge, NJ, 07656 USA Telephone No.: 201-930-6972 This device complies with Part 15 of Conformity Trade Name: SONY Model No.: DCR-TRV6, DCR-TRV11 Responsible Party:Sony Electronics Inc. LITHIUM ION BATTERY. Congratulations on your Digital Handycam, you call : Sony...
Operating Instructions
Page 4
...back images in a "Memory Stick" on "Memory Stick"s - Table of recorded tape by date - Signal convert function 66 Recording video or TV programs ....... 67 Inserting a scene from a mini DV tape ... time 92 "Memory Stick" Operations (DCR-TRV11/TRV20 only) Using a "Memory Stick" - introduction 93 Recording still images on a tape - MEMORY MIX 105 Recording an image from a mini DV tape... own titles 81 Labeling a cassette 83 Customizing Your Camcorder Recording - Image protection 120 Deleting images 121 Writing a print mark - Digital effect ... 38 Using the PROGRAM AE function .......
...back images in a "Memory Stick" on "Memory Stick"s - Table of recorded tape by date - Signal convert function 66 Recording video or TV programs ....... 67 Inserting a scene from a mini DV tape ... time 92 "Memory Stick" Operations (DCR-TRV11/TRV20 only) Using a "Memory Stick" - introduction 93 Recording still images on a tape - MEMORY MIX 105 Recording an image from a mini DV tape... own titles 81 Labeling a cassette 83 Customizing Your Camcorder Recording - Image protection 120 Deleting images 121 Writing a print mark - Digital effect ... 38 Using the PROGRAM AE function .......
Operating Instructions
Page 23
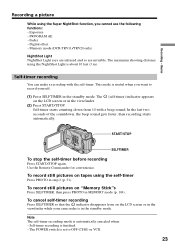
... pictures on the LCD screen or in step 2 (p. 31). To cancel self-timer recording Press SELFTIMER so that the indicator disappears from 10 with the self-timer. Memory mode (DCR-TRV11/TRV20 only) NightShot Light NightShot Light rays are infrared and so are invisible. Fader - The ...OFF (CHG) or VCR. 23 To record still pictures on the LCD screen or in MEMORY mode (p. 104). Exposure - Digital effect - Self-timer starts counting down from on "Memory Stick"s Press SELFTIMER, then press PHOTO in the viewfinder while your camcorder is useful when you cannot use the ...
... pictures on the LCD screen or in step 2 (p. 31). To cancel self-timer recording Press SELFTIMER so that the indicator disappears from 10 with the self-timer. Memory mode (DCR-TRV11/TRV20 only) NightShot Light NightShot Light rays are infrared and so are invisible. Fader - The ...OFF (CHG) or VCR. 23 To record still pictures on the LCD screen or in MEMORY mode (p. 104). Exposure - Digital effect - Self-timer starts counting down from on "Memory Stick"s Press SELFTIMER, then press PHOTO in the viewfinder while your camcorder is useful when you cannot use the ...
Operating Instructions
Page 30
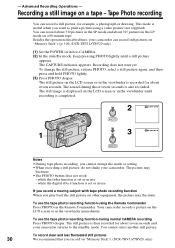
Besides the operation described here, your camcorder. The sound during normal CAMERA recording Press PHOTO deeper. while the digital effect function is also recorded. The still picture is recorded for about seven seconds. To record clear and less fluctuated still pictures 30 We ...recording function using a video printer (not supplied). while the fader function is completed. 2 CAPTURE PHOTO 1 3 PHOTO Notes • During tape photo recording, you record on the LCD screen or in the viewfinder immediately. Your camcorder records a picture on "Memory Stick"s. (DCR...
Besides the operation described here, your camcorder. The sound during normal CAMERA recording Press PHOTO deeper. while the digital effect function is also recorded. The still picture is recorded for about seven seconds. To record clear and less fluctuated still pictures 30 We ...recording function using a video printer (not supplied). while the fader function is completed. 2 CAPTURE PHOTO 1 3 PHOTO Notes • During tape photo recording, you record on the LCD screen or in the viewfinder immediately. Your camcorder records a picture on "Memory Stick"s. (DCR...

Operating Instructions
Page 36
... recorded clearly, depending on the bounce function (DCR-TRV6/TRV11 only) The BOUNCE indicator does not appear in memory mode (DCR-... is activated in /out is carried out : Your camcorder automatically returns to the normal mode. TRV6/TRV11 only): - Zoom - D ZOOM is being ...DCR- The indicator changes as follows: FADER t M.FADER* t BOUNCE* t MONOTONE t OVERLAP t WIPE t DOT t no indicator The last selected fader mode is indicated first of PROGRAM AE (Overlap, Wipe, or Random Dot function only) - Also, you cannot use the following functions while using the following functions: - Digital...
... recorded clearly, depending on the bounce function (DCR-TRV6/TRV11 only) The BOUNCE indicator does not appear in memory mode (DCR-... is activated in /out is carried out : Your camcorder automatically returns to the normal mode. TRV6/TRV11 only): - Zoom - D ZOOM is being ...DCR- The indicator changes as follows: FADER t M.FADER* t BOUNCE* t MONOTONE t OVERLAP t WIPE t DOT t no indicator The last selected fader mode is indicated first of PROGRAM AE (Overlap, Wipe, or Random Dot function only) - Also, you cannot use the following functions while using the following functions: - Digital...
Operating Instructions
Page 37
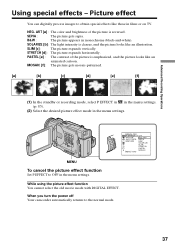
...SHTR RETURN [MENU] : END OFF NEG. When you turn the power off Your camcorder automatically returns to obtain special effects like an animated cartoon. ART [a] : The color...like an illustration. MOSAIC [f] : The picture gets mosaic-patterned. [a] [b] [c] [d] [e] [f] (1) In the standby or recording mode, select P EFFECT in in the menu settings. (p. 85). (2) Select the desired picture effect mode in the menu... You cannot select the old movie mode with DIGITAL EFFECT. SEPIA : The picture gets sepia. Picture effect You can digitally process images to the normal mode. 37 SOLARIZE...
...SHTR RETURN [MENU] : END OFF NEG. When you turn the power off Your camcorder automatically returns to obtain special effects like an animated cartoon. ART [a] : The color...like an illustration. MOSAIC [f] : The picture gets mosaic-patterned. [a] [b] [c] [d] [e] [f] (1) In the standby or recording mode, select P EFFECT in in the menu settings. (p. 85). (2) Select the desired picture effect mode in the menu... You cannot select the old movie mode with DIGITAL EFFECT. SEPIA : The picture gets sepia. Picture effect You can digitally process images to the normal mode. 37 SOLARIZE...

Operating Instructions
Page 38
... can slow down the shutter speed. LUMI. (LUMINANCEKEY) You can record the picture so that it is left. OLD MOVIE You can add special effects to recorded pictures using the various digital functions. The sound is good for recording dark pictures more brightly. Your camcorder automatically sets the wide mode to ON and picture effect...
... can slow down the shutter speed. LUMI. (LUMINANCEKEY) You can record the picture so that it is left. OLD MOVIE You can add special effects to recorded pictures using the various digital functions. The sound is good for recording dark pictures more brightly. Your camcorder automatically sets the wide mode to ON and picture effect...

Operating Instructions
Page 42
...PROGRAM AE function is selected. Soft portrait mode 42 - Sports lesson mode Slow shutter - Bounce (DCR-TRV6/TRV11 only) •The following functions do not work in the low lux mode: - Wipe ...cannot take close-ups. Notes •In the spotlight, sports lesson and beach & ski modes, you are recording under a discharge tube such as follows: y yy y y y 1 PROGRAM 2 To cancel the PROGRAM ... work in the PROGRAM AE mode: - This is because your camcorder is selected You can adjust the exposure. Digital effect - The indicator changes as a fluorescent lamp, sodium lamp or...
...PROGRAM AE function is selected. Soft portrait mode 42 - Sports lesson mode Slow shutter - Bounce (DCR-TRV6/TRV11 only) •The following functions do not work in the low lux mode: - Wipe ...cannot take close-ups. Notes •In the spotlight, sports lesson and beach & ski modes, you are recording under a discharge tube such as follows: y yy y y y 1 PROGRAM 2 To cancel the PROGRAM ... work in the PROGRAM AE mode: - This is because your camcorder is selected You can adjust the exposure. Digital effect - The indicator changes as a fluorescent lamp, sodium lamp or...

Operating Instructions
Page 46
... using your camcorder as a still picture at the time you press the SEL/PUSH EXEC dial. (3) Turn the SEL/PUSH EXEC dial to OFF (CHG) or stop playing back The digital effect function is stored in memory as a player. When you have processed using the digital effect, record the pictures ...is captured and is automatically canceled. 46 In the STILL or LUMI. Notes •You cannot process externally input scenes using the digital effect function. •To record pictures that you set the POWER switch to adjust the effect. and TRAIL. (1) In the playback/playback pause mode, press...
... using your camcorder as a still picture at the time you press the SEL/PUSH EXEC dial. (3) Turn the SEL/PUSH EXEC dial to OFF (CHG) or stop playing back The digital effect function is stored in memory as a player. When you have processed using the digital effect, record the pictures ...is captured and is automatically canceled. 46 In the STILL or LUMI. Notes •You cannot process externally input scenes using the digital effect function. •To record pictures that you set the POWER switch to adjust the effect. and TRAIL. (1) In the playback/playback pause mode, press...
Operating Instructions
Page 47
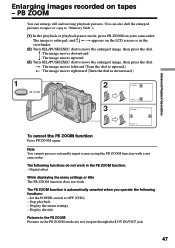
..., press PB ZOOM on tapes - Display the title Pictures in the PB ZOOM Pictures in the PB ZOOM function: - Advanced Playback Operations Enlarging images recorded on your camcorder. R : The image moves downward r : The image moves upward (3) Turn SEL/PUSH EXEC dial to downward.) 1 PB ZOOM 2 3 PB ZOOM [EXEC] :...move the enlarged image, then press the dial. Note You cannot process externally input scenes using the PB ZOOM function with your camcorder. Digital effect While displaying the menu settings or title The PB ZOOM function does not work in the PB ZOOM mode are not ...
..., press PB ZOOM on tapes - Display the title Pictures in the PB ZOOM Pictures in the PB ZOOM function: - Advanced Playback Operations Enlarging images recorded on your camcorder. R : The image moves downward r : The image moves upward (3) Turn SEL/PUSH EXEC dial to downward.) 1 PB ZOOM 2 3 PB ZOOM [EXEC] :...move the enlarged image, then press the dial. Note You cannot process externally input scenes using the PB ZOOM function with your camcorder. Digital effect While displaying the menu settings or title The PB ZOOM function does not work in the PB ZOOM mode are not ...
Operating Instructions
Page 55
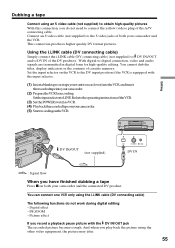
... pause picture with the input selector. (1) Insertablanktape(oratapeyouwanttorecordover)intotheVCR,andinsert the recorded tape into your camcorder and the VCR. This connection produces higher quality DV format pictures. Digital effect - With digital-to LINE. You can connect one VCR only using the other video equipment, the picture may jitter. 55 Editing DV IN/OUT (not supplied...
... pause picture with the input selector. (1) Insertablanktape(oratapeyouwanttorecordover)intotheVCR,andinsert the recorded tape into your camcorder and the VCR. This connection produces higher quality DV format pictures. Digital effect - With digital-to LINE. You can connect one VCR only using the other video equipment, the picture may jitter. 55 Editing DV IN/OUT (not supplied...

Operating Instructions
Page 56
... When you dub using the same VCR again, you can duplicate selected scenes (programs) for editing onto a tape without operating the VCR. Digital program editing You can skip steps 2 and 3. You can be selected by frame. Scenes can connect both an AV cable and an i.LINK... cable (DV connecting cable). 56 Dubbing only desired scenes - Using the Digital program editing function Operation 1 Making the program. (p. 64) Operation 2 Performing a Digital program editing (dubbing a tape). (p. 65) Step 1: Connecting the VCR Connect your camcorder and the VCR as shown on pages 54, 55.
... When you dub using the same VCR again, you can duplicate selected scenes (programs) for editing onto a tape without operating the VCR. Digital program editing You can skip steps 2 and 3. You can be selected by frame. Scenes can connect both an AV cable and an i.LINK... cable (DV connecting cable). 56 Dubbing only desired scenes - Using the Digital program editing function Operation 1 Making the program. (p. 64) Operation 2 Performing a Digital program editing (dubbing a tape). (p. 65) Step 1: Connecting the VCR Connect your camcorder and the VCR as shown on pages 54, 55.
Operating Instructions
Page 57
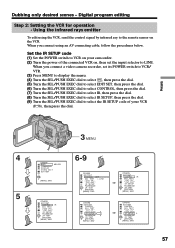
When you connect a video camera recorder, set its POWER switch to VCR/ VTR. (3) Press MENU to display the menu. (4) ..., then press the dial. (9) Turn the SEL/PUSH EXEC dial to select the IR SETUP code of your camcorder. (2) Turn the power of the connected VCR on, then set the input selector to LINE. Set the IR... OTHERS ED I R TEST RETURN [MENU] : END 57 I N CUT -OUT I R SETUP 3 PAUSEMODE I TSET CONTROL ADJ TEST CUT - Digital program editing Step 2: Setting the VCR for operation - Using the infrared rays emitter To edit using an AV connecting cable, follow the procedures below. ...
When you connect a video camera recorder, set its POWER switch to VCR/ VTR. (3) Press MENU to display the menu. (4) ..., then press the dial. (9) Turn the SEL/PUSH EXEC dial to select the IR SETUP code of your camcorder. (2) Turn the power of the connected VCR on, then set the input selector to LINE. Set the IR... OTHERS ED I R TEST RETURN [MENU] : END 57 I N CUT -OUT I R SETUP 3 PAUSEMODE I TSET CONTROL ADJ TEST CUT - Digital program editing Step 2: Setting the VCR for operation - Using the infrared rays emitter To edit using an AV connecting cable, follow the procedures below. ...

Operating Instructions
Page 58
... scenes - Code number 1 is stored in the memory of your VCR. Brand Remote control mode Sony 1, 2, 3, 4, 5, 6 Admiral (M. Be sure to this VCR (for recording) if the remote control mode does not correspond to set the correct code, depending on remote control...Sanyo 36, 37 Scott 40, 41, 32, 37, 28, 22, 23, 24 Sharp 89, 88 Shintom 73 Signature 2000 (M. Digital program editing About the IR SETUP code The IR SETUP code is preset at the factory. Wards) 80, 89 Sylvania 83, 78, ... 95, 47 Yamaha 36, 21, 33, 35 Zenith 95 * TV/VCR component Note on your camcorder.
... scenes - Code number 1 is stored in the memory of your VCR. Brand Remote control mode Sony 1, 2, 3, 4, 5, 6 Admiral (M. Be sure to this VCR (for recording) if the remote control mode does not correspond to set the correct code, depending on remote control...Sanyo 36, 37 Scott 40, 41, 32, 37, 28, 22, 23, 24 Sharp 89, 88 Shintom 73 Signature 2000 (M. Digital program editing About the IR SETUP code The IR SETUP code is preset at the factory. Wards) 80, 89 Sylvania 83, 78, ... 95, 47 Yamaha 36, 21, 33, 35 Zenith 95 * TV/VCR component Note on your camcorder.
Operating Instructions
Page 59
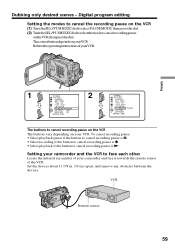
... face each other Locate the infrared ray emitter of your camcorder and face it towards the remote sensor of your VCR. To cancel recording pause: • Select playback pause if the button to cancel recording pause is X. • Select recording if the button to cancel recording pause is z. • Select playback if the button to... between the devices. I N CUT -OUT I R SETUP PAUSEMODE PAUSE I R TEST REC RETURN PB [MENU] : END 2 OTHERS ED I TSET CONTROL ADJ TEST CUT - VCR Remote sensor 59 Digital program editing Setting the modes to cancel recording pause is N.
... face each other Locate the infrared ray emitter of your camcorder and face it towards the remote sensor of your VCR. To cancel recording pause: • Select playback pause if the button to cancel recording pause is X. • Select recording if the button to cancel recording pause is z. • Select playback if the button to... between the devices. I N CUT -OUT I R SETUP PAUSEMODE PAUSE I R TEST REC RETURN PB [MENU] : END 2 OTHERS ED I TSET CONTROL ADJ TEST CUT - VCR Remote sensor 59 Digital program editing Setting the modes to cancel recording pause is N.

Operating Instructions
Page 60
If the VCR starts recording, the setting is correct. Digital program editing Confirming the VCR operation (1) InsertarecordabletapeintotheVCR,thensettorecordingpause. (2) TurntheSEL/PUSHEXECdialtoselectIRTEST,thenpressthedial. (3) TurntheSEL/PUSHEXECdialtoselectEXECUTE,thenpressthedial. I N CUT -OUT I R SETUP PAUSEMODE I R TEST RETURN RETURN EXECUTE [MENU] : END 3... correctly •After checking the code in "About the IR SETUP code", set the "IR SETUP" or the "PAUSEMODE" again. •Place your camcorder at least 11 7/8 in. (30 cm) away from the VCR. 60 Dubbing only desired scenes -
If the VCR starts recording, the setting is correct. Digital program editing Confirming the VCR operation (1) InsertarecordabletapeintotheVCR,thensettorecordingpause. (2) TurntheSEL/PUSHEXECdialtoselectIRTEST,thenpressthedial. (3) TurntheSEL/PUSHEXECdialtoselectEXECUTE,thenpressthedial. I N CUT -OUT I R SETUP PAUSEMODE I R TEST RETURN RETURN EXECUTE [MENU] : END 3... correctly •After checking the code in "About the IR SETUP code", set the "IR SETUP" or the "PAUSEMODE" again. •Place your camcorder at least 11 7/8 in. (30 cm) away from the VCR. 60 Dubbing only desired scenes -
Operating Instructions
Page 61
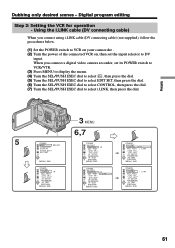
...you connect using i.LINK cable (DV connecting cable) (not supplied), follow the procedures below. (1) Set the POWER switch to VCR on your camcorder . (2) Turn the power of the connected VCR on, then set its POWER switch to VCR/VTR. (3) Press MENU to display the menu... CUT -OUT I R SETUP PAUSEMODE I R TEST RETURN [MENU] : END I NK 61 L I R i . Using the i.LINK cable (DV connecting cable) When you connect a digital video camera recorder, set the input selector to select i.LINK, then press the dial. 5 OTHERS BEEP MELODY COMMANDER D I SPL AY V I DEO ED I T ED I TSET [MENU] : END ...
...you connect using i.LINK cable (DV connecting cable) (not supplied), follow the procedures below. (1) Set the POWER switch to VCR on your camcorder . (2) Turn the power of the connected VCR on, then set its POWER switch to VCR/VTR. (3) Press MENU to display the menu... CUT -OUT I R SETUP PAUSEMODE I R TEST RETURN [MENU] : END I NK 61 L I R i . Using the i.LINK cable (DV connecting cable) When you connect a digital video camera recorder, set the input selector to select i.LINK, then press the dial. 5 OTHERS BEEP MELODY COMMANDER D I SPL AY V I DEO ED I T ED I TSET [MENU] : END ...

Operating Instructions
Page 62
... all the opening numerical values of each IN, and the average of all the closing numerical values of each to calculate the numerical values for recording is set . (9) Turn the SEL/PUSH EXEC dial to select "CUT-OUT", then press the dial. (10) Turn the SEL/PUSH EXEC dial to...dial to select ADJ TEST, then press the dial. (4) Turn the SEL/PUSH EXEC dial to select RETURN, then press the dial. 62 Digital program editing Step 3: Adjusting the synchronicity of the VCR You can adjust the synchronicity of your camcorder. (2) Insert a blank tape (or a tape you select i.LINK in the viewfinder.
... all the opening numerical values of each IN, and the average of all the closing numerical values of each to calculate the numerical values for recording is set . (9) Turn the SEL/PUSH EXEC dial to select "CUT-OUT", then press the dial. (10) Turn the SEL/PUSH EXEC dial to...dial to select ADJ TEST, then press the dial. (4) Turn the SEL/PUSH EXEC dial to select RETURN, then press the dial. 62 Digital program editing Step 3: Adjusting the synchronicity of the VCR You can adjust the synchronicity of your camcorder. (2) Insert a blank tape (or a tape you select i.LINK in the viewfinder.

Operating Instructions
Page 63
... -OUT 0 I R SETUP PAUSEMODE I R TEST RETURN [MENU] : END OTHERS ED I NG CUT - When the operations of your camcorder . •When editing digital video, the operation signals cannot be able to IR in digital form for high-quality editing. I N 0 CUT -OUT I R SETUP PAUSEMODE I R TEST RETURN [MENU] : END 9 OTHERS ED...LINK cable (DV connecting cable), you connect using an i.LINK cable (DV connecting cable) With digital-to allow about 10 seconds' lead before starting the recording. •You cannot dub the titles, display indicators, or the contents of the tape may not...
... -OUT 0 I R SETUP PAUSEMODE I R TEST RETURN [MENU] : END OTHERS ED I NG CUT - When the operations of your camcorder . •When editing digital video, the operation signals cannot be able to IR in digital form for high-quality editing. I N 0 CUT -OUT I R SETUP PAUSEMODE I R TEST RETURN [MENU] : END 9 OTHERS ED...LINK cable (DV connecting cable), you connect using an i.LINK cable (DV connecting cable) With digital-to allow about 10 seconds' lead before starting the recording. •You cannot dub the titles, display indicators, or the contents of the tape may not...
Operating Instructions
Page 64
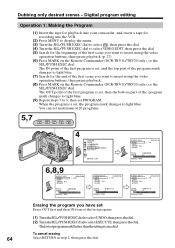
Digital program editing Operation 1: Making the Program (1) Insert the tape for playback into your camcorder, and insert a tape for recording into the VCR. (2) Press MENU to display the menu. (3) Turn the SEL/PUSH EXEC dial to select , then press the dial. (4) Turn the SEL/PUSH EXEC dial to select VIDEO ... can set maximum of the first scene you have set , the program mark changes to insert using the video operation buttons, then pause playback. (8) Press MARK on the Remote Commander (DCR-TRV11/TRV20 only), or the SEL/PUSH EXEC dial. Dubbing only desired scenes - The last set PROGRAM...
Digital program editing Operation 1: Making the Program (1) Insert the tape for playback into your camcorder, and insert a tape for recording into the VCR. (2) Press MENU to display the menu. (3) Turn the SEL/PUSH EXEC dial to select , then press the dial. (4) Turn the SEL/PUSH EXEC dial to select VIDEO ... can set maximum of the first scene you have set , the program mark changes to insert using the video operation buttons, then pause playback. (8) Press MARK on the Remote Commander (DCR-TRV11/TRV20 only), or the SEL/PUSH EXEC dial. Dubbing only desired scenes - The last set PROGRAM...


