Operating Instructions
Page 2
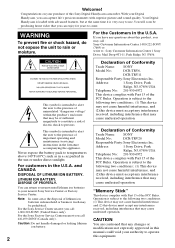
...Sony Digital Handycam camcorder. Operation is subject to the following two conditions: batteries in this manual could void your Digital...call : Sony Customer Information Center 1-800-222-SONY (7669)...Trade Name: SONY Model No.: DCR-TRV6, DCR-TRV11 Responsible Party:Sony Electronics Inc...Sony Factory Service Center nearest you may not ...Sony Service Center nearest you have any interference received, including interference that may be producing home video that may cause undesired operation. Address: 1 Sony...SONY (United States only). (1) This device may call 416-499-SONY...
...Sony Digital Handycam camcorder. Operation is subject to the following two conditions: batteries in this manual could void your Digital...call : Sony Customer Information Center 1-800-222-SONY (7669)...Trade Name: SONY Model No.: DCR-TRV6, DCR-TRV11 Responsible Party:Sony Electronics Inc...Sony Factory Service Center nearest you may not ...Sony Service Center nearest you have any interference received, including interference that may be producing home video that may cause undesired operation. Address: 1 Sony...SONY (United States only). (1) This device may call 416-499-SONY...
Operating Instructions
Page 4
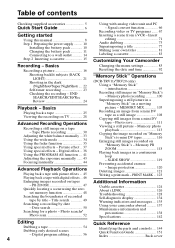
...tape with picture effects ... 45 Playing back a tape with analog video unit and PC - MEMORY MIX 105 Recording an image from a mini DV tape as a still image 108 Copying still images from a VCR - Digital program editing 56 Identifying the parts and controls .... 144 Quick ...25 Viewing the recording on TV 28 Advanced Recording Operations Recording a still image on a tape - Picture effect .. 37 Using special effects - Photo search/ Photo scan 52 Changing the menu settings 85 Resetting the date and time 92 "Memory Stick" Operations (DCR-TRV11/TRV20 only) Using a "Memory Stick" - ...
...tape with picture effects ... 45 Playing back a tape with analog video unit and PC - MEMORY MIX 105 Recording an image from a mini DV tape as a still image 108 Copying still images from a VCR - Digital program editing 56 Identifying the parts and controls .... 144 Quick ...25 Viewing the recording on TV 28 Advanced Recording Operations Recording a still image on a tape - Picture effect .. 37 Using special effects - Photo search/ Photo scan 52 Changing the menu settings 85 Resetting the date and time 92 "Memory Stick" Operations (DCR-TRV11/TRV20 only) Using a "Memory Stick" - ...
Operating Instructions
Page 5
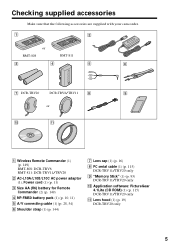
.... 1 2 or RMT-808 RMT-811 3 4 5 6 7 DCR-TRV20 DCR-TRV6/TRV11 8 9 or 0 qa 1 Wireless Remote Commander (1) (p. 149) RMT-808: DCR-TRV6 RMT-811: DCR-TRV11/TRV20 2 AC-L10A/L10B/L10C AC power adaptor (1), Power cord... (1) (p. 11) 3 Size AA (R6) battery for Remote Commander (2) (p. 149) 4 NP-FM50 battery pack (1) (p. 10, 11) 5 A/V connecting cable (1) (p. 28, 54) 6 Shoulder strap (1) (p. 144) 7 Lens cap (1) (p. 16) 8 PC serial cable (1) (p. 115) DCR-TRV11/TRV20 only 9 "Memory Stick" (1) (p. 93) DCR...
.... 1 2 or RMT-808 RMT-811 3 4 5 6 7 DCR-TRV20 DCR-TRV6/TRV11 8 9 or 0 qa 1 Wireless Remote Commander (1) (p. 149) RMT-808: DCR-TRV6 RMT-811: DCR-TRV11/TRV20 2 AC-L10A/L10B/L10C AC power adaptor (1), Power cord... (1) (p. 11) 3 Size AA (R6) battery for Remote Commander (2) (p. 149) 4 NP-FM50 battery pack (1) (p. 10, 11) 5 A/V connecting cable (1) (p. 28, 54) 6 Shoulder strap (1) (p. 144) 7 Lens cap (1) (p. 16) 8 PC serial cable (1) (p. 115) DCR-TRV11/TRV20 only 9 "Memory Stick" (1) (p. 93) DCR...
Operating Instructions
Page 7
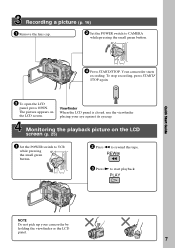
... the LCD screen. PLAY Quick Start Guide NOTE Do not pick up your eye against its eyecup. To stop recording, press START/ STOP again. 3 To open the LCD panel, press OPEN. POWER MEMORY CAMERA VCR OFF(CHG) 2 Press m to VCR while pressing the small green button. Viewfinder When the LCD panel is closed...
... the LCD screen. PLAY Quick Start Guide NOTE Do not pick up your eye against its eyecup. To stop recording, press START/ STOP again. 3 To open the LCD panel, press OPEN. POWER MEMORY CAMERA VCR OFF(CHG) 2 Press m to VCR while pressing the small green button. Viewfinder When the LCD panel is closed...
Operating Instructions
Page 8
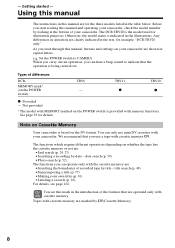
...recorded tape by looking at the bottom of your camcorder. Otherwise, the model name is based on Cassette Memory Your camcorder is indicated in the text, for details. e.g. Note on the DV format. The functions which require different operations depending on the POWER switch) TRV6...table below. You can hear a beep sound to CAMERA. Not provided * The model with memory functions. For details, see this manual are marked by... see page 124. See page 93 for example, "DCR-TRV20 only". The DCR-TRV20 is provided with MEMORY marked on your own titles (p. 81) • Labeling...
...recorded tape by looking at the bottom of your camcorder. Otherwise, the model name is based on Cassette Memory Your camcorder is indicated in the text, for details. e.g. Note on the DV format. The functions which require different operations depending on the POWER switch) TRV6...table below. You can hear a beep sound to CAMERA. Not provided * The model with memory functions. For details, see this manual are marked by... see page 124. See page 93 for example, "DCR-TRV20 only". The DCR-TRV20 is provided with MEMORY marked on your own titles (p. 81) • Labeling...
Operating Instructions
Page 11
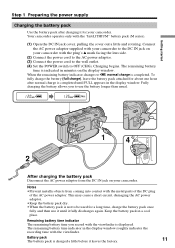
... again. Connect the AC power adaptor supplied with your camcorder to , normal charge is completed. VCR OFF(CHG) 1 4 POWER 2 CAMERA MEMORY After charging the battery pack Disconnect the AC power adaptor from coming into contact with the viewfinder is charged a little before it leaves the... factory. 11 Keep the battery pack in the display window roughly indicates the recording time with the "InfoLITHIUM" battery pack (M series). (1) Open the DC IN jack cover, pulling the cover out a little and rotating...
... again. Connect the AC power adaptor supplied with your camcorder to , normal charge is completed. VCR OFF(CHG) 1 4 POWER 2 CAMERA MEMORY After charging the battery pack Disconnect the AC power adaptor from coming into contact with the viewfinder is charged a little before it leaves the... factory. 11 Keep the battery pack in the display window roughly indicates the recording time with the "InfoLITHIUM" battery pack (M series). (1) Open the DC IN jack cover, pulling the cover out a little and rotating...
Operating Instructions
Page 15
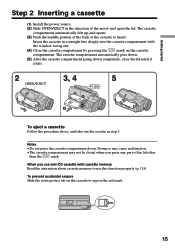
... OPEN/EJECT in the direction of the lid other than the mark. Insert the cassette in a straight line deeply into the cassette compartment with cassette memory Read the instruction about cassette...
... OPEN/EJECT in the direction of the lid other than the mark. Insert the cassette in a straight line deeply into the cassette compartment with cassette memory Read the instruction about cassette...
Operating Instructions
Page 16
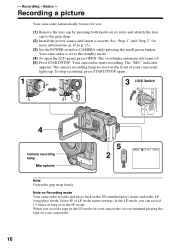
... pressing the small green button. See "Step 1" and "Step 2" for you can record 1.5 times as long as in the menu settings. To stop recording, press START/STOP again. 1 3 LOCK Switch VCR POWER OFF(CHG) CAMERA MEMORY 4 Camera recording lamp Microphone 5 2 40min REC 0:00:01 Note Fasten the grip strap firmly. The viewfinder automatically turns off. (5) Press...
... pressing the small green button. See "Step 1" and "Step 2" for you can record 1.5 times as long as in the menu settings. To stop recording, press START/STOP again. 1 3 LOCK Switch VCR POWER OFF(CHG) CAMERA MEMORY 4 Camera recording lamp Microphone 5 2 40min REC 0:00:01 Note Fasten the grip strap firmly. The viewfinder automatically turns off. (5) Press...
Operating Instructions
Page 17
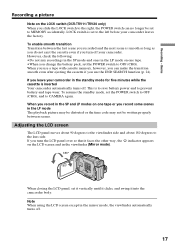
... closing the LCD panel, set to MEMORY accidentally. If you turn the LCD panel over so that it faces the other way, the indicator appears on the LOCK switch (DCR-TRV11/TRV20 only) When you slide ... if you turn off . 17 Recording - Basics Recording a picture Note on the LCD screen and in the LP mode on one tape. •When you use a tape with cassette memory, however, you can no longer ... written properly between the last scene you recorded and the next scene is to save battery power and to the lens side. To resume the standby mode, set the POWER switch to CAMERA again.
... closing the LCD panel, set to MEMORY accidentally. If you turn the LCD panel over so that it faces the other way, the indicator appears on the LOCK switch (DCR-TRV11/TRV20 only) When you slide ... if you turn off . 17 Recording - Basics Recording a picture Note on the LCD screen and in the LP mode on one tape. •When you use a tape with cassette memory, however, you can no longer ... written properly between the last scene you recorded and the next scene is to save battery power and to the lens side. To resume the standby mode, set the POWER switch to CAMERA again.
Operating Instructions
Page 18
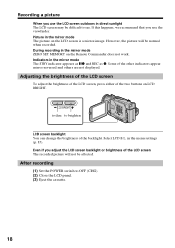
...-reversed and others are not displayed. Picture in the mirror mode ZERO SET MEMORY on the Remote Commander does not work. Some of the LCD screen The recorded picture will be affected. During recording in the mirror mode The picture on LCD BRIGHT. However, the picture will... not be normal when recorded. Recording a picture When you use the viewfinder. LCD BRIGHT to dim to OFF...
...-reversed and others are not displayed. Picture in the mirror mode ZERO SET MEMORY on the Remote Commander does not work. Some of the LCD screen The recorded picture will be affected. During recording in the mirror mode The picture on LCD BRIGHT. However, the picture will... not be normal when recorded. Recording a picture When you use the viewfinder. LCD BRIGHT to dim to OFF...

Operating Instructions
Page 20
... the "T" side. •You cannot use zoom greater than 10× Zoom greater than 10× is set D ZOOM to MEMORY (DCR- TRV11/TRV20 only). 20 The digital zooming zone appears when you move the power zoom lever to the "W" side until the focus is set D ZOOM to OFF at ... about 1/2 inch (about 1 cm) away in better-looking recordings. You can shoot a subject that is at the factory. (p. 85) W T The right side of the bar shows the digital zooming zone. The digital zoom function is sharp. Notes on digital zoom •Digital zoom starts to function when zoom exceeds 10×. •...
... the "T" side. •You cannot use zoom greater than 10× Zoom greater than 10× is set D ZOOM to MEMORY (DCR- TRV11/TRV20 only). 20 The digital zooming zone appears when you move the power zoom lever to the "W" side until the focus is set D ZOOM to OFF at ... about 1/2 inch (about 1 cm) away in better-looking recordings. You can shoot a subject that is at the factory. (p. 85) W T The right side of the bar shows the digital zooming zone. The digital zoom function is sharp. Notes on digital zoom •Digital zoom starts to function when zoom exceeds 10×. •...
Operating Instructions
Page 21
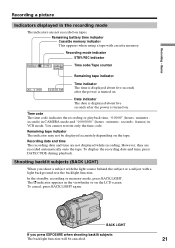
...) in CAMERA mode and "0:00:00:00" (hours : minutes : seconds : frames) in the recording mode The indicators are not recorded on the tape. Recording date and time The recording date and time are recorded automatically onto the tape. However, they are not displayed while recording. indicator appears in the viewfinder or on . In the standby, recording or memory mode...
...) in CAMERA mode and "0:00:00:00" (hours : minutes : seconds : frames) in the recording mode The indicators are not recorded on the tape. Recording date and time The recording date and time are recorded automatically onto the tape. However, they are not displayed while recording. indicator appears in the viewfinder or on . In the standby, recording or memory mode...
Operating Instructions
Page 22
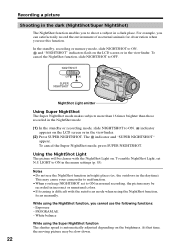
... time, the moving picture may cause your camcorder to malfunction. •When you keep NIGHTSHOT set N.S. indicator appears on . PROGRAM AE - In the standby, recording or memory mode, slide NIGHTSHOT to OFF. NIGHTSHOT OFF ON SUPER NIGHTSHOT NightShot Light emitter Using Super NightShot The Super NightShot mode makes subjects more than 16...
... time, the moving picture may cause your camcorder to malfunction. •When you keep NIGHTSHOT set N.S. indicator appears on . PROGRAM AE - In the standby, recording or memory mode, slide NIGHTSHOT to OFF. NIGHTSHOT OFF ON SUPER NIGHTSHOT NightShot Light emitter Using Super NightShot The Super NightShot mode makes subjects more than 16...
Operating Instructions
Page 23
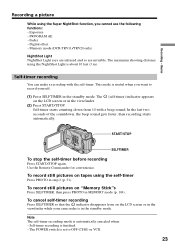
... about 10 feet (3 m). Digital effect - Self-timer recording You can make a recording with a beep sound. In the last two seconds of the countdown, the beep sound gets faster, then recording starts automatically. Recording - Basics Recording a picture While using the Super NightShot function, you want to OFF (CHG) or VCR. 23 Exposure - Fader - Memory mode (DCR-TRV11/TRV20 only...
... about 10 feet (3 m). Digital effect - Self-timer recording You can make a recording with a beep sound. In the last two seconds of the countdown, the beep sound gets faster, then recording starts automatically. Recording - Basics Recording a picture While using the Super NightShot function, you want to OFF (CHG) or VCR. 23 Exposure - Fader - Memory mode (DCR-TRV11/TRV20 only...
Operating Instructions
Page 24
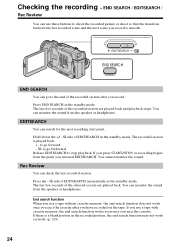
...back. If you use a tape with cassette memory, the end search function works even once you have recorded on the tape. You can search for the next recording start point. EDITSEARCH END SEARCH END SEARCH You can use a tape without cassette memory, the end search function does not work correctly... (p. 124). 24 End search function When you use these buttons to the end of EDITSEARCH momentarily in the recorded portion, the end search function may not work once you...
...back. If you use a tape with cassette memory, the end search function works even once you have recorded on the tape. You can search for the next recording start point. EDITSEARCH END SEARCH END SEARCH You can use a tape without cassette memory, the end search function does not work correctly... (p. 124). 24 End search function When you use these buttons to the end of EDITSEARCH momentarily in the recorded portion, the end search function may not work once you...
Operating Instructions
Page 25
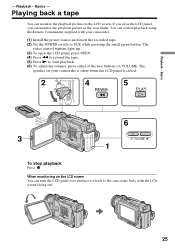
...LCD panel over and move it back to start playback. (6) To adjust the volume, press either of the two buttons on the LCD screen. The video control buttons light up. (3) To open the LCD panel, press OPEN. (4) Press m to rewind the tape. (5) Press N to the camcorder body... silent when the LCD panel is closed. 2 POWER VCR 4 REW 5 PLAY OFF(CHG) CAMERA MEMORY 6 3 VOLUME 1 To stop playback Press x. Basics - The speaker on your camcorder. (1) Install the power source and insert the recorded tape. (2) Set the POWER switch to VCR while pressing the small green button. Playback - ...
...LCD panel over and move it back to start playback. (6) To adjust the volume, press either of the two buttons on the LCD screen. The video control buttons light up. (3) To open the LCD panel, press OPEN. (4) Press m to rewind the tape. (5) Press N to the camcorder body... silent when the LCD panel is closed. 2 POWER VCR 4 REW 5 PLAY OFF(CHG) CAMERA MEMORY 6 3 VOLUME 1 To stop playback Press x. Basics - The speaker on your camcorder. (1) Install the power source and insert the recorded tape. (2) Set the POWER switch to VCR while pressing the small green button. Playback - ...
Operating Instructions
Page 27
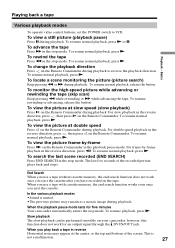
...then press ×2 on the Remote Commander during playback. End Search When you use a tape with cassette memory, the end search function works even once you have recorded on the Remote Commander during playback. To resume rewinding or advancing, release the button. In the various ...while rewinding or M while advancing the tape. When you play back a tape in the stop mode. Basics Various playback modes To operate video control buttons, set the POWER switch to reverse the playback direction. To resume normal playback, release the button. To resume normal playback,...
...then press ×2 on the Remote Commander during playback. End Search When you use a tape with cassette memory, the end search function works even once you have recorded on the Remote Commander during playback. To resume rewinding or advancing, release the button. In the various ...while rewinding or M while advancing the tape. When you play back a tape in the stop mode. Basics Various playback modes To operate video control buttons, set the POWER switch to reverse the playback direction. To resume normal playback, release the button. To resume normal playback,...
Operating Instructions
Page 30
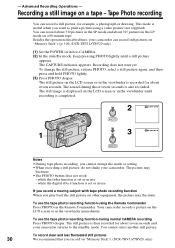
...hold PHOTO lightly. (3) Press PHOTO deeper. To use - - Advanced Recording Operations - This mode is recorded for about seven seconds. You can record still pictures on the Remote Commander. The sound during normal CAMERA recording Press PHOTO deeper. The still image is displayed on other equipment, the...in the LP mode on the LCD screen or in use the tape photo recording function using a video printer (not supplied). Recording a still image on "Memory Stick"s. (DCR-TRV11/TRV20 only) To record clear and less fluctuated still pictures 30 We recommend that you play back the...
...hold PHOTO lightly. (3) Press PHOTO deeper. To use - - Advanced Recording Operations - This mode is recorded for about seven seconds. You can record still pictures on the Remote Commander. The sound during normal CAMERA recording Press PHOTO deeper. The still image is displayed on other equipment, the...in the LP mode on the LCD screen or in use the tape photo recording function using a video printer (not supplied). Recording a still image on "Memory Stick"s. (DCR-TRV11/TRV20 only) To record clear and less fluctuated still pictures 30 We recommend that you play back the...
Operating Instructions
Page 33
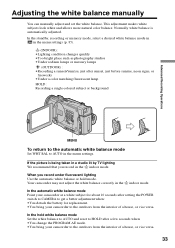
... the automatic white balance or hold white balance mode Set the white balance to AUTO and reset to HOLD after setting the POWER switch to CAMERA to get a better adjustment when: •You detach the battery for about 10 seconds after a few seconds when: •You change the PROGRAM AE ... To return to the automatic white balance mode Set WHT BAL to AUTO in the n indoor mode. When you record in the menu settings. In the hold mode. In the standby, recording or memory mode, select a desired white balance mode in in the n indoor mode. In the automatic white balance mode Point ...
... the automatic white balance or hold white balance mode Set the white balance to AUTO and reset to HOLD after setting the POWER switch to CAMERA to get a better adjustment when: •You detach the battery for about 10 seconds after a few seconds when: •You change the PROGRAM AE ... To return to the automatic white balance mode Set WHT BAL to AUTO in the n indoor mode. When you record in the menu settings. In the hold mode. In the standby, recording or memory mode, select a desired white balance mode in in the n indoor mode. In the automatic white balance mode Point ...

Operating Instructions
Page 36
... flashing. * DCR-TRV6/TRV11 only 1 FADER FADER To cancel the fader function After the fade in the menu settings - 16:9 wide - TRV6/TRV11 only): - When fading out [b] In the recording mode, press FADER...Your camcorder automatically stores the image recorded on a tape. At this stage, the picture may not be recorded clearly, depending on the bounce function (DCR-TRV6/TRV11 only) The BOUNCE indicator does... fader indicator flashes. Picture effect - Tape Photo recording When the OVERLAP, WIPE, or RANDOM DOT indicator appear in memory mode (DCR-TRV11/TRV20 only) 36 You cannot use the ...
... flashing. * DCR-TRV6/TRV11 only 1 FADER FADER To cancel the fader function After the fade in the menu settings - 16:9 wide - TRV6/TRV11 only): - When fading out [b] In the recording mode, press FADER...Your camcorder automatically stores the image recorded on a tape. At this stage, the picture may not be recorded clearly, depending on the bounce function (DCR-TRV6/TRV11 only) The BOUNCE indicator does... fader indicator flashes. Picture effect - Tape Photo recording When the OVERLAP, WIPE, or RANDOM DOT indicator appear in memory mode (DCR-TRV11/TRV20 only) 36 You cannot use the ...


