Computer Applications Guide
Page 2
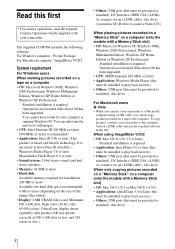
... assured if the above OS has been upgraded. To copy pictures, connect your camcorder to a Macintosh computer using ImageMixer VCD2 • OS: Mac OS X (v10.1.5 or later) Standard installation is required. • Application: QuickTime 4.0 or later (this must be installed to play back movies.) •...connect your camcorder to the computer. When using a USB cable, you need a CD-R drive to play back movies.) • Others: USB port (this must be provided as standard), disc drive 2 Read this first • For camera operations, read the separate Camera Operations Guide supplied ...
... assured if the above OS has been upgraded. To copy pictures, connect your camcorder to a Macintosh computer using ImageMixer VCD2 • OS: Mac OS X (v10.1.5 or later) Standard installation is required. • Application: QuickTime 4.0 or later (this must be installed to play back movies.) •...connect your camcorder to the computer. When using a USB cable, you need a CD-R drive to play back movies.) • Others: USB port (this must be provided as standard), disc drive 2 Read this first • For camera operations, read the separate Camera Operations Guide supplied ...
Computer Applications Guide
Page 3
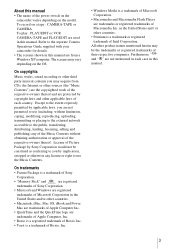
...applicable laws of Intel Corporation. On copyrights Music works, sound recording or other countries. • Pentium is a trademark of Sony Corporation. • "Memory Stick" and are registered trademarks of Sony Corporation. • Microsoft and Windows are registered trademarks of the power switch on the camcorder...transferring, distributing, lending, licensing, selling and publishing) any license or right to the separate Camera Operations Guide supplied with your camcorder for details. • The screens shown in this manual are not mentioned in each country. License of...
...applicable laws of Intel Corporation. On copyrights Music works, sound recording or other countries. • Pentium is a trademark of Sony Corporation. • "Memory Stick" and are registered trademarks of Sony Corporation. • Microsoft and Windows are registered trademarks of the power switch on the camcorder...transferring, distributing, lending, licensing, selling and publishing) any license or right to the separate Camera Operations Guide supplied with your camcorder for details. • The screens shown in this manual are not mentioned in each country. License of...
Computer Applications Guide
Page 11
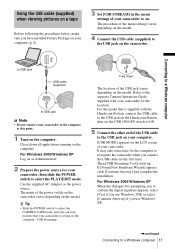
...• Do not connect your camcorder to the computer at this point. 1 Turn on the computer. Close down all applications running on the computer. The ...camcorder, then slide the POWER switch to select the PLAY/EDIT mode. Refer to the separate Camera Operations Guide supplied with the Handycam Station, connect the USB cable to the USB jack on the Handycam...camcorder. If [Found New Hardware Wizard] appears, click [Continue Anyway] and complete the installation. USB Streaming. Fully insert. For Windows 2000/Windows XP When the dialogue box prompting you to confirm the digital...
...• Do not connect your camcorder to the computer at this point. 1 Turn on the computer. Close down all applications running on the computer. The ...camcorder, then slide the POWER switch to select the PLAY/EDIT mode. Refer to the separate Camera Operations Guide supplied with the Handycam Station, connect the USB cable to the USB jack on the Handycam...camcorder. If [Found New Hardware Wizard] appears, click [Continue Anyway] and complete the installation. USB Streaming. Fully insert. For Windows 2000/Windows XP When the dialogue box prompting you to confirm the digital...
Computer Applications Guide
Page 13
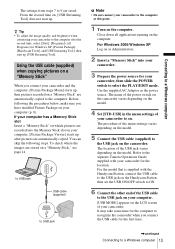
... location. Close down all applications running on a "Memory Stick," see page 14. If your computer has a Memory Stick slot Insert a "Memory Stick" on which pictures are saved. to USB jack USB cable (supplied) to USB jack b Note • Do not connect your camcorder to the computer at this... point. 1 Turn on your camcorder to the separate Camera Operations Guide supplied with the Handycam Station, connect the USB cable to the USB jack on the Handycam Station, then set the USB ON/OFF switch to ON. 6...
... location. Close down all applications running on a "Memory Stick," see page 14. If your computer has a Memory Stick slot Insert a "Memory Stick" on which pictures are saved. to USB jack USB cable (supplied) to USB jack b Note • Do not connect your camcorder to the computer at this... point. 1 Turn on your camcorder to the separate Camera Operations Guide supplied with the Handycam Station, connect the USB cable to the USB jack on the Handycam Station, then set the USB ON/OFF switch to ON. 6...
Computer Applications Guide
Page 17
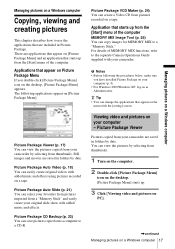
... Slide (p. 21) You can select your favorites from pictures imported from a "Memory Stick" and easily create your camcorder. z Tip • You can change the applications that appear on the menu with your original slide show with added music and effects using pictures recorded on a tape...(p. 23) You can save pictures copied onto a computer to a CD-R. For details of MEMORY MIX functions, refer to the separate Camera Operations Guide supplied with the [setting] screen. Picture Package Viewer Pictures copied from thumbnails. 1 Turn on the computer. 2 Double-click [Picture Package Menu...
... Slide (p. 21) You can select your favorites from pictures imported from a "Memory Stick" and easily create your camcorder. z Tip • You can change the applications that appear on the menu with your original slide show with added music and effects using pictures recorded on a tape...(p. 23) You can save pictures copied onto a computer to a CD-R. For details of MEMORY MIX functions, refer to the separate Camera Operations Guide supplied with the [setting] screen. Picture Package Viewer Pictures copied from thumbnails. 1 Turn on the computer. 2 Double-click [Picture Package Menu...

Computer Applications Guide
Page 28
... slide the POWER switch repeatedly to select the PLAY/ EDIT mode. To disconnect the USB cable/ To turn off the camcorder/To eject the "Memory Stick" 1 Quit all applications running on the computer. 2 Drag and drop the "Memory Stick" or drive icon on the LCD screen of the menu settings ...it may be damaged, and causes a malfunction of your camcorder. 5 Connect the other end of the USB jack varies depending on the Handycam Station, then set the USB ON/OFF switch to ON. Refer to the separate Camera Operations Guide supplied with the Handycam Station, connect the USB cable to the USB jack on...
... slide the POWER switch repeatedly to select the PLAY/ EDIT mode. To disconnect the USB cable/ To turn off the camcorder/To eject the "Memory Stick" 1 Quit all applications running on the computer. 2 Drag and drop the "Memory Stick" or drive icon on the LCD screen of the menu settings ...it may be damaged, and causes a malfunction of your camcorder. 5 Connect the other end of the USB jack varies depending on the Handycam Station, then set the USB ON/OFF switch to ON. Refer to the separate Camera Operations Guide supplied with the Handycam Station, connect the USB cable to the USB jack on...
Computer Applications Guide
Page 29
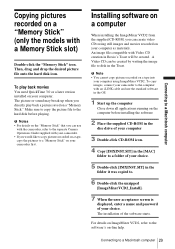
... refer to a "Memory Stick" on your computer using still images and movies recorded on a tape into your camcorder first. b Notes • For details on the "Memory Stick" that you directly play back movies You need ...starts. An image file compatible with an i.LINK cable and use with the camcorder, refer to the separate Camera Operations Guide supplied with your camcorder. • If you can be created. Then, drag and drop the ... or sound may break up the computer Close down all applications running on a "Memory Stick." A Video CD can create video CDs using ImageMixer VCD2.
... refer to a "Memory Stick" on your computer using still images and movies recorded on a tape into your camcorder first. b Notes • For details on the "Memory Stick" that you directly play back movies You need ...starts. An image file compatible with an i.LINK cable and use with the camcorder, refer to the separate Camera Operations Guide supplied with your camcorder. • If you can be created. Then, drag and drop the ... or sound may break up the computer Close down all applications running on a "Memory Stick." A Video CD can create video CDs using ImageMixer VCD2.

Computer Applications Guide
Page 30
...computer equipped with an i.LINK. 2 Prepare the power source for this operation. USA http://www.ita.sel.sony.com/support/ dvimag/ - z Tips • After you turn on your camcorder is set up . Use the supplied AC Adaptor as the power source since it starts up automatically when you...sonystyle.com.cn/vaio/ - Asia Pacific Regional http://www.css.ap.sony.com/ - You can be used to write DVDs. Quit all applications running with a DVD drive that you need the computer with a compatible version of the Camera Operations Guide. • You can only use a USB cable. Latin America...
...computer equipped with an i.LINK. 2 Prepare the power source for this operation. USA http://www.ita.sel.sony.com/support/ dvimag/ - z Tips • After you turn on your camcorder is set up . Use the supplied AC Adaptor as the power source since it starts up automatically when you...sonystyle.com.cn/vaio/ - Asia Pacific Regional http://www.css.ap.sony.com/ - You can be used to write DVDs. Quit all applications running with a DVD drive that you need the computer with a compatible version of the Camera Operations Guide. • You can only use a USB cable. Latin America...
Camera Operations Guide
Page 7
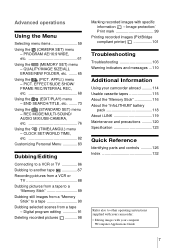
...SLIDE SHOW/ FRAME REC/INTERVAL REC, etc 68 Using the (EDIT/PLAY) menu - Digital program editing 91 Deleting recorded pictures 98 Marking recorded images with your computer cComputer Applications Guide 7 END SEARCH/TITLE, etc. ........73 Using the (STANDARD SET) menu - QUALITY/...99 Printing recorded images (PictBridge compliant printer 101 Troubleshooting Troubleshooting 103 Warning indicators and messages ...110 Additional Information Using your camcorder abroad ..........114 Usable cassette tapes 115 About the "Memory Stick 116 About the "InfoLITHIUM" battery pack 118 About i....
...SLIDE SHOW/ FRAME REC/INTERVAL REC, etc 68 Using the (EDIT/PLAY) menu - Digital program editing 91 Deleting recorded pictures 98 Marking recorded images with your computer cComputer Applications Guide 7 END SEARCH/TITLE, etc. ........73 Using the (STANDARD SET) menu - QUALITY/...99 Printing recorded images (PictBridge compliant printer 101 Troubleshooting Troubleshooting 103 Warning indicators and messages ...110 Additional Information Using your camcorder abroad ..........114 Usable cassette tapes 115 About the "Memory Stick 116 About the "InfoLITHIUM" battery pack 118 About i....

Camera Operations Guide
Page 13
...battery is no "Memory Stick" media supplied with DCR-TRV460. A/V connecting cable (1) USB cable (1) AC Adaptor (1) Power cord (1) Rechargeable battery pack NP-FM30 (1) CD-ROM "SPVD-012 USB Driver" (1) Cleaning cloth (1) Camera Operations Guide (This manual) (1) Computer Applications Guide (1) Lens cap (1) See page 126 on ... The number in parentheses indicates the number of that item supplied. "Memory Stick" 8MB (1) (DCR-TRV361) "Memory Stick" media is only supplied with your camcorder. Getting started Step 1: Checking supplied items Make sure you have following items supplied with...
...battery is no "Memory Stick" media supplied with DCR-TRV460. A/V connecting cable (1) USB cable (1) AC Adaptor (1) Power cord (1) Rechargeable battery pack NP-FM30 (1) CD-ROM "SPVD-012 USB Driver" (1) Cleaning cloth (1) Camera Operations Guide (This manual) (1) Computer Applications Guide (1) Lens cap (1) See page 126 on ... The number in parentheses indicates the number of that item supplied. "Memory Stick" 8MB (1) (DCR-TRV361) "Memory Stick" media is only supplied with your camcorder. Getting started Step 1: Checking supplied items Make sure you have following items supplied with...
Camera Operations Guide
Page 44
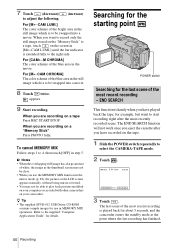
...You may not be able to play back pictures modified on your computer or recorded with other camcorders on the tape. 1 Slide the POWER switch repeatedly to the supplied "Computer Applications Guide" for use the MEMORY MIX function in the still image which is handy when you are... recording on a tape Press REC START/STOP. appears. 9 Start recording. When you have recorded on your camcorder. Refer to select the CAMERA-TAPE mode...
...You may not be able to play back pictures modified on your computer or recorded with other camcorders on the tape. 1 Slide the POWER switch repeatedly to the supplied "Computer Applications Guide" for use the MEMORY MIX function in the still image which is handy when you are... recording on a tape Press REC START/STOP. appears. 9 Start recording. When you have recorded on your camcorder. Refer to select the CAMERA-TAPE mode...
Camera Operations Guide
Page 73
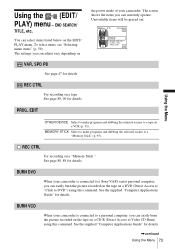
... connected to Video CD Burn) using this command. See page 88, 89 for details. See the supplied "Computer Applications Guide" for details. BURN VCD When your camcorder. END SEARCH/ TITLE, etc. You can easily burn the picture recorded on the tape on VAR. SPD PB See page 47 .... EDIT the power mode of your camcorder is connected to a Sony VAIO series personal computer, you can easily burn the picture recorded on the tape on a DVD (Direct Access to "Click to a tape on the EDIT/ PLAY menu. See the supplied "Computer Applications Guide" for details. ,continued Using the ...
... connected to Video CD Burn) using this command. See page 88, 89 for details. See the supplied "Computer Applications Guide" for details. BURN VCD When your camcorder. END SEARCH/ TITLE, etc. You can easily burn the picture recorded on the tape on VAR. SPD PB See page 47 .... EDIT the power mode of your camcorder is connected to a Sony VAIO series personal computer, you can easily burn the picture recorded on the tape on a DVD (Direct Access to "Click to a tape on the EDIT/ PLAY menu. See the supplied "Computer Applications Guide" for details. ,continued Using the ...
Camera Operations Guide
Page 79
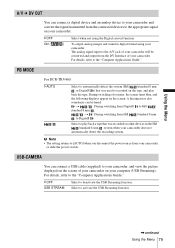
..., refer to the "Computer Applications Guide." During switching of your camcorder on the screen. GOFF ON ( Select when not using the Digital convert function. ) To output analog images and sound in the Hi8 /standard 8 mm system when your camcorder. For details, refer to the "Computer Applications Guide." Select to Digital8 . PB MODE For DCR-TRV460: GAUTO / Select to automatically...
..., refer to the "Computer Applications Guide." During switching of your camcorder on the screen. GOFF ON ( Select when not using the Digital convert function. ) To output analog images and sound in the Hi8 /standard 8 mm system when your camcorder. For details, refer to the "Computer Applications Guide." Select to Digital8 . PB MODE For DCR-TRV460: GAUTO / Select to automatically...
Camera Operations Guide
Page 80
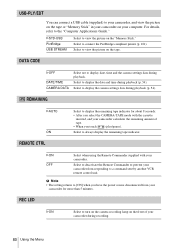
... REC LED GON OFF Select when using the Remote Commander supplied with the cassette inserted, and your camcorder calculates the remaining amount of your camcorder from your camcorder. Select to always display the remaining tape indicator. REMAINING GAUTO ON REMOTE CTRL Select to display the... your camcorder during playback. Select to deactivate the Remote Commander to turn on the camera recording lamp on the tape. For details, refer to view the picture on the front of tape. • When you touch (play/pause). Select to the "Computer Applications Guide."
... REC LED GON OFF Select when using the Remote Commander supplied with the cassette inserted, and your camcorder calculates the remaining amount of your camcorder from your camcorder. Select to always display the remaining tape indicator. REMAINING GAUTO ON REMOTE CTRL Select to display the... your camcorder during playback. Select to deactivate the Remote Commander to turn on the camera recording lamp on the tape. For details, refer to view the picture on the front of tape. • When you touch (play/pause). Select to the "Computer Applications Guide."


