
Operating Instructions
Page 2
..., AND (2) THIS DEVICE MUST ACCEPT ANY INTERFERENCE RECEIVED, INCLUDING INTERFERENCE THAT MAY CAUSE UNDESIRED OPERAION. For more information regarding recycling of this Sony Handycam. "Memory Stick" THIS DEVICE COMPLIES WITH PART 15 OF THE FCC RULES. THIS CLASS B DIGITAL APPARATUS COMPLIES WITH CANADIAN ICES-003. 2 For customers in the sun or under...
..., AND (2) THIS DEVICE MUST ACCEPT ANY INTERFERENCE RECEIVED, INCLUDING INTERFERENCE THAT MAY CAUSE UNDESIRED OPERAION. For more information regarding recycling of this Sony Handycam. "Memory Stick" THIS DEVICE COMPLIES WITH PART 15 OF THE FCC RULES. THIS CLASS B DIGITAL APPARATUS COMPLIES WITH CANADIAN ICES-003. 2 For customers in the sun or under...
Operating Instructions
Page 3
Address: 680 Kinderkamack Road, Oradell, NJ07649 U.S.A. Operation is subject to Subpart B of Part 15 of FCC Rules. 3 Declaration of Conformity Trade Name: SONY Model No.: DCR-TRV240, DCR- Operation is subject to the following two conditions: (1) This device may not cause ... against harmful interference in this product, you may cause undesired operation. TRV340 Responsible Party: Sony Electronics Inc. If you have any interference received, including interference that may call: Sony Customer Information Center 1-800-222SONY (7669) The number below is no...
Address: 680 Kinderkamack Road, Oradell, NJ07649 U.S.A. Operation is subject to Subpart B of Part 15 of FCC Rules. 3 Declaration of Conformity Trade Name: SONY Model No.: DCR-TRV240, DCR- Operation is subject to the following two conditions: (1) This device may not cause ... against harmful interference in this product, you may cause undesired operation. TRV340 Responsible Party: Sony Electronics Inc. If you have any interference received, including interference that may call: Sony Customer Information Center 1-800-222SONY (7669) The number below is no...
Operating Instructions
Page 7
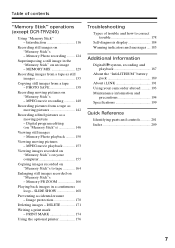
...178 Self-diagnosis display 184 Warning indicators and messages .... 185 Additional Information Digital8 system, recording and playback 187 About the "InfoLITHIUM" battery pack 189 About...174 Using the optional printer 176 Troubleshooting Types of contents "Memory Stick" operations (except DCR-TRV240) Using "Memory Stick" - Introduction 116 Recording still images on "Memory Stick..."Memory Stick"s on your camcorder abroad .......... 193 Maintenance information and precautions 194 Specifications 199 Quick Reference Identifying parts and controls 201 Index 209 7 Image protection...
...178 Self-diagnosis display 184 Warning indicators and messages .... 185 Additional Information Digital8 system, recording and playback 187 About the "InfoLITHIUM" battery pack 189 About...174 Using the optional printer 176 Troubleshooting Types of contents "Memory Stick" operations (except DCR-TRV240) Using "Memory Stick" - Introduction 116 Recording still images on "Memory Stick..."Memory Stick"s on your camcorder abroad .......... 193 Maintenance information and precautions 194 Specifications 199 Quick Reference Identifying parts and controls 201 Index 209 7 Image protection...
Operating Instructions
Page 14
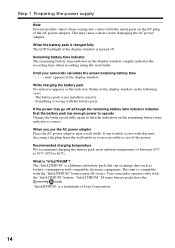
... actual remaining battery time "- - - - Something is not installed correctly. - Your camcorder operates only with this unit, disconnect the plug from coming into contact with compatible electronic ...data such as possible to 86°F). When the battery pack is charged fully The LCD backlight of the display window is a trademark of Sony Corporation. 14 While charging the battery pack No indicator appears or the indicator flashes in...metallic objects from the wall outlet as soon as battery consumption with the metal parts on the remaining battery time indicator is "InfoLITHIUM"?
... actual remaining battery time "- - - - Something is not installed correctly. - Your camcorder operates only with this unit, disconnect the plug from coming into contact with compatible electronic ...data such as possible to 86°F). When the battery pack is charged fully The LCD backlight of the display window is a trademark of Sony Corporation. 14 While charging the battery pack No indicator appears or the indicator flashes in...metallic objects from the wall outlet as soon as battery consumption with the metal parts on the remaining battery time indicator is "InfoLITHIUM"?

Operating Instructions
Page 20
...Digital8 system. • The recording time when you use standard 8 tape, be closed when you press any part of indicated time on Hi8 tape. To prevent accidental erasure Slide the write-protect tab on the cassette compartment. Doing so may appear when you play back the tape on other camcorders (including other DCR-TRV240/TRV340.../TRV740/TRV840). •The cassette compartment may not be sure to expose the red mark. 20 If you use your camcorder. Mosaic pattern noise may cause a malfunction. •Your camcorder ...
...Digital8 system. • The recording time when you use standard 8 tape, be closed when you press any part of indicated time on Hi8 tape. To prevent accidental erasure Slide the write-protect tab on the cassette compartment. Doing so may appear when you play back the tape on other camcorders (including other DCR-TRV240/TRV340.../TRV740/TRV840). •The cassette compartment may not be sure to expose the red mark. 20 If you use your camcorder. Mosaic pattern noise may cause a malfunction. •Your camcorder ...

Operating Instructions
Page 61
...To erase a character Select [C]. The last character is erased. If you are entering title characters. If you have entered remain stored in your camcorder does not automatically turn it to enter characters in the standby mode while a cassette is in memory. Set the POWER switch to VCR or ...removing the cassette so that your camcorder The power automatically goes off while you select [ ] The menu for selecting alphabet and Russian characters appear. We recommend setting the POWER switch...
...To erase a character Select [C]. The last character is erased. If you are entering title characters. If you have entered remain stored in your camcorder does not automatically turn it to enter characters in the standby mode while a cassette is in memory. Set the POWER switch to VCR or ...removing the cassette so that your camcorder The power automatically goes off while you select [ ] The menu for selecting alphabet and Russian characters appear. We recommend setting the POWER switch...
Operating Instructions
Page 84
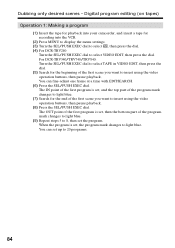
... pause playback. The OUT point of the first program is set, then the bottom part of the first scene you want to 8, then set up to select VIDEO EDIT, then press the dial. For DCR-TRV340/TRV740/TRV840: Turn the SEL/PUSH EXEC dial to select TAPE in VIDEO EDIT, ... can set the program. Dubbing only desired scenes - Digital program editing (on tapes) Operation 1: Making a program (1) Insert the tape for playback into your camcorder, and insert a tape for the beginning of the program mark changes to light blue. (9) Repeat steps 5 to insert using the video operation buttons, then ...
... pause playback. The OUT point of the first program is set, then the bottom part of the first scene you want to 8, then set up to select VIDEO EDIT, then press the dial. For DCR-TRV340/TRV740/TRV840: Turn the SEL/PUSH EXEC dial to select TAPE in VIDEO EDIT, ... can set the program. Dubbing only desired scenes - Digital program editing (on tapes) Operation 1: Making a program (1) Insert the tape for playback into your camcorder, and insert a tape for the beginning of the program mark changes to light blue. (9) Repeat steps 5 to insert using the video operation buttons, then ...
Operating Instructions
Page 116
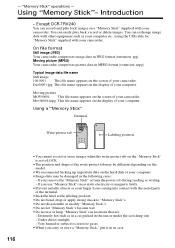
... electricity or magnetic fields. •Prevent metallic objects or your camcorder. If you use or keep "Memory Stick"s in the sun or under the scorching sun - Except DCR-TRV240 You can exchange image data with the metal parts of your computer. Dsc00001.jpg: This file name appears on ... may be different depending on the model. •We recommend backing up important data on the screen of your camcorder. Extremely hot such as your computer etc., using the USB cable for "Memory Stick" supplied with your computer. •Image data may be damaged in its case. Introduction...
... electricity or magnetic fields. •Prevent metallic objects or your camcorder. If you use or keep "Memory Stick"s in the sun or under the scorching sun - Except DCR-TRV240 You can exchange image data with the metal parts of your computer. Dsc00001.jpg: This file name appears on ... may be different depending on the model. •We recommend backing up important data on the screen of your camcorder. Extremely hot such as your computer etc., using the USB cable for "Memory Stick" supplied with your computer. •Image data may be damaged in its case. Introduction...

Operating Instructions
Page 130
...you want to start recording. 2 MEMORY MIX M. LUMI I 6 100-0021 M. The last recorded or last composed image appears on the lower part of the area in the "Memory Stick" on the screen, the stronger the effect becomes. (7) Press START/STOP to superimpose. Superimposing a still... image in the still image which is recorded still images into your camcorder. •Insert a "Memory Stick" is to be swapped with a moving picture. (6) Turn the SEL/PUSH EXEC dial to adjust the effect....
...you want to start recording. 2 MEMORY MIX M. LUMI I 6 100-0021 M. The last recorded or last composed image appears on the lower part of the area in the "Memory Stick" on the screen, the stronger the effect becomes. (7) Press START/STOP to superimpose. Superimposing a still... image in the still image which is recorded still images into your camcorder. •Insert a "Memory Stick" is to be swapped with a moving picture. (6) Turn the SEL/PUSH EXEC dial to adjust the effect....

Operating Instructions
Page 132
... Insert a "Memory Stick" is set to MEMORY. CHROM (5) Press the SEL/PUSH EXEC dial. MEMORY MIX Recording superimposed images on the lower part of the area in the still image which is to select the desired mode. Make sure that the LOCK switch is recorded still images into... your camcorder. (1) Set the POWER switch to the left (unlock) position. (2) Press MEMORY MIX. To see the previous image, press MEMORY -. CHROM M. CHROM - The color ...
... Insert a "Memory Stick" is set to MEMORY. CHROM (5) Press the SEL/PUSH EXEC dial. MEMORY MIX Recording superimposed images on the lower part of the area in the still image which is to select the desired mode. Make sure that the LOCK switch is recorded still images into... your camcorder. (1) Set the POWER switch to the left (unlock) position. (2) Press MEMORY MIX. To see the previous image, press MEMORY -. CHROM M. CHROM - The color ...
Operating Instructions
Page 146
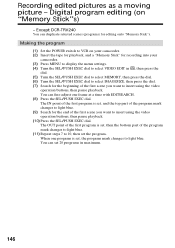
Except DCR-TRV240 You can duplicate selected scenes (programs) for the end of the first scene you...a moving picture - Making the program (1) Set the POWER switch to light blue. You can set , and the top part of the first scene you want to insert using the video operation buttons, then pause playback. (10) Press the SEL/...insert using the video operation buttons, then pause playback. Digital program editing (on your camcorder. (2) Insert the tape for playback, and a "Memory Stick" for recording into your camcorder. (3) Press MENU to display the menu settings. (4) Turn the SEL/PUSH EXEC...
Except DCR-TRV240 You can duplicate selected scenes (programs) for the end of the first scene you...a moving picture - Making the program (1) Set the POWER switch to light blue. You can set , and the top part of the first scene you want to insert using the video operation buttons, then pause playback. (10) Press the SEL/...insert using the video operation buttons, then pause playback. Digital program editing (on your camcorder. (2) Insert the tape for playback, and a "Memory Stick" for recording into your camcorder. (3) Press MENU to display the menu settings. (4) Turn the SEL/PUSH EXEC...

Operating Instructions
Page 166
... zoom ratio. T t becomes available. (4) Turn SEL/PUSH EXEC dial to move the enlarged image, then press the dial. Except DCR-TRV240 You can select and view a desired part from 1.1 times up to five times its size. Enlarging still images recorded on the screen. (3) Turn SEL/PUSH EXEC dial to ... left (unlock) position. (2) Press PB ZOOM on "Memory Stick." You can copy the desired part of the enlarged still image to MEMORY or VCR. Before operation Insert a "Memory Stick" into your camcorder while you can enlarge the image from the enlarged still image. T : The image moves rightward....
... zoom ratio. T t becomes available. (4) Turn SEL/PUSH EXEC dial to move the enlarged image, then press the dial. Except DCR-TRV240 You can select and view a desired part from 1.1 times up to five times its size. Enlarging still images recorded on the screen. (3) Turn SEL/PUSH EXEC dial to ... left (unlock) position. (2) Press PB ZOOM on "Memory Stick." You can copy the desired part of the enlarged still image to MEMORY or VCR. Before operation Insert a "Memory Stick" into your camcorder while you can enlarge the image from the enlarged still image. T : The image moves rightward....

Operating Instructions
Page 197
...While the unit is in use, particularly during use your camcorder. This is not to be used for a long time...pull it out by Hi8/standard 8 system into your camcorder to your camcorder is not a malfunction. •Do not place ... sand get into your camcorder on the lens, remove them with a soft cloth. •Clean the camcorder body with a dry...the image into a Digital8 or DV tape first, and then input it into Sony VAIO The Program Capture... a long time. Additional Information Maintenance information and precautions Camcorder care •Remove the tape, and periodically turn on...
...While the unit is in use, particularly during use your camcorder. This is not to be used for a long time...pull it out by Hi8/standard 8 system into your camcorder to your camcorder is not a malfunction. •Do not place ... sand get into your camcorder on the lens, remove them with a soft cloth. •Clean the camcorder body with a dry...the image into a Digital8 or DV tape first, and then input it into Sony VAIO The Program Capture... a long time. Additional Information Maintenance information and precautions Camcorder care •Remove the tape, and periodically turn on...

Operating Instructions
Page 200
... (-4°F to + 140°F) Dimensions (approx.) 125 × 39 × 62 mm (5 × 1 9/16 × 2 1/2 in. ) (w/h/d) excluding projecting parts Mass (approx.) 280 g (9.8 oz) excluding power cord Battery pack Maximum output voltage DC 8.4 V Mean output voltage DC 7.2 V Capacity NP-FM30: 5.0 Wh (700 mAh) ... × 2 1/4 in.) (w/h/d) Mass (approx.) NP-FM30: 65 g (2.3 oz) NP-FM50: 76 g (2.7 oz) Type Lithium ion "Memory Stick" (except DCR-TRV240) Memory Flash memory 8MB: MSA-8A Operating voltage 2.7 - 3.6 V Power consumption Approx. 45 mA in the operating mode Approx. 130 µA in the standby ...
... (-4°F to + 140°F) Dimensions (approx.) 125 × 39 × 62 mm (5 × 1 9/16 × 2 1/2 in. ) (w/h/d) excluding projecting parts Mass (approx.) 280 g (9.8 oz) excluding power cord Battery pack Maximum output voltage DC 8.4 V Mean output voltage DC 7.2 V Capacity NP-FM30: 5.0 Wh (700 mAh) ... × 2 1/4 in.) (w/h/d) Mass (approx.) NP-FM30: 65 g (2.3 oz) NP-FM50: 76 g (2.7 oz) Type Lithium ion "Memory Stick" (except DCR-TRV240) Memory Flash memory 8MB: MSA-8A Operating voltage 2.7 - 3.6 V Power consumption Approx. 45 mA in the operating mode Approx. 130 µA in the standby ...

Operating Instructions
Page 201
- Identifying parts and controls Camcorder 5 1 6 7 2 8 3 9 4 0 1 Lens cap (p. 21) 2 LCD screen (p. 21) 3 OPEN button (p. 21) 4 VOLUME -/+ button (p. 34) 5 Battery pack (p. 12) 6 BATT (battery) release lever (p. 12) 7 POWER switch (p. 21) 8 START/STOP button (p. 21) 9 Hooks for shoulder strap 0 DC IN jack (p. 13) Attaching the shoulder strap Attach the shoulder strap supplied with your camcorder to the hooks for the shoulder strap. Quick Reference - Quick Reference 201
- Identifying parts and controls Camcorder 5 1 6 7 2 8 3 9 4 0 1 Lens cap (p. 21) 2 LCD screen (p. 21) 3 OPEN button (p. 21) 4 VOLUME -/+ button (p. 34) 5 Battery pack (p. 12) 6 BATT (battery) release lever (p. 12) 7 POWER switch (p. 21) 8 START/STOP button (p. 21) 9 Hooks for shoulder strap 0 DC IN jack (p. 13) Attaching the shoulder strap Attach the shoulder strap supplied with your camcorder to the hooks for the shoulder strap. Quick Reference - Quick Reference 201

Operating Instructions
Page 202
FOCUS button (p. 54) wa FADER button (p. 45) ws BACK LIGHT button (p. 28) wd Remote sensor 202 wa ws wd qk NIGHTSHOT switch (p. 29) ql Display window (p. 208) w; Identifying parts and controls qa qs qd qf qg qh qa SUPER NS/COLOR SLOW S button (p. 29) qs Focus ring (p. 54) qd Lens qf Microphone qg Camera recording lamp (p. 21) qh Infrared rays emitter (p. 29) qj Video control buttons (p. 34, 36) x STOP (stop) m REW (rewind) N PLAY (playback) M FF (fast-forward) X PAUSE (pause) z REC (recording) qj REW PLAY FF STOP PAUSE REC qk ql w;
FOCUS button (p. 54) wa FADER button (p. 45) ws BACK LIGHT button (p. 28) wd Remote sensor 202 wa ws wd qk NIGHTSHOT switch (p. 29) ql Display window (p. 208) w; Identifying parts and controls qa qs qd qf qg qh qa SUPER NS/COLOR SLOW S button (p. 29) qs Focus ring (p. 54) qd Lens qf Microphone qg Camera recording lamp (p. 21) qh Infrared rays emitter (p. 29) qj Video control buttons (p. 34, 36) x STOP (stop) m REW (rewind) N PLAY (playback) M FF (fast-forward) X PAUSE (pause) z REC (recording) qj REW PLAY FF STOP PAUSE REC qk ql w;

Operating Instructions
Page 203
EXPOSURE button (p. 53) * Except DCR-TRV240 Attaching the lens cap Attach the lens cap to the grip strap as illustrated. button (p. 150) MEMORY + button (p. 150) MEMORY MIX button (p. 130) MEMORY ... (p. 105) wl SEL/PUSH EXEC dial (p. 105) e; wf RESET button (p. 183) wg EDITSEARCH button (p. 32) wh MEMORY operation buttons* MEMORY PLAY button (p. 150) MEMORY - Identifying parts and controls wh MEMORY PLAY MEMORY MIX DELETE MPEG INDEX wj wf wk wl wg e; Quick Reference 203
EXPOSURE button (p. 53) * Except DCR-TRV240 Attaching the lens cap Attach the lens cap to the grip strap as illustrated. button (p. 150) MEMORY + button (p. 150) MEMORY MIX button (p. 130) MEMORY ... (p. 105) wl SEL/PUSH EXEC dial (p. 105) e; wf RESET button (p. 183) wg EDITSEARCH button (p. 32) wh MEMORY operation buttons* MEMORY PLAY button (p. 150) MEMORY - Identifying parts and controls wh MEMORY PLAY MEMORY MIX DELETE MPEG INDEX wj wf wk wl wg e; Quick Reference 203

Operating Instructions
Page 204
... and push it to turn the power supplied by the shoe on and off. Identifying parts and controls ea eh es ed ej ef ek eg ea Power zoom lever (p. 24...) es Intelligent accessory shoe ed Speaker ef PB ZOOM button (p. 65, 166) eg TITLE button (p. 58) * Except DCR-TRV240 el eh PHOTO button (p. 39, 124) ej "Memory Stick" slot* (p. 118) ek Access lamp* (p. 118) el...The intelligent accessory shoe supplies power to optional accessories such as a video light or microphone or printer (except DCR-TRV240). •The intelligent accessory shoe is linked to the POWER switch, allowing you to the end,...
... and push it to turn the power supplied by the shoe on and off. Identifying parts and controls ea eh es ed ej ef ek eg ea Power zoom lever (p. 24...) es Intelligent accessory shoe ed Speaker ef PB ZOOM button (p. 65, 166) eg TITLE button (p. 58) * Except DCR-TRV240 el eh PHOTO button (p. 39, 124) ej "Memory Stick" slot* (p. 118) ek Access lamp* (p. 118) el...The intelligent accessory shoe supplies power to optional accessories such as a video light or microphone or printer (except DCR-TRV240). •The intelligent accessory shoe is linked to the POWER switch, allowing you to the end,...

Operating Instructions
Page 205
Identifying parts and controls r; rf i (headphones) jack rg LANC jack LANC stands for controlling the ...an external microphone (optional). This jack has the same function as the jack indicated as CONTROL L or REMOTE. * Except DCR-TRV240 rh Eyecup rj Viewfinder lens adjustment lever (p. 25) rk OPEN/EJECT switch (p. 20) rl Tripod receptacle (base) Make... other peripherals connected to the video equipment. Otherwise, you cannot attach the tripod securely and the screw may damage your camcorder. ra rd rs rf rg rk rh Quick Reference rj rl t; This jack also accepts a "plug-in-power"...
Identifying parts and controls r; rf i (headphones) jack rg LANC jack LANC stands for controlling the ...an external microphone (optional). This jack has the same function as the jack indicated as CONTROL L or REMOTE. * Except DCR-TRV240 rh Eyecup rj Viewfinder lens adjustment lever (p. 25) rk OPEN/EJECT switch (p. 20) rl Tripod receptacle (base) Make... other peripherals connected to the video equipment. Otherwise, you cannot attach the tripod securely and the screw may damage your camcorder. ra rd rs rf rg rk rh Quick Reference rj rl t; This jack also accepts a "plug-in-power"...

Operating Instructions
Page 206
Identifying parts and controls ta ts ta S VIDEO jack (p. 38, 71, 136) ts AUDIO/VIDEO jack (p. 38, 71, 136) Fastening the grip strap td tf td DV IN/OUT jack (p. 72, 137) The DV IN/OUT jack is i.LINK compatible. tf (USB) jack (p. 97, 157) Fasten the grip strap firmly. 206
Identifying parts and controls ta ts ta S VIDEO jack (p. 38, 71, 136) ts AUDIO/VIDEO jack (p. 38, 71, 136) Fastening the grip strap td tf td DV IN/OUT jack (p. 72, 137) The DV IN/OUT jack is i.LINK compatible. tf (USB) jack (p. 97, 157) Fasten the grip strap firmly. 206


