Operating Instructions
Page 4
...;Viewing images recorded on "Memory Stick"s using the USB cable (except DCR-TRV240) (p. 155) •Viewing images recorded on a tape using the USB cable (p. 94) •Viewing images live on your computer from your camcorder using the USB cable (p. 103) •Capturing images from an ...Adjusting the exposure manually (p. 53) Functions for giving images more impact •Digital zoom [MENU] (p. 24) The default setting is OFF. (To zoom greater than 25×, (DCR-TRV240/TRV340)/15× (DCR-TRV740/TRV840), select the digital zoom power in D ZOOM in the menu settings.) •Fader (p. 44...
...;Viewing images recorded on "Memory Stick"s using the USB cable (except DCR-TRV240) (p. 155) •Viewing images recorded on a tape using the USB cable (p. 94) •Viewing images live on your computer from your camcorder using the USB cable (p. 103) •Capturing images from an ...Adjusting the exposure manually (p. 53) Functions for giving images more impact •Digital zoom [MENU] (p. 24) The default setting is OFF. (To zoom greater than 25×, (DCR-TRV240/TRV340)/15× (DCR-TRV740/TRV840), select the digital zoom power in D ZOOM in the menu settings.) •Fader (p. 44...
Operating Instructions
Page 6
...Digital effect 48 Using the PROGRAM AE function .... 51 Adjusting the exposure manually ...... 53 Focusing manually 54 Interval recording 55 Frame by date - ZERO SET MEMORY 67 Searching a recording by frame recording - NightShot/Super NightShot/ Color Slow Shutter 29 Self-timer recording (except DCR... a title 58 Making your computer (Windows users only 94 Customizing Your Camcorder Changing the menu settings 105 6 Tape PB ZOOM 65 Quickly locating a scene - DATE SEARCH 68 Searching for a photo - Digital program editing (on tapes 74 Capturing images from a VCR - Basics ...
...Digital effect 48 Using the PROGRAM AE function .... 51 Adjusting the exposure manually ...... 53 Focusing manually 54 Interval recording 55 Frame by date - ZERO SET MEMORY 67 Searching a recording by frame recording - NightShot/Super NightShot/ Color Slow Shutter 29 Self-timer recording (except DCR... a title 58 Making your computer (Windows users only 94 Customizing Your Camcorder Changing the menu settings 105 6 Tape PB ZOOM 65 Quickly locating a scene - DATE SEARCH 68 Searching for a photo - Digital program editing (on tapes 74 Capturing images from a VCR - Basics ...
Operating Instructions
Page 7
... Self-diagnosis display 184 Warning indicators and messages .... 185 Additional Information Digital8 system, recording and playback 187 About the "InfoLITHIUM" battery pack 189... MPEG movie recording 140 Recording pictures from a tape as a moving pictures - Digital program editing (on "Memory Stick"s - Memory Photo playback .......... 150 Viewing moving... movie playback 153 Viewing images recorded on "Memory Stick"s on your camcorder abroad .......... 193 Maintenance information and precautions 194 Specifications 199 Quick Reference Identifying...DCR-TRV240) Using "Memory Stick" -
... Self-diagnosis display 184 Warning indicators and messages .... 185 Additional Information Digital8 system, recording and playback 187 About the "InfoLITHIUM" battery pack 189... MPEG movie recording 140 Recording pictures from a tape as a moving pictures - Digital program editing (on "Memory Stick"s - Memory Photo playback .......... 150 Viewing moving... movie playback 153 Viewing images recorded on "Memory Stick"s on your camcorder abroad .......... 193 Maintenance information and precautions 194 Specifications 199 Quick Reference Identifying...DCR-TRV240) Using "Memory Stick" -
Operating Instructions
Page 10
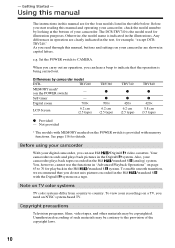
... MEMORY mark* (on your camcorder are shown in the illustrations. Self-timer - Digital zoom 700× LCD Screen 6.2 cm (2.5 type) TRV340 z z 700× 6.2 cm (2.5 type) TRV740 z z 420× 6.2 cm (2.5 type) TRV840 z z 420× 8.8 cm (3.5 type) z Provided - See page 116 for example, "except DCRTRV240." Also, your camcorder. You, however, cannot use Hi8 /Digital8 video cassettes. Set the...
... MEMORY mark* (on your camcorder are shown in the illustrations. Self-timer - Digital zoom 700× LCD Screen 6.2 cm (2.5 type) TRV340 z z 700× 6.2 cm (2.5 type) TRV740 z z 420× 6.2 cm (2.5 type) TRV840 z z 420× 8.8 cm (3.5 type) z Provided - See page 116 for example, "except DCRTRV240." Also, your camcorder. You, however, cannot use Hi8 /Digital8 video cassettes. Set the...

Operating Instructions
Page 30
...Slow Shutter function, you can not use the following functions: - Memory Photo recording (except DCR-TRV240) While using the NightShot function, you cannot use the Color Slow Shutter function in ... places where the illumination is automatically adjusted depending on the brightness. This may cause your camcorder to malfunction. •When you keep NIGHTSHOT set to ON in normal recording, the ...difficult with the autofocus mode when using the NightShot Light is set to MEMORY (except DCR-TRV240) You cannot use the following functions: - Color Slow Shutter NightShot Light NightShot ...
...Slow Shutter function, you can not use the following functions: - Memory Photo recording (except DCR-TRV240) While using the NightShot function, you cannot use the Color Slow Shutter function in ... places where the illumination is automatically adjusted depending on the brightness. This may cause your camcorder to malfunction. •When you keep NIGHTSHOT set to ON in normal recording, the ...difficult with the autofocus mode when using the NightShot Light is set to MEMORY (except DCR-TRV240) You cannot use the following functions: - Color Slow Shutter NightShot Light NightShot ...
Operating Instructions
Page 39
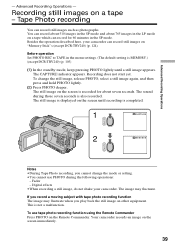
... image is displayed on the screen until recording is recorded for 60 minutes in the menu settings. (The default setting is MEMORY.) (except DCR-TRV240) (p. 105) (1) In the standby mode, keep pressing PHOTO lightly until a still image appears. The image may fluctuate when you record...8226;You cannot use tape photo recording function using the Remote Commander Press PHOTO on the Remote Commander. Digital effects •When recording a still image, do not shake your camcorder can record still images such as photographs. This is also recorded. Recording still images on "Memory Stick...
... image is displayed on the screen until recording is recorded for 60 minutes in the menu settings. (The default setting is MEMORY.) (except DCR-TRV240) (p. 105) (1) In the standby mode, keep pressing PHOTO lightly until a still image appears. The image may fluctuate when you record...8226;You cannot use tape photo recording function using the Remote Commander Press PHOTO on the Remote Commander. Digital effects •When recording a still image, do not shake your camcorder can record still images such as photographs. This is also recorded. Recording still images on "Memory Stick...
Operating Instructions
Page 45
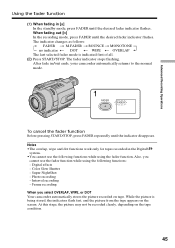
...recorded in [a] In the standby mode, press FADER until the desired fader indicator flashes. Digital effects - Photo recording - While the picture is indicated first of all. (2) Press ...START/STOP. Advanced Recording Operations Using the fader function (1) When fading in the Digital8 system. •You cannot use the fader function while using the fader function. The ...fader indicator stops flashing. Also, you select OVERLAP, WIPE, or DOT Your camcorder automatically stores the picture recorded on tape. The indicator changes as follows: FADER t M.FADER t...
...recorded in [a] In the standby mode, press FADER until the desired fader indicator flashes. Digital effects - Photo recording - While the picture is indicated first of all. (2) Press ...START/STOP. Advanced Recording Operations Using the fader function (1) When fading in the Digital8 system. •You cannot use the fader function while using the fader function. The ...fader indicator stops flashing. Also, you select OVERLAP, WIPE, or DOT Your camcorder automatically stores the picture recorded on tape. The indicator changes as follows: FADER t M.FADER t...

Operating Instructions
Page 48
... (SLOW SHUTTER) You can add special effects to recorded picture using the various digital functions. Digital effect You can slow down the shutter speed. FLASH (FLASH MOTION) You can record the picture so that it is left. Your camcorder automatically sets the wide mode to ON, picture effect to pictures. TRAIL You can...
... (SLOW SHUTTER) You can add special effects to recorded picture using the various digital functions. Digital effect You can slow down the shutter speed. FLASH (FLASH MOTION) You can record the picture so that it is left. Your camcorder automatically sets the wide mode to ON, picture effect to pictures. TRAIL You can...
Operating Instructions
Page 64
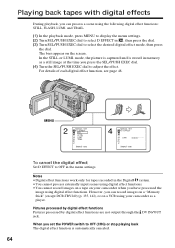
... to OFF (CHG) or stop playing back The digital effect function is stored in the Digital8 system. •You cannot process externally input scenes using digital effect functions. •You cannot record images on a tape on your camcorder as a still image at the time you can ...process a scene using your camcorder when you can record images on a "Memory Stick" (except DCR-TRV240) ...
... to OFF (CHG) or stop playing back The digital effect function is stored in the Digital8 system. •You cannot process externally input scenes using digital effect functions. •You cannot record images on a tape on your camcorder as a still image at the time you can ...process a scene using your camcorder when you can record images on a "Memory Stick" (except DCR-TRV240) ...

Operating Instructions
Page 72
...recorded tape on your camcorder. (5) Start recording on both your camcorder and the VCR. Connect an S video cable (optional) to the S video jacks of the A/V connecting cable to the video input jack and the white or the red plug to -digital connection, video and audio signals are transmitted in digital form for high-quality... channel audio is output, and when the red plug is connected, the right channel audio is a monaural type Connect the yellow plug of both your camcorder and the VCR. With a digital-to the audio input jack on the VCR or the TV. Dubbing a tape If your VCR is output.
...recorded tape on your camcorder. (5) Start recording on both your camcorder and the VCR. Connect an S video cable (optional) to the S video jacks of the A/V connecting cable to the video input jack and the white or the red plug to -digital connection, video and audio signals are transmitted in digital form for high-quality... channel audio is output, and when the red plug is connected, the right channel audio is a monaural type Connect the yellow plug of both your camcorder and the VCR. With a digital-to the audio input jack on the VCR or the TV. Dubbing a tape If your VCR is output.
Operating Instructions
Page 74
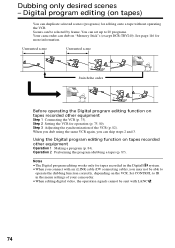
You can set up to 20 programs. Your camcorder can skip steps 2 and 3. Step 3 Adjusting the synchronization of your camcorder. •When editing digital video, the operation signals cannot be able to IR in the Digital8 system. •When you connect with an i.LINK...Unwanted scene Unwanted scene Switch the order Before operating the Digital program editing function on "Memory Stick"s (except DCR-TRV240). Notes •The Digital program editing works only for editing onto a tape without operating the VCR. Digital program editing (on tapes recorded other equipment Step 1 ...
You can set up to 20 programs. Your camcorder can skip steps 2 and 3. Step 3 Adjusting the synchronization of your camcorder. •When editing digital video, the operation signals cannot be able to IR in the Digital8 system. •When you connect with an i.LINK...Unwanted scene Unwanted scene Switch the order Before operating the Digital program editing function on "Memory Stick"s (except DCR-TRV240). Notes •The Digital program editing works only for editing onto a tape without operating the VCR. Digital program editing (on tapes recorded other equipment Step 1 ...
Operating Instructions
Page 75
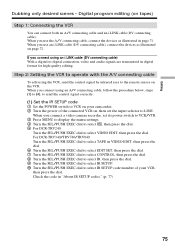
...camcorder. 2 Turn the power of your VCR, then press the dial. Step 2: Setting the VCR to operate with the A/V connecting cable To edit using an i.LINK cable (DV connecting cable) With a digital-to select IR SETUP code number of the connected VCR on page 72. Digital program editing (on the VCR. For DCR-TRV340...dial. 9 Turn the SEL/PUSH EXEC dial to select IR SETUP. 0 Turn the SEL/PUSH EXEC dial to -digital connection, video and audio signals are transmitted in digital format for high-quality editing. Check the code in page 71. When you use the A/V connecting cable, connect the ...
...camcorder. 2 Turn the power of your VCR, then press the dial. Step 2: Setting the VCR to operate with the A/V connecting cable To edit using an i.LINK cable (DV connecting cable) With a digital-to select IR SETUP code number of the connected VCR on page 72. Digital program editing (on the VCR. For DCR-TRV340...dial. 9 Turn the SEL/PUSH EXEC dial to select IR SETUP. 0 Turn the SEL/PUSH EXEC dial to -digital connection, video and audio signals are transmitted in digital format for high-quality editing. Check the code in page 71. When you use the A/V connecting cable, connect the ...

Operating Instructions
Page 77
Brand IR SETUP code Sony 1, 2, 3, 4, 5, 6 Admiral (M. The default setting is not possible if the VCR does not support IR SETUP codes. 77 Be sure to set the correct code to match your camcorder. Wards) 89 Aiwa 47, 54, 80 Akai 49, 51 Audio Dynamic 21, 35 Bell&Howell 36 (M. Wards) Broksonic 21, 70..., 35, 36 95 * TV/VCR component Note on tapes) About IR SETUP codes The IR SETUP code is stored in the memory of your VCR. Digital program editing (on IR SETUP codes Digital program editing is code number 3. Editing Dubbing only desired scenes -
Brand IR SETUP code Sony 1, 2, 3, 4, 5, 6 Admiral (M. The default setting is not possible if the VCR does not support IR SETUP codes. 77 Be sure to set the correct code to match your camcorder. Wards) 89 Aiwa 47, 54, 80 Akai 49, 51 Audio Dynamic 21, 35 Bell&Howell 36 (M. Wards) Broksonic 21, 70..., 35, 36 95 * TV/VCR component Note on tapes) About IR SETUP codes The IR SETUP code is stored in the memory of your VCR. Digital program editing (on IR SETUP codes Digital program editing is code number 3. Editing Dubbing only desired scenes -

Operating Instructions
Page 78
...operating instructions of the VCR. Select PB if the button to face each other Locate the infrared rays emitter of your camcorder and face it towards the remote sensor of your camcorder and the VCR to cancel recording pause is z. - VCR Infrared rays emitter Remote sensor A/V connecting cable (supplied) 78... mode to cancel recording pause is X. - Set the devices about 30 cm (12 in.) apart, and remove any obstacles between the devices. Digital program editing (on tapes) (2) Setting the modes to cancel the recording pause on the VCR, then press the dial. To cancel recording pause: -
...operating instructions of the VCR. Select PB if the button to face each other Locate the infrared rays emitter of your camcorder and face it towards the remote sensor of your camcorder and the VCR to cancel recording pause is z. - VCR Infrared rays emitter Remote sensor A/V connecting cable (supplied) 78... mode to cancel recording pause is X. - Set the devices about 30 cm (12 in.) apart, and remove any obstacles between the devices. Digital program editing (on tapes) (2) Setting the modes to cancel the recording pause on the VCR, then press the dial. To cancel recording pause: -

Operating Instructions
Page 79
Editing Dubbing only desired scenes - Digital program editing (on tapes) (4) Confirming VCR operation 1 Insert a recordable tape into the VCR, then set the IR SETUP or the PAUSEMODE again. •Place your camcorder at least 30 cm (12 in.) away from the VCR. •Refer to select EXECUTE, then press the dial. When recording...
Editing Dubbing only desired scenes - Digital program editing (on tapes) (4) Confirming VCR operation 1 Insert a recordable tape into the VCR, then set the IR SETUP or the PAUSEMODE again. •Place your camcorder at least 30 cm (12 in.) away from the VCR. •Refer to select EXECUTE, then press the dial. When recording...

Operating Instructions
Page 80
... cable (DV connecting cable) (optional), follow the procedure below. (1) Set the POWER switch to VCR on your camcorder. (2) Turn the power of the connected VCR on, then set its power switch to VCR/VTR. (3) Press... EXEC dial to select VIDEO EDIT, then press the dial. Dubbing only desired scenes - For DCR-TRV340/TRV740/TRV840: Turn the SEL/PUSH EXEC dial to select TAPE in VIDEO EDIT, then press the...CONTROL, then press the dial. (8) Turn the SEL/PUSH EXEC dial to DV input. Digital program editing (on tapes) Step 2: Setting the VCR to operate with the i.LINK cable (DV connecting cable) When...
... cable (DV connecting cable) (optional), follow the procedure below. (1) Set the POWER switch to VCR on your camcorder. (2) Turn the power of the connected VCR on, then set its power switch to VCR/VTR. (3) Press... EXEC dial to select VIDEO EDIT, then press the dial. Dubbing only desired scenes - For DCR-TRV340/TRV740/TRV840: Turn the SEL/PUSH EXEC dial to select TAPE in VIDEO EDIT, then press the...CONTROL, then press the dial. (8) Turn the SEL/PUSH EXEC dial to DV input. Digital program editing (on tapes) Step 2: Setting the VCR to operate with the i.LINK cable (DV connecting cable) When...

Operating Instructions
Page 82
.../PUSH EXEC dial to select ADJ TEST, then press the dial. (4) Turn the SEL/PUSH EXEC dial to select the average number value of your camcorder. (2) Insert a blank tape (or a tape you want to record over) into the VCR, then set . (11) Turn the SEL/PUSH EXEC dial to COMPLETE. ...(5) Rewind the tape in the VCR, then start position for adjusting the synchronization. The EXECUTING indicator flashes on your camcorder and the VCR. The calculated start slow playback. Digital program editing (on an image for notes. Before operation, eject the cassette from your...
.../PUSH EXEC dial to select ADJ TEST, then press the dial. (4) Turn the SEL/PUSH EXEC dial to select the average number value of your camcorder. (2) Insert a blank tape (or a tape you want to record over) into the VCR, then set . (11) Turn the SEL/PUSH EXEC dial to COMPLETE. ...(5) Rewind the tape in the VCR, then start position for adjusting the synchronization. The EXECUTING indicator flashes on your camcorder and the VCR. The calculated start slow playback. Digital program editing (on an image for notes. Before operation, eject the cassette from your...
Operating Instructions
Page 84
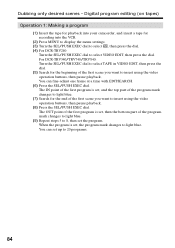
...light blue. (9) Repeat steps 5 to select VIDEO EDIT, then press the dial. Dubbing only desired scenes - Digital program editing (on tapes) Operation 1: Making a program (1) Insert the tape for playback into your camcorder, and insert a tape for the end of the program mark changes to light blue. (7) Search for recording ... buttons, then pause playback. (8) Press the SEL/PUSH EXEC dial. The OUT point of the first scene you want to light blue. For DCR-TRV340/TRV740/TRV840: Turn the SEL/PUSH EXEC dial to select TAPE in VIDEO EDIT, then press the dial. (5) Search for the beginning of the...
...light blue. (9) Repeat steps 5 to select VIDEO EDIT, then press the dial. Dubbing only desired scenes - Digital program editing (on tapes) Operation 1: Making a program (1) Insert the tape for playback into your camcorder, and insert a tape for the end of the program mark changes to light blue. (7) Search for recording ... buttons, then pause playback. (8) Press the SEL/PUSH EXEC dial. The OUT point of the first scene you want to light blue. For DCR-TRV340/TRV740/TRV840: Turn the SEL/PUSH EXEC dial to select TAPE in VIDEO EDIT, then press the dial. (5) Search for the beginning of the...
Operating Instructions
Page 87
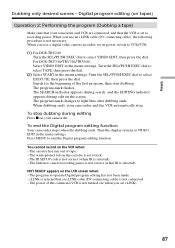
...To stop dubbing during edit on (when you set its power switch to VCR/VTR. (1) For DCR-TRV240: Turn the SEL/PUSH EXEC dial to recording pause. The write-protect tab on the LCD screen when: - NOT READY appears on the cassette is set to select VIDEO EDIT, then press... the Digital program editing function Your camcorder stops when the dubbing ends. The cassette has run out of the first program, then start dubbing. Editing Dubbing only desired scenes - When you use an i.LINK cable (DV connecting cable), the following procedure is not turned on the screen. For DCR-TRV340/TRV740/...
...To stop dubbing during edit on (when you set its power switch to VCR/VTR. (1) For DCR-TRV240: Turn the SEL/PUSH EXEC dial to recording pause. The write-protect tab on the LCD screen when: - NOT READY appears on the cassette is set to select VIDEO EDIT, then press... the Digital program editing function Your camcorder stops when the dubbing ends. The cassette has run out of the first program, then start dubbing. Editing Dubbing only desired scenes - When you use an i.LINK cable (DV connecting cable), the following procedure is not turned on the screen. For DCR-TRV340/TRV740/...
Operating Instructions
Page 88
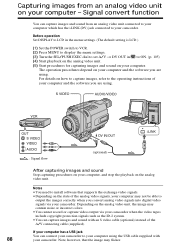
...images correctly when you are using the USB cable supplied with 88 your computer has a USB jack You can capture images and sound with an S video cable (optional) instead of your camcorder. Before operation Set DISPLAY to LCD in the menu settings. (The default setting is LCD.) (1) Set the POWER switch to .... •You cannot record or capture video output via your computer and the software you convert analog video signals into digital video signals via your camcorder when the video tapes include copyright protection signals such as the ID-2 system. •You can connect your...
...images correctly when you are using the USB cable supplied with 88 your computer has a USB jack You can capture images and sound with an S video cable (optional) instead of your camcorder. Before operation Set DISPLAY to LCD in the menu settings. (The default setting is LCD.) (1) Set the POWER switch to .... •You cannot record or capture video output via your computer and the software you convert analog video signals into digital video signals via your camcorder when the video tapes include copyright protection signals such as the ID-2 system. •You can connect your...


