
Operating Instructions
Page 3
...interference, and (2) this device must accept any interference received, including interference that interference will not occur in CANADA This Class B digital apparatus complies with the instructions, may cause undesired operation. 3 Operation is subject to radio communications. Getting started Note: This ... has been tested and found to comply with the limits for help. "Memory Stick" For customers in a particular installation. Connect the equipment into an outlet on , the user is encouraged to try to provide reasonable protection against harmful interference in accordance...
...interference, and (2) this device must accept any interference received, including interference that interference will not occur in CANADA This Class B digital apparatus complies with the instructions, may cause undesired operation. 3 Operation is subject to radio communications. Getting started Note: This ... has been tested and found to comply with the limits for help. "Memory Stick" For customers in a particular installation. Connect the equipment into an outlet on , the user is encouraged to try to provide reasonable protection against harmful interference in accordance...

Operating Instructions
Page 4
... for a photo - Inserting a scene from a tape - Table of Recording video or TV programs 60 their respective companies. NightShot/Super NightShot ...... 20 Self-timer recording (DCR-TRV320 only 22 Checking the recording - Memory Photo recording 77 Superimposing a still image in the "Memory Stick" on "Memory Stick"s - PRINT MARK ...... 101 Recording a still image on "Memory Stick" - BACK LIGHT 20 Shooting...
... for a photo - Inserting a scene from a tape - Table of Recording video or TV programs 60 their respective companies. NightShot/Super NightShot ...... 20 Self-timer recording (DCR-TRV320 only 22 Checking the recording - Memory Photo recording 77 Superimposing a still image in the "Memory Stick" on "Memory Stick"s - PRINT MARK ...... 101 Recording a still image on "Memory Stick" - BACK LIGHT 20 Shooting...

Operating Instructions
Page 5
... for Remote Commander (2) (p. 128) 6 A/V connecting cable (1) (p. 27) 7 Shoulder strap (1) (p. 125) 8 Lens cap (1) (p. 16) 9 PC serial cable (1) (p. 91) DCR-TRV320 only 0 "Memory Stick" (1) (p. 72) DCR-TRV320 only qa Application software: PictureGear 4.1 Lite (CD-ROM) (1) (p. 91) DCR-TRV320 only Contents of the recording cannot be compensated if recording or playback is not made due to a malfunction of the camcorder, video tape, etc. 5
... for Remote Commander (2) (p. 128) 6 A/V connecting cable (1) (p. 27) 7 Shoulder strap (1) (p. 125) 8 Lens cap (1) (p. 16) 9 PC serial cable (1) (p. 91) DCR-TRV320 only 0 "Memory Stick" (1) (p. 72) DCR-TRV320 only qa Application software: PictureGear 4.1 Lite (CD-ROM) (1) (p. 91) DCR-TRV320 only Contents of the recording cannot be compensated if recording or playback is not made due to a malfunction of the camcorder, video tape, etc. 5

Operating Instructions
Page 6
... with its v mark facing up . 3 Close the cassette compartment by pressing the mark on the cassette compartment. Connecting the power cord (p. 14) Use the battery pack when using your camcorder. AC power adaptor (supplied) Inserting a cassette (p. 15) 1 Open the lid of the cassette ...
... with its v mark facing up . 3 Close the cassette compartment by pressing the mark on the cassette compartment. Connecting the power cord (p. 14) Use the battery pack when using your camcorder. AC power adaptor (supplied) Inserting a cassette (p. 15) 1 Open the lid of the cassette ...
Operating Instructions
Page 11
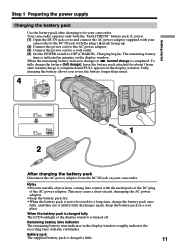
...charging the battery allows you to use it until FULL appears in the display window roughly indicates the recording time with the plug's v mark facing up. (2) Connect the power cord to the AC power adaptor. (3) Connect the power cord to a wall outlet. (4) Set the POWER switch to be used for a ...long time, charge the battery pack once fully, and then use the battery longer than usual. 4 VTR OFF (CHARGE) MEMORY CAMERA 1 2 After charging the battery pack Disconnect...
...charging the battery allows you to use it until FULL appears in the display window roughly indicates the recording time with the plug's v mark facing up. (2) Connect the power cord to the AC power adaptor. (3) Connect the power cord to a wall outlet. (4) Set the POWER switch to be used for a ...long time, charge the battery pack once fully, and then use the battery longer than usual. 4 VTR OFF (CHARGE) MEMORY CAMERA 1 2 After charging the battery pack Disconnect...
Operating Instructions
Page 14
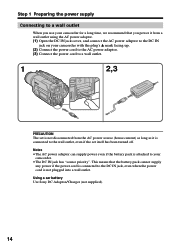
... the wall outlet, even if the set is not disconnected from a wall outlet using the AC power adaptor. (1) Open the DC IN jack cover, and connect the AC power adaptor to a wall outlet. 1 2,3 PRECAUTION The set itself has been turned off. Notes • The AC power adaptor can supply power even... power cord to the AC power adaptor. (3) Connect the power cord to the DC IN jack on your camcorder. • The DC IN jack has "source priority". Using a car battery Use Sony DC Adaptor/Charger (not supplied). 14 This means that you power it from the AC power source (house current) as...
... the wall outlet, even if the set is not disconnected from a wall outlet using the AC power adaptor. (1) Open the DC IN jack cover, and connect the AC power adaptor to a wall outlet. 1 2,3 PRECAUTION The set itself has been turned off. Notes • The AC power adaptor can supply power even... power cord to the AC power adaptor. (3) Connect the power cord to the DC IN jack on your camcorder. • The DC IN jack has "source priority". Using a car battery Use Sony DC Adaptor/Charger (not supplied). 14 This means that you power it from the AC power source (house current) as...

Operating Instructions
Page 25
... the indicators disappear, press DISPLAY again. In the recording mode, the recording data will not be displayed. When you connect your camcorder. The tape was recorded by a camcorder without the date and time set. DATA CODE DISPLAY Using the data code function Your camcorder automatically records not only images on the LCD screen. The indicators...
... the indicators disappear, press DISPLAY again. In the recording mode, the recording data will not be displayed. When you connect your camcorder. The tape was recorded by a camcorder without the date and time set. DATA CODE DISPLAY Using the data code function Your camcorder automatically records not only images on the LCD screen. The indicators...

Operating Instructions
Page 27
... adaptor (p. 14). If your TV or VCR has an S video jack Connect using the A/V connecting cable. Connect your camcorder to the TV using an S video cable (not supplied) to obtain high-quality pictures. Set the input selector on the VCR to VCR. Viewing the recording on TV Connect your camcorder to your TV or VCR with the...
... adaptor (p. 14). If your TV or VCR has an S video jack Connect using the A/V connecting cable. Connect your camcorder to the TV using an S video cable (not supplied) to obtain high-quality pictures. Set the input selector on the VCR to VCR. Viewing the recording on TV Connect your camcorder to your TV or VCR with the...

Operating Instructions
Page 28
... • The above feature may not work on some TV models. S. To do as the AC power adaptor to your camcorder, and insert the recorded tape. (1) After connecting your TV and AV cordless IR receiver, set the POWER switch on the AV cordless IR receiver to ON. (2) Turn the TV on and... camcorder consumes power. LASER LINK button goes out. If you use a Sony TV • You can switch the video input of your camcorder at the AV cordless IR receiver. Viewing the recording on TV Using the AV cordless IR receiver Once you connect the AV cordless IR receiver (not supplied) to your TV or...
... • The above feature may not work on some TV models. S. To do as the AC power adaptor to your camcorder, and insert the recorded tape. (1) After connecting your TV and AV cordless IR receiver, set the POWER switch on the AV cordless IR receiver to ON. (2) Turn the TV on and... camcorder consumes power. LASER LINK button goes out. If you use a Sony TV • You can switch the video input of your camcorder at the AV cordless IR receiver. Viewing the recording on TV Using the AV cordless IR receiver Once you connect the AV cordless IR receiver (not supplied) to your TV or...

Operating Instructions
Page 31
... S VIDEO jack and the S video input of the video printer. Connect the video printer using the video printer (not supplied). S VIDEO AUDIO / VIDEO Video printer LINE IN VIDEO S VIDEO : Signal flow If the video printer is equipped with your camcorder. Connect the A/V connecting cable to the AUDIO/VIDEO jack and connect the yellow plug of the cable to the video input of the video printer. 31 Advanced Recording Operations Recording...
... S VIDEO jack and the S video input of the video printer. Connect the video printer using the video printer (not supplied). S VIDEO AUDIO / VIDEO Video printer LINE IN VIDEO S VIDEO : Signal flow If the video printer is equipped with your camcorder. Connect the A/V connecting cable to the AUDIO/VIDEO jack and connect the yellow plug of the cable to the video input of the video printer. 31 Advanced Recording Operations Recording...

Operating Instructions
Page 32
... mode, set 16:9WIDE to a TV that is set 16:9WIDE to ON in 16:9 WIDE mode [a]. Bounce During recording You cannot select or cancel the wide mode. you connect your camcorder to the standby mode and then set 16:9WIDE to ON in the menu setting. If you set the...TV [c] are compressed in the 16:9WIDE mode automatically appear on the TV. If the wide mode is compatible with ID-1 signals inserted between video signals when you connect your camcorder to OFF in the menu settings when the SteadyShot function is working, flashes and the SteadyShot function does not function. 32
... mode, set 16:9WIDE to a TV that is set 16:9WIDE to ON in 16:9 WIDE mode [a]. Bounce During recording You cannot select or cancel the wide mode. you connect your camcorder to the standby mode and then set 16:9WIDE to ON in the menu setting. If you set the...TV [c] are compressed in the 16:9WIDE mode automatically appear on the TV. If the wide mode is compatible with ID-1 signals inserted between video signals when you connect your camcorder to OFF in the menu settings when the SteadyShot function is working, flashes and the SteadyShot function does not function. 32

Operating Instructions
Page 45
When you press the SEL/PUSH EXEC dial at step 5, the title is not recorded on tape. Then select the desired language and return to the VCR with the A/V connecting cable. Title setting •The title color changes as follows : WHITE y YELLOW y VIOLET y RED y CYAN y GREEN y BLUE •The... as follows : SMALL y LARGE You cannot input more than 12 characters in step 2. If you are playing back You can record a title when you dub a tape connecting your camcorder to step 2. When you superimpose a title while you have not made any custom title appears on the screen. While...
When you press the SEL/PUSH EXEC dial at step 5, the title is not recorded on tape. Then select the desired language and return to the VCR with the A/V connecting cable. Title setting •The title color changes as follows : WHITE y YELLOW y VIOLET y RED y CYAN y GREEN y BLUE •The... as follows : SMALL y LARGE You cannot input more than 12 characters in step 2. If you are playing back You can record a title when you dub a tape connecting your camcorder to step 2. When you superimpose a title while you have not made any custom title appears on the screen. While...

Operating Instructions
Page 57
.... If your VCR has an S video jack Connect using the A/V connecting cable supplied with your camcorder. (1) Insert a blank tape (or a tape you want to the S video jacks of the A/V connecting cable. With this connection, you have finished dubbing a tape Press x on the VCR or the TV. Connect an S video cable (not supplied) to record over) into the VCR, and...
.... If your VCR has an S video jack Connect using the A/V connecting cable supplied with your camcorder. (1) Insert a blank tape (or a tape you want to the S video jacks of the A/V connecting cable. With this connection, you have finished dubbing a tape Press x on the VCR or the TV. Connect an S video cable (not supplied) to record over) into the VCR, and...

Operating Instructions
Page 58
... Note on tapes that are not recorded in the Hi8/standard 8 system Digital signals are transmitted in digital form for details about i.LINK. Also, when you record playback pause picture via the DV IN/OUT jack The recorded picture becomes rough. During playback of the DV products. With digital-to-digital connection, video and audio signals are output as...
... Note on tapes that are not recorded in the Hi8/standard 8 system Digital signals are transmitted in digital form for details about i.LINK. Also, when you record playback pause picture via the DV IN/OUT jack The recorded picture becomes rough. During playback of the DV products. With digital-to-digital connection, video and audio signals are output as...

Operating Instructions
Page 59
... colors. •You cannot record or capture the video output via your camcorder. Depending on your PC and the software which you convert analog video signals into digital video signals via your PC. The operation procedures depend on the analog video unit, the image may not...on the analog video unit. Signal convert function You can capture images and sound from an analog video unit connecting a PC which can exchange video signals. •Depending on how to capture images, refer to output the images correctly when you use. Analog video signals t Digital video signals (1) Set...
... colors. •You cannot record or capture the video output via your camcorder. Depending on your PC and the software which you convert analog video signals into digital video signals via your PC. The operation procedures depend on the analog video unit, the image may not...on the analog video unit. Signal convert function You can capture images and sound from an analog video unit connecting a PC which can exchange video signals. •Depending on how to capture images, refer to output the images correctly when you use. Analog video signals t Digital video signals (1) Set...
Operating Instructions
Page 60
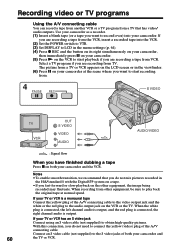
... and 60 the TV or VCR. Recording video or TV programs Using the A/V connecting cable You can record a tape from another VCR or a TV program from . 4 PAUSE REC S VIDEO OUT S VIDEO VIDEO AUDIO AUDIO/VIDEO : Signal flow When you do not need to connect the yellow (video) plug of the A/V connecting cable. If you are recording a tape from TV. If your camcorder...
... and 60 the TV or VCR. Recording video or TV programs Using the A/V connecting cable You can record a tape from another VCR or a TV program from . 4 PAUSE REC S VIDEO OUT S VIDEO VIDEO AUDIO AUDIO/VIDEO : Signal flow When you do not need to connect the yellow (video) plug of the A/V connecting cable. If you are recording a tape from TV. If your camcorder...
Operating Instructions
Page 61
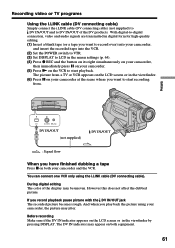
.... (1) Insert a blank tape (or a tape you record playback pause picture with the DV IN/OUT jack The recorded picture becomes rough. During digital editing The color of the DV products. You can connect one VCR only using your camcorder. (5) Press N on the VCR to start playback. With digital-to-digital connection, video and audio signals are transmitted in...
.... (1) Insert a blank tape (or a tape you record playback pause picture with the DV IN/OUT jack The recorded picture becomes rough. During digital editing The color of the DV products. You can connect one VCR only using your camcorder. (5) Press N on the VCR to start playback. With digital-to-digital connection, video and audio signals are transmitted in...

Operating Instructions
Page 62
Insert Editing You can insert a new scene from a VCR - Insert a cassette containing the desired scene to insert into the VCR. [a] [b] [c] 62 Connections are the same as in "Recording video or TV programs" on page 60, 61. Inserting a scene from a VCR onto your originally recorded tape by specifying the insert start and end points. Use the Remote Commander for this operation.
Insert Editing You can insert a new scene from a VCR - Insert a cassette containing the desired scene to insert into the VCR. [a] [b] [c] 62 Connections are the same as in "Recording video or TV programs" on page 60, 61. Inserting a scene from a VCR onto your originally recorded tape by specifying the insert start and end points. Use the Remote Commander for this operation.

Operating Instructions
Page 70
... is removed, as long as the lithium battery is connected with DISPLAY set to "V-OUT/LCD" in the viewfinder VTR CAMERA MEMORY To light up the camera recording lamp at the front of your camcorder CAMERA MEMORY To turn the camera recording lamp off the backlight on display window To turn on... the backlight VTR CAMERA MEMORY Note If you set the time difference to...
... is removed, as long as the lithium battery is connected with DISPLAY set to "V-OUT/LCD" in the viewfinder VTR CAMERA MEMORY To light up the camera recording lamp at the front of your camcorder CAMERA MEMORY To turn the camera recording lamp off the backlight on display window To turn on... the backlight VTR CAMERA MEMORY Note If you set the time difference to...

Operating Instructions
Page 71
... battery with no power source installed. Note on the time indicator The internal clock of your camcorder operates on the tape and the "Memory Stick" (DCR-TRV320 only). Resetting the date and time The default clock setting is set to make the menu settings disappear. 1, MENU 2 3 7 SETUP MENU CLOCK SET AUTO TV... Time. You must reset the date and time when the lithium battery becomes dead with the battery pack or other power source connected, you do not set the date and time is recorded on a 12-hour cycle. •12:00 AM stands for midnight. •12:00 PM stands for noon. 71...
... battery with no power source installed. Note on the time indicator The internal clock of your camcorder operates on the tape and the "Memory Stick" (DCR-TRV320 only). Resetting the date and time The default clock setting is set to make the menu settings disappear. 1, MENU 2 3 7 SETUP MENU CLOCK SET AUTO TV... Time. You must reset the date and time when the lithium battery becomes dead with the battery pack or other power source connected, you do not set the date and time is recorded on a 12-hour cycle. •12:00 AM stands for midnight. •12:00 PM stands for noon. 71...


