
Operating Instructions
Page 8
... pack when using your camcorder. Inserting a cassette (p. 18) 1 Slide OPEN/ EJECT in parentheses "( )" for more information. AC power adaptor (supplied) Connect the plug with the window facing out. 3 Close the cassette compartment by pressing the mark on the cassette compartment. After the cassette compartment goes down completely, close the lid until...
... pack when using your camcorder. Inserting a cassette (p. 18) 1 Slide OPEN/ EJECT in parentheses "( )" for more information. AC power adaptor (supplied) Connect the plug with the window facing out. 3 Close the cassette compartment by pressing the mark on the cassette compartment. After the cassette compartment goes down completely, close the lid until...

Operating Instructions
Page 11
... that constantly appear on the LCD screen and the finder. Copyright precautions Television programs, films, video tapes, and other materials may cause your camcorder to malfunction. To view your recordings on mounted models only) •The LCD screen and the finder are manufactured using extremely high-...precision technology, so over 99.99% of the sun in the sun or under direct sunlight [b]. •Be careful when placing the camera near a window or outdoors. These...
... that constantly appear on the LCD screen and the finder. Copyright precautions Television programs, films, video tapes, and other materials may cause your camcorder to malfunction. To view your recordings on mounted models only) •The LCD screen and the finder are manufactured using extremely high-...precision technology, so over 99.99% of the sun in the sun or under direct sunlight [b]. •Be careful when placing the camera near a window or outdoors. These...
Operating Instructions
Page 13
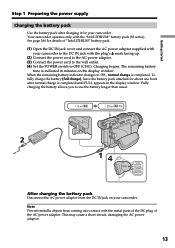
.... (4) Set the POWER switch to OFF (CHG). See page 166 for your camcorder. Note Prevent metallic objects from the DC IN jack on the display window. This may cause a short-circuit, damaging the AC power adaptor. 13 Fully charging the battery allows you to use the battery longer than usual. 2 ...14 POWER VCR OFF(CHG) CAMERA MEMORY After charging the battery pack Disconnect the AC power adaptor from coming into contact with the metal parts of the DC plug of "InfoLITHIUM...
.... (4) Set the POWER switch to OFF (CHG). See page 166 for your camcorder. Note Prevent metallic objects from the DC IN jack on the display window. This may cause a short-circuit, damaging the AC power adaptor. 13 Fully charging the battery allows you to use the battery longer than usual. 2 ...14 POWER VCR OFF(CHG) CAMERA MEMORY After charging the battery pack Disconnect the AC power adaptor from coming into contact with the metal parts of the DC plug of "InfoLITHIUM...

Operating Instructions
Page 14
... (300) Approximate minutes at 25 °C (77 °F). Step 1 Preparing the power supply Remaining battery time indicator The remaining battery time indicator in the display window indicates the approximate recording time with the LCD screen Continuous* Typical** 100 55 215 120 330 190 380 220 Approximate minutes when you repeat...
... (300) Approximate minutes at 25 °C (77 °F). Step 1 Preparing the power supply Remaining battery time indicator The remaining battery time indicator in the display window indicates the approximate recording time with the LCD screen Continuous* Typical** 100 55 215 120 330 190 380 220 Approximate minutes when you repeat...
Operating Instructions
Page 18
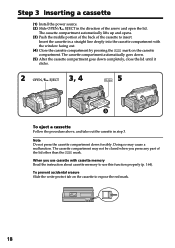
...). Insert the cassette in a straight line deeply into the cassette compartment with cassette memory Read the instruction about cassette memory to use cassette with the window facing out. (4) Close the cassette compartment by pressing the mark on the cassette to insert. The cassette compartment may cause a malfunction. Step 3 Inserting a cassette (1) Install...
...). Insert the cassette in a straight line deeply into the cassette compartment with cassette memory Read the instruction about cassette memory to use cassette with the window facing out. (4) Close the cassette compartment by pressing the mark on the cassette to insert. The cassette compartment may cause a malfunction. Step 3 Inserting a cassette (1) Install...

Operating Instructions
Page 37
Tape Photo recording Recording images with the flash The flash pops up automatically. The default setting is adjusted to find the most appropriate setting for the flash. The flash ... the indicator as follows: t t t No indicator Auto red-eye reduction: The flash fires before recording to reduce the red-eye phenomenon. Try recording various images to the appropriate brightness through the photocell window for FLASH LVL. 37 Advanced Recording Operations Recording a still image on the screen. (flash) Each press of the surrounding brightness. You can...
Tape Photo recording Recording images with the flash The flash pops up automatically. The default setting is adjusted to find the most appropriate setting for the flash. The flash ... the indicator as follows: t t t No indicator Auto red-eye reduction: The flash fires before recording to reduce the red-eye phenomenon. Try recording various images to the appropriate brightness through the photocell window for FLASH LVL. 37 Advanced Recording Operations Recording a still image on the screen. (flash) Each press of the surrounding brightness. You can...

Operating Instructions
Page 50
...Beach & ski This mode prevents people's faces from appearing dark in strong light or reflected light, such as at a beach in windows when you are recording sunsets, general night views, fireworks displays and neon signs. Low lux This mode makes subjects brighter in insufficient light. 50 Soft portrait ...This mode brings out the subject while creating a soft background for when you are recording a subject behind glass or a screen. Using the PROGRAM AE function You can select PROGRAM AE (Auto Exposure) mode to maintain atmosphere ...
...Beach & ski This mode prevents people's faces from appearing dark in strong light or reflected light, such as at a beach in windows when you are recording sunsets, general night views, fireworks displays and neon signs. Low lux This mode makes subjects brighter in insufficient light. 50 Soft portrait ...This mode brings out the subject while creating a soft background for when you are recording a subject behind glass or a screen. Using the PROGRAM AE function You can select PROGRAM AE (Auto Exposure) mode to maintain atmosphere ...

Operating Instructions
Page 107
..., "™" and "®" are not sold in this manual. Notes on image data compatibility •Image data files recorded on "Memory Stick"s by the JEITA (Japan Electronics and Information Technology Industries Association). introduction "Memory Stick"s formatted by a computer "... a guaranteed compatibility with the Design rule for Camera File system universal standard established by your camcorder still images recorded on the "Memory Stick." •"Memory Stick" and are trademarks of Sony Corporation. •Windows and ActiveMovie, DirectShow are either registered trademarks or...
..., "™" and "®" are not sold in this manual. Notes on image data compatibility •Image data files recorded on "Memory Stick"s by the JEITA (Japan Electronics and Information Technology Industries Association). introduction "Memory Stick"s formatted by a computer "... a guaranteed compatibility with the Design rule for Camera File system universal standard established by your camcorder still images recorded on the "Memory Stick." •"Memory Stick" and are trademarks of Sony Corporation. •Windows and ActiveMovie, DirectShow are either registered trademarks or...

Operating Instructions
Page 118
You can also change FLASH LVL to the appropriate brightness through the photocell window for the flash. If you select auto and during the following operations: - The flash does not fire even if you leave your camcorder for 5 or ... does not have the auto red-eye reduction function You cannot select the auto red-eye reduction. 118 Spotlight mode of PROGRAM AE - Memory Photo recording The flash is adjusted to the desired brightness in the menu settings (p. 100). Notes •The recommended shooting distance using the built-in flash is...
You can also change FLASH LVL to the appropriate brightness through the photocell window for the flash. If you select auto and during the following operations: - The flash does not fire even if you leave your camcorder for 5 or ... does not have the auto red-eye reduction function You cannot select the auto red-eye reduction. 118 Spotlight mode of PROGRAM AE - Memory Photo recording The flash is adjusted to the desired brightness in the menu settings (p. 100). Notes •The recommended shooting distance using the built-in flash is...

Operating Instructions
Page 139
... standard installation However, note that the update to play back moving pictures). On file format Data recorded on the "Memory Stick" is stored in this manual. 139 "Memory Stick" Operations Viewing images using computer You can... connector must be used simultaneously, some equipment may be provided as standard. Recommended USB connection environment Recommended Windows environment OS: Microsoft Windows 98, Windows 98SE, Windows Me, Windows 2000 Professional standard installation is upgraded OS. Notes •Operations are installed on the application software, refer...
... standard installation However, note that the update to play back moving pictures). On file format Data recorded on the "Memory Stick" is stored in this manual. 139 "Memory Stick" Operations Viewing images using computer You can... connector must be used simultaneously, some equipment may be provided as standard. Recommended USB connection environment Recommended Windows environment OS: Microsoft Windows 98, Windows 98SE, Windows Me, Windows 2000 Professional standard installation is upgraded OS. Notes •Operations are installed on the application software, refer...

Operating Instructions
Page 140
...USB connector on "USB Driver Installation for viewing images on a CD-ROM which is not in step 4 (drag and drop). • Sony Camcorder USB Driver • Sony Camcorder USB Shim (6) When "Put these items into the Extensions folder?" For Macintosh users (1) Turn on your computer and allow the Mac ...your computer using computer Installing the USB driver Before connecting your camcorder to your computer. Your computer recognizes the camcorder, and the Windows Add Hardware Wizard starts. (7) The Add Hardware Wizard starts twice because 2 different USB drivers are installed. Be sure to allow...
...USB connector on "USB Driver Installation for viewing images on a CD-ROM which is not in step 4 (drag and drop). • Sony Camcorder USB Driver • Sony Camcorder USB Shim (6) When "Put these items into the Extensions folder?" For Macintosh users (1) Turn on your computer and allow the Mac ...your computer using computer Installing the USB driver Before connecting your camcorder to your computer. Your computer recognizes the camcorder, and the Windows Add Hardware Wizard starts. (7) The Add Hardware Wizard starts twice because 2 different USB drivers are installed. Be sure to allow...

Operating Instructions
Page 141
... "Moml0001" folder t Image file* * Copying a file to MEMORY. "Memory Stick" Operations Viewing images using computer Viewing images For Windows 98 users (1) Turn on the power of your computer and allow Windows 98 to load. (2) Connect one end of the USB cable to the USB jack on the camcorder and the other... end to the USB connector on Windows 98 and double click the newly recognized drive. (Example: "Removable Disk (D:)") The folders inside the "Memory Stick" are displayed. (6) Select and double-click...
... "Moml0001" folder t Image file* * Copying a file to MEMORY. "Memory Stick" Operations Viewing images using computer Viewing images For Windows 98 users (1) Turn on the power of your computer and allow Windows 98 to load. (2) Connect one end of the USB cable to the USB jack on the camcorder and the other... end to the USB connector on Windows 98 and double click the newly recognized drive. (Example: "Removable Disk (D:)") The folders inside the "Memory Stick" are displayed. (6) Select and double-click...

Operating Instructions
Page 142
... and drop the "Memory Stick" icon to remove the device from the system appears, then unplug the USB cable or eject the "Memory Stick." For Windows 2000, Windows Me users (1) Move the cursor to the "Unplug or Eject Hardware" icon on the Task Tray and click to cancel the applicable drive. (2) A message...
... and drop the "Memory Stick" icon to remove the device from the system appears, then unplug the USB cable or eject the "Memory Stick." For Windows 2000, Windows Me users (1) Move the cursor to the "Unplug or Eject Hardware" icon on the Task Tray and click to cancel the applicable drive. (2) A message...

Operating Instructions
Page 143
The meanings of the file names are grouped in folders by recording mode. For Windows 98 users (The drive recognizing the camcorder is [D:]) Folder containing still image data Folder containing moving picture data Folder 100msdcf Moml0001 File DSC0ssss.JPG MOV0ssss... 143 Compressed files cannot be assured if the "Memory Stick" has been formatted on your computer. •Do not optimize the "Memory Stick" on a Windows machine. Communications with your computer may increase when you directly modify the image on the camcorder, the image format will shorten the "Memory Stick" life...
The meanings of the file names are grouped in folders by recording mode. For Windows 98 users (The drive recognizing the camcorder is [D:]) Folder containing still image data Folder containing moving picture data Folder 100msdcf Moml0001 File DSC0ssss.JPG MOV0ssss... 143 Compressed files cannot be assured if the "Memory Stick" has been formatted on your computer. •Do not optimize the "Memory Stick" on a Windows machine. Communications with your computer may increase when you directly modify the image on the camcorder, the image format will shorten the "Memory Stick" life...

Operating Instructions
Page 160
... button, all the settings including the date and time return to the default.) (p. 182) When you may hear a clatter sound from inside your Sony dealer or local authorized Sony service facility. Types of the AC power adaptor or remove the battery, then reconnect it in your camcorder. c Contact your camcorder. • Your... charge the battery pack. • The POWER switch is on . While charging the battery pack, no indicator appears or the indicator flashes in the display window. • The battery pack is wrong with the battery pack.
... button, all the settings including the date and time return to the default.) (p. 182) When you may hear a clatter sound from inside your Sony dealer or local authorized Sony service facility. Types of the AC power adaptor or remove the battery, then reconnect it in your camcorder. c Contact your camcorder. • Your... charge the battery pack. • The POWER switch is on . While charging the battery pack, no indicator appears or the indicator flashes in the display window. • The battery pack is wrong with the battery pack.

Operating Instructions
Page 161
... or local authorized Sony service facility. c Disconnect the power cord of your camcorder for at least one hour to rectify the problem even if you are unable to acclimatize. (p. 171) • The video heads are using the cleaning cassette (optional). (p. 172) • A malfunction other than the... the cassette and leave your camcorder. LCD screen, Viewfinder or Display window C:21:00 Self-diagnosis display •C:ss:ss You can service has occurred. If a 5-digit code is not an "InfoLITHIUM" battery pack. The last 2 digits (indicated by ss) will differ depending on the screen or in ...
... or local authorized Sony service facility. c Disconnect the power cord of your camcorder for at least one hour to rectify the problem even if you are unable to acclimatize. (p. 171) • The video heads are using the cleaning cassette (optional). (p. 172) • A malfunction other than the... the cassette and leave your camcorder. LCD screen, Viewfinder or Display window C:21:00 Self-diagnosis display •C:ss:ss You can service has occurred. If a 5-digit code is not an "InfoLITHIUM" battery pack. The last 2 digits (indicated by ss) will differ depending on the screen or in ...

Operating Instructions
Page 166
...decreases in an ambient temperature of between the battery pack and your camcorder, and displays the remaining battery time in the display window, indicating that has functions for communicating information related to water. We recommend using the battery pack up on the remaining battery ...- So, the time that the correct battery indication sometimes will not be used for two or three times the expected recording time, and make trial recordings before you charge the battery outside of your camcorder or an AC power adaptor. Note, however, that the battery pack...
...decreases in an ambient temperature of between the battery pack and your camcorder, and displays the remaining battery time in the display window, indicating that has functions for communicating information related to water. We recommend using the battery pack up on the remaining battery ...- So, the time that the correct battery indication sometimes will not be used for two or three times the expected recording time, and make trial recordings before you charge the battery outside of your camcorder or an AC power adaptor. Note, however, that the battery pack...
Operating Instructions
Page 178
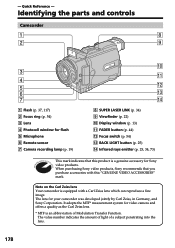
... purchasing Sony video products, Sony recommends that this "GENUINE VIDEO ACCESSORIES" mark. It adopts the MTF* measurement system for Sony video products. Identifying the parts and controls Camcorder 1 8 2 9 3 4 5 6 7 1 Flash (p. 37, 117) 2 Focus ring (p. 54) 3 Lens 4 Photocell window for your camcorder was developed jointly by Carl Zeiss, in Germany, and Sony Corporation. The lens for flash 5 Microphone 6 Remote sensor 7 Camera recording...
... purchasing Sony video products, Sony recommends that this "GENUINE VIDEO ACCESSORIES" mark. It adopts the MTF* measurement system for Sony video products. Identifying the parts and controls Camcorder 1 8 2 9 3 4 5 6 7 1 Flash (p. 37, 117) 2 Focus ring (p. 54) 3 Lens 4 Photocell window for your camcorder was developed jointly by Carl Zeiss, in Germany, and Sony Corporation. The lens for flash 5 Microphone 6 Remote sensor 7 Camera recording...

Operating Instructions
Page 185
...min ql ST I LL 1 6 : 9W I T wd 8 100 - 0001 wf 9 wg 0 qa wh qs Display window wj wk B Quick Reference 1 Cassette memory indicator (p. 24, 164) 2 Remaining battery time indicator (p. 24) 3 Zoom indicator... (p. 23)/Exposure indicator (p. 53)/Data file name indicator (p. 106) 4 Digital effect indicator (p. 47)/ MEMORY MIX indicator (p. 129)/ FADER indicator (p. 43) 5 16:9WIDE indicator (p....Infinity indicator (p. 54) qd Recording mode indicator (p. 24, 103) qf Self-timer indicator (p. 27) qg STBY/REC indicator (p. 19)/Video control mode indicator (p. 31)/...
...min ql ST I LL 1 6 : 9W I T wd 8 100 - 0001 wf 9 wg 0 qa wh qs Display window wj wk B Quick Reference 1 Cassette memory indicator (p. 24, 164) 2 Remaining battery time indicator (p. 24) 3 Zoom indicator... (p. 23)/Exposure indicator (p. 53)/Data file name indicator (p. 106) 4 Digital effect indicator (p. 47)/ MEMORY MIX indicator (p. 129)/ FADER indicator (p. 43) 5 16:9WIDE indicator (p....Infinity indicator (p. 54) qd Recording mode indicator (p. 24, 103) qf Self-timer indicator (p. 27) qg STBY/REC indicator (p. 19)/Video control mode indicator (p. 31)/...


