Operating Instructions
Page 5
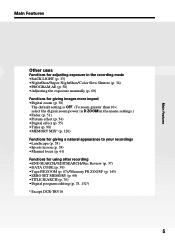
... your recordings •Landscape (p. 58) •Sports lesson (p. 58) •Manual focus (p. 61) Functions for using after recording •END SEARCH/EDITSEARCH/Rec Review (p. 37) •DATA CODE (p. 39) •Tape PB ZOOM (p. 67)/Memory PB ZOOM* (p. 145) •ZERO SET MEMORY (p. 69) •TITLE SEARCH (p. 70) •Digital program editing (p. 78, 132*) * Except DCR...
... your recordings •Landscape (p. 58) •Sports lesson (p. 58) •Manual focus (p. 61) Functions for using after recording •END SEARCH/EDITSEARCH/Rec Review (p. 37) •DATA CODE (p. 39) •Tape PB ZOOM (p. 67)/Memory PB ZOOM* (p. 145) •ZERO SET MEMORY (p. 69) •TITLE SEARCH (p. 70) •Digital program editing (p. 78, 132*) * Except DCR...

Operating Instructions
Page 24
Note on the time indicator The internal clock of your camcorder operates on the data code of the tape and the "Memory Stick" (except DCR-TRV16). Step 2 Setting the date and time The year changes as follows: 1995 T t 2002 T t 2079 If you do not set the date and time and are recorded on a 12-hour cycle. •12:00 AM stands for midnight. •12:00 PM stands for noon. 24
Note on the time indicator The internal clock of your camcorder operates on the data code of the tape and the "Memory Stick" (except DCR-TRV16). Step 2 Setting the date and time The year changes as follows: 1995 T t 2002 T t 2079 If you do not set the date and time and are recorded on a 12-hour cycle. •12:00 AM stands for midnight. •12:00 PM stands for noon. 24
Operating Instructions
Page 26
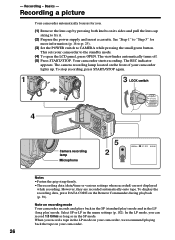
...for you. (1) Remove the lens cap by pressing both knobs on recording mode Your camcorder records and plays back in the SP (standard play ) mode. To stop recording, press START/STOP again. 1 3 LOCK switch 4 POWER VCR OFF(CHG) CAMERA MEMORY Camera recording lamp Microphone 5 2 50min REC 0:00:01 Notes •Fasten ... and pull the lens cap string to fix it. (2) Prepare the power supply and insert a cassette. To display the recording data, press DATA CODE on your camcorder, we recommend playing back the tape on the Remote Commander during playback (p. 39). In the LP mode, you...
...for you. (1) Remove the lens cap by pressing both knobs on recording mode Your camcorder records and plays back in the SP (standard play ) mode. To stop recording, press START/STOP again. 1 3 LOCK switch 4 POWER VCR OFF(CHG) CAMERA MEMORY Camera recording lamp Microphone 5 2 50min REC 0:00:01 Notes •Fasten ... and pull the lens cap string to fix it. (2) Prepare the power supply and insert a cassette. To display the recording data, press DATA CODE on your camcorder, we recommend playing back the tape on the Remote Commander during playback (p. 39). In the LP mode, you...
Operating Instructions
Page 27
... time using the viewfinder. If you leave your camcorder in the LP mode • The transition between scenes. Basics Recording a picture Note on the LOCK switch (except DCR-TRV16) When you turn off your camcorder does not turn off automatically while the cassette is set the POWER switch to... OFF (CHG) and then back to CAMERA. To enable smooth transition Transition between the last scene you can no longer be written properly between scenes may not be smooth. • The playback picture may be distorted or the time code may not be set the POWER switch to...
... time using the viewfinder. If you leave your camcorder in the LP mode • The transition between scenes. Basics Recording a picture Note on the LOCK switch (except DCR-TRV16) When you turn off your camcorder does not turn off automatically while the cassette is set the POWER switch to... OFF (CHG) and then back to CAMERA. To enable smooth transition Transition between the last scene you can no longer be written properly between scenes may not be smooth. • The playback picture may be distorted or the time code may not be set the POWER switch to...

Operating Instructions
Page 32
The indicator may not be correct, depending on the tape. Time code The time code indicates the recording or playback time, "0:00:00" (hours : minutes : seconds) in CAMERA and "0:00:00:00" (hours : minutes : seconds : frames) in the recording mode Indicators are recording. Remaining tape indicator The indicator may not be displayed accurately depending on the conditions...
The indicator may not be correct, depending on the tape. Time code The time code indicates the recording or playback time, "0:00:00" (hours : minutes : seconds) in CAMERA and "0:00:00:00" (hours : minutes : seconds : frames) in the recording mode Indicators are recording. Remaining tape indicator The indicator may not be displayed accurately depending on the conditions...

Operating Instructions
Page 39
... value Various settings 50min 0:00:23:01 [a] [b] [c] [d] AUTO 60 AWB F2.0 9dB [e] [f] [g] To not display various settings Set DATA CODE to DATE in the menu settings (p. 184). The display changes as follows: date/time t various settings (SteadyShot, white balance, gain, shutter speed,...Press DATA CODE on the screen. Playing back a tape To display the screen indicators - The indicators appear on the Remote Commander. Display function Press DISPLAY on your camcorder automatically records the recording data, including date/time and various settings on the tape (data code). 1 ...
... value Various settings 50min 0:00:23:01 [a] [b] [c] [d] AUTO 60 AWB F2.0 9dB [e] [f] [g] To not display various settings Set DATA CODE to DATE in the menu settings (p. 184). The display changes as follows: date/time t various settings (SteadyShot, white balance, gain, shutter speed,...Press DATA CODE on the screen. Playing back a tape To display the screen indicators - The indicators appear on the Remote Commander. Display function Press DISPLAY on your camcorder automatically records the recording data, including date/time and various settings on the tape (data code). 1 ...

Operating Instructions
Page 40
...X. To resume normal playback, press N. To resume normal playback, press N. 40 The tape was recorded by a camcorder without the date and time set the POWER switch to VCR. To resume normal ...blank portion of the tape is unreadable due to be displayed. Various playback modes To operate video control buttons, set . To monitor high-speed pictures while advancing or rewinding the tape ...your camcorder's information when you are your camcorder to reverse the playback direction. Data code The data code is displayed on the conditions in the stop mode. To rewind the tape Press ...
...X. To resume normal playback, press N. To resume normal playback, press N. 40 The tape was recorded by a camcorder without the date and time set the POWER switch to VCR. To resume normal ...blank portion of the tape is unreadable due to be displayed. Various playback modes To operate video control buttons, set . To monitor high-speed pictures while advancing or rewinding the tape ...your camcorder's information when you are your camcorder to reverse the playback direction. Data code The data code is displayed on the conditions in the stop mode. To rewind the tape Press ...

Operating Instructions
Page 69
The ZERO SET MEMORY indicator disappears, and the time code appears. (5) Press N. If a tape has a blank portion between recorded portions The zero set memory function will be canceled. • There may not work correctly. 69 Playback starts from the time code. The tape counter shows "0:00:00" and then starts counting. DISPLAY m x ZERO SET...
The ZERO SET MEMORY indicator disappears, and the time code appears. (5) Press N. If a tape has a blank portion between recorded portions The zero set memory function will be canceled. • There may not work correctly. 69 Playback starts from the time code. The tape counter shows "0:00:00" and then starts counting. DISPLAY m x ZERO SET...

Operating Instructions
Page 75
DISPLAY - S VIDEO : Signal flow AUDIO/VIDEO Yellow IN S VIDEO VIDEO AUDIO Red White A/V connecting cable (supplied) VCR When you want to... they will not be superimposed on VCRs that support the following buttons to the VCR using your camcorder. DATA CODE on the VCR. Connect the A/V connecting cable to LCD in the menu settings. (The defalt setting is ...(2) Prepare the VCR for recording, then set the input selector to VCR on your camcorder. (4) Play back the recorded tape on the VCR connected to record over) into the VCR, and insert the recorded tape into your VCR. ...
DISPLAY - S VIDEO : Signal flow AUDIO/VIDEO Yellow IN S VIDEO VIDEO AUDIO Red White A/V connecting cable (supplied) VCR When you want to... they will not be superimposed on VCRs that support the following buttons to the VCR using your camcorder. DATA CODE on the VCR. Connect the A/V connecting cable to LCD in the menu settings. (The defalt setting is ...(2) Prepare the VCR for recording, then set the input selector to VCR on your camcorder. (4) Play back the recorded tape on the VCR connected to record over) into the VCR, and insert the recorded tape into your VCR. ...

Operating Instructions
Page 79
... video camera recorder, set the input selector to VCR/VTR. 3 Press MENU. Check the code in with the A/V connecting cable To edit using the A/V connecting cable, follow the procedure below, (1) to (4), to send the control signal correctly. (1) Set the IR SETUP code 1 Set the POWER switch to VCR on the VCR. Digital program... editing (on tapes) Step 2: Setting the VCR to operate with the SEL/PUSH EXEC dial (p. 184). 4 Turn the SEL/PUSH EXEC dial to select TAPE, then press the dial. (except DCR-TRV16) 5 Turn the...
... video camera recorder, set the input selector to VCR/VTR. 3 Press MENU. Check the code in with the A/V connecting cable To edit using the A/V connecting cable, follow the procedure below, (1) to (4), to send the control signal correctly. (1) Set the IR SETUP code 1 Set the POWER switch to VCR on the VCR. Digital program... editing (on tapes) Step 2: Setting the VCR to operate with the SEL/PUSH EXEC dial (p. 184). 4 Turn the SEL/PUSH EXEC dial to select TAPE, then press the dial. (except DCR-TRV16) 5 Turn the...

Operating Instructions
Page 80
... 47, 54, 80 Akai 49, 51 Audio Dynamic 21, 35 Bell&Howell 36 (M. Brand IR SETUP code Sony 1, 2, 3, 4, 5, 6 Admiral (M. Wards) Broksonic 21, 70, 82 Canon 77, 78 Citizen ...82 Fisher 36, 37, 44, 45 Funai 80 General Electric 8, 32*, 77, 94*, 101 Goldstar/LG 47 GO VIDEO 71 Hitachi 8, 42, 78 HQ 40 Instant Replay 77, 78 JC Penny 8, 21, 33, 35, 36, 42...on tapes) About IR SETUP codes The IR SETUP code is stored in the memory of your VCR. Be sure to set the correct code to match your camcorder. Digital program editing (on IR SETUP codes Digital program editing is...
... 47, 54, 80 Akai 49, 51 Audio Dynamic 21, 35 Bell&Howell 36 (M. Brand IR SETUP code Sony 1, 2, 3, 4, 5, 6 Admiral (M. Wards) Broksonic 21, 70, 82 Canon 77, 78 Citizen ...82 Fisher 36, 37, 44, 45 Funai 80 General Electric 8, 32*, 77, 94*, 101 Goldstar/LG 47 GO VIDEO 71 Hitachi 8, 42, 78 HQ 40 Instant Replay 77, 78 JC Penny 8, 21, 33, 35, 36, 42...on tapes) About IR SETUP codes The IR SETUP code is stored in the memory of your VCR. Be sure to set the correct code to match your camcorder. Digital program editing (on IR SETUP codes Digital program editing is...

Operating Instructions
Page 82
... EXECUTE [MENU] : END 3 VIDEO EDIT 0:08:55:06 EDITSET CONTROL ADJ TEST "CUT-IN" "CUT-OUT" IR SETUP PAUSEMODE IR TEST COMPLETE RETURN [MENU] : END When the VCR does not operate correctly •After checking the code in "About IR SETUP codes," set to recording pause. 2 Turn the SEL/PUSH...30 cm (12 in.) away from the VCR. •Refer to select EXECUTE, then press the dial. When recording is correct. Digital program editing (on tapes) (4) Confirming VCR operation 1 Insert a recordable tape into the VCR, then set the IR SETUP or the PAUSEMODE again. •Place your VCR. 82
... EXECUTE [MENU] : END 3 VIDEO EDIT 0:08:55:06 EDITSET CONTROL ADJ TEST "CUT-IN" "CUT-OUT" IR SETUP PAUSEMODE IR TEST COMPLETE RETURN [MENU] : END When the VCR does not operate correctly •After checking the code in "About IR SETUP codes," set to recording pause. 2 Turn the SEL/PUSH...30 cm (12 in.) away from the VCR. •Refer to select EXECUTE, then press the dial. When recording is correct. Digital program editing (on tapes) (4) Confirming VCR operation 1 Insert a recordable tape into the VCR, then set the IR SETUP or the PAUSEMODE again. •Place your VCR. 82
Operating Instructions
Page 83
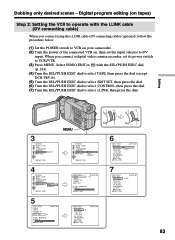
...the SEL/PUSH EXEC dial to select TAPE, then press the dial (except DCR-TRV16). (5) Turn the SEL/PUSH EXEC dial to select EDIT SET, then ...CODE BEEP COMMANDER DISPLAY VIDEO EDIT READY RETURN [MENU] : END MENU OTHERS DATA CODE BEEP COMMANDER DISPLAY VIDEO EDIT RETURN RETURN TAPE MEMORY [MENU] : END 4 OTHERS DATA CODE BEEP COMMANDER DISPLAY VIDEO EDIT RETURN RETURN TAPE MEMORY [MENU] : END VIDEO...ADJ TEST i. Dubbing only desired scenes - Select VIDEO EDIT in with the i.LINK cable (DV connecting cable) When you connect a digital video camera recorder, set the input selector to select i.LINK, ...
...the SEL/PUSH EXEC dial to select TAPE, then press the dial (except DCR-TRV16). (5) Turn the SEL/PUSH EXEC dial to select EDIT SET, then ...CODE BEEP COMMANDER DISPLAY VIDEO EDIT READY RETURN [MENU] : END MENU OTHERS DATA CODE BEEP COMMANDER DISPLAY VIDEO EDIT RETURN RETURN TAPE MEMORY [MENU] : END 4 OTHERS DATA CODE BEEP COMMANDER DISPLAY VIDEO EDIT RETURN RETURN TAPE MEMORY [MENU] : END VIDEO...ADJ TEST i. Dubbing only desired scenes - Select VIDEO EDIT in with the i.LINK cable (DV connecting cable) When you connect a digital video camera recorder, set the input selector to select i.LINK, ...

Operating Instructions
Page 86
... top part of the program mark changes to light blue. (6) Search for recording into your camcorder, and insert a tape for the end of the first scene you want to insert using the video operation buttons, then pause playback. (7) Turn the SEL/PUSH EXEC dial to...DCR-TRV16). (4) Search for the beginning of the first scene you want to select MARK, then press the dial. Digital program editing (on tapes) Operation 1: Making the program (1) Insert the tape for playback into the VCR. (2) Press MENU, then select VIDEO EDIT in maximum. 86 MENU 2 OTHERS DATA CODE BEEP COMMANDER DISPLAY VIDEO...
... top part of the program mark changes to light blue. (6) Search for recording into your camcorder, and insert a tape for the end of the first scene you want to insert using the video operation buttons, then pause playback. (7) Turn the SEL/PUSH EXEC dial to...DCR-TRV16). (4) Search for the beginning of the first scene you want to select MARK, then press the dial. Digital program editing (on tapes) Operation 1: Making the program (1) Insert the tape for playback into the VCR. (2) Press MENU, then select VIDEO EDIT in maximum. 86 MENU 2 OTHERS DATA CODE BEEP COMMANDER DISPLAY VIDEO...

Operating Instructions
Page 87
To cancel erasing all programs (1) Select VIDEO EDIT in the menu settings. (2) Turn the SEL/PUSH EXEC dial to select TAPE, then press the dial (except DCR-TRV16). (3) Select ERASE ALL in step 3. Note You cannot operate recording during Digital program editing. Digital program editing (on tapes) Erasing the ...program you have set Erase OUT first and then IN from the last set IN or OUT on the tape The total time code may ...
To cancel erasing all programs (1) Select VIDEO EDIT in the menu settings. (2) Turn the SEL/PUSH EXEC dial to select TAPE, then press the dial (except DCR-TRV16). (3) Select ERASE ALL in step 3. Note You cannot operate recording during Digital program editing. Digital program editing (on tapes) Erasing the ...program you have set Erase OUT first and then IN from the last set IN or OUT on the tape The total time code may ...
Operating Instructions
Page 88
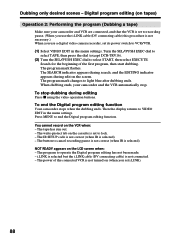
...record on the LCD screen when: - Turn the SEL/PUSH EXEC dial to select TAPE, then press the dial (except DCR-TRV16). (2) Turn the SEL/PUSH EXEC dial to operate the Digital...connected, and that the VCR is set to recording pause. (When you use a digital video camera recorder, set to VCR/VTR. (1) Select VIDEO EDIT in the menu settings. Dubbing only ...Digital program editing (on the cassette is not necessary.) When you set i.LINK). 88 The power of the first program, then start dubbing. The program mark changes to end the Digital program editing function. The IR SETUP code...
...record on the LCD screen when: - Turn the SEL/PUSH EXEC dial to select TAPE, then press the dial (except DCR-TRV16). (2) Turn the SEL/PUSH EXEC dial to operate the Digital...connected, and that the VCR is set to recording pause. (When you use a digital video camera recorder, set to VCR/VTR. (1) Select VIDEO EDIT in the menu settings. Dubbing only ...Digital program editing (on the cassette is not necessary.) When you set i.LINK). 88 The power of the first program, then start dubbing. The program mark changes to end the Digital program editing function. The IR SETUP code...

Operating Instructions
Page 113
...Digital effect - Picture effect - Recording data The recording data (date/time or various settings when recorded) are recorded automatically onto the "Memory Stick." To display the recording data, press DATA CODE on the screen when you press PHOTO on the Remote Commander Your camcorder immediately records... while recording. "Memory Stick" Operations Recording still images on a "Memory Stick" - Sports lesson of view when the POWER switch is set to MEMORY (DCR-TRV25/TRV27 only) The angle of view is set to CAMERA. 113 Color Slow Shutter - Wide mode - Digital zoom ...
...Digital effect - Picture effect - Recording data The recording data (date/time or various settings when recorded) are recorded automatically onto the "Memory Stick." To display the recording data, press DATA CODE on the screen when you press PHOTO on the Remote Commander Your camcorder immediately records... while recording. "Memory Stick" Operations Recording still images on a "Memory Stick" - Sports lesson of view when the POWER switch is set to MEMORY (DCR-TRV25/TRV27 only) The angle of view is set to CAMERA. 113 Color Slow Shutter - Wide mode - Digital zoom ...

Operating Instructions
Page 118
... while you press PHOTO on a tape cannot be reproduced more faithfully by using an S video cable (optional). Data codes recorded on the Remote Commander Your camcorder immediately records the image that is recorded. If your camcorder and the TV or VCR. Recording an image from a tape as a still image If you press the button. When you...
... while you press PHOTO on a tape cannot be reproduced more faithfully by using an S video cable (optional). Data codes recorded on the Remote Commander Your camcorder immediately records the image that is recorded. If your camcorder and the TV or VCR. Recording an image from a tape as a still image If you press the button. When you...

Operating Instructions
Page 126
...indicator flashes.) Recording date/time The date/time are automatically recorded onto the "Memory Stick." However, they are not displayed while recording. When the POWER switch is set to MEMORY (DCR-TRV25/TRV27 only) The angle of view is set to CAMERA. 126 Digital effect - ... Recording moving pictures on the "Memory Stick." MPEG movie recording When the POWER switch is recorded on a "Memory Stick" - Super NightShot - Fader - To display the recording date/time, press DATA CODE on a "Memory Stick" Do not eject the cassette tape from your camcorder. During recording ...
...indicator flashes.) Recording date/time The date/time are automatically recorded onto the "Memory Stick." However, they are not displayed while recording. When the POWER switch is set to MEMORY (DCR-TRV25/TRV27 only) The angle of view is set to CAMERA. 126 Digital effect - ... Recording moving pictures on the "Memory Stick." MPEG movie recording When the POWER switch is recorded on a "Memory Stick" - Super NightShot - Fader - To display the recording date/time, press DATA CODE on a "Memory Stick" Do not eject the cassette tape from your camcorder. During recording ...

Operating Instructions
Page 129
...codes recorded on a "Memory Stick". When the access lamp is displayed Sound that cannot be recorded on a tape cannot be recorded by your camcorder has been recorded. Titles already recorded on a "Memory Stick" is recorded. Various settings are recording moving picture Notes •Sound recorded in 48 kHz is converted to 32 kHz sound when recording... or flashing Do not shake or knock the unit. Also, do not appear while you are not recorded. "Memory Stick" Operations Recording pictures from a tape as a moving pictures with START/STOP. Titles do not turn the power off or eject...
...codes recorded on a "Memory Stick". When the access lamp is displayed Sound that cannot be recorded on a tape cannot be recorded by your camcorder has been recorded. Titles already recorded on a "Memory Stick" is recorded. Various settings are recording moving picture Notes •Sound recorded in 48 kHz is converted to 32 kHz sound when recording... or flashing Do not shake or knock the unit. Also, do not appear while you are not recorded. "Memory Stick" Operations Recording pictures from a tape as a moving pictures with START/STOP. Titles do not turn the power off or eject...


