Camera Operations Guide
Page 11
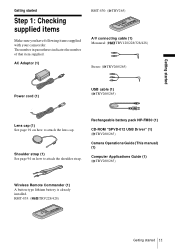
.../328/428) Stereo: ( TRV260/265) Power cord (1) USB cable (1) ( TRV260/265) Lens cap (1) See page 91 on how to attach the lens cap. RMT-833: ( TRV228/428) Getting started Step 1: Checking supplied items Make sure you have following items supplied with your camcorder. Shoulder strap (1) See page... 94 on how to attach the shoulder strap. Getting started Getting started 11 Rechargeable battery pack NP-FM30 (1) CD-ROM "SPVD-012 USB Driver" (1) ( TRV260/265) Camera Operations Guide (This manual)...
.../328/428) Stereo: ( TRV260/265) Power cord (1) USB cable (1) ( TRV260/265) Lens cap (1) See page 91 on how to attach the lens cap. RMT-833: ( TRV228/428) Getting started Step 1: Checking supplied items Make sure you have following items supplied with your camcorder. Shoulder strap (1) See page... 94 on how to attach the shoulder strap. Getting started Getting started 11 Rechargeable battery pack NP-FM30 (1) CD-ROM "SPVD-012 USB Driver" (1) ( TRV260/265) Camera Operations Guide (This manual)...

Camera Operations Guide
Page 12
... until it clicks. 3 With the v mark on your camcorder. DC IN jack Battery pack DC plug Power cord To the wall outlet AC Adaptor 1 Lift up to (CHG) OFF. v mark 4 Connect the power cord to the AC Adaptor. 5 Connect the power cord to the wall outlet. 6 Slide the POWER switch up the viewfinder. Step 2: Charging the battery pack...
... until it clicks. 3 With the v mark on your camcorder. DC IN jack Battery pack DC plug Power cord To the wall outlet AC Adaptor 1 Lift up to (CHG) OFF. v mark 4 Connect the power cord to the AC Adaptor. 5 Connect the power cord to the wall outlet. 6 Slide the POWER switch up the viewfinder. Step 2: Charging the battery pack...

Camera Operations Guide
Page 15
...camcorder, even if its charge even when it while connected to run out. To enter the recording or playing mode, slide the switch repeatedly until the respective lamp for the first time, the [CLOCK SET] screen appears (p. 17). Getting started b Notes • The power will not lose its power cord... is connected to (CHG) OFF. While pressing the green button, slide the POWER switch down. When using the AC Adaptor, the battery pack will not be supplied from the ...
...camcorder, even if its charge even when it while connected to run out. To enter the recording or playing mode, slide the switch repeatedly until the respective lamp for the first time, the [CLOCK SET] screen appears (p. 17). Getting started b Notes • The power will not lose its power cord... is connected to (CHG) OFF. While pressing the green button, slide the POWER switch down. When using the AC Adaptor, the battery pack will not be supplied from the ...

Camera Operations Guide
Page 89
...215; 31 × 100 mm (2 1/4 × 1 1/4 × 4 in.) (w/h/ d) excluding the projecting parts Mass (approx.) 190 g (6.7 oz) excluding the power cord Rechargeable battery pack (NP-FM30) Maximum output voltage DC 8.4 V Output voltage DC 7.2 V Capacity 5.0 Wh (700 mAh) Dimensions (approx.) 38.2 × 20.5 &#... (battery pack) DC 8.4 V (AC Adaptor) Average power consumption (when using the battery pack) For TRV128/228/328/428: During camera recording using the viewfinder 1.8 W During camera recording using the LCD 2.7 W For TRV260/265: During camera recording using viewfinder 2.5 W During camera...
...215; 31 × 100 mm (2 1/4 × 1 1/4 × 4 in.) (w/h/ d) excluding the projecting parts Mass (approx.) 190 g (6.7 oz) excluding the power cord Rechargeable battery pack (NP-FM30) Maximum output voltage DC 8.4 V Output voltage DC 7.2 V Capacity 5.0 Wh (700 mAh) Dimensions (approx.) 38.2 × 20.5 &#... (battery pack) DC 8.4 V (AC Adaptor) Average power consumption (when using the battery pack) For TRV128/228/328/428: During camera recording using the viewfinder 1.8 W During camera recording using the LCD 2.7 W For TRV260/265: During camera recording using viewfinder 2.5 W During camera...


